Урок 38. Поиск и устранение неисправностей в NAT (NAT troubleshooting)
Рассмотрим вкратце основные причины неправильного функционирования NAT:
- Неправильно настроен список доступа
- Не указаны команды ip nat inside/ip nat outside либо неверно настроены
- Не указана команда overload при настройке PAT
Для поиска неисправностей полезно использовать следующие команды:
show ip nat translations — показывает все преобразованные адреса
show ip nat statistics — показывает статистику преобразования адресов
debug ip nat — позволяет в режиме реального времени видеть преобразования адресов
clear ip nat translations * — удаляет кэш-таблицу преобразованных адресов
clear ip nat statistics — удаляет статистику
С чего же следует начать поиск?
Рассмотрим на основе нескольких примеров.
Ситуация №1
Рассмотрим следующий рисунок сети:

Пользователи жалуются, что доступ в интернет не работает либо нестабильный.
Начнем двигаться от простого к сложному:
- Проверяем у всех ли это пользователей или только у некоторых
- Проверяем настройки Default gateway и DNS на всех компьютерах
- Убеждаемся , что шлюз по умолчанию доступен (с помощью Ping) с их компьютеров
- Если все настроено верно, то проверяем маршрутизацию на самом шлюзе
- Если маршрутизация работает, то проверяем настройки NAT
Предположим, что пункты с 1-го по 4-й включительно мы проверили. Проверим теперь преобразования и статистику командами show ip nat translations и show ip nat statistics.
Так выглядит результат команды, когда преобразование прошло успешно:
![]()
И этому свидетельствует статистика:

Важно знать следующие счетчики:
CEF Translated packets — количество переданных хостом пакетов + количество обратных пакетов-ответов, вернувшихся данному хосту.. В нашем случае с хоста PC_A мы отправили 5 ICMP эхо-запросов. Удаленный узел ответил 5-ю эхо-ответами. Получилось 5 + 5 = 10 пакетов.
Misses — если в NAT таблице отсутствует запись о преобразовании локального адреса для передачи пакета удаленному узлу, то создается новая запись в NAT таблице. Именно такая запись и отображается в выводе команды show ip nat translations.
Иными словами, сколько записей в таблице преобразований NAT, столько и покажет счетчик Misses. В нашем случае — 1.
Hits — количество совпадений в таблице преобразований NAT. Когда мы послали 5 эхо-запросов, то в таблице преобразований отсутствовала запись о преобразовании данного локального адреса для передачи удаленному узлу. Система создала эту запись и увеличила счетчик misses на единицу. После этого значение счетчика Hits начинает увеличиваться с каждым переданным и принятым пакетами. При нормальной работе NAT значение счетчика Hits должно увеличиваться.
Почему переданных пакетов 10, а счетчик hits равен 9?
Потому что для первого пакета не было никакой записи в таблице преобразований. Для всех остальных пакетов запись уже присутствовала в таблице.
misses — счетчик ошибок, то есть безуспешных попыток преобразовать адреса поступивших пакетов. При нормальной работе NAT должен равняться 0.
Теперь в интернет пытаются выйти 2 компьютера. Проверим преобразования:
![]()
Как видно, таблица преобразований NAT не изменилась, то есть NAT успешно работает лишь для одного компьютера, второй — остался без интернета. Но мы все еще не знаем причину. Ищем дальше.

У нас изменились значения новых счетчиков:
CEF punted packets — увеличивается, когда IOS не может коммутировать пакеты в текущем режиме и передает данный процесс на более низкий уровень коммутации или уничтожает пакеты (Cisco Express Forwarding, CEF в данном курсе не рассматривался). В данном случае на вход маршрутизатора поступило 5 ICMP пакетов, которые IOS не смог обработать с помощью NAT.
misses — маршрутизатор уничтожил пакеты (5 эхо-запросов) и отправил соответствующее уведомление Destination Unreachable (5 эхо-ответов). И получилось всего 10 пакетов.
Но как такое произошло? Ведь в выводе статистики явно указано, что возможно преобразовать 2 адреса:

Все верно. Однако при более внимательном рассмотрении мы заметим, что маска равна 255.255.255.252. При такой маске можно иметь только 2 адреса, которые в данный момент и используются самим маршрутизатором и провайдером. Адрес 128.0.0.3 — широковещательный.
Была допущена ошибка по невнимательности. Система не выдаст предупреждение, если в конфигурации NAT используются широковещательные адреса.
Ситуация №2
Данная ситуация аналогична предыдущей. Администратор исправил свою ошибку, однако проблема все еще не решена. Пользователи до сих пор жалуются на нестабильный интернет.
Проверим таблицу NAT:
![]()
По крайней мере для двоих пользователей интернет работает.

И все становится понятным. Пространство адресов (пул) NAT использовано на все 100% и для остальных компьютеров просто не хватило адресов.
Из этого следует, что администратор забыл указать команду overload при настройке NAT. Это сразу видно в выводе статистики NAT:

Отсутствие команды overload также видно и в самой конфигурации:

Ситуация №3
Вернемся снова к нашему рисунку, однако вместо серийного интерфейса воспользуемся Fast Ethernet интерфейсом:

Администратор настроил NAT, однако ни у одного пользователя не работает интернет.
Команда show ip nat translation ничего не показывает.
Статистика показывает следующее:

На первый взгляд никакой полезной информации здесь нет. Возможно.
Запустим отладчик событий NAT, который в “прямом эфире” покажет преобразования адресов. Запускается командой debug ip nat. Чтобы увидеть преобразования адресов з апустим Ping на локальном компьютере и посмотрим, что у нас происходит в маршрутизаторе.
Но как назло отладчик молчит и не выдал ни одного сообщения. То есть маршрутизатор не знает, что ему делать с поступающими из локальной сети пакетами.

Если внимательно посмотреть на конфигурацию, то можно заметить, что просто перепутали команды ip nat inside, ip nat outside для LAN и WAN интерфейсов.
Такую ошибку легко допустить, если одинаковый тип интерфейса (в нашем случае Fast Ethernet) используется для LAN и WAN.
Ситуации бывают разные и не всегда причиной неисправности является неправильная настройка NAT. Например, это могут быть неправильно настроенные списки доступа, маршрутизация и так далее.
Источник
NAT Principles
Network Address Translation is a method of remapping one IP address space into another by modifying network address information in the IP header of packets while they are in transit across a traffic routing device.
There are two types of NAT: source and destination NAT (SNAT and DNAT respectively). The names can be slightly confusing, as they refer to the field of the raw IP Packet that they’re changing; SNAT modifies the Source IP Address field, and DNAT modifies the Destination IP Address.
Source NAT
One of the most common use cases of Source NAT is the translation of IP addresses of many internal hosts into one or several public IP address(es).
To setup SNAT, we need to know:
- The internal IP addresses we want to translate
- The outgoing interface to perform the translation on
- The external IP address(es) to translate to
In this example, we need to provide internet access from our ISP on the interface eth1 to the private subnet 192.168.1.0/24 .

In this example, we use masquerade as the translation address instead of an IP address. The masquerade target is effectively an alias to say «use whatever IP address is on the outgoing interface», rather than a statically configured IP address.
To verify that translation occurs and view current translations, we can run show nat source translations :
Destination NAT
DNAT is typically referred to as a Port Forward. When using VyOS as a NAT router, a common configuration task is to redirect incoming traffic to a system behind the VyOS router.
To setup a DNAT rule we need to gather:
- The interface traffic will be coming in on
- The protocol and port we wish to forward
- The IP address of the internal system we wish to forward traffic to

In our example, we will be forwarding web server traffic to an internal web server on 192.168.1.100 .
HTTP traffic makes use of the TCP protocol on port 80.
More complex examples will be provided in future articles.
Источник
Network Address Translation — NAT
Network Address Translation (NAT) enables your network to use one set of IP addresses for internal traffic and a second set of addresses for external traffic.
NAT was designed to overcome addressing problems due to the explosive growth of the Internet. In addition to preventing the depletion of IPv4 addresses, NAT enables you to use the private address space internally and still have a way to access the Internet.
Cumulus Linux supports both static NAT and dynamic NAT. Static NAT provides a permanent mapping between one private IP address and a single public address. Dynamic NAT maps private IP addresses to public addresses; these public IP addresses come from a pool. The translations are created as needed dynamically, so that a large number of private addresses can share a smaller pool of public addresses.
Static and dynamic NAT both support:
- Basic NAT, which only translates the IP address in the packet: the source IP address in the outbound direction and the destination IP address in the inbound direction.
- Port Address Translation (PAT), which translates both the IP address and layer 4 port: the source IP address and port in the outbound direction and the destination IP address and port in the inbound direction.
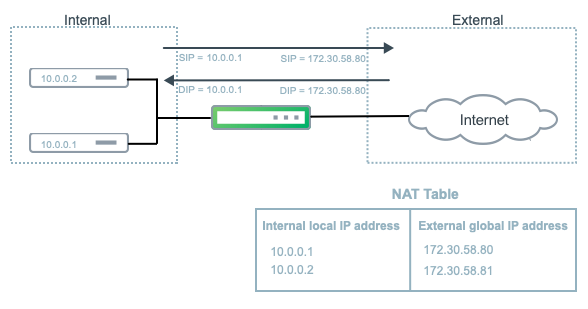
The following illustratration shows a basic NAT configuration.
- NAT is supported on physical interfaces and bond interfaces and only in the default VRF.
- IPv6 to IPv4 translation is not supported.
- Multicast traffic is not supported.
- NAT is not supported in an EVPN configuration.
- NAT is supported on Broadcom Trident3 X7 and Mellanox Spectrum-2 switches only.
Static NAT
Static NAT provides a one-to-one mapping between a private IP address inside your network and a public IP address. For example, if you have a web server with the private IP address 10.0.0.10 and you want a remote host to be able to make a request to the web server using the IP address 172.30.58.80, you must configure a static NAT mapping between the two IP addresses.
Static NAT entries do not time out from the translation table.
Enable Static NAT
To enable static NAT, edit the /etc/cumulus/switchd.conf file and uncomment the nat.static_enable = TRUE option:
Restart switchd with the sudo systemctl restart switchd.service command.
Other options in the NAT configuration section of the switchd.conf file, such as nat.age_poll_interval and nat.table_size are dynamic NAT configuration options and are not supported with static NAT.
Configure Static NAT
For static NAT, create a rule that matches a source or destination IP address and translates the IP address to a public IP address.
For static PAT, create a rule that matches a source or destination IP address together with the layer 4 port and translates the IP address and port to a public IP address and port.
For Mellanox Spectrum-2 switches, you can include the outgoing or incoming interface.
To create rules, you can use either NCLU or cl-acltool.
Use the following NCLU commands:
NAT
PAT
- snat is the source NAT
- dnat is the destination NAT
- protocol is TCP, ICMP, or UDP. The protocol is required.
- out-interface is the outbound interface for snat (Mellanox Spectrum-2 switches only)
- in-interface is the inbound interface for dnat (Mellanox Spectrum-2 switches only)
Command Examples
The following rule matches TCP packets with source IP address 10.0.0.1 and translates the IP address to 172.30.58.80:
The following rule matches ICMP packets with destination IP address 172.30.58.80 on interface swp51 and translates the IP address to 10.0.0.1
The following rule matches UDP packets with source IP address 10.0.0.1 and source port 5000, and translates the IP address to 172.30.58.80 and the port to 6000.
The following rule matches UDP packets with destination IP address 172.30.58.80 and destination port 6000 on interface swp51, and translates the IP address to 10.0.0.1 and the port to 5000:
To delete a static rule, run the net del command. For example:
To add NAT rules using cl-acltool , either edit an existing file in the /etc/cumulus/acl/policy.d directory and add rules under [iptables] or create a new file in the /etc/cumulus/acl/policy.d directory and add rules under an [iptables] section. For example:
Example Rules
The following rule matches TCP packets with source IP address 10.0.01 and translates the IP address to 172.30.58.80:
The following rule matches ICMP packets with destination IP address 172.30.58.80 on interface swp51 and translates the IP address to 10.0.0.1
The following rule matches UDP packets with source IP address 10.0.0.1 and source port 5000, and translates the IP address to 172.30.58.80 and the port to 6000.
The following rule matches UDP packets with destination IP address 172.30.58.80 and destination port 6000 on interface swp51, and translates the IP address to 10.0.0.1 and the port to 5000.
To delete a static NAT rule, remove the rule from the policy file in the /etc/cumulus/acl/policy.d directory, then run the sudo cl-acltool -i command .
Dynamic NAT
Dynamic NAT maps private IP addresses and ports to a public IP address and port range or a public IP address range and port range. IP addresses are assigned from a pool of addresses dynamically. When entries are released after a period of inactivity, new incoming connections are dynamically mapped to the freed up addresses and ports.
Enable Dynamic NAT
To enable dynamic NAT, edit the /etc/cumulus/switchd.conf file and uncomment the nat.dynamic_enable = TRUE option:
Restart switchd with the sudo systemctl restart switchd.service command.
For dynamic NAT to work on switches with the Broadcom Trident3 ASIC, you must also enable static NAT. Uncomment the nat.static_enable = TRUE option in addition to the nat.dynamic_enable = TRUE option.
Optional Dynamic NAT Settings
The /etc/cumulus/switchd.conf file includes the following configuration options for dynamic NAT. Only change these options if dynamic NAT is enabled.
| Option | Description |
|---|---|
| nat.age_poll_interval | The period of inactivity before switchd releases a NAT entry from the translation table. The default value is 5 minutes. The minimum value is 1 minute. The maximum value is 24 hours. |
| nat.table_size | The maximum number of dynamic snat and dnat entries in the translation table. The default value is 1024. Trident3 switches support a maximum of 1024 entries. Mellanox Spectrum-2 switches support a maximum of 8192 entries. |
| nat.config_table_size | The maximum number of rules allowed (NCLU or cl-acltool). The default value is 64. The minimum value is 64. The maximum value is 1024. |
After you change any of the dynamic NAT configuration options, restart switchd with the sudo systemctl restart switchd.service command.
Configure Dynamic NAT
For dynamic NAT, create a rule that matches a IP address in CIDR notation and translates the address to a public IP address or IP address range.
For dynamic PAT, create a rule that matches an IP address in CIDR notation and translates the address to a public IP address and port range or an IP address range and port range. You can also match on an IP address in CIDR notation and port.
For Mellanox Spectrum-2 switches, you can include the outgoing or incoming interface in the rule. See the examples below.
Use the following NCLU commands:
NAT
PAT
- snat is the source NAT
- dnat is the destination NAT
- protocol is TCP, ICMP, or UDP. The protocol is required.
- out-interface is the outbound interface for snat (Mellanox Spectrum-2 switches only)
- in-interface is the inbound interface for dnat (Mellanox Spectrum-2 switches only)
Example Commands
The following rule matches TCP packets with source IP address in the range 10.0.0.0/24 on outbound interface swp5 and translates the address dynamically to an IP address in the range 172.30.58.0-172.30.58.80:
The following rule matches UDP packets with source IP address in the range 10.0.0.0/24 and translates the addresses dynamically to IP address 172.30.58.80 with layer 4 ports in the range 1024-1200:
The following rule matches UDP packets with source IP address in the range 10.0.0.0/24 on source port 5000 and translates the addresses dynamically to IP address 172.30.58.80 with layer 4 ports in the range 1024-1200:
The following rule matches TCP packets with destination IP address in the range 10.1.0.0/24 and translates the address dynamically to IP address range 172.30.58.0-172.30.58.80 with layer 4 ports in the range 1024-1200:
The following rule matches ICMP packets with source IP address in the range 10.0.0.0/24 and destination IP address in the range 10.1.0.0/24, and translates the address dynamically to IP address range 172.30.58.0-172.30.58.80 with layer 4 ports in the range 1024-1200:
To delete a dynamic rule, run the net del command. For example:
To add NAT rules using cl-acltool , either edit an existing file in the /etc/cumulus/acl/policy.d directory and add rules under [iptables] or create a new file in the /etc/cumulus/acl/policy.d directory and add rules under an [iptables] section. For example:
Example Rules
The following rule matches TCP packets with source IP address in the range 10.0.0.0/24 on outbound interface swp5 and translates the address dynamically to an IP address in the range 172.30.58.0-172.30.58.80.
The following rule matches UDP packets with source IP address in the range 10.0.0.0/24 and translates the addresses dynamically to IP address 172.30.58.80 with layer 4 ports in the range 1024-1200:
The following rule matches UDP packets with source IP address in the range 10.0.0.0/24 on source port 5000 and translates the addresses dynamically to IP address 172.30.58.80 with layer 4 ports in the range 1024-1200:
The following rule matches TCP packets with destination IP address in the range 10.1.0.0/24 and translates the address dynamically to IP address range 172.30.58.0-172.30.58.80 with layer 4 ports in the range 1024-1200:
The following rule matches ICMP packets with source IP address in the range 10.0.0.0/24 and destination IP address in the range 10.1.0.0/24, and translates the address dynamically to IP address range 172.30.58.0-172.30.58.80 with layer 4 ports in the range 1024-1200:
To delete a dynamic NAT rule, remove the rule from the policy file in the /etc/cumulus/acl/policy.d directory, then run the sudo cl-acltool -i command.
Show Configured NAT Rules
To see the NAT rules configured on the switch, run the sudo iptables -t nat -v -L or the sudo cl-acltool -L ip -v command. For example:
Show Conntrack Flows
To see the currently active connection tracking (conntrack) flows, run the sudo cat /proc/net/nf_conntrack command. The hardware offloaded flows contain [OFFLOAD] in the output.
Источник


