- How to Add Application Shortcuts on Ubuntu Desktop
- Adding desktop shortcut in Ubuntu
- Prerequisite
- Step 1: Locate the .desktop files of applications
- Step 2: Copy the .desktop file to desktop
- Step 3: Run the desktop file
- Troubleshoot for Ubuntu 19.04 or GNOME 3.32 users
- Here’s How to Find Out Which Desktop Environment You are Using
- Check which desktop environment you are using
- How to get desktop environment version
- Using GUI to check desktop environment version
- Add ‘Show Desktop’ to Dock Panel in Ubuntu 21.10, 20.04 & 18.04
- 1. Install xdotool:
- 2. Create a shortcut icon for Show Desktop:
- 3. Add show desktop to dock panel:
- How to Add Show Desktop in Ubuntu 18.04, 18.10 in Dock
- 1 min
- Steps to Add Show Desktop Icon
- Ubuntu Documentation
- Getting around the desktop
- Common editing shortcuts
- Capturing from the screen
- More Information
- See Also
How to Add Application Shortcuts on Ubuntu Desktop
Last updated June 27, 2021 By Abhishek Prakash 44 Comments
In this quick tutorial, you’ll learn how to add application shortcuts on desktop in Ubuntu and other distributions that use GNOME desktop.
A classic desktop operating systems always have icons on the ‘desktop screen’. These desktop icons could include the file manager, the trash bin and the shortcut to applications.
While installing applications in Windows, some of the programs ask if you want to create a shortcut on the desktop. That’s not the case in Linux though.
But if you are a fan of this feature, let me show you how you can add desktop shortcuts to your favorite applications in Ubuntu and other Linux distributions.
In case you are wondering about the looks of my desktop, I am using Ant theme with Tela icons. You can also get some GTK themes and icons for Ubuntu and change them as you like.
Adding desktop shortcut in Ubuntu

Personally I prefer the Ubuntu launcher for application shortcuts. If I use a program frequently, I add it to the launcher. But I know not everyone has the same preference and a few people prefer the shortcuts on the desktop.
Let’s see the simplest way of creating an application shortcut on the desktop.
This tutorial has been tested on Ubuntu 18.04 LTS with GNOME desktop. It may work in other distributions and desktop environments but you have to try it on your own. Some GNOME specific steps may change so please pay attention while trying it on other desktop environments.
Prerequisite
First and foremost thing is to make sure that you have icons allowed on the GNOME desktop.
If you followed the Ubuntu 18.04 customization tips, you know how to install GNOME Tweak tool. In this tool, make sure that you have ‘Show Icons’ option enabled.
Once you have made sure of that, it’s time to add some application shortcuts on the desktop.
Step 1: Locate the .desktop files of applications
Go to Files -> Other Location -> Computer.
From here, go to the directory usr -> share -> applications. You’ll see icons of several Ubuntu applications you have installed here. Even if you don’t see the icons, you should see the .desktop files that are named as application.desktop.
Step 2: Copy the .desktop file to desktop
Now all you have to do here is to look for the application icon (or its desktop file). When you find it, either drag-drop the file to the desktop or copy the file (using Ctrl+C shortcut) and paste it on the desktop (using Ctrl+V shortcut).
Step 3: Run the desktop file
When you do that, you should see a text file kind of icon on the desktop instead of the logo of the application. Don’t worry, things will be different in a moment.
Option 1: In newer Ubuntu versions, you may right click on the .desktop file and click on “Properties“. In here, give the file execute permission.
Now if you right click on the file, you’ll find find an “allow launching” option. Select it and you’ll see that the file has turned into an application shortcut.
Option 2: On the older Ubuntu versions like 18.04, things were pretty straightforward. What you have to do is to double click on that file on the desktop. It will warn you that it’s an ‘untrusted application launcher’ so click on Trust and Launch.
The application will launch as usual but the good thing that you’ll notice that the .desktop file has now turned into the application icon. I believe you like the application shortcuts this way, don’t you?
Troubleshoot for Ubuntu 19.04 or GNOME 3.32 users
If you use Ubuntu 19.04 or GNOME 3.32, you the .desktop file may not launch at all. You should right click on the .desktop file and select “Allow Launching”.
After this, you should be able to launch the application and the application shortcut should be displayed properly on the desktop.
Conclusion
If you don’t like a certain application launcher on the desktop, just select it and delete it. It will delete the shortcut but the application will remain safely in your system.
I hope you found this quick tip helpful and now you can enjoy the application shortcuts on Ubuntu desktop.
If you have questions or suggestions, please let me know in the comments below.
Like what you read? Please share it with others.
Источник
Here’s How to Find Out Which Desktop Environment You are Using
Last updated August 27, 2020 By Abhishek Prakash 33 Comments
If you are a new Linux user and seeking help in one of the Linux forums, you may be asked this question:
“Which desktop environment are you using?”
You have an idea about what a desktop environment is but how do you know which one are you using? I’ll tell you how to find it out. I’ll show the command line method first because that is applicable to all kind of Linux distributions. I’ll also show the graphical way of getting this information.
Check which desktop environment you are using

You can use the echo command in Linux to display the value of XDG_CURRENT_DESKTOP variable in the terminal.
Open the terminal and copy paste this command:
For example, it shows that I am using GNOME desktop in Ubuntu 20.04:
While this command quickly tells you which desktop environment is being used, it doesn’t give any other information.
Knowing the version of desktop environment (also called DE) could be important in some cases. Each new version of a software brings new features or removes some. GNOME 3.36 introduces a ‘Do Not Disturb’ option to toggle off all the desktop notifications.
Suppose you read about this new Do Not Disturb feature. You verify that you are using GNOME and yet you don’t see this option in your GNOME desktop. If you could check the GNOME desktop version you have installed on your system, that could make things clear for you.
I’ll show you the commands to check the desktop environment’s version first because you can use it in any Linux, running desktop environment.
How to get desktop environment version
Unlike getting the name of desktop environment. getting its version number is not straightforward because there is no standard command or environment variable that could give this information.
One way to get the desktop environment information in Linux is by using a tool like Screenfetch. This command line tool displays the logo of your Linux distribution in ascii format along with a few basic system information. Desktop environment version is one of them.
In Ubuntu based distributions, you can install Screenfetch by enabling Universe repository and then using this command:
For other Linux distributions, please use your system’s package manager to install this program.
Once installed, simply type screenfetch in the terminal and it should show the desktop environment version along with other system information.
Check Desktop Environment Version
As you can see in the above image, my system is using GNOME 3.36.1 (basically GNOME 3.36). You can also check the Linux kernel version and other details here.
Please keep in mind that it is not guaranteed that Screenfetch will display the desktop environment version. I checked its source code and it has lots of if-else code to get the version information from a number of sources and parameters in various desktop environments. If it can find nothing on version, it just displays the DE name.
Using GUI to check desktop environment version
Almost all desktop environments provide basic system details in their Settings-About section.
The one major problem is that most DEs look different and thus I cannot show the exact steps for each of them. I am going to show it for GNOME and I let you discover it in your desktop.
So, search for Settings in the menu (press Windows key and search):
In here, go to the bottom to find the About section. Click on it and you should have the desktop environment along with its version.
As you can see, it shows that my system is using GNOME 3.36.
I hope you find this quick beginner tip useful. If you have questions or suggestions, please leave a comment below.
Like what you read? Please share it with others.
Источник
Add ‘Show Desktop’ to Dock Panel in Ubuntu 21.10, 20.04 & 18.04
This simply tutorial shows how to add a ‘Show Desktop‘ icon into the left dock panel in Ubuntu 21.10, Ubuntu 20.04, or Ubuntu 18.04 with default GNOME desktop.
The ‘Show Desktop‘ button was dropped since Ubuntu switched to Gnome 3 Desktop. For those using desktop app shortcuts, it’s useful to have a button to toggle display blank desktop quickly. And to add it back, you can manually create shortcut icon to do the trick and add it to panel (dock).
As you may know, the keyboard shortcuts Ctrl+Alt+d or Super+d do the function hide or show all opened app windows. And following steps will create a ‘show desktop’ shortcut icon simulates the keyboard press ( Super+d ) via the xdotool tool.
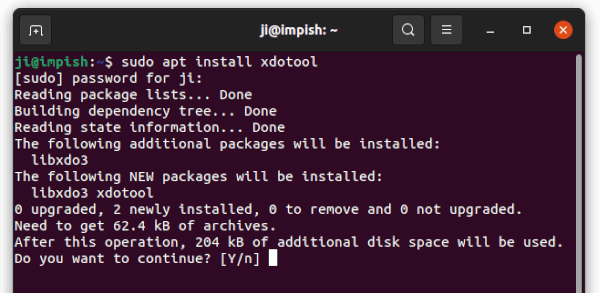
1. Install xdotool:
Xdotool is a command-line X11 automation tool, that allows to simulate keyboard input and mouse activity, move and resize windows, etc.
To install it, open terminal either by pressing Ctrl+Alt+T key combination on keyboard, or by searching from the activities overview screen. When terminal opens, paste the command below into it and hit run:
Type your user password (no asterisk feedback) when it prompts and answer y to confirm.
2. Create a shortcut icon for Show Desktop:
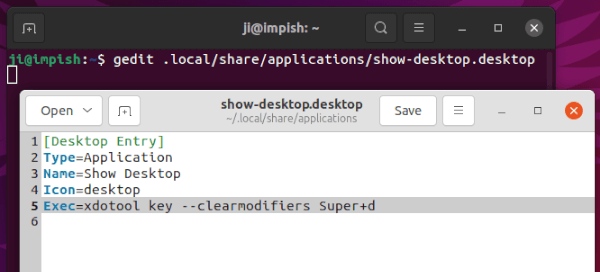
Most Linux distributions identify app shortcut icons via .desktop file under “/usr/share/applications” for global or ‘.local/share/applications’ for local user only.
To create an app shortcut in the case, run command in terminal:
This command will create and also open it via gedit text editor. When the file opens, copy and paste the lines below and save it.
3. Add show desktop to dock panel:
After created the shortcut, either press Windows (or Super) key on keyboard or click upper-left corner ‘Activities’ to bring up the overview screen.
Then search for ‘Show Desktop’ (without quotes), right-click on the result icon and select ‘Add to Favorites’.
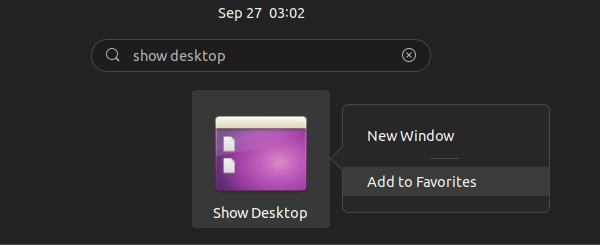
Finally, you’ll see the ‘Show Desktop’ icon on the dock panel. As mentioned, it works only on Xorg session. For Ubuntu 21.04 and higher, you may need to choose ‘Ubuntu on Xorg‘ from the login screen via the gear button.
Источник
How to Add Show Desktop in Ubuntu 18.04, 18.10 in Dock
1 min
This tutorial would show you how to add show desktop feature in Ubuntu.
Show desktop feature dropped from Ubuntu during transition to GNOME 3 desktop environment. However, you can still create a desktop shortcut add it to the Panel, Dock.
Typically, when you press Super+d or CTRL+Alt+d – all the opened windows become minimized or restored. This following method can help you to do that.
Steps to Add Show Desktop Icon
- Open terminal and run below commands to install xdotool.
- Create a .desktop file, named show-desktop.desktop – using below commands.
- In the file, copy below entries and paste.
- Save and close gedit.
- Now search the show desktop in application search and right click -> Add to favourites to add it in the dock.
 Show Desktop in Ubuntu 18.04
- Now you would be able to use the icon to minimize all the open windows and show the desktop.
Note: Above steps will not work on Ubuntu on Wayland sessions as the xdotool simulates X11 mouse and keyboard events.
We bring the latest tech, software news and stuff that matters. Stay in touch via Telegram, Twitter, YouTube, and Facebook and never miss an update!
Источник
Ubuntu Documentation
This page provides an overview of keyboard shortcuts that can help you use your desktop and applications more efficiently. If you cannot use a mouse or pointing device at all, see Keyboard navigation for more information on navigating user interfaces with only the keyboard.
Getting around the desktop
Switch between the Activities overview and desktop. In the overview, start typing to instantly search your applications, contacts, and documents.
Pop up command window (for quickly running commands).
Use the arrow keys to quickly access previously run commands.
Quickly switch between windows . Hold down Shift for reverse order.
Switch between windows from the same application, or from the selected application after Super + Tab .
This shortcut uses ` on US keyboards, where the ` key is above Tab . On all other keyboards, the shortcut is Super plus the key above Tab .
Switch between windows in the current workspace. Hold down Shift for reverse order.
Give keyboard focus to the top bar. In the Activities overview, switch keyboard focus between the top bar, dash, windows overview, applications list, and search field. Use the arrow keys to navigate.
Show the list of applications.
Super + Page Down
Shift + Super + Page Up
Shift + Super + Page Down
Shift + Super + в†ђ
Move the current window one monitor to the left.
Shift + Super + в†’
Move the current window one monitor to the right.
Ctrl + Alt + Delete
Show the notification list . Press Super + V again or Esc to close.
Common editing shortcuts
Select all text or items in a list.
Cut (remove) selected text or items and place it on the clipboard.
Copy selected text or items to the clipboard.
Paste the contents of the clipboard.
Undo the last action.
Capturing from the screen
Shift + Prnt Scrn
Take a screenshot of an area of the screen. The pointer changes to a crosshair. Click and drag to select an area.
Ctrl + Alt + Shift + R
More Information
See Also
- Keyboard navigation — Use applications and the desktop without a mouse.
- Set keyboard shortcuts — Define or change keyboard shortcuts in Keyboard settings.
- What is the Menu key? — The Menu key launches a context menu with the keyboard rather than with a right-click.
- What is the Super key? — The Super key opens the Activities overview. You can usually find it next to the Alt key on your keyboard.
You can choose the displayed language by adding a language suffix to the web address so it ends with e.g. .html.en or .html.de.
If the web address has no language suffix, the preferred language specified in your web browser’s settings is used. For your convenience:
[ Change to English Language | Change to Browser’s Preferred Language ]
The material in this document is available under a free license, see Legal for details.
For information on contributing see the Ubuntu Documentation Team wiki page. To report errors in this documentation, file a bug.
Источник


