- 2 easy methods to extend/shrink resize primary partition in Linux
- Lab Environment to resize primary partition (RHEL/CentOS 7/8) in Linux
- Method 1: Change size of partition using parted CLI utility
- List available partitions
- Disable swap partition
- Delete swap and expand partition
- Re-create swap partition
- Method 2: Change size of partition using fdisk utility
- List available partitions
- Delete swap partition
- Part 1 — Resize root partition
- Create swap partition
- Part 2 — Resize root partition
- Related Posts
- How to shrink a Linux partition without losing data?
- Make a GParted Live USB
- Boot from GParted Live
- Shrink an existing partition
- Create an additional partition
- Apply the GParted changes
- Other options in GParted
- Red Hat Customer Portal
- Log in to Your Red Hat Account
- Red Hat Account
- Customer Portal
- Select Your Language
- How to Shrink an ext2/3/4 File system with resize2fs
- Prerequisits
- Procedure
- More Information
- Как изменить размер раздела Linux
- Работа с разделами в GParted
- Меняем размер разделов диска с помощью fdisk
2 easy methods to extend/shrink resize primary partition in Linux
Table of Contents
Related Searches: How to resize primary partition in Linux. How to extend non lvm root partition. How to change size of partition in Linux using parted and fdisk without destroying data. Steps to expand partition in RHEL/CentOS 7 and 8 Linux. Perform Disk Management in CentOS. How to use unallocated space to change size of partition in a disk in Linux. How to resize root partition not on LVM in Linux. Step by step guide to resize primary partition. How to expand partition with examples in Linux. centos disk management. rhel 7 extend non lvm root partition. centos 7 resize root partition. Steps to resize primary partition to extend non lvm root partition in linux. how to add unallocated disk space to a partition in Linux. centos shrink or extend non lvm root partition. add space to partition. fdisk extend partition. resize boot partition. extend non lvm root partition in linux. change size of partition.how to expand partition. centos resize primary partition. rhel change size of partition.
Earlier I had shared steps to create a file system and check file system type in Linux . Now in this article I will share the steps to resize primary partition, here we will extend non lvm root partition. With LVM it is far more easier and less riskier to change size of partition in an volume group in Linux .
- This article covers steps to resize primary partition (non-lvm) which can be dangerous and can leave your Linux system in an unusable broken state. It is important that you backup your content before you attempt to change size of partition.
- You can change size of partition (non-lvm) only on the last partition on the storage device with unallocated space. If the respective partition is not the last partition then the only way to expand partition is to backup your data , rebuild the disk and partitions, then restore the data. No tool such as gparted, parted or fdisk can help you change size of partition in such case.
- You must have some unallocated space or free space available in the concerned device to be able to expand partition. In some of the virtual environment you have an option to change the storage device size but on physical node if there is no enough unallocated space then resize primary partition (extend non lvm root partition) is not possible
- This article assumes you’re using either a GPT partition table, or an msdos partition table using primary partition types to extend non lvm root partition.
Lab Environment to resize primary partition (RHEL/CentOS 7/8) in Linux
I have performed resize primary partition operation on Virtual Machine running on Oracle VirtualBox installed on Linux server . My VM is running with CentOS 8 but I have also verified these steps on RHEL/CentOS 7 and RHEL 8 Linux.
Here my VM is installed on /dev/sda device where /dev/sda1 is boot partition, /dev/sda2 is root while /dev/sda3 is for swap.. Additionally I have left some unallocated free space in /dev/sda for the demonstration of this article to extend non lvm root partition.
Method 1: Change size of partition using parted CLI utility
You can either use gparted (GUI utility) or parted (CLI utility) to change size of partition in Linux. Here we plan to resize primary partition which in our case is /dev/sda.
List available partitions
To list the available partitions in /dev/sda we will execute below command
As I mentioned in the disclaimer section, you can change size of partition only on the last partition of the device but here root partition ( /dev/sda2 ) is not the last one instead swap ( /dev/sda3 ) is my last partition. So to expand root partition I must delete swap device to be able to to use unallocated space and extend non lvm root partition. After deleting swap, root partition will become the last partition on /dev/sda after which we can resize primary partition.
Disable swap partition
Currently I have around 1GB reserved for swap partition
I will turn off my swap (disable swap partition) and use this space to extend non lvm root partition in Linux
Verify the swap partition space, as you see not it is 0
Update /etc/fstab to make sure swap partition is not mounted at boot up stage.
Delete swap and expand partition
Now to resize primary partition /dev/sda2 and expand partition to a new value we must first delete swap partition using parted utility. As we need root partition to be the last partition of /dev/sda before we expand partition.
But our root partition is showing the same size as earlier i.e.
To complete the steps to resize non lvm root partition, execute resizefs to expand partition and refresh the changes
Re-verify the new size of root partition to make sure our steps to extend non lvm root partition was successful.
Re-create swap partition
Now we must create Swap partition which we deleted earlier in this article. We will again use parted utility to create swap partition
Now with parted we only created a partition with file system type as swap. Use mkswap to turn this partition into swap.
Next we must update /etc/fstab with the UUID of our new swap partition. To get the new UUID of swap partition
Update this UUID in /etc/fstab as shown below
Finally turn on the new swap partition
Verify the new swap partition
Now you can reboot your Linux server to make sure everything is OK and resize primary partition was successful.
Method 2: Change size of partition using fdisk utility
Similar to parted command, you can also use fdisk utility to resize primary partition and extend non lvm root partition.
List available partitions
Before we resize primary partition, let us list the available partitions
Now as you see my existing root partition /dev/sda2 size is
10G . Here we will expand partition with +1GB using unallocated disk space from /dev/sda .
Delete swap partition
Currently my swap partition is enabled and is the last partition of /dev/sda . So we must first delete swap partition here before we change size of partition as we need root to be the last partition in /dev/sda
So we will turn off the swap partition before we disable it
Now it is time to use fdisk utility to resize partition
Part 1 — Resize root partition
We will continue with the steps to extend non lvm root partition in the same fdisk session. Note down the start sector of the root partition before you expand partition.
Create swap partition
After we resize primary partition, in the same fdisk session we will also create a new swap partition which we had deleted initially with new start and end sector
Update the kernel regarding the recent changes we did to change size of partition
But our swap partition is still shown as 0
Now let us complete our steps to create swap partition using mkswap
Next update /etc/fstab with the UUID for your new swap partition. You can use blkid to get the UUID
Update the same in /etc/fstab as shown below
Now you can turn on the swap partition
Verify the same using free command
Part 2 — Resize root partition
If not done already in above steps, once you exit fdisk utility, update the kernel regarding the recent changes we did to change size of partition
We are not done with resize primary partition, as df command still shows old partition size for root partition
Execute resize2fs to expand partition on /dev/sda2 with the new changes
Now you can verify the new size of root partition
Lastly I hope the steps from the article to resize primary partition and extend non lvm root partition on RHEL/CentOS 7/8 Linux was helpful. So, let me know your suggestions and feedback using the comment section.
Related Posts
Didn’t find what you were looking for? Perform a quick search across GoLinuxCloud
If my articles on GoLinuxCloud has helped you, kindly consider buying me a coffee as a token of appreciation.

For any other feedbacks or questions you can either use the comments section or contact me form.
Thank You for your support!!
Источник
How to shrink a Linux partition without losing data?
Do you need to shrink a partition with your Linux without reinstalling the system? You can resize your partition without losing your data with GParted and this post will show you how to do that.
I used this method when I decided that I needed to re-partition my hard drive and create several new partitions to test different Linux distributions. However, I did not want to reinstall my current Arch Linux system. Instead, I shrank my Arch Linux partition and added new partitions using the free space I created. Below I share how I did that.
You can watch the video tutorial or continue reading below.
Make a GParted Live USB
The first step to shrink a partition in Linux is going to Gparted.org and download the GParted Live ISO.
Next, create a bootable USB using this ISO. You can do it from the terminal using the dd command:
The if option is the path to GParted ISO, and the option of is the USB device where you will record the ISO. You can find out the name of your USB devise with sudo fdisk -l and the size of your USB.
Boot from GParted Live
Then, boot from this live USB drive. You can keep everything default.
Just press enter for every question.
In the end, you should get to the Live session of Gparted. This is the same Gparted program you may have on your system.
Shrink an existing partition
One advantage of Live USB Gparted is that your main system is not working and you can manipulate its partitions, while Gparted in a working system cannot resize a partition.
If you have several hard drives, make sure you selected the hard drive with the partition you want to resize in the top right part of the program window. In my case, I have one hard drive and one partition.
Below, you can see the yellow area is the part with the data. It is around 3 Gb in my case. The rest is free space. Let’s use this space to create another partition.
Select this partition and click on Resize option.
You can resize it using the numbers or by mowing the arrows. I will free up 10 Gb. Enter the number, press enter, and click on Resize.
After this, the main partition is shrunk.
Create an additional partition
Now, you can create another partition. Click on the unallocated space, then click New to create a new partition.
You can select its size, whether you want it to be primary or extended. An extended partition allows you to create more than 4 partitions. You can choose the file system you need. And you can also give a name to this partition. So, when you have set everything as you want, click Add.
In the below image, you can see the two partitions I have created.
Apply the GParted changes
Everything above created only the plan of the changes to do. You can find the detail of the changes you are about to apply at the bottom of Gparted.
So, if you notice that something is wrong, it is safe to cancel at this stage.
Also, let me warn you. Although Gparted is a reliable program, there is no guaranty that your data won’t be corrupted. So, before you resize your partition, back up all the important files.
If you have backed up all important data and you are sure about these settings, press apply.
Confirm and wait a few minutes until everything is complete.
Check that there were no errors.
Now, there are two partitions on this hard drive and your system files should be intact. Close the program, double-click on exit and reboot into your main system. It should work as before.
So, the process is complete.
Other options in GParted
As you can see, shrinking a partition in Linux is simple and reliable.
Moreover, you can use this Live GParted ISO not only to shrink a partition in Linux, but to do any other manipulations including deleting partitions, increasing partition’s size, and create a brand new partition table.
Have you used Gparted? Have you ever tried this method to create new partitions? Let me know in the comments.
Источник
Red Hat Customer Portal
Log in to Your Red Hat Account
Your Red Hat account gives you access to your profile, preferences, and services, depending on your status.
If you are a new customer, register now for access to product evaluations and purchasing capabilities.
Need access to an account?
If your company has an existing Red Hat account, your organization administrator can grant you access.
Red Hat Account
Customer Portal
For your security, if you’re on a public computer and have finished using your Red Hat services, please be sure to log out.
Select Your Language
How to Shrink an ext2/3/4 File system with resize2fs
Prerequisits
- A created partition that you know the name of. To check the name, run cat /etc/fstab. The first field is the name of the partition.
Procedure
1. If the partition the file system is on is currently mounted, unmount it.
2. Run fsck on the unmounted file system.
3. Shrink the file system with the resize2fs /dev/device size command.
Accepted size units for file system block sizes are:
S — 512 byte sectors
4. Delete and recreate the partition the file system is on to the required amount. If the file system is smaller than 2TB use fdisk as is described in How to Resize a File System with fdisk, if the file system is larger than 2TB use parted as described in [LINK TO COME].
5. Mount the file system and partition.
More Information
man resize2fs – man page for resize2fs that contains information on what resize2fs is, what it supports, and the various options it takes.
Источник
Как изменить размер раздела Linux
Изменение размеров логических томов в Linux осуществляется сложнее, нежели в Windows, что связано с особенностями использования консольных команд и доступных графических приложений. Однако эта задача под силу любому пользователю, и приведенные далее инструкции помогут разобраться с тем, как выполнить ее быстро.
Работа с разделами в GParted
Не все юзеры Linux предпочитают использовать терминал, когда можно обойтись без него. К тому же новички в этой операционной системе не особо желают разбираться с активацией сложных команд. Поэтому в качестве первого варианта предлагаю ознакомиться с использованием программы GParted, которая представляет собой полноценную систему управления дисками.
GParted по умолчанию установлена в большинстве популярных дистрибутивов и их оболочках. Однако если при запуске окажется, что она отсутствует, используйте менеджер приложений или пользовательские репозитории для стандартной процедуры инсталляции. После этого приступайте к выполнению следующей инструкции.
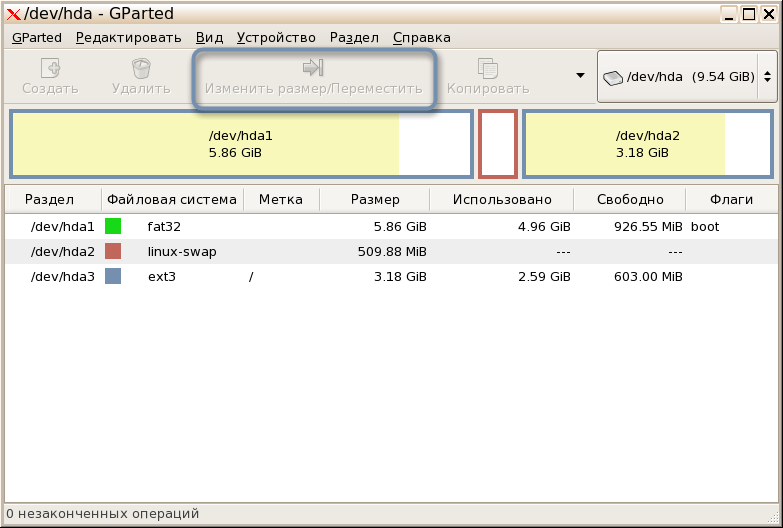
- Запустите приложение через терминал, введя там gparted, или нажмите по созданному значку. В главном окне сразу можно выбрать диск, размер которого необходимо изменить, и нажать по кнопке «Изменить размер/Переместить» .

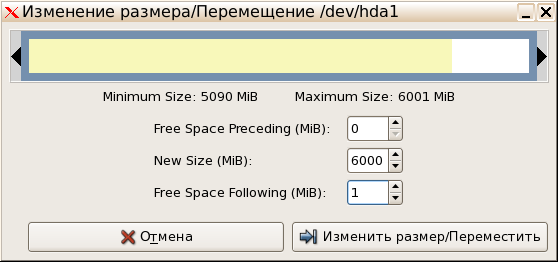
- Отобразится новое окно, где вы можете добавить свободное пространство к диску или же сжать том, освободив тем самым определенное количество мегабайт. Как только выставите новые настройки, подтвердите действие, чтобы закрыть это окно.
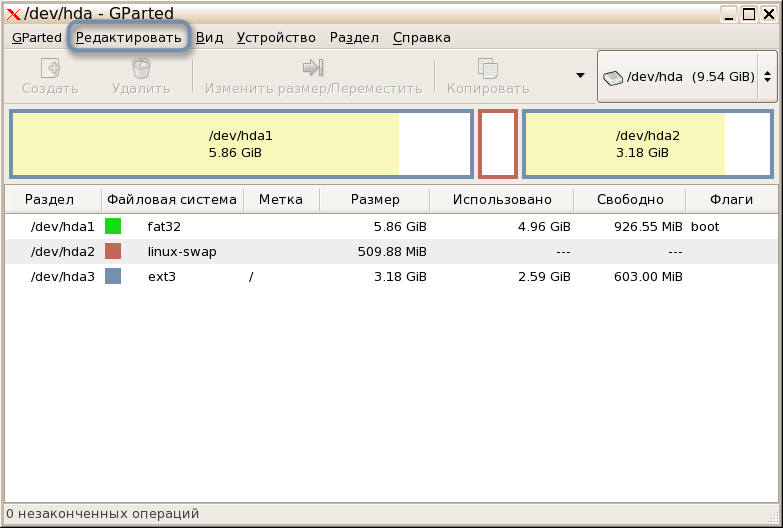
- В главном меню разверните всплывающее меню «Редактировать» и нажмите «Применить все операции» .
- В новом окне следите за прогрессом операции, а по ее завершении можете убедиться в том, что размер был успешно изменен.

Если все пространство уже распределено по разделам, учитывайте, что сначала его придется вернуть к нераспределенному, сжав один или несколько логических томов. Затем свободные мегабайты уже можно будет отнести к новому тому, расширив его.
Меняем размер разделов диска с помощью fdisk
Более гибкий, но сложный вариант изменения размера диска в Linux подразумевает использование консольной утилиты fdisk. Для выполнения расширения тома на все свободное пространство понадобится выполнить более десятка разных действий, но на все про все уйдет не больше 10 минут.
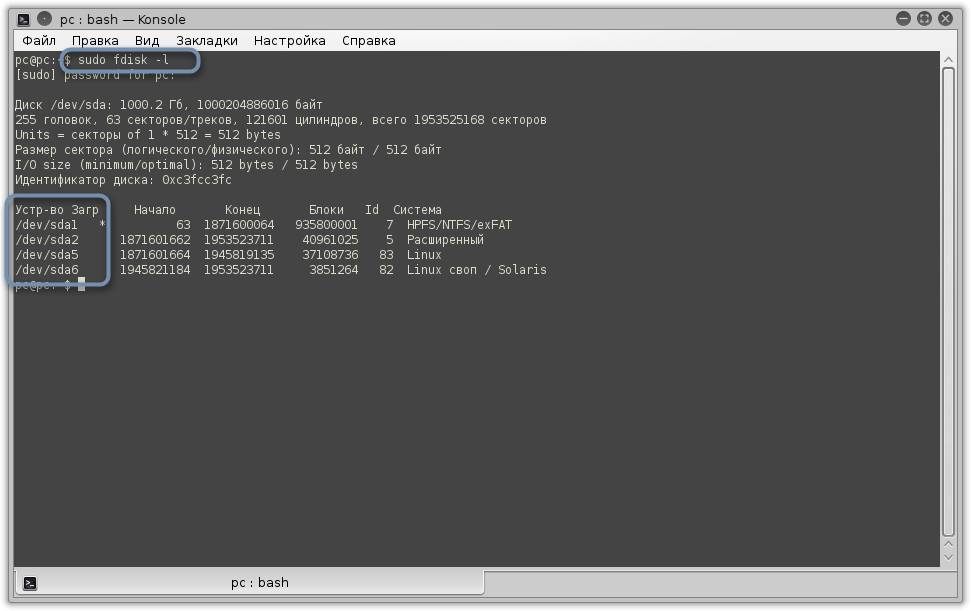
- Если вы пока не знаете, под какими метками располагается сам диск и его логические тома, используйте команду sudo fdisk -l, отобразив список со всеми секторами.
- Используйте команду umount /dev/sdb2 для размонтирования раздела. Замените его название на необходимое и учитывайте, что корневой том размонтировать так просто нельзя, понадобится загрузка с LiveCD.
- Далее укажите fdisk /dev/sdb , подключившись тем самым к указанному диску.
- Посмотрите все разделы, введя p и нажав на Enter .
- За удаление отвечает d; после активации этого атрибута понадобится ввести цифру раздела, который вы хотите удалить (при этом форматирования не происходит, все данные сохраняются).
- Последовательно активируйте n (новый раздел), p (основной) и 2 (замените на номер тома). При появлении уведомления о создании первого и последнего сектора подтверждайте операцию нажатием на Enter .
- Проверьте список томов еще раз через p , а затем нажмите w для сохранения изменений.
Осталось только указать файловой системе, что размер тома был расширен до максимального, поскольку пока отображается старое значение. Для этого сначала определите используемую файловую систему через df -T . Введите одну из трех следующих команд, отталкиваясь от полученной информации:
Для ext2/ext3/ext4 :
XFS :
Reiserfs :
В командах номера разделов указаны в качестве примеров, вы же заменяете их на свои. Еще оставлю пример команды для монтирования диска, если ранее он был отключен:
Сделать это нужно уже после внесения всех изменений.
Для уменьшения размера раздела используйте последовательность команд:
После ввода последней снова используйте последовательную активацию букв так, как это было показано в предыдущей инструкции, чтобы создать новый раздел. Кроме того, не забудьте смонтировать его обратно!
Источник


