- Узнаём данные S.M.A.R.T. в Linux. Контроль состояния HDD или SSD
- Ubuntu Documentation
- Introduction
- Prerequisites
- Setting up
- Installation
- Checking a drive for SMART Capability
- Enabling SMART
- Testing a Drive
- Results
- Suggested application: GSmartControl
- Advanced: Running as Smartmontools as a Daemon
- Actions in case of trouble
- Personal computer
- Server
- Testing
- Utility: Checking all disks at once
- Testing drives behind MegaRAID
- Examples of SMART reports
- 📑 Диагностика дисков в Ubuntu/Mint — пакет smartmontools
- Утилита smartctl
- Утилита (демон) smartd
Узнаём данные S.M.A.R.T. в Linux. Контроль состояния HDD или SSD
Дата добавления: 07 июля 2012

S.M.A.R.T. (Self-Monitoring, Analisys and Reporting Technology) — это технология, предоставляющая пользователю различные данные о текущем состоянии жесткого диска или твердотельного накопителя. Анализируя данные S.M.A.R.T., пользователь может оценить состояние своих накопителей и решить, требуют ли они замены или ещё смогут работать долго и без сбоев.
Консольный способ: smartmontools
Узнать данные S.M.A.R.T. в чистом виде нам поможет утилита под названием smartmontools .
Приведем пример установки для дистрибутивов на основе Debian:
Количество атрибутов может отличаться в зависимости от модели диска.
В этой таблице нам нужно смотреть на значение поля RAW_VALUE для нужного атрибута. Именно оно показывает текущее значение атрибута.
Наиболее важные показатели:
Raw_Read_Error_Rate — количество ошибок чтения. Ненулевое значение должно сильно насторожить, а большие значение и вовсе говорят о скором выходе диска из строя. Известно, что на дисках Seagate, Samsung (семейства F1 и более новые) и Fujitsu 2,5? большое значение в этом поле является нормальным. Для остальных же дисков в идеале значение должно быть равно нулю;
Spin_Up_Time — время раскрутки диска. Измеряется в миллисекундах т.е. в моём случае это 1.3 секунды. Чем меньше — тем лучше. Большие значения говорят о низкой отзывчивости;
Start_Stop_Count — количество циклом запуска/остановки шпинделя;
Reallocated_Sector_Ct — количество перераспределённых секторов. Большое значение говорит о большом количестве ошибок диска;
Seek_Error_Rate — количество ошибок позиционирования. Большое значение говорит о плохом состоянии диска;
Power_On_Hours — количество наработанных часов во включённом состоянии. По нему можно узнать сколько проработал диск во включённом состоянии. Довольно полезно, например, если покупать ноутбук с витрины и хочется узнать долго ли он там стоял;
Power_Cycle_Count — количество включений/выключений диска;
Spin_Retry_Count — количество попыток повторной раскрутки. Большое значение говорит о плохом состоянии диска;
Temperature_Celsius — температура диска в градусах Цельсия. При слишком высокой температуре диски могут быстрее выйти из строя;
Reallocated_Event_Count — количество операций перераспределения секторов;
Offline_Uncorrectable — количество неисправных секторов. Большое значение говорит о повреждённой поверхности.
Более наглядный графический способ: gnome-disk-utility
В графическом варианте и с описанием атрибутов, данные SMART представляет программа gnome-disk-utility . В русской локализации в меню она называется как «дисковая утилита». В английской локализации известна как «Disks».
Пример установки для дистрибутивов на основе Debian:
Запускаем программу. 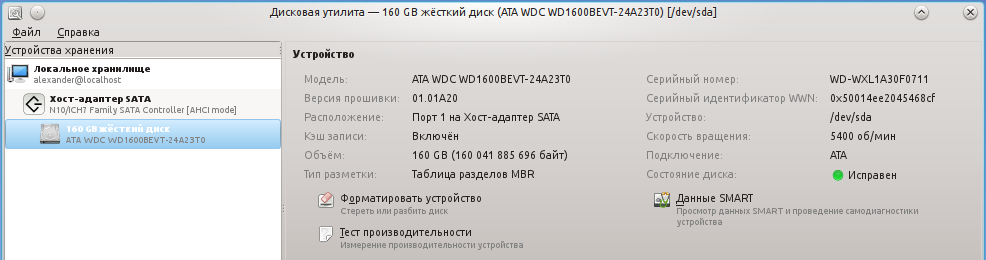
В поле «состояние диска» уже можно увидеть оценку состояния диска на основе данных S.M.A.R.T. Чтобы увидеть значение конкретных атрибутов нажимаем на кнопку «Данные SMART»: 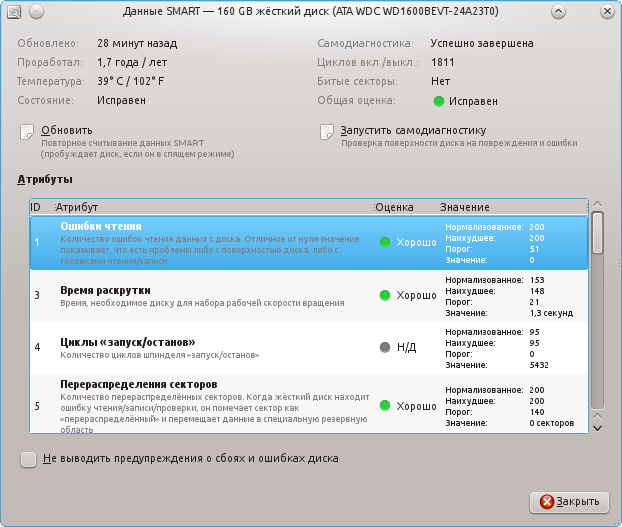
Пример данных о SSD (Твёрдотельном накопителе): 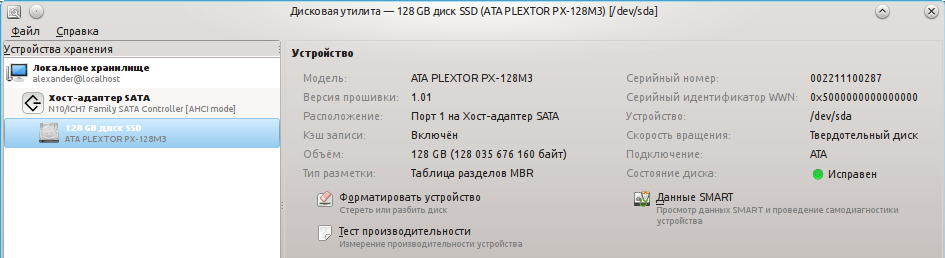
S.M.A.R.T.: 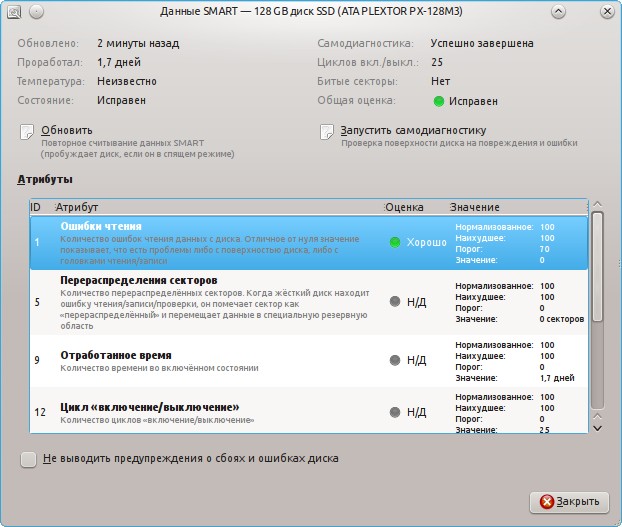
Здесь всё понятно и наглядно. Также присутствует описание атрибутов и оценка их показаний. Проблемные значения будут выделены красным цветом.
Источник
Ubuntu Documentation
Introduction
Smartmontools is a set of applications that can test hard drives and read their hardware SMART statistics. Note: SMART data may not accurately predict future drive failure, however abnormal error rates may be an indication of possible hardware failure or data inconsistency.
This how to will help you to configure Smartmontools to do actions such as shut down the computer or send an e-mail when the disk is going to fail.
Prerequisites
- A modern S.M.A.R.T. capable hard disk
Setting up
Installation
You can install the smartmontools package from the Synaptic Package Manager (see SynapticHowto), or by typing the following into the terminal:
Checking a drive for SMART Capability
To ensure that your drive supports SMART, type:
where /dev/sda is your hard drive. This will give you brief information about your drive. The last two lines may look something like this:
Enabling SMART
In the case that SMART is not enabled for your drive, you can enable it by typing:
Testing a Drive
You may run any type of test while the drive is mounted although there may be some drop in performance. There are three types of test that can be conducted on a drive:
- Short
- Extended (Long)
- Conveyance
To find an estimate of the time it takes to conduct each test, type:
The most useful test is the extended test (long). You can initiate the test by typing:
Results
You can view a drive’s test statistics by typing:
To display detailed SMART information for an IDE drive, type:
To display detailed SMART information for a SATA drive, type:
Note: This also works for IDE drives in new kernels that are being run through the SCSI stack and show up as /dev/sdX
Suggested application: GSmartControl
Take a look at GSmartControl. It’s a nice graphical frontend to smartctl; it shows all SMART values, and highlights those that indicate old age or impending failure, plus you may run tests on demand:


As usual, you may install it from Synaptic or running sudo apt-get install gsmartcontrol.
Advanced: Running as Smartmontools as a Daemon
You can run Smartmontools in the background and have it check drives and email when there are issues:
Open the file /etc/default/smartmontools with your favourite text editor. For example (using vim): sudo vim /etc/default/smartmontools. Uncomment the line start_smartd=yes.
How smartd is going to scan the disks and what it will do in case of errors is controlled by the daemon configuration file, /etc/smartd.conf. Again, use your favourite text editor to open this file. There should be one uncommented line, similar to:
In this example (which is the default for Karmic), smartd will:
scan for all ATA/SCSI devices (DEVICESCAN). The rest of the file will be ignored;
mail a report to the ‘root’ account in case of trouble (-m);
but instead of the mail command, it will execute /usr/share/smartmontools/smartd-runner and feed the report to it (-M exec program).
/usr/share/smartmontools/smartd-runner is a script that basically saves the report to a temporary file, and then runs anything it finds in /etc/smartmontools/run.d/; take a look there to understand what you already have (there should be a script that mails the report).
There are several -M directives that change when and how often reports are sent. You need to specify (-m something) in order to use them, even if you’re not sending any mail.
You may include some useful options:
In this example, smartd will:
check the SMART health status (-H);
report increases in both SMART error logs (-l);
check for failure of any Usage Attributes (-f);
schedule an Offline Immediate Test every Friday at 11 am, a Long Self-Test every Friday at 1 pm, and a Conveyance Self-Test every Friday at 3 pm (-s) — see the smartd manual page for what these tests do so you can choose what suits you.
You may also replace DEVICESCAN with the path of the device which you’d like to be monitored (e.g. /dev/sda), and the daemon will only monitor this drive. You’ll need one such line for each device.
Actions in case of trouble
You’ll want to configure the actions smartd will take in case of trouble. If all you want is a notification shown on your desktop, skip to «Personal computer» below.
Most of the time, you only need to place a script in /etc/smartmontools/run.d/. Whenever smartd wants to send a report, it will execute smart-runner and the latter will run your script.
You have several variables available to your script (again, see the smartd manpage). These come from a test run:
Your script also has a temporary copy of the report available as «$1». It will be deleted after you finish but the same content is written to /var/log/syslog.
Personal computer
For a visual notification, you may just install smart-notifier. You will see a large popup with the report:

Alternatively, you may create a custom notification (bubble) as seen in other GNOME programs.
You will need to install the libnotify-bin package:
Now create a text file called 60notify in /etc/smartmontools/run.d:
and add the following to the file:
(The DISPLAY=:0.0 part is a variable assignment that helps programs to locate your X server. It’s already set for your terminal, but the script lacks it since it is being run inside a different session).
Now give it execute permissions:
This will produce a nice libnotify bubble with a warning icon:

You may also experiment with Zenity:
Notice: Be very careful with these scripts as they are run under the root account.
Server
Here, you may wish to handle things differently. In this example we want to mail an admin and shut down the server. Comment out the line that contains DEVICESCAN, by adding # to the beginning of the line. Then, add this to the end of the file:
(Be sure not to add any whitespace after the «\»)
Now, we are going to make the script which is going to shut down the computer *after* we mail the admin. Create a text file called 99shutdown in /etc/smartmontools/run.d and add the following to the file:
The number 99 at the start of the filename is to ensure that it is called last when smartd-runner runs. It will wait 40 seconds and then shut down the computer. Of course, you may customize this at will; you may not wish to turn off the server.
Now, it is time to start the daemon:
Testing
If you want to test all these actions, add -M test after exec /usr/share/smartmontools/smartd-runner and restart the daemon (sudo service smartmontools restart). When the daemon comes up, it will execute the script immediately with a test message. Notice: If you included the shutdown -h line, the script will shut down the computer as soon as the service starts. To fix this, you will have to start the computer in recovery mode and remove the -M test option from /etc/smartd.conf.
Before running this, be sure to check that you have a «mail» command, and do a test first to your address. On my default Fiesty:
The program ‘mail’ can be found in the following packages:
- mailx
- mailutils
Try: sudo apt-get install
Make sure you have the ‘universe’ component enabled
bash: mail: command not found
Utility: Checking all disks at once
Note: Following the Gentoo Wiki I made a modified script which checks all the disk in /dev/disk/by-id/ Just invoke the script below as follows:
The script creates a directory named smart-logs and stores all the files there.
(Remember to give execute permissions to the script with chmod +x smart.sh).
Testing drives behind MegaRAID
If /dev/sda is a MegaRAID device then straightforward execution of smartctl on it is not effective. It just returns an empty report for the controller itself. To get S.M.A.R.T. attributes of a drive behind the RAID controller you need to use the following command:
Examples of SMART reports
See large collection of smartctl reports for various hard drives here.
Smartmontools (последним исправлял пользователь linuxhw 2019-12-24 11:07:49)
The material on this wiki is available under a free license, see Copyright / License for details
You can contribute to this wiki, see Wiki Guide for details
Источник
📑 Диагностика дисков в Ubuntu/Mint — пакет smartmontools
Пакет smartmontools состоит из двух утилит (smartctl и smartd), которые контролируют и следят за системными накопителями используя самопроверку, анализ и систему технологического отчёта (S.M.A.R.T.), встроенную в большинство современных ATA и SCSI жёстких дисков. Этот пакет основан на коде пакета smartsuite и включает поддержку ATA/ATAPI6 дисков.
Smartmontools состоит из двух утилит:
- smartctl — Control and Monitor Utility for SMART Disks. Поддерживает многие ATA-3 и более поздние ATA, IDE, SATA и SCSI-3 диски. Представляет собой консоль для просмотра параметров SMART диска и запуска тестов в ручную. Используется для однократного тестирования жестких дисках.
- smartd — пытается включить SMART monitoring на ATA устройствах (аналогично smartctl -s on) и будет опрашивать устройства каждые 30 минут (это конфигурируемо), логирует ошибки дисков и изменения атрибутов. Используется для автономного мониторинга.
Пакет smartmontools присутствует в стандартных репозиториях Ubuntu/Mint и устанавливается очень просто:
$ sudo apt-get install smartmontools
Утилита smartctl
Информация о диске /dev/sda
Если S.M.A.R.T. отключен (SMART support is: Disabled), то для включения нужно выполнить команду
Но при этом нужно убедиться, что диск поддерживает технологию SMART:
Просмотр значений S.M.A.R.T. для устройства /dev/sda
Существует 2 типа атрибутов (колонка TYPE)
- критичные атрибуты (pre-fail);
- некритичные атрибуты (old_age);
- Raw Read Error Rate — частота ошибок при чтении данных с диска;
- Reallocated Sector Count — число операций переназначения секторов;
- Spin Up Time — время раскрутки пакета дисков из состояния покоя до рабочей скорости;
- Spin Up Retry Count — число повторных попыток раскрутки дисков до рабочей скорости, в случае если первая попытка была неудачной;
- Seek Error Rate — частота ошибок при позиционировании блока головок;
Быстрый опрос диска на предмет живучести, с предсказанием отказа диска в ближайшие 24 часа
Список поддерживаемых тестов и примерное время на каждый текст
Запуск теста на проверку читаемости секторов
Провести быстрый тест здоровья жесткого диска
Выполнить расширенные встроенные тесты для диска /dev/sda.
Команду можно использовать на работающей системе. Для просмотра результатов выполнения тестов используется команда вывода внутреннего журнала после завершения теста
Для просмотра всех возможностей
Утилита (демон) smartd
Для периодического тестирования дисков настроим демон smartd, для этого нужно: активировать smartd в /etc/default/smartmontools, задать настройки в /etc/smartd.conf, перезапустить демон sudo /etc/init.d/smartmontools restart;
Отредактируем файл /etc/default/smartmontools, удалив # перед start_smartd. Параметр smartd_opts отвечает за дополнительные опции для smartd, —interval говорит о периодичности проведения самодиагностики.
Источник


