- How To Set up SSH Keys on a Linux / Unix System
- What is a public key authentication?
- How to set up SSH keys
- How do I set up public key authentication?
- 1: Create the key pair
- Optional syntax for advance users
- Авторизация по ключу SSH
- Как работают ключи SSH?
- Как создать ключи SSH?
- Загрузка ключа на сервер
- Отключение проверки пароля
- Выводы
- Quick steps: Create and use an SSH public-private key pair for Linux VMs in Azure
- Supported SSH key formats
- Create an SSH key pair
- Provide an SSH public key when deploying a VM
- SSH into your VM
- Next steps
How To Set up SSH Keys on a Linux / Unix System
I recently read that SSH keys provide a secure way of logging into a Linux and Unix-based server. How do I set up SSH keys on a Linux or Unix based systems? In SSH for Linux/Unix, how do I set up public key authentication?
| Tutorial details | |
|---|---|
| Difficulty level | Easy |
| Root privileges | No |
| Requirements | OpenSSH client and server |
| Est. reading time | 8 mintues |
This page explains a public key and shows you how to set up SSH keys on a Linux or Unix-like server. I am assuming that you are using Linux or Unix-like server and client with the following software:
- OpenSSH SSHD server
- OpenSSH ssh client and friends on Linux (Ubuntu, Debian,
What is a public key authentication?
OpenSSH server supports various authentication schema. The two most popular are as follows:
- Passwords based authentication
- Public key based authentication. It is an alternative security method to using passwords. This method is recommended on a VPS, cloud, dedicated or even home based server.
How to set up SSH keys
Steps to setup secure ssh keys:
- Create the ssh key pair using ssh-keygen command.
- Copy and install the public ssh key using ssh-copy-id command on a Linux or Unix server.
- Add yourself to sudo or wheel group admin account.
- Disable the password login for root account.
- Test your password less ssh keys login using ssh user@server-name command.
Let us see all steps in details.
How do I set up public key authentication?
You must generate both a public and a private key pair. For example:
Fig.01: Our sample setup
In public key based method you can log into remote hosts and server, and transfer files to them, without using your account passwords. Feel free to replace server1.cyberciti.biz and client1.cyberciti.biz names with your actual setup. Enough talk, let’s set up public key authentication. Open the Terminal and type following commands if .ssh directory does not exists:
1: Create the key pair
On the computer (such as client1.cyberciti.biz), generate a key pair for the protocol.
You need to set the Key Pair location and name. I recommend you use the default location if you do not yet have another key there, for example: $HOME/.ssh/id_rsa. You will be prompted to supply a passphrase (password) for your private key. I suggest that you setup a passphrase when prompted. You should see two new files in $HOME/.ssh/ directory:
- $HOME/.ssh/id_rsa – contains your private key.
- $HOME/.ssh/id_rsa.pub – contain your public key.
Optional syntax for advance users
The following syntax specifies the 4096 of bits in the RSA key to creation (default 2048):
$ ssh-keygen -t rsa -b 4096 -f
/.ssh/vps-cloud.web-server.key -C «My web-server key»
Where,
- -t rsa : Specifies the type of key to create. The possible values are “rsa1” for protocol version 1 and “dsa”, “ecdsa”, “ed25519”, or “rsa” for protocol version 2.
- -b 4096 : Specifies the number of bits in the key to create
- -f
Источник
Авторизация по ключу SSH
SSH или Secure Shell — это зашифрованный протокол, который часто используется для взаимодействия и удаленного управления серверами. Если вы захотите что-либо сделать на удаленном сервере, скорее всего, вам придется воспользоваться SSH и работать через терминал.
В SSH существует несколько способов авторизации. Вы можете каждый раз вводить пароль пользователя или использовать более безопасный и надежный способ — ключи SSH. Что самое интересное, он более удобен для применения, вам даже не нужно будет вводить пароль. В этой статье мы рассмотрим как настраивается авторизация по ключу SSH.
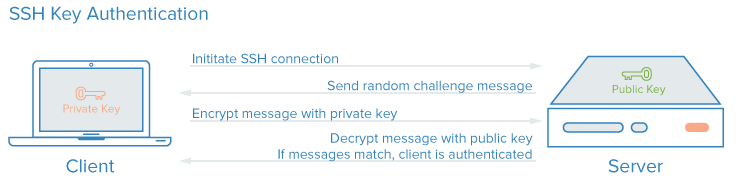
Как работают ключи SSH?
SSH сервер может выполнять аутентификацию пользователей с помощью различных алгоритмов. Самый популярный — это аутентификация по паролю. Он достаточно прост, но не очень безопасный. Пароли передаются по безопасному каналу, но они недостаточно сложны для противостояния попыткам перебора. Вычислительная мощность современных систем в сочетании со специальными скриптами делают перебор очень простым. Конечно, существуют другие способы дополнительной безопасности, например, fail2ban, но аутентификация по ключу SSH более надежна.
Каждая пара ключей состоит из открытого и закрытого ключа. Секретный ключ сохраняется на стороне клиента и не должен быть доступен кому-либо еще. Утечка ключа позволит злоумышленнику войти на сервер, если не была настроена дополнительная аутентификация по паролю.
Открытый ключ используется для шифрования сообщений, которые можно расшифровать только закрытым ключом. Это свойство и используется для аутентификации с помощью пары ключей. Открытый ключ загружается на удаленный сервер, к которому необходимо получить доступ. Его нужно добавить в специальный файл
Когда клиент попытается выполнить проверку подлинности через этот ключ, сервер отправит сообщение, зашифрованное с помощью открытого ключа, если клиент сможет его расшифровать и вернуть правильный ответ — аутентификация пройдена.
Как создать ключи SSH?
Сначала необходимо создать ключи ssh для аутентификации на локальном сервере. Для этого существует специальная утилита ssh-keygen, которая входит в набор утилит OpenSSH. По умолчанию она создает пару 2048 битных RSA ключей, которая подойдет не только для SSH, но и для большинства других ситуаций.
И так, генерация ключей ssh выполняется командой:
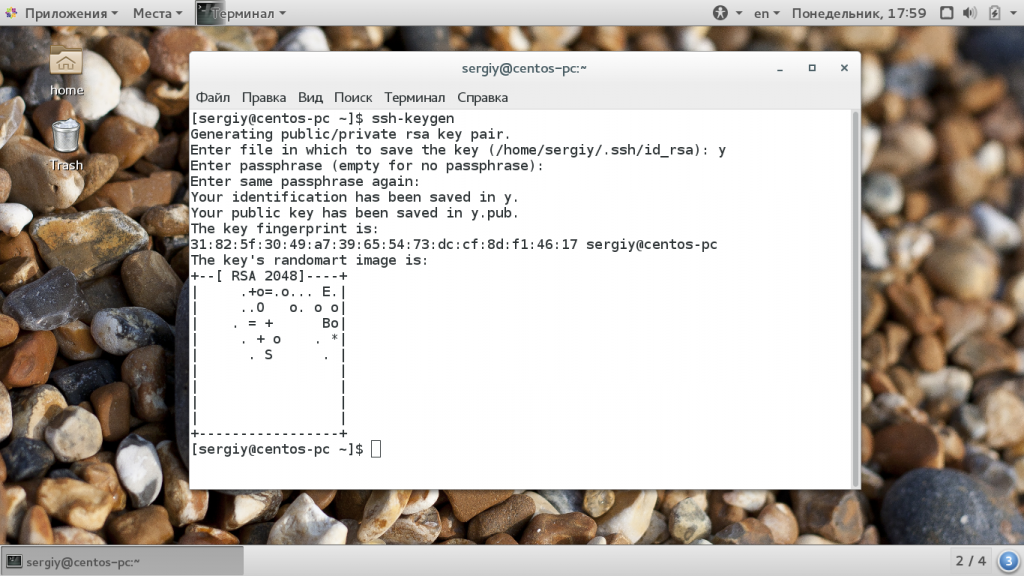
Утилита предложит вам выбрать расположение ключей. По умолчанию ключи располагаются в папке
/.ssh/. Лучше ничего не менять, чтобы все работало по умолчанию и ключи автоматически подхватывались. Секретный ключ будет называться id_rsa, а публичный id_rsa.pub.
Затем утилита предложит ввести пароль для дополнительного шифрования ключа на диске. Его можно не указывать, если не хотите. Использование дополнительного шифрования имеет только один минус — необходимость вводить пароль, и несколько преимуществ:
- Пароль никогда не попадет в сеть, он используется только на локальной машине для расшифровки ключа. Это значит что перебор по паролю больше невозможен.
- Секретный ключ хранится в закрытом каталоге и у клиента ssh нет к нему доступа пока вы не введете пароль;
- Если злоумышленник хочет взломать аутентификацию по ключу SSH, ему понадобится доступ к вашей системе. И даже тогда ключевая фраза может стать серьезной помехой на его пути.
Но все же, это необязательное дополнение и если не хотите, то вы можете просто нажать Enter. Тогда доступ по ключу ssh будет выполняться автоматически и вам не нужно будет что-либо вводить.
Теперь у вас есть открытый и закрытый ключи SSH и вы можете использовать их для проверки подлинности. Дальше нам осталось разместить открытый ключ на удаленном сервере.
Загрузка ключа на сервер
Когда генерация ключей завершена, нам осталось только загрузить ключ на сервер. Для загрузки ключа можно использовать несколько способов. В некоторых случаях вы можете указать ключ в панели управления сервером, например, сPanel или любой другой. Но мы такой способ рассматривать не будем. Мы рассмотрим ручные способы.
Самый простой способ скопировать ключ на удаленный сервер — это использовать утилиту ssh-copy-id. Она тоже входит в пакет программ OpenSSH. Но для работы этого метода вам нужно иметь пароль доступа к серверу по SSH. Синтаксис команды:
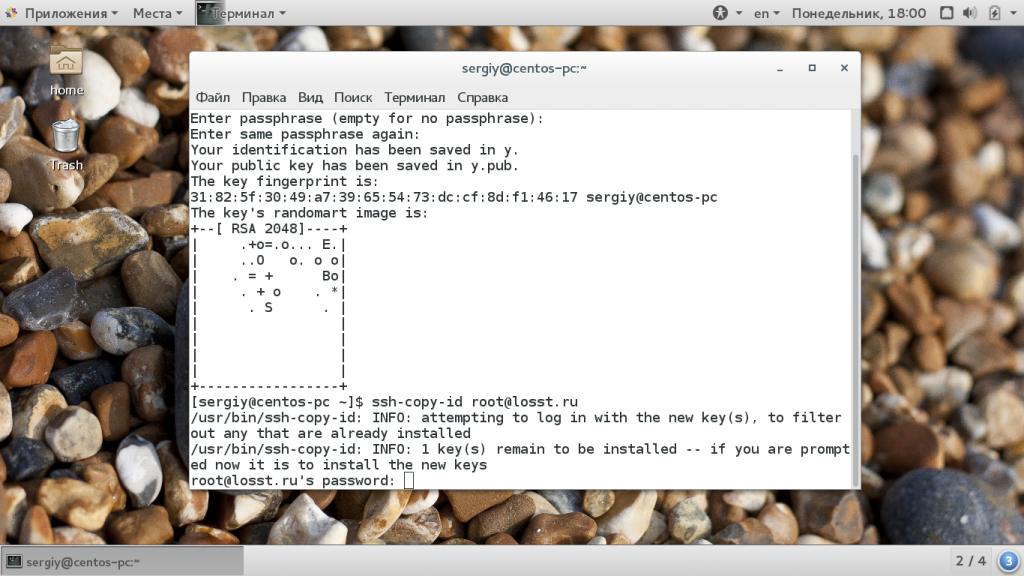
При первом подключении к серверу система может его не распознать, поэтому вам нужно ввести yes. Затем введите ваш пароль пользователя на удаленном сервере. Утилита подключится к удаленному серверу, а затем использует содержимое ключа id.rsa.pub для загрузки его на сервер в файл
/.ssh/authorized_keys. Дальше вы можете выполнять аутентификацию с помощью этого ключа.
Если такой способ по какой-либо причине для вас не работает, вы можете скопировать ключ по ssh вручную. Мы создадим каталог
/.ssh, а затем поместим наш ключ в файл authorized_keys с помощью символа >>, это позволит не перезаписывать существующие ключи:
/.ssh/id_rsa.pub | ssh username@remote_host «mkdir -p
Здесь вам тоже нужно набрать yes, если вы подключаетесь к новому серверу, а затем ввести пароль. Теперь вы можете использовать созданный ключ для аутентификации на сервере:
Если вы не захотели создать ssh ключ с доступом по паролю, то вы сразу же будете авторизованы, что очень удобно. Иначе, сначала вам придется ввести фразу-пароль для расшифровки ключа.
Отключение проверки пароля
Если пароль больше не будет использоваться, то для увеличения безопасности системы лучше его вовсе отключить. Но убедитесь, что ключ надежно сохранен и вы его не потеряете, потому что по паролю вы больше не войдете. Авторизуйтесь на сервере, затем откройте конфигурационный файл /etc/ssh/sshd_config и найдите там директиву PasswordAuthenticatin. Нужно установить ее значение в No:
sudo vi /etc/ssh/sshd_config
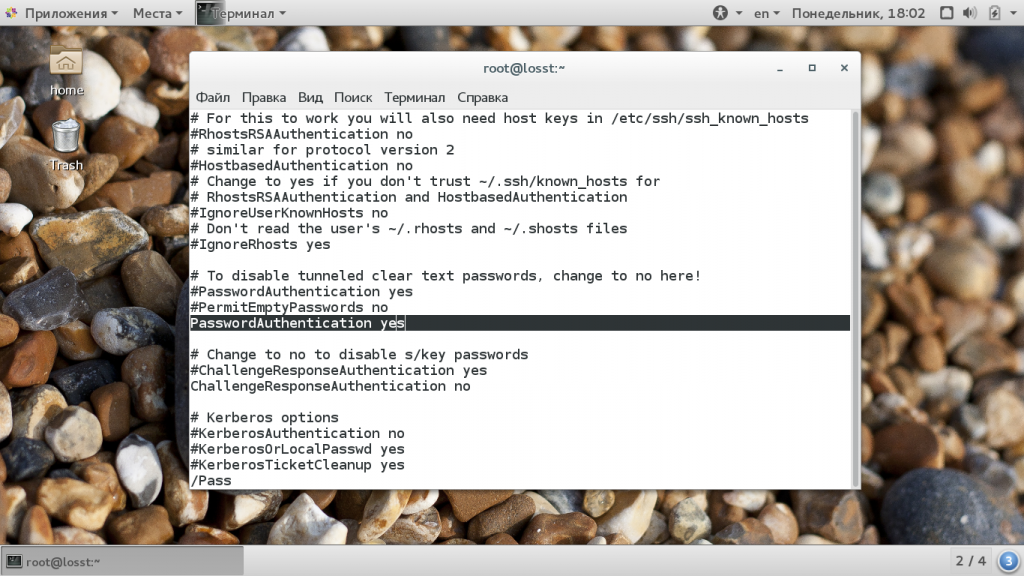
Теперь сохраните файл и перезапустите службу ssh:
sudo service ssh restart
Дальше будет возможно только подключение по ключу ssh, пароль не будет приниматься.
Выводы
В этой статье мы рассмотрели как выполняется авторизация по ключу ssh, настройка ключей ssh и добавить ssh ключ. Теперь вы можете войти на сервер без ввода пароля. Если у вас остались вопросы, спрашивайте в комментариях!
Источник
Quick steps: Create and use an SSH public-private key pair for Linux VMs in Azure
Applies to: вњ”пёЏ Linux VMs вњ”пёЏ Flexible scale sets
With a secure shell (SSH) key pair, you can create virtual machines (VMs) in Azure that use SSH keys for authentication. This article shows you how to quickly generate and use an SSH public-private key file pair for Linux VMs. You can complete these steps with the Azure Cloud Shell, a macOS, or a Linux host.
VMs created using SSH keys are by default configured with passwords disabled, which greatly increases the difficulty of brute-force guessing attacks.
For more background and examples, see Detailed steps to create SSH key pairs.
For additional ways to generate and use SSH keys on a Windows computer, see How to use SSH keys with Windows on Azure.
Supported SSH key formats
Azure currently supports SSH protocol 2 (SSH-2) RSA public-private key pairs with a minimum length of 2048 bits. Other key formats such as ED25519 and ECDSA are not supported.
Create an SSH key pair
Use the ssh-keygen command to generate SSH public and private key files. By default, these files are created in the
/.ssh directory. You can specify a different location, and an optional password (passphrase) to access the private key file. If an SSH key pair with the same name exists in the given location, those files are overwritten.
The following command creates an SSH key pair using RSA encryption and a bit length of 4096:
If you use the Azure CLI to create your VM with the az vm create command, you can optionally generate SSH public and private key files using the —generate-ssh-keys option. The key files are stored in the
/.ssh directory unless specified otherwise with the —ssh-dest-key-path option. If an ssh key pair already exists and the —generate-ssh-keys option is used, a new key pair will not be generated but instead the existing key pair will be used. In the following command, replace VMname and RGname with your own values:
Provide an SSH public key when deploying a VM
To create a Linux VM that uses SSH keys for authentication, specify your SSH public key when creating the VM using the Azure portal, Azure CLI, Azure Resource Manager templates, or other methods:
If you’re not familiar with the format of an SSH public key, you can display your public key with the following cat command, replacing
/.ssh/id_rsa.pub with the path and filename of your own public key file if needed:
A typical public key value looks like this example:
If you copy and paste the contents of the public key file to use in the Azure portal or a Resource Manager template, make sure you don’t copy any trailing whitespace. To copy a public key in macOS, you can pipe the public key file to pbcopy . Similarly in Linux, you can pipe the public key file to programs such as xclip .
The public key that you place on your Linux VM in Azure is by default stored in
/.ssh/id_rsa.pub, unless you specified a different location when you created the key pair. To use the Azure CLI 2.0 to create your VM with an existing public key, specify the value and optionally the location of this public key using the az vm create command with the —ssh-key-values option. In the following command, replace myVM, myResourceGroup, UbuntuLTS, azureuser, and mysshkey.pub with your own values:
If you want to use multiple SSH keys with your VM, you can enter them in a space-separated list, like this —ssh-key-values sshkey-desktop.pub sshkey-laptop.pub .
SSH into your VM
With the public key deployed on your Azure VM, and the private key on your local system, SSH into your VM using the IP address or DNS name of your VM. In the following command, replace azureuser and myvm.westus.cloudapp.azure.com with the administrator user name and the fully qualified domain name (or IP address):
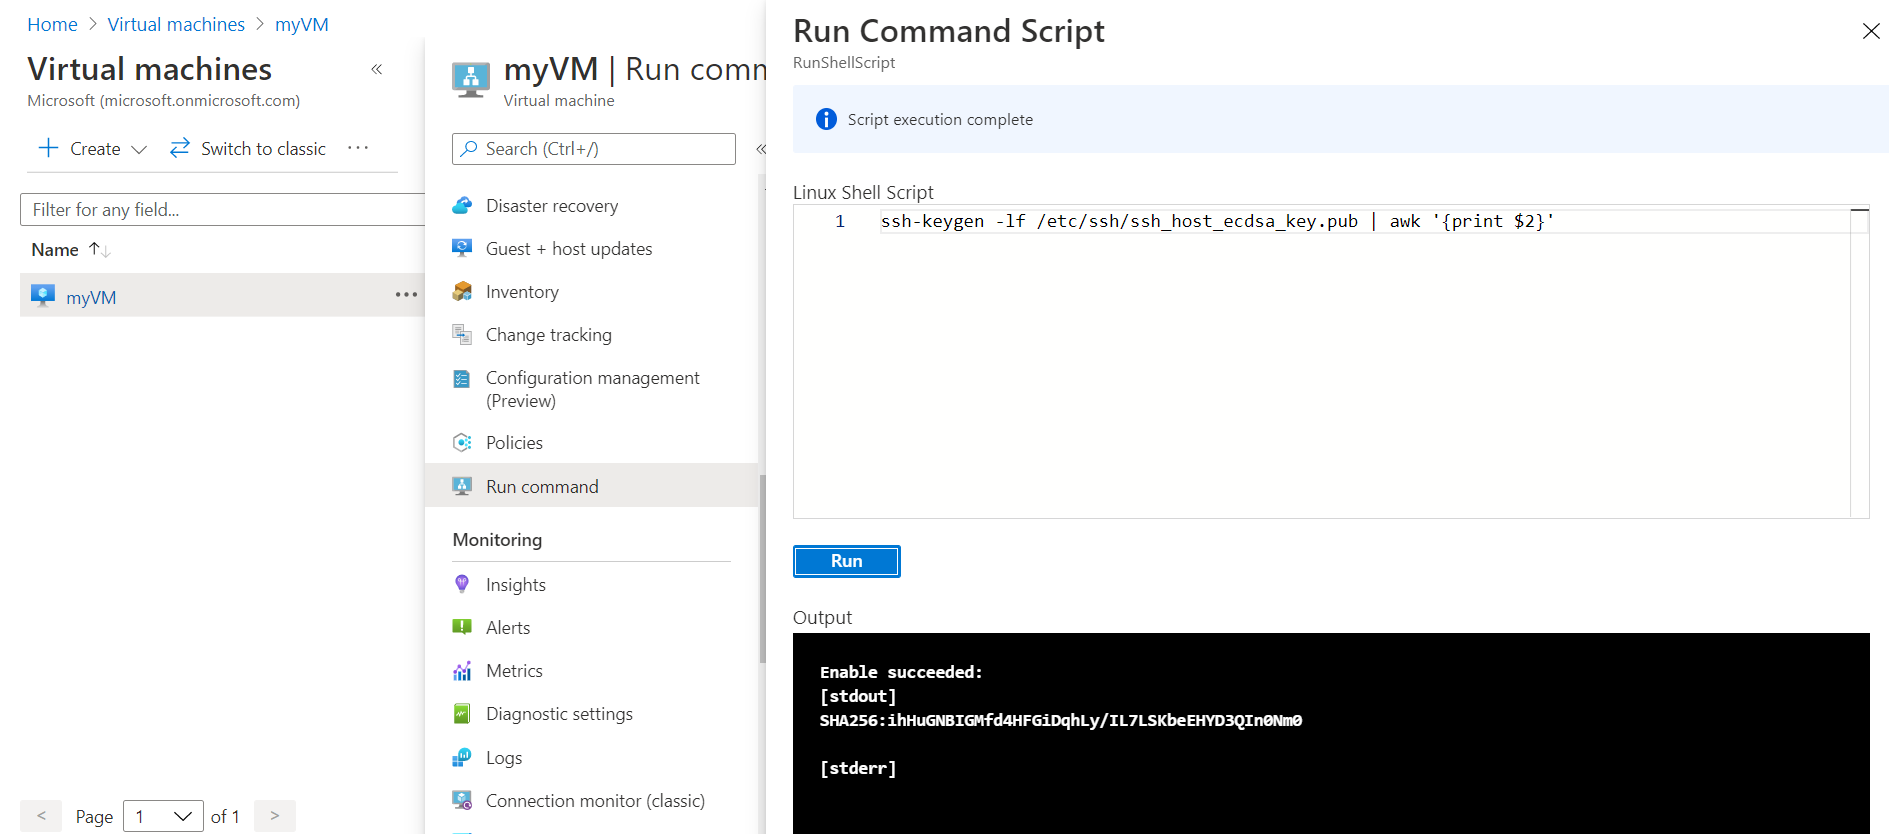
If you’re connecting to this VM for the first time, you’ll be asked to verify the host’s fingerprint. It’s tempting to simply accept the fingerprint that’s presented, but that approach exposes you to a possible person-in-the-middle attack. You should always validate the host’s fingerprint. You need to do this only the first time you connect from a client. To obtain the host fingerprint via the portal, use the Run Command feature to execute the command ssh-keygen -lf /etc/ssh/ssh_host_ecdsa_key.pub | awk ‘
To run the command using CLI, use az vm run-command invoke .
If you specified a passphrase when you created your key pair, enter that passphrase when prompted during the sign-in process. The VM is added to your
/.ssh/known_hosts file, and you won’t be asked to connect again until either the public key on your Azure VM changes or the server name is removed from
If the VM is using the just-in-time access policy, you need to request access before you can connect to the VM. For more information about the just-in-time policy, see Manage virtual machine access using the just in time policy.
Next steps
For more information on working with SSH key pairs, see Detailed steps to create and manage SSH key pairs.
If you have difficulties with SSH connections to Azure VMs, see Troubleshoot SSH connections to an Azure Linux VM.
Источник


