- How to configure proxy settings on Ubuntu 18.04
- Overview
- Ubuntu Desktop Network Settings
- Ubuntu Terminal Proxy Settings
- Single User Temporary Proxy Settings
- Single User Persistent Proxy Settings
- All Users
- Использование прокси
- Содержание
- Глобальные настройки
- Firefox
- Chromium-browser
- apt-add-repository
- Как настроить прокси в Linux
- Как настроить прокси в Linux
- В статье показано как настроить прокси в любой версии ОС Linux.
- Рассмотрим настройку переменных для использования прокси
- Тестирование работы
- How to configure system proxy settings in Red Hat Enterprise Linux
- Setting the proxy via Gnome GUI (Linux Control Panel Applet)
- Setting the proxy via command line
- Setting the proxy to be available in all shell instances.
- Configuring YUM to use a proxy
How to configure proxy settings on Ubuntu 18.04
Overview
Proxies are commonly found on business networks, but they are increasingly becoming popular for personal use. The following tutorial will show you multiple ways of setting your proxy in Ubuntu 18.04, allowing you to browse the Internet with additional privacy.
This tutorial will cover the following three areas. Use the one the fits your needs.
Desktop: learn how to set your proxy settings from within the desktop.
Terminal: set environment variables for your proxy server when using a terminal or console.
All users: setting the proxy settings for all users on the system.
Ubuntu Desktop Network Settings
To configure your proxy settings in Ubuntu Desktop you need to access Network Settings. Within there you can set a number of parameters, including proxy settings for HTTP traffic, HTTPS traffic, and FTP traffic.
Equally as important as setting your Internet proxy settings is setting Ignore Hosts, to prevent local traffic from going through your proxy server.
To set your proxy in Ubuntu Desktop, do the following:
- Open the Application launcher by clicking the “Show Applications” icon, located at the bottom of the left-hand quick application access bar.
- Type in ‘Settings’
- Click the ‘Settings’ icon.
- From the left-hand navigation, click the Network tab.
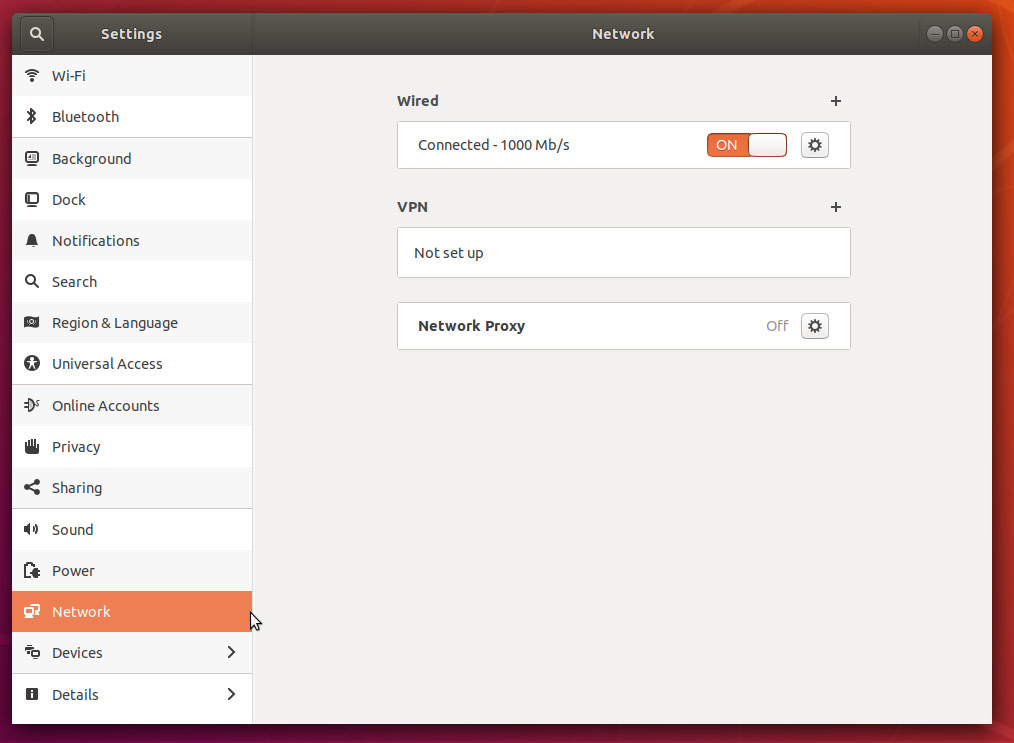 Network Settings Configuration Screen
Click the cog icon near the Network Proxy label.
Network settings proxy icon
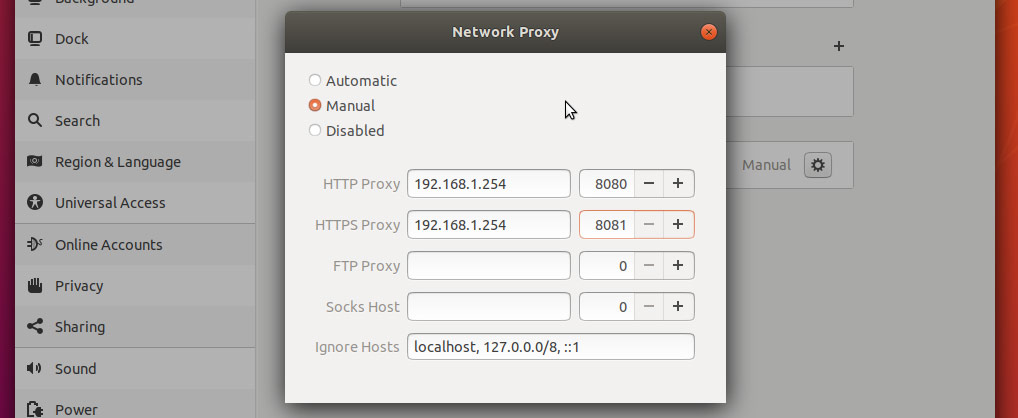 Ubuntu Proxy Settings Dialog Box
Ubuntu Terminal Proxy Settings
Like every Linux distribution, proxy settings can be set using environment variables. There are a number of variables available to use, ranging from HTTP traffic to FTP traffic.
Proxy settings can be either persistent by setting them in your profile, or non-persistent by setting them from the shell session.
| Variable | Description |
|---|---|
| http_proxy | Proxy server for HTTP Traffic. |
| https_proxy | Proxy server for HTTPS traffic |
| ftp_proxy | Proxy server for FTP traffic |
| no_proxy | Patterns for IP addresses or domain names that shouldn’t use the proxy |
The value for every proxy setting, except for no_proxy, uses the same template. They all require a hostname, but you may optionally specify a proxy server port and your user credentials if required to do so. For example:
Single User Temporary Proxy Settings
You may not always want to force Internet traffic through a proxy. Sometimes you need to override existing settings, and you can do this safely by setting the proxy environment variables from the command line.
The following will set a proxy for HTTP and HTTPS, while preventing local traffic from going through the proxy. Our example proxy server endpoint is my.proxy.server:8080 for HTTP traffic and my.proxy.server:8081 for HTTPS.
- Open a Terminal window where you need proxy access.
- Set and export the HTTP_PROXY variable.
- Set and export the HTTPS_PROXY variable.
- Set and export the NO_PROXY variable to prevent local traffic from being sent to the proxy.
Single User Persistent Proxy Settings
- Open your bash profile file into a text editor.
- Add the following lines, modifying them to match your environment.
- Save your settings.
- The proxy settings will be applied the next time you start a session, by logging into the server or opening a new Terminal window from a Desktop.
- To force apply your new proxy settings in the current Terminal session, execute the source command against your bash profile.
All Users
You will need administrative rights to perform this task. All versions of Ubuntu and Debian have a file called /etc/environment. Within this file, we can set global variables and other such things.
Similar to how you set proxy settings for your own local proxy, we’ll be adding the environment variables to this file. The variables will be set when a new user session is created, which is to say when you log in next.
- Using an administrator account, open /etc/environment into a text editor.
- Add the following lines, modifying them to fit your environment. Username and password may be omitted, if not required.
For example, if you do not need to enter a username or password, and your proxy server is my.proxyserver.net at port 8080, and you do not want local traffic going through the proxy, you would enter the following:
Источник
Использование прокси
Содержание
В этой статье содержится описание настроек прокси-соединений для различных программ.
Глобальные настройки
Для того, чтобы настроить прокси в Ubuntu откройте Системные параметры, перейдите в пункт Сеть. Выберите пункт Сетевая прокси-служба. Смените метод на Вручную и введите ваши настройки прокси. Минус такой настройки в том, что в случае, если у Вас прокси с авторизацией по логину и паролю, то указать эти данные невозможно, и прокси не будет работать.
Настроить прокси на системном уровне можно и через конфигурационные файлы (True UNIX-way). Для этого нужно открыть на редактирования с правами root файл /etc/environment (например sudo nano /etc/environment). В конец файла добавим строки:
Если прокси без авторизации, то строки должны быть вида:
Для применения настроек придется пере-загрузиться, изменения в файле /etc/environment вступили в силу при запуске процесса init — родителя всех процессов в системе и именно от него все дочерние процессы унаследуют настройки прокси в переменных окружения.
Как правила глобальной насторойки прокси достаточно для того что бы все остальные приложения работали через прокси без необходимости настраивать прокси внутри приложения. Однако некоторые приложения не умеют работать с глобальными настройками или им нужны особенные настройки.
Firefox
Firefox умеет использовать как глобальные настройки, так и свои собственные. Для того чтобы назначить ему прокси, откройте его окно настроек, перейдите на вкладку Дополнительно, далее на вкладку Сеть и нажмите на кнопку Настроить напротив надписи Настройка параметров соединения Firefox с Интернетом. Важное отличие от других программ — он умеет использовать NTLM аутентификацию (используется на Microsoft Internet Security and Acceleration Server).
Chromium-browser
Также может использовать глобальные настройки и имеет свои. Для того чтобы назначить ему прокси персонально, откройте файл /etc/chromium-browser/default и допишите следующие строки:
И перезапустите браузер
В новых версиях умеет работать с глобальными настройками, но в более старых мог работать только с персональными настройками. Сообщенные настройки: в файле /etc/apt/apt.conf нужно указать:
Если сервер без авторизации, то логин:пароль@ нужно убрать.
Само собой настройка через /etc/environment (описано выше в разделе глобальных настроек) будет работать для всех программ запущенных из терминала. Если вы хотите указать настройки персонально для запускаемой программы, то перед ее запуском нужно выполнить:
Дописываем в файл /etc/wgetrc :
Если прокси без авторизации, то proxy-user и proxy-password нужно убрать
apt-add-repository
Многие компании и университеты блокируют все неизвестные порты наружу. Обычно блокируется и порт 11371, используемый утилитой apt-add-repository для добавления репозиториев. Есть простое решение, как получать ключи репозиториев через 80-ый порт, который используется для доступа к web-страницам и чаще всего не блокируется.
Редактируем файл /usr/lib/python2.6/dist-packages/softwareproperties/ppa.py (нужны привилегии root, вместо /usr/lib/python2.6 может быть версия 2.7). Ищем фразу keyserver.ubuntu.com , заменяем
В версии 16.04 достаточно иметь настроенной переменную окружения
© 2012 Ubuntu-ru — Русскоязычное сообщество Ubuntu Linux.
© 2012 Canonical Ltd. Ubuntu и Canonical являются зарегистрированными торговыми знаками Canonical Ltd.
Источник
Как настроить прокси в Linux

Как настроить прокси в Linux
В статье показано как настроить прокси в любой версии ОС Linux.
Прокси-сервер или proxy — в переводе с англ. «представитель» — сервер как комплекс программ в компьютерных сетях, позволяющий клиентам выполнять косвенные запросы к другим сетевым службам. В рамках данного материала прокси понимается сервер выполняющий доступ к глобальной сети интернет.
Проще всего для использования прокси в командной строке, но в зависимости от типа трафика, Вы можете определить переменные окружения http_proxy, https_proxy или ftp_proxy.
Практически все утилиты командой строки, такие как curl, wget, ssh, apt-get, ftp, wget, yum и прочие, используют данные переменные.
Рассмотрим настройку переменных для использования прокси
Используйте следующий синтаксис для настройки таких типов трафика как http, https и ftp из командной строки:
$ export ftp_proxy=»http://proxy-server:port»
$ export http_proxy=»http://proxy-server:port»
$ export https_proxy=»https://proxy-server:port»
Используйте следующий синтаксис, если прокси-сервер требует аутентификацию:
$ export http_proxy=»http://user:pass@proxy-server:port»
$ export https_proxy=»https://user:pass@proxy-server:port»
$ export ftp_proxy=»http://user:pass@proxy-server:port»
Если Ваш пароль содержит спец. символы, Вы должны заменить их на ASCII коды.
Например символ собаки «@», должен быть заменен на «%40» (т. е. p@ss = p%40ss).
Тестирование работы
Используйте следующую команду для проверки текущих переменных прокси:
$ env | grep -i proxy
Можно проверить работу прокси, узнав ваш внешний IP адрес из командной строки:
Источник
How to configure system proxy settings in Red Hat Enterprise Linux
Here we will examine how to set proxy settings in RHEL 5 or 6. This will also work for centOS 5 and 6 as well as most versions of Fedora.
We will cover the following three topics:
- Setting the proxy via Gnome GUI
- Setting the proxy via command line
- Configuring YUM to use our proxy
Setting the proxy via Gnome GUI (Linux Control Panel Applet)
From your desktop click System > Preferences > Network Proxy
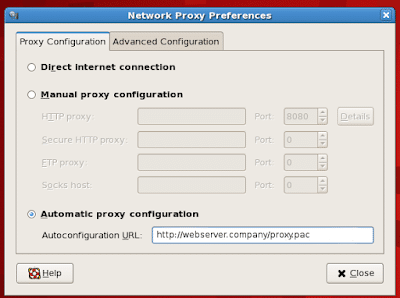
This will bring up the following dialog box.
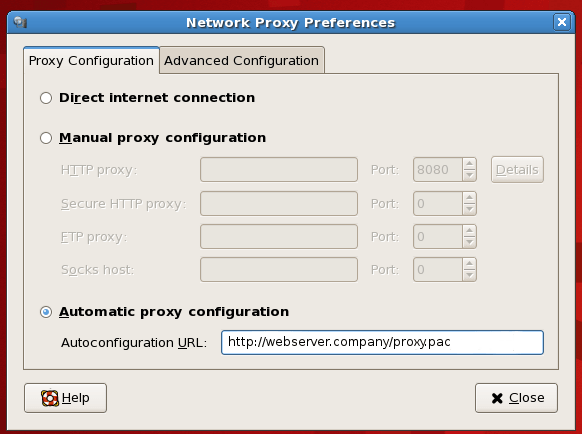 Proxy Settings Dialog Box
Most companies that run a proxy server will offer an auto configuration URL. This URL usually leads to a “proxy.pac” or “wpad.dat” on a web server. This is the preferred way of offering a proxy configuration since it allows flexibility to the system administrator to dynamically change your settings.
If you have been provided an auto configuration URL you can enter it here. If no URL has been provided check the “Manual proxy configuration” and enter the hostname and port for each protocol.
Learn more about WPAD (Web Proxy Autodiscovery Protocol) you can start with an overview at the WPAD WikiPedia Page.
Linux proxy settings differ from the way Windows handle’s proxy settings. In Windows if you set the proxy in Internet Explorer then it is a system wide setting. In Linux you will still need to tell other applications about your new proxy settings, including your browser.
Open Firefox (default web browser for RHEL) and select Preferences > Network > Connections.
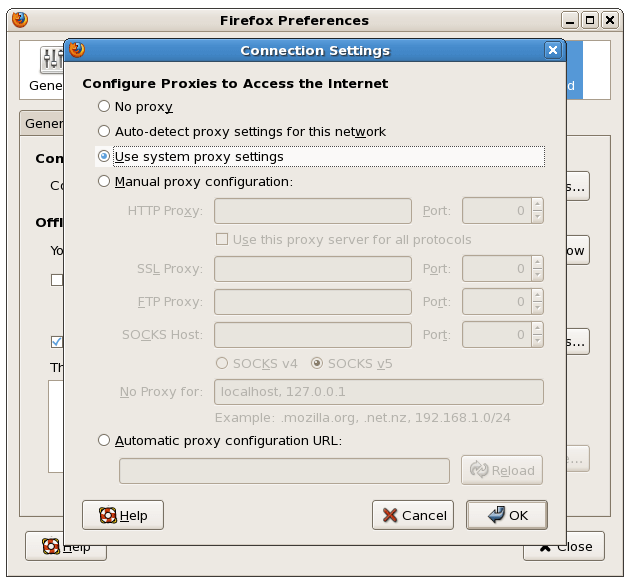 Firefox Connection Settings Dialog – Shows Proxy Configuration
Select the radio box that says “Use system proxy settings”.
Optionally you can also enter the same auto configuration URL you used above in the “Automatic Proxy Configuration URL” box in the above screen. Another option is to set the proxy manually in the browser as well.
Setting the proxy via command line
In order to use HTTP/HTTPS proxy settings via the command line you will need to set the http_proxy environmental variable. The auto configuration URL you used above will not work when setting an environmental variable.
YOU MUST USE THE DIRECT FQDN FOR THE PROXY FOLLOWED BY THE PORT NUMBER.
You can set this via the command line like so:
To confirm the variable is set correctly you can use the “echo” command:
Remember that if you set the variable via the command like described above it is only valid for the current shell. If you open a new shell, or logout the variable will be unset. To make this setting available in all future shell instances we can export the variable via the .bash_profile file.
Setting the proxy to be available in all shell instances.
NOTE: The .bash_profile file is a hidden file in your home directory. In your favorite editor open the .bash_profile file for editing.
(example: vi
/.bash_profile)
Add the following lines to the end of the file:
NOTE: This must be done for each individual user, including root.
Configuring YUM to use a proxy
To configure “yum” to use the HTTP / HTTPS proxy you will need to edit the /etc/yum.conf configuration file. Open /etc/yum.conf in your favorite editor and add the following line.
Save and close the file, then clear the cache used by yum with the following command:yum clean all
If your proxy requires authentication, you can configure yum to use proxy authentication by adding/changing the following lines in /etc/sysconfig/rhn/up2date:
Источник


