Linux terminal image viewer
timg — Terminal Image and Video Viewer
![]()
![]()
![]()
![]()
A user-friendly viewer that uses 24-Bit color capabilities and unicode character blocks to display images, animations and videos in the terminal.
On terminals that implement the Kitty Graphics Protocol or the iTerm2 Graphics Protocol this displays images in full resolution.

Displays regular images, plays animated gifs, scrolls static images and plays videos.
Useful if you want to have a quick visual check without leaving the comfort of your shell and having to start a bulky image viewer. Sometimes this is the only way if your terminal is connected remotely via ssh. And of course if you don’t need the resolution. While icons typically fit pixel-perfect, larger images are scaled down to match the resolution.
The command line accepts any number of image/video filenames that it shows in sequence one per page or in a grid in multiple columns, depending on your choice of —grid . The output is emitted in-line with minimally messing with your terminal, so you can simply go back in history using your terminals’ scroll-bar (Or redirecting the output to a file allows you to later simply cat that file to your terminal. Even less -R seems to be happy with it).
On a regular terminal, block-characters are used to output images. Half blocks present pixels color-accurately, and quarter blocks provide a higher spatial resolution at the expense of slightly worse color accuracy. These modes should be compatible with most common terminals that support UTF8 and 24Bit color.
If you are on a Kitty, iTerm2, or wezterm terminal, images can be shown in full resolution.
| -p half | -p quarter | -p kitty or -p iterm2 |
|---|---|---|
Images can be shown in a grid, which is very useful if you quickly want to sieve through a lot of images. You can choose to show the filename as title, so it is easy to find exactly the filename you’re looking for (The following grid uses —grid=2 and is pixelated with -pq ).

This is how the same grid looks with Kitty or iTerm2 Graphics mode.

: Pixelation: ‘h’ = half blocks ‘q’ = quarter blocks ‘k’ = kitty graphics ‘i’ = iTerm2 graphics Default: Auto-detect graphics, otherwise ‘quarter’. —compress : Only for -pk or -pi: Compress image data. More CPU use for timg, but less bandwidth needed. -C, —center : Center image horizontally. -W, —fit-width: Scale to fit width of available space, even if it exceeds height. —grid= [x ] : Arrange images in a grid (contact sheet). -w : Wait time between images (default: 0.0). -a : Switch off anti aliasing (default: on). -b : Background color to use behind alpha channel. Format ‘yellow’, ‘#rrggbb’, ‘auto’ or ‘none’ (default ‘auto’). -B : Checkerboard pattern color to use on alpha. —pattern-size= : Integer factor scale of the checkerboard pattern. —auto-crop[=
Partially transparent icon on champagne-colored terminal emulator
| -b auto | -b lightgreen | -b lightgreen -B yellow | -b none |
|---|---|---|---|
 |  |  |  |
| —pattern-size=1 | —pattern-size=4 |
|---|---|
|  |
Include in file browsers
There are many terminal based file-browsers. Adding timg to their configuration is usually straight forward.
Other fun things
This section contains some details that you only might need to ever look at if the output is not as expected.
Half block and quarter block rendering
The half block pixelation ( -p half ) uses the the unicode character [▄](U+2584 — ‘Lower Half Block’) or [▀](U+2580 — ‘Upper Half Block’) (depending on the TIMG_USE_UPPER_BLOCK environment variable). If the top and bottom color is the same, a simple space with background color is used.
The quarter block pixelation ( -p quarter ) uses eight different blocks.
With both of these pixelations, choosing the foreground color and background 24-bit color, timg can simulate ‘pixels’. With the half-block pixelation, this can assign the correct color to the two ‘pixels’ available in one character cell, in the quarter pixelation, four ‘pixels’ have to share two colors, so the color accuracy is slighlty worse but it allows for higher spatial resolution.
The -p command line flag allows to choose between -p half , -p quarter , also possible to just shorten to -ph and -pq . Default is -pq (see above how this looks like).
Terminals that don’t support Unicode or 24 bit color will probably not show a very pleasent output. For terminals that only do 8 bit color, use the —color8 command line option.
Some terminals support direct image output
The Kitty, iTerm2, and wezterm terminals have a special feature that allows for directly displaying high-resolution pictures. If timg is running in such a terminal, it will automatically use that mode. (You can choose Kitty mode explicitly with -pk , iTerm and wezterm mode with -pi ).
All the features with arranging images (center, grid, adding titles) or transparency settings behave exactly the same.
Note, if watching videos remotely with this is too slow (due to high bandwidth requirements or simply because your terminal has to do more work), try setting the environment variable TIMG_ALLOW_FRAME_SKIP=1 to allow timg leaving out frames to stay on track (see man timg , environment variable section).
Half block: Choice of rendering block
By default, timg uses the ‘lower half block’ to show the pixels in -p half mode. Depending on the font the terminal is using, using the upper block might look better, so it is possible to change the default with an environment variable. Play around with this value if the output looks poor on your terminal. I found that on my system there is no difference for konsole or xterm but the cool-retro-term looks better with the lower block, this is why it is the default.
In some terminals, such as alacritty (and only with certain font sizes), there seems to be the opposite working better. To change, set this environment variable:
(this only will work fully with -p half . In -p quarter mode, there are additional blocks that can’t be worked around)
What a problematic choice of block looks like
The image generally looks a bit ‘glitchy’ if the terminal leaves little space between blocks, so that the wrong background color shows on a single line between pixels. This is likely not intended by the terminal emulator and possibly happening on rounding issues of font height or similar.
Anyway, we can work around it (fully in -p half , partially in -p quarter mode). In the following illustration you see how that looks like. If you see that, change the TIMG_USE_UPPER_BLOCK environment variable.
| Glitchy. Change TIMG_USE_UPPER_BLOCK | Looks good |
|---|---|
 |  |
Some terminals leave one pixel of horizontal space between characters that result in fine vertical lines in the image. That can’t be worked around, send a bug or better pull request to your terminal emulator.
Wrong font aspect ratio
Usually, timg attempts to determine the font aspect ratio and apply some correction if it is off from the nominal 1:2. But if you notice that the image displayed is not quite the right aspect ratio because of the terminals font used, you can set an environment variable TIMG_FONT_WIDTH_CORRECT with a factor to make it look correctly.
Increasing the visual width by 10% would be setting the value to 1.1 for instance.
This is an environment variable, so that you can set it once to best fit your terminal emulator of choice and don’t have to worry about later.
| Terminal font too narrow | Correct. Here with TIMG_FONT_WIDTH_CORRECT=1.375 |
|---|---|
 |  |
Tested terminal emulators
(Needs update; these comparisons are from 2016 when I tested this last with timg, so newer terminals are probably even better).
Tested terminals: konsole >= 2.14.1, gnome-terminal > 3.6.2 look good, recent xterms also seem to work (albeit with less color richness). Like gnome-terminal, libvte based terminals in general should work, such as Xfte or termite. Also QTerminal is confirmed working.
Linux console seems to be limited in colors and does not show the block character — if you know how to enable the unicode character or full color there, please let me know.
For Mac users, at least the combination of macOS 11.2 and iTerm2 3.4.3 works.
Источник
3 CLI Image Viewers To Display Images In The Terminal
There are plenty of GUI applications available to view images in Linux. But I haven’t used any CLI applications yet which displays pictures in the Terminal itself. To my luck, I found 3 CLI image viewers to display images in Terminal itself. These applications could be useful for those who wants to use CLI alternatives for GUI apps and who live in Terminal mostly.
1. Display Images In the Terminal Using FIM
FIM stands for Fbi IMproved. For those who don’t know, Fbi is a linux framebuffer imageviewer. It uses the system’s framebuffer to display images directly from the command line. By default, it displays bmp, gif, jpeg, PhotoCD, png, ppm, tiff, and xwd from the Terminal itself. For other formats, it will try to use ImageMagick’s convert. The FIM utility draw my attention, because it is very lightweight compared to most GUI picture viewer applications.
FIM is based on Fbi and it is a highly customizable and scriptable image viewer targeted at the users who are comfortable with software like the Vim text editor or the Mutt mail user agent. It displays the images in full screen and the images can be controlled (such as resize, flip, zoom) using keyboard shortcuts. Unlike fbi, the FIM utility is universal. It can open many file formats and it can display pictures in the following video modes:
- Graphically, with the Linux framebuffer device.
- Graphically, under X/Xorg, using the SDL library.
- Graphically, under X/Xorg, using the Imlib2 library.
- Rendered as ASCII Art in any textual console, using the AAlib library.
FIM is completely free and open source.
Install FIM
The FIM image viewer is available in the default repositories of DEB-based systems such as Ubuntu, Linux Mint. So, you can install fbi using command:
If it is not available in the default repositories of your Linux distribution, you can download, compile and install from source as described in the section titled «Download and build instructions» in official documentation page.
FIM Usage
Once installed, you can display an image with «auto zoom» option using command:
Here is the sample output from my Ubuntu box.
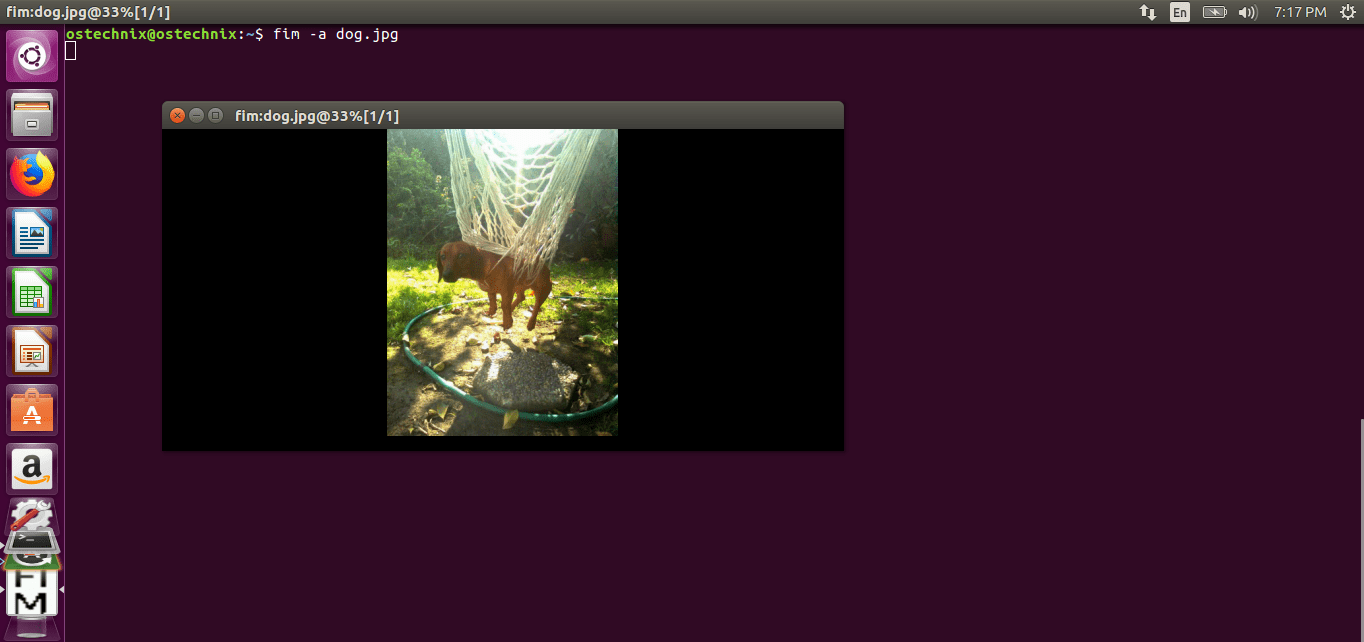
Display Images In the Terminal Using Fim
As you can see in the above screenshot, FIM didn’t use any external GUI picture viewers. Instead, it uses our system’s framebuffer to display the image.
If you have multiple .jpg files in the current directory, you could use wildcard to open all of them as shown below.
To open all images in a directory, for example Pictures, run:
We can also open the images recursively in a folder and its sub-folder and then sorting the list like below.
To render the image in ASCII format, you can use -t flag.
To quit Fim, press ESC or q.
Keyboard shortcuts
You can use various keyboard shortcuts to manage the images. For example, to load next image and previous images, press PgUp/PgDown keys. Ton Zoom in or out, use +/- keys. Here is the common keys used to control images in FIM.
- PageUp/Down : Prev/Next image
- +/- : Zoom in/out
- a : Autoscale
- w : Fit to width
- h : Fit to height
- j/k : Pan down/up
- f/m : flip/mirror
- r/R : Rotate (Clock wise and ant-clock wise)
- ESC/q : Quit
For complete details, refer man pages.
2. Display Images In the Terminal Using Viu
Viu is yet another command line application to view images from the Terminal. It is free, open source CLI image viewer written using Rust programming language. Using Viu we can;
- Display popular type of image, including .jpg, .png, igif etc.
- Display images in custom dimensions.
- Display images directly from the image hosting platforms, for example giphy.
Install Viu
Since Viu is written in Rust, we can install it using Cargo package manager. After installing Rust in your Linux box, run the following command to install Viu.
On Arch Linux and its derivatives, It can be installed from AUR using any AUR helper programs like Yay.
Viu is also available as per-compiled binary. Download the latest binary from the releases page. As of writing this, the latest version was 0.2.1.
After downloading the Viu binary file, make it executable:
And, move it to your path, for example /usr/local/bin.
Viu usage
Viu usage is trivial. Just type viu followed by the image path and hit ENTER key.
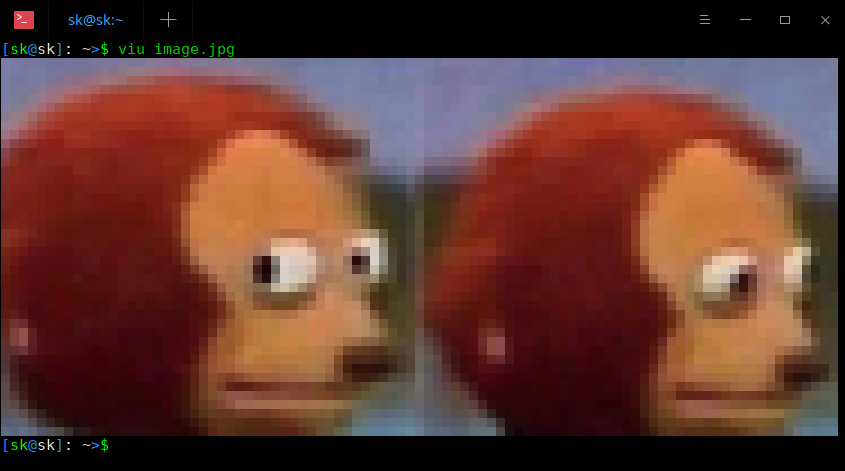
Display Images In the Terminal Using Viu
You can even display custom dimension image using -h (Height) or -w (Width) flags like below.
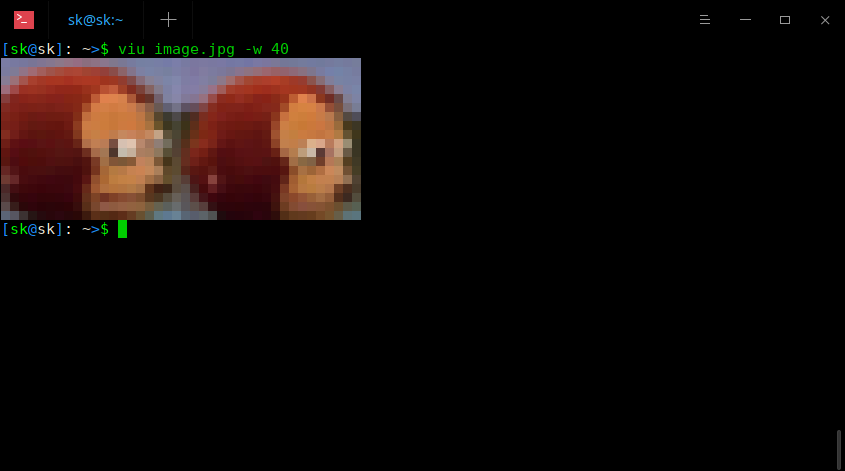
Display custom size image using Viu
To display multiple images one after another in a folder, use wildcard characters like below.
Like I already mentioned, Viu is capable of displaying different format images. For example, the following command will display the gif image using Viu:
Display animated images
To exit, just press CTRL+C.
It is also possible to display the image hosting sites, for example Giphy, in Terminal like below.
For more details about Viu, refer the help section by typing the command:
3. Display Images In the Terminal Using Lsix
Unlike the previous two image viewers, Lsix will only display thumbnails in Terminal. It is like ‘ls’ command in Unix-like systems, but for images only. Lsix is a simple BASH script to view thumbnail images in Terminal using Sixel graphics. For more details about this script, please click the following link.
And, that’s all for now. If you use/know any other CLI image viewers, please mention them in the comment section below. I will check and update the guide.
Источник


