- Команда find в Linux – мощный инструмент сисадмина
- Поиск по имени
- Поиск по типу файла
- Поиск по размеру файла
- Единицы измерения файлов:
- Поиск пустых файлов и каталогов
- Поиск времени изменения
- Поиск по времени доступа
- Поиск по имени пользователя
- Поиск по набору разрешений
- Операторы
- Действия
- -delete
- Заключение
- How to Search for Files from the Linux Command Line
- How to use the find command
- Find by name
- Find by type
- Outputting results to a file
- Finding files by size
- Keep learning
- How to find files on the Ubuntu command line
- Method 1: Using Find command
- Search files in a specific directory
- Search files in the current directory
- Search using a wildcard
- Search for empty files
- Search based on date and time
- Search based on file size
- Search based on file permissions
- Method 2: Using Locate command
- Installing Locate
- Searching for a file
- Search for Multiple files
- Search using Wildcard
- Update locate database
- Method 3: Using Grep command
- Search for Multiple words
- Karim Buzdar
Команда find в Linux – мощный инструмент сисадмина
Иногда критически важно быстро найти нужный файл или информацию в системе. Порой можно ограничиться стандартами функциями поиска, которыми сейчас обладает любой файловый менеджер, но с возможностями терминала им не сравниться.
Команда find – это невероятно мощный инструмент, позволяющий искать файлы не только по названию, но и по:
- Дате добавления.
- Содержимому.
- Регулярным выражениям.
Данная команда будет очень полезна системным администраторам для:
- Управления дисковым пространством.
- Бэкапа.
- Различных операций с файлами.
Команда find в Linux производит поиск файлов и папок на основе заданных вами критериев и позволяет выполнять действия с результатами поиска.
Синтаксис команды find:
- directory-to-search (каталог поиска) – это отправной каталог, с которой find начинает поиск файлов по всем подкаталогам, которые находятся внутри. Если не указать путь, тогда поиск начнется в текущем каталоге;
- criteria (критерий) – критерий, по которым нужно искать файлы;
- action (действие) – что делать с каждым найденным файлом, соответствующим критериям.
Поиск по имени
Следующая команда ищет файл s.txt в текущем каталоге:
- . (точка) – файл относится к нынешнему каталогу
- -name – критерии по которым осуществляется поиск. В данном случае поиск по названию файла.
В данном случае критерий -name учитывает только символы нижнего регистра и файл S.txt не появиться в результатах поиска. Чтобы убрать чувствительность к регистру необходимо использовать –iname.
Для поиска всех изображений c расширением .png нужно использовать шаблон подстановки *.png:
Можно использовать название каталога для поиска. Например, чтобы с помощью команды find найти все png изображения в каталоге home:
Если выдает слишком много ошибок в отказе разрешения, тогда можно добавить в конец команды – 2> /dev/null. Таким образом сообщения об ошибках будут перенаправляться по пути dev/null, что обеспечит более чистую выдачу.
Поиск по типу файла
Критерий -type позволяет искать файлы по типу, которые бывают следующих видов:
- f – простые файлы;
- d – каталоги;
- l – символические ссылки;
- b – блочные устройства (dev);
- c – символьные устройства (dev);
- p – именованные каналы;
- s – сокеты;
Например, указав критерий -type d будут перечислены только каталоги:
Поиск по размеру файла
Допустим, что вам необходимо найти все большие файлы. Для таких ситуаций подойдет критерий -size.
- «+» — Поиск файлов больше заданного размера
- «-» — Поиск файлов меньше заданного размера
- Отсутствие знака означает, что размер файлов в поиске должен полностью совпадать.
В данном случае поиск выведет все файлы более 1 Гб (+1G).
Единицы измерения файлов:
Поиск пустых файлов и каталогов
Критерий -empty позволяет найти пустые файлы и каталоги.
Поиск времени изменения
Критерий -cmin позволяет искать файлы и каталоги по времени изменения. Для поиска всех файлов, измененных за последний час (менее 60 мин), нужно использовать -60:
Таким образом можно найти все файлы в текущем каталоге, которые были созданы или изменены в течение часа (менее 60 минут).
Для поиска файлов, которые наоборот были изменены в любое время кроме последнего часа необходимо использовать +60.
Поиск по времени доступа
Критерий -atime позволяет искать файлы по времени последнего доступа.
Таким образом можно найти файлы, к которым не обращались последние полгода (180 дней).
Поиск по имени пользователя
Опция –user username дает возможность поиска всех файлов и каталогов, принадлежащих конкретному пользователю:
Таким образом можно найти все файлы пользователя tisha в каталоге home, а 2>/dev/null сделает выдачу чистой без ошибок в отказе доступа.
Поиск по набору разрешений
Критерий -perm – ищет файлы по определенному набору разрешений.
Поиск файлов с разрешениями 777.
Операторы
Для объединения нескольких критериев в одну команду поиска можно применять операторы:
Например, чтобы найти файлы размером более 1 Гбайта пользователя tisha необходимо ввести следующую команду:
Если файлы могут принадлежать не только пользователю tisha, но и пользователю pokeristo, а также быть размером более 1 Гбайта.
Перед скобками нужно поставить обратный слеш «\».
Действия
К команде find можно добавить действия, которые будут произведены с результатами поиска.
- -delete — Удаляет соответствующие результатам поиска файлы
- -ls — Вывод более подробных результатов поиска с:
- Размерами файлов.
- Количеством inode.
- -print Стоит по умолчанию, если не указать другое действие. Показывает полный путь к найденным файлам.
- -exec Выполняет указанную команду в каждой строке результатов поиска.
-delete
Полезен, когда необходимо найти и удалить все пустые файлы, например:
Перед удалением лучше лишний раз себя подстраховать. Для этого можно запустить команду с действием по умолчанию -print.
Данное действие является особенным и позволяет выполнить команду по вашему усмотрению в результатах поиска.
- command – это команда, которую вы желаете выполнить для результатов поиска. Например:
- rm
- mv
- cp
- <> – является результатами поиска.
- \; — Команда заканчивается точкой с запятой после обратного слеша.
С помощью –exec можно написать альтернативу команде –delete и применить ее к результатам поиска:
Другой пример использования действия -exec:
Таким образом можно скопировать все .jpg изображения в каталог backups/fotos
Заключение
Команду find можно использовать для поиска:
- Файлов по имени.
- Дате последнего доступа.
- Дате последнего изменения.
- Имени пользователя (владельца файла).
- Имени группы.
- Размеру.
- Разрешению.
- Другим критериям.
С полученными результатами можно сразу выполнять различные действия, такие как:
- Удаление.
- Копирование.
- Перемещение в другой каталог.
Команда find может сильно облегчить жизнь системному администратору, а лучший способ овладеть ей – больше практиковаться.
Источник
How to Search for Files from the Linux Command Line
Learn how to use the find command in this tutorial from our archives.
It goes without saying that every good Linux desktop environment offers the ability to search your file system for files and folders. If your default desktop doesn’t — because this is Linux — you can always install an app to make searching your directory hierarchy a breeze.
But what about the command line? If you happen to frequently work in the command line or you administer GUI-less Linux servers, where do you turn when you need to locate a file? Fortunately, Linux has exactly what you need to locate the files in question, built right into the system.
The command in question is find . To make the understanding of this command even more enticing, once you know it, you can start working it into your Bash scripts. That’s not only convenience, that’s power.
Let’s get up to speed with the find command so you can take control of locating files on your Linux servers and desktops, without the need of a GUI.
How to use the find command
When I first glimpsed Linux, back in 1997, I didn’t quite understand how the find command worked; therefore, it never seemed to function as I expected. It seemed simple; issue the command find FILENAME (where FILENAME is the name of the file) and the command was supposed to locate the file and report back. Little did I know there was more to the command than that. Much more.
If you issue the command man find , you’ll see the syntax of the find command is:
Naturally, if you’re unfamiliar with how man works, you might be confused about or overwhelmed by that syntax. For ease of understanding, let’s simplify that. The most basic syntax of a basic find command would look like this:
Now we’ll see it at work.
Find by name
Let’s break down that basic command to make it as clear as possible. The most simplistic structure of the find command should include a path for the file, an option, and the filename itself. You may be thinking, “If I know the path to the file, I’d already know where to find it!”. Well, the path for the file could be the root of your drive; so / would be a legitimate path. Entering that as your path would take find longer to process — because it has to start from scratch — but if you have no idea where the file is, you can start from there. In the name of efficiency, it is always best to have at least an idea where to start searching.
The next bit of the command is the option. As with most Linux commands, you have a number of available options. However, we are starting from the beginning, so let’s make it easy. Because we are attempting to find a file by name, we’ll use one of two options:
name – case sensitive
iname – case insensitive
Remember, Linux is very particular about case, so if you’re looking for a file named Linux.odt, the following command will return no results.
If, however, you were to alter the command by using the -iname option, the find command would locate your file, regardless of case. So the new command looks like:
Find by type
What if you’re not so concerned with locating a file by name but would rather locate all files of a certain type? Some of the more common file descriptors are:
f – regular file
l – symbolic link
c – character devices
b – block devices
Now, suppose you want to locate all block devices (a file that refers to a device) on your system. With the help of the -type option, we can do that like so:
The above command would result in quite a lot of output (much of it indicating permission denied ), but would include output similar to:
Voilà! Block devices.
We can use the same option to help us look for configuration files. Say, for instance, you want to locate all regular files that end in the .conf extension. This command would look something like:
The above command would traverse the entire directory structure to locate all regular files ending in .conf. If you know most of your configuration files are housed in /etc , you could specify that like so:
The above command would list all of your .conf files from /etc ( Figure 1 ).
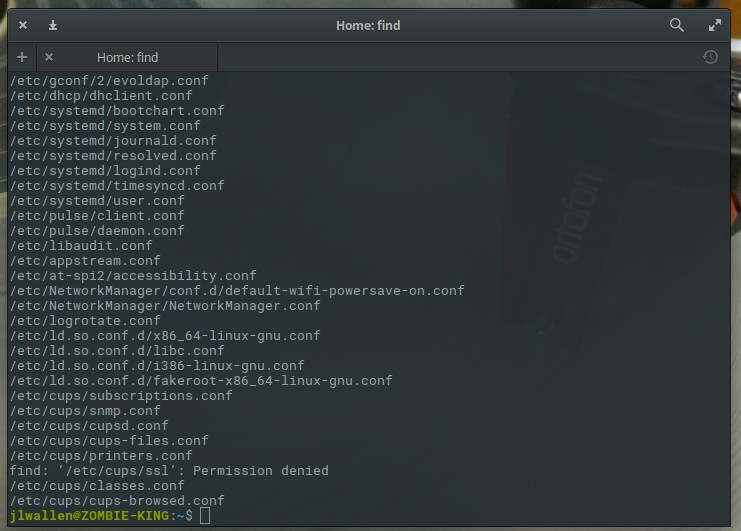 Figure 1: Locating all of your configuration files in /etc.
Outputting results to a file
One really handy trick is to output the results of the search into a file. When you know the output might be extensive, or if you want to comb through the results later, this can be incredibly helpful. For this, we’ll use the same example as above and pipe the results into a file called conf_search. This new command would look like:
You will now have a file ( conf_search ) that contains all of the results from the find command issued.
Finding files by size
Now we get to a moment where the find command becomes incredibly helpful. I’ve had instances where desktops or servers have found their drives mysteriously filled. To quickly make space (or help locate the problem), you can use the find command to locate files of a certain size. Say, for instance, you want to go large and locate files that are over 1000MB. The find command can be issued, with the help of the -size option, like so:
You might be surprised at how many files turn up. With the output from the command, you can comb through the directory structure and free up space or troubleshoot to find out what is mysteriously filling up your drive.
You can search with the following size descriptions:
b – 512-byte blocks
Keep learning
We’ve only scratched the surface of the find command, but you now have a fundamental understanding of how to locate files on your Linux systems. Make sure to issue the command man find to get a deeper, more complete, knowledge of how to make this powerful tool work for you.
Learn more about Linux through the free “Introduction to Linux” course from The Linux Foundation and edX.
Источник
How to find files on the Ubuntu command line
One typical issue when working with computers is that you can’t find the files you’ve saved somewhere. Many GUI programs allow you to search for files while working under Linux, independent of distribution. However, in some situations, you will only have access to the command line terminal, particularly if you manage servers or use SSH to access the system. If you can’t find your files, you must use command-line programs on Linux to look for them.
This tutorial will show you how to use the Terminal, which is the command-line program in Ubuntu OS, to find files. On the shell, there are three well-known ways for searching for files:
- Find files using Find command
- Using Locate command to find files
- Using Grep command to search in files
Find and Locate commands are used to search for the files in the system while grep is used to search file based in the text that it contains. Find is a slower method but contains several search conditions while Locate does not include as many conditions but is much faster than the Find.
Let us get started with the procedure. We will use Ubuntu 20.04 LTS for describing the procedure mentioned in this article.
Method 1: Using Find command
Find is a highly flexible command used to search files based on a variety of conditions. It is a very helpful tool when searching a file for which you do not remember the name of the file. Using the Find command you can search based on file and folder name, creation date, modification date, and permissions. You can combine these multiple conditions in a one Find command. It is a very powerful but slower search tool.
The general syntax of the command is:

Search files in a specific directory
You can use the Find command to search for all files in a specific directory. The general syntax would be:
For instance, to find all the files under the /home/tin/Downloads/ directory, launch the Terminal by pressing Ctrl+Alt+T and then run the following command in Terminal:

Search files in the current directory
To search for files in a current directory, use

To search for a file named e.g “softwares” under current directory, use the following command in Terminal:

Search using a wildcard
You can also use the wildcard characters to find the files that match the query. The general syntax would be:
For instance to search files that start with the word “cent”, run the following command in Terminal:

Search for empty files
You can also search for empty files using the Find command. The general syntax would be:
For instance to find empty files under the /home/tin directory, run the following command in Terminal:

Search based on date and time
Using Find command, you can also search for files depending upon when they were access or modified. There are types of time you can use to search files:
- mtime (Modification time): when the file’s content was modified last time.
- atime (Access time): when the file was accessed last time.
- ctime (Change time): when the file attributes were modified last time.
For instance, to search for files in a current directory that were modified less than 2 days ago, run the following command in Terminal:

To search for files that were accessed less than 2 days ago, run the following command in Terminal:

To search for files that were changed less than 2 days ago, run the following command in Terminal:

Search based on file size
For instance, to search file whose size is larger than 5MB size, we can use the following command in Terminal:

Search based on file permissions
It is used to find files with specific permission. The general syntax would be:
Type parameter includes d or f value that are used for specifying type of the file. d for directories and f for files only.
mode can be either with numeric permission (e.g 777, 655.. etc) or symbolic permission (e.g u=x, a=r+x).
For instance, to search for a file with the permission of 644, we can use the following command in Terminal:

Method 2: Using Locate command
There is another command Locate that can be used to search files in Linux. It does not have as many search conditions as the Find utility offers but it is much better and faster than the Find utility. The reason behind is the background process that actually runs in your system and searches and stores new files in its own database. Unlike Find command, it does not search your local hard disk for files and directories but instead, it searches them in its own database. Its database should be regularly updated for the search utility to work.
Installing Locate
Locate is not installed by default in the Linux OS. You will need to manually install it. Press Ctrl+Alt+T to launch the Terminal and then type the following command as sudo to install the Locate utility:

Once the installation is completed, you can use the Locate utility right away.
The general syntax of the command is:
Where -i is used to ignore case distinctions.
Searching for a file
For instance, to search for a filename “centos”, use the following command in Terminal:

It will search for all the files that include the string “centos” in their filenames.
Search for Multiple files
You can also search for multiple file names simultaneously. For instance, use the following command in Terminal to search for two files “sdn.txt” and “centos”:

Search using Wildcard
You can also use the wildcard character to find the files that match the query. For instance to search for all the files that ends in “.iso”, use the following command in Terminal:

Update locate database
Locate command relies on its database to work, so it needs to be updated regularly. Run the following command in Terminal to update the Locate utility database:

Method 3: Using Grep command
Although Grep is not for directly searching files in your system, instead it is used to search text. However, you can use it to display the names of files that contain the particular string of characters that matches your search query. To search for a string, you must enclose it in double quotes.
The general Syntax of the command is:
$ grep [options] [pattern] [/path/to/file]
where [options] parameter contains generic options to control the search and [pattern] contains string that we want to search.
If you are looking for a file that contains a word, which you suspect might be in your any specific directory, you can search for it using the above command syntax in Terminal.
For instance, to search for a file that contains the word “tintin” and we think that file might be in our Downloads folder, we can use the following command to locate that file.

-i is used to ignore case distinctions
–r is used to search for the specified directory recursively
Search for Multiple words
You can also search for multiple strings simultaneously. You have to use backslash “\” and pipe sign “|” characters among your strings.
For instance to search for two strings “tintin” and “ping”, we can use the following command in Terminal:

So, that was the brief overview of how you can search for files using the command line in Ubuntu. In this article, we have seen three useful command line methods to search for files. You can choose any one of these methods depending upon the search speed and conditions.
Karim Buzdar
About the Author: Karim Buzdar holds a degree in telecommunication engineering and holds several sysadmin certifications. As an IT engineer and technical author, he writes for various web sites. You can reach Karim on LinkedIn
Источник


