- Boot Ubuntu Linux into Rescue mode to fix system
- Few things to remember….
- grub rescue – что делать?
- Содержание
- grub rescue – что делать?
- Восстановление ubuntu с флешки
- Видео
- Navigating the Rescue Mode for Linux
- Logging into rescue mode
- Identifying your disk partitions
- Detecting physical disk problems
- RAID Instructions
- Detecting and fixing file system errors
- RAID Instructions
- Access and recover data
- Chroot
- Recovering your data
- Unmount
Boot Ubuntu Linux into Rescue mode to fix system
Q. How do I boot my Ubuntu Linux server into Rescue mode to fix system?
A. You can boot Ubuntu Linux into rescue mode when things go wrong, there are several ways to work on fixing them. However, you must understand your system and what to fix in case of emergency.
Use this mode only if your system is unbootable. It is also recommended that you make backup of important data.
=> Start Computer / reboot computer
=> Put your Ubuntu install CD
=> Make sure BIOS is set to boot from CD
=> Now booting will start from Ubuntu install CD
=> You will see various option screen – select Recover a broken system
You will system is booting in to rescue mode; system will ask about Network and other information. This is required to setup rescue environment.
- No ads and tracking
- In-depth guides for developers and sysadmins at Opensourceflare✨
- Join my Patreon to support independent content creators and start reading latest guides:
- How to set up Redis sentinel cluster on Ubuntu or Debian Linux
- How To Set Up SSH Keys With YubiKey as two-factor authentication (U2F/FIDO2)
- How to set up Mariadb Galera cluster on Ubuntu or Debian Linux
- A podman tutorial for beginners – part I (run Linux containers without Docker and in daemonless mode)
- How to protect Linux against rogue USB devices using USBGuard
Join Patreon ➔
Now you will prompted to select root partition or device.
Next it will try to mount root device and it will notify the same.
Now you will see common rescue mode option such as Reinstall GRUB or open / execute a shell etc.
Now you are in rescue mode and you need to use your own knowledge to rescue the system. When things go wrong, there are several ways to work on fixing them.
Few things to remember….
The rescue-mode CD mounts your root filesystem at /target directory. Open or execute a shell and change directory to /target
# ls /target
# cd /target
# mount
If you need to run fsck command use fdisk -l command to find out partition name. Usually they are located at /dev/discs/discX/partY. For example repair 2nd partition (not mounted as /target) you may type command:
# ls -l /dev/discs/disc0
# fsck.ext3 /dev/discs/disc0/part1
To exit type command :
# sync ;sync
# exit
# reboot
As I said earlier in rescue mode, there is no single command that I can recommend to fix problem. You need to use your own knowledge to rescue the system and don’t forget to read command documentation before using any command.
🐧 Get the latest tutorials on Linux, Open Source & DevOps via
Источник
grub rescue – что делать?

Содержание
В случае возникновения проблем с загрузчиком появляется надпись grub rescue. Чаще всего проблема появляется, когда на компьютере установлено сразу две операционные системы: Linux и Windows. Обычно установка производится в такой последовательности.
Сначала на жёсткий диск устанавливается Windows после чего на отдельный раздел производится установка Linux. При такой схеме в загрузочную область диска добавится загрузчик grub2 что позволяет выбирать в какую из систем производить запуск.
Но бывает так, что в таком состоянии компьютер работает длительное время. У Windows как известно разрастается реестр, и система начинает работать медленно. Тут вы приняли решение переустановить Винду, а заодно затёрли загрузчик Linux. Загрузочная область оказывается повреждена и при старте системы появляется сообщение на чёрном экране: grub rescue unknown filesystem .

Ещё вы могли что-нибудь нахимичить с файлом конфигурации grub.cfg в директории /boot/grub/ . Его вообще не рекомендуется править редакторами поскольку в будущем он всё равно окажется перезаписан автоматически. Вместо этого сконфигурируйте файл /etc/default/grub и выполните команду: sudo grub-update
grub rescue – что делать?
Итак, мы находимся консоли загрузчика. Она имеет небольшой командный интерпретатор наподобие bash. Список всех доступных команд можно получить, набрав:

Введите команду для просмотра существующих разделов:

В данном примере всего один раздел msdos1 на жёстком диске hd0.
Убедимся, что это нужный раздел. Для этого выводим список файлов загрузчика:
Находим файл grub.cfg значит всё в порядке, продолжаем. Если каталог не обнаружен, то перебираем остальные разделы дисков пока не найдём.

Следующая команда создаёт префикс для каталога загрузчика:
Установим раздел в качестве корневого:
Затем необходимо подключить ещё пару модулей и стартовать загрузку системы:

После успешной загрузки в Linux не забудьте переустановить загрузчик командой:
(вместо «_» введите букву загрузочного жёсткого диска).
Далее выполните команду обновления конфигурации файла grub.cfg:
Обычно grub2 автоматически определяет установленные системы, в том числе Windows, и добавляет их в список загрузки.
Восстановление ubuntu с флешки
Если все проделанные выше действия не помогли, то придётся раздобыть загрузочную флешку.
Лучше подготовить USB или CD носитель с Ubuntu той же версии и разрядности что и восстанавливаемая система. Я покажу на примере системы Ubuntu 18.04 LTS x64. Загрузитесь в Live режиме и откройте терминал комбинацией Ctrl+Alt+T.
Для удобства сразу активируйте права суперпользователя root. Знак минус в конце команды означает перемещение в домашний каталог:

Теперь нужно посмотреть список дисков и разделов программой fdisk:

Обнаруживаем раздел с установленной системой Linux. В этом примере раздел /dev/sda1 единственный, он же корневой и загрузочный.
Выбирайте раздел аккуратно, буква диска может отличаться от моих примеров. Не потеряйте свои данные!
Смонтируем его в каталог /mnt/ :
Убедитесь, что каталог /boot/ находится на этом же разделе диска выполнив команду:
В случае отсутствия каталога, монтируйте его отдельно. Для этого нужно найти раздел в результате вывода утилиты fdisk (на скриншоте выше) и смонтировать командой:
X = номер вашего раздела с файлами каталога /boot/ .
Сейчас необходимо произвести логин в ту систему, которую будем чинить. Но перед этим смонтируем из Live системы несколько служебных разделов:
Двойной амперсанд && между командами означает проверку выполнения предыдущей команды. Выполнение последующей команды происходит только при условии, что предыдущая завершена успешно.
Переходим в окружение chroot , то есть заходим под пользователем root в систему, установленную на жёстком диске:
Всё, мы в системе. Можно устанавливать загрузчик и обновлять его конфигурацию. Будьте внимательны, используется именно корневой раздел диска /dev/sda без цифры:
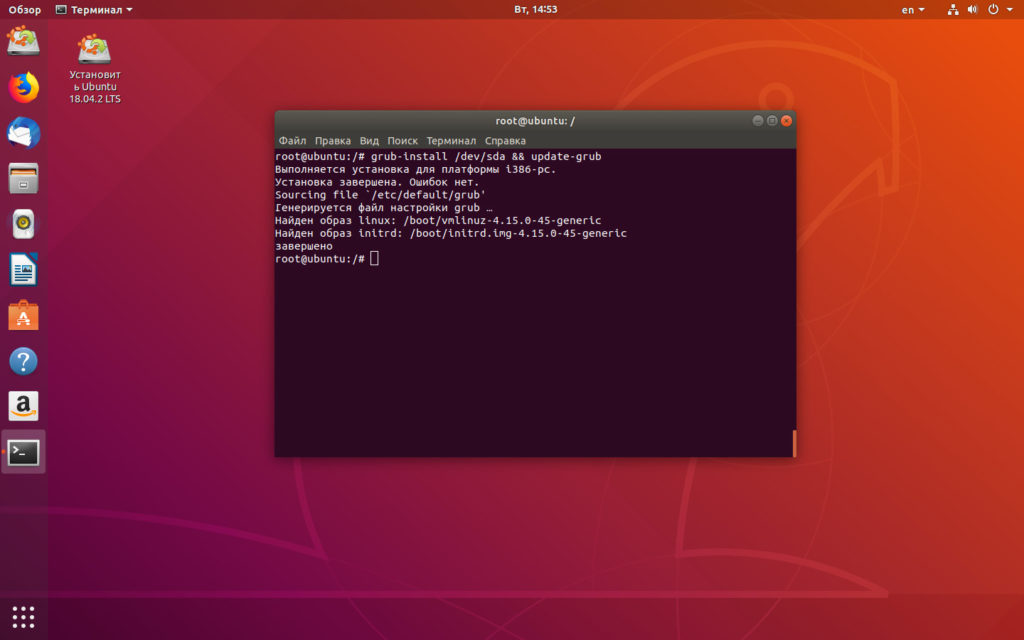
Посмотрите, чтобы не было ошибок в результате выполнения команд. Далее набираем один раз exit , или комбинацию Ctrl+D и выходим в консоль Live системы.
На всякий случай размонтируем корректно разделы и перезагружаемся:
Процедура восстановления загрузчика grub2 на этом завершена.
Видео
Источник
Navigating the Rescue Mode for Linux
This document will take you through the process of booting your Linux server into rescue mode to identify and fix the problem(s) that may be causing it to be unresponsive.
This guide will instruct you on how to:
Logging into rescue mode
If your Linux dedicated server is unresponsive and fails to come online after a reboot, you can boot the server into rescue mode from the Simply Cloud control panel to identify and fix the problem.
- Once rescue mode has been started on your dedicated server, log into the system via SSH using your servers usual IP address and the root password that was set when the system was first installed (you can find this in your Simply Cloud control panel). You can also access the server in graphical mode using VNC if you have a VNC client installed.
Please be aware that the rescue mode system will have a different SSH host key to your normal server. If you are using PuTTY you will see a warning like Screen 1: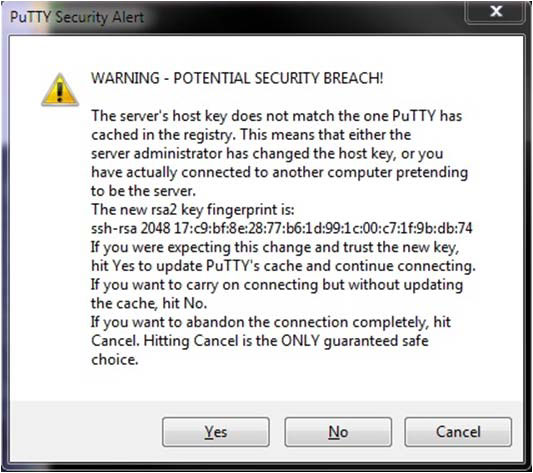
(Screen 1)
Accept the warning by clicking the ‘Yes’ button and logging in. If you are using SSH from a Linux or Mac shell, you may need to remove the old version of the SSH key from your known hosts file before logging in. Once you have finished with rescue mode and booted your server normally, it will return to using its usual SSH host key and you will see a similar warning again.
You should see a window similar to Screen 2 once you are logged in: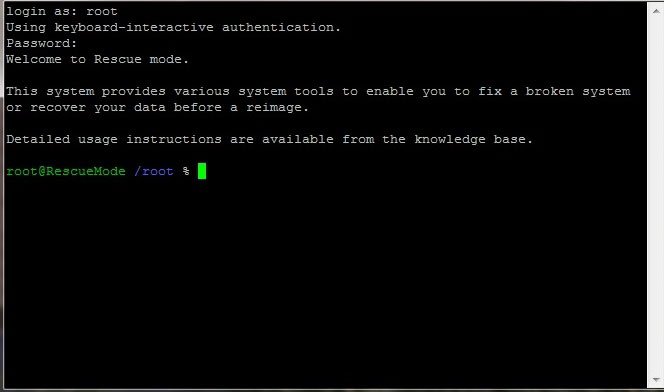
(Screen 2)
Identifying your disk partitions
- Identify your disk partitions before recovering your system. Get a list of all of the disks connected to the system and their partitions by running the command ‘fdisk –l’ as noted in Screen 3:

(Screen 3) - The exact output from this will vary depending on the number of disk in your server, the number of partitions on each disk, and whether or not your system uses software RAID. Screen 3 shows one disk (/dev/sda) that contains four partitions (numbered 1, 2, 5 and 6). The first partition (/dev/sda1) is marked as bootable, so this would be the partition mounted under /boot.
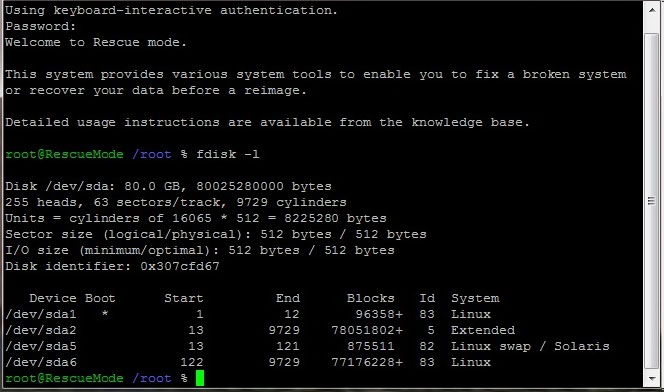
The second partition (/dev/sda2) is an extended partition and is only used as a container for the other two partitions. It is not mountable. The third partition (/dev/sda5) is the swap space, and the fourth partition (/dev/sda6) is the root partition, normally mounted as /. If your server has two disks the output will look something like Screen 4: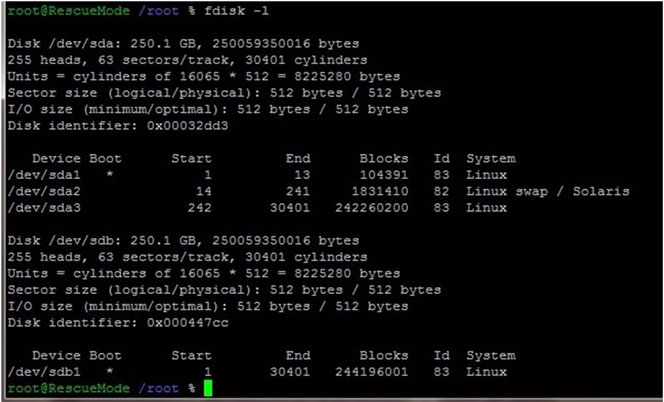
(Screen 4)
If your system uses software RAID, it will look something like Screen 5: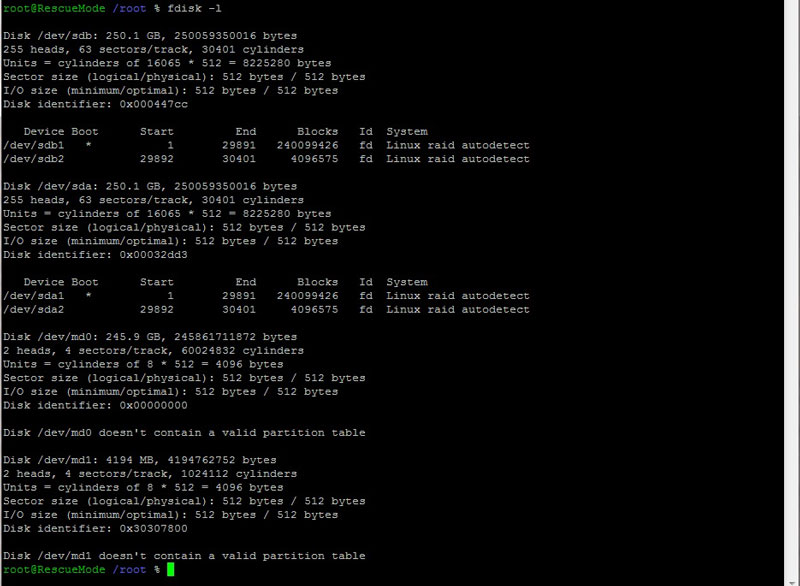
(Screen 5)
If your system uses software RAID, there are additional steps you will need to take before attempting to fix disk issues or access your data. Please refer to the separate software RAID instructions in the following sections.
If no disks are displayed (or an incorrect number of disks are displayed) then the disk(s) may have already suffered a catastrophic failure. In such an event, you will need to ask Simply Cloud Support to arrange for a replacement disk / server and then restore any backups.
Detecting physical disk problems
- Your disk(s) may have physical errors that cannot be corrected and would require a disk replacement. You can use the smartctl program to test the disk to see if this is the case. First, check that the disk has its SMART capability enabled with the command ‘smartctl –i /dev/diskname’, swapping diskname for the correct device as shown in Screen 6.
This command should be successful as all Simply Cloud disks have SMART enabled. If this command does not successfully return the disk(s), a catastrophic failure may have occurred and the disk(s) will need to be replaced.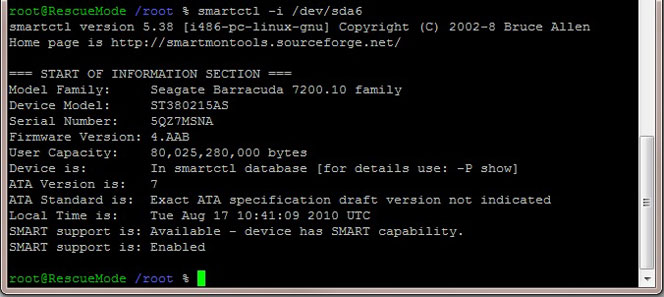
(Screen 6)

(Screen 7)

(Screen 8)
RAID Instructions
There are no separate instructions required for this section.
Detecting and fixing file system errors
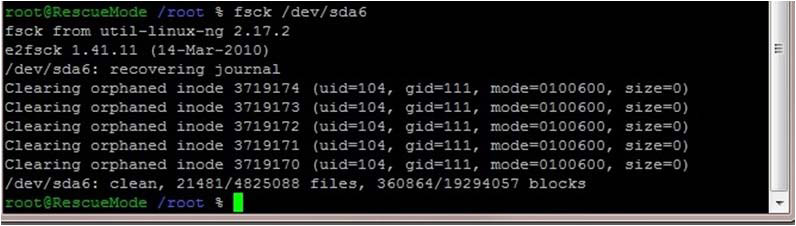
- Your server may fail to boot if there are errors with the file system. You can identify and correct these errors using the fsck tool. For example, if you have seen errors in the systems logs indicating partition problems on the root disk (/dev/sda6 as shown in Screen 9), you can try to correct this by running the command ‘fsck /dev/sda6’. This must be done before the disk has been mounted.
(Screen 9) - In Screen 9, there are a few minor errors that fsck has fixed. For more severe errors, fsck may ask if you would like to fix them through a prompt. To avoid being prompted and simply accept the default options, run the fsck command with the –a flag. Further details are available from the fsck manual (type ‘man fsck’).
- If you fix any disk errors, exit rescue mode and attempt to boot the system normally. If the system still fails to boot, or can’t fix the disk errors, you may need to recover any data that you did not back up (see the section on recovering data).
RAID Instructions
Perform fsck on the RAID device rather than on the member partitions to check the file system on both disks simultaneously. The RAID device will likely be either /dev/md0 or /dev/md1, whichever is the largest (the smaller RAID device will be swap space). In Screen 10, minor errors have been corrected.

(Screen 8)
Access and recover data
- If your disks did not show any errors, or you know your system did not boot due to disk related reasons (e.g., incorrectly enabled firewall, incorrectly modified grub, etc.) you will need to access your disk(s) to either correct the problem or recover the data before reimaging. To do this, the disk(s) needs to be mounted.
- From earlier steps, you should have already established the root partition. In our one disk example shown in Screen 11, it is /dev/sda6 and in our RAID example sin Screen 12 it is /dev/md0. For servers with multiple disks, you may want to access the partition on the second disk, although problems that prevent a server booting will normally be on the partition mounted at /.
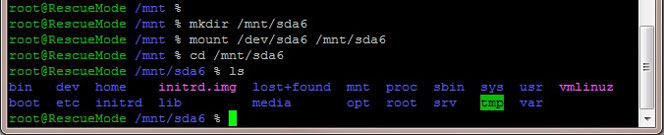
- To access the data on the root partition, create a mount point for the partition. For our one disk system, it will be created at /mnt/sda6. We then mount the disk on this mount point, and cd into the directory to view our system as shown below in Screen 11:
(Screen 8)
Chroot
- Use the chroot command to change the root of the rescue system to the root on the disk. This is needed if you wanted to use the ‘passwd’ program to reset one of your system passwords.

(Screen 12)
Then use ‘chroot mountpoint’ to change the root to the partition you have mounted. In Screen 13 we used ‘chroot /mnt/sda6’ or ‘chroot /mnt/md0’. You may see an error such as:
chroot: failed to run command `/bin/zsh’: No such file or directory
This indicates that the zsh shell used by the rescue system is not available to run (i.e., it is not installed) on your dedicated server. In this case, modify the command to run the bash shell:
‘chroot mountpoint bash’

(Screen 13)
Recovering your data
- If you are unable to fix your server, you will need to copy any data that is not backed up before requesting a reimage from the Simply Cloud control panel. If you have access to another server that runs FTP or SSH, use the command line FTP or SCP tools to upload your data to that server. Otherwise, you can connect an SCP client (such as WinSCP for Windows) to the rescue mode server, navigate to the point where you mounted the disk and download the data to your local system.
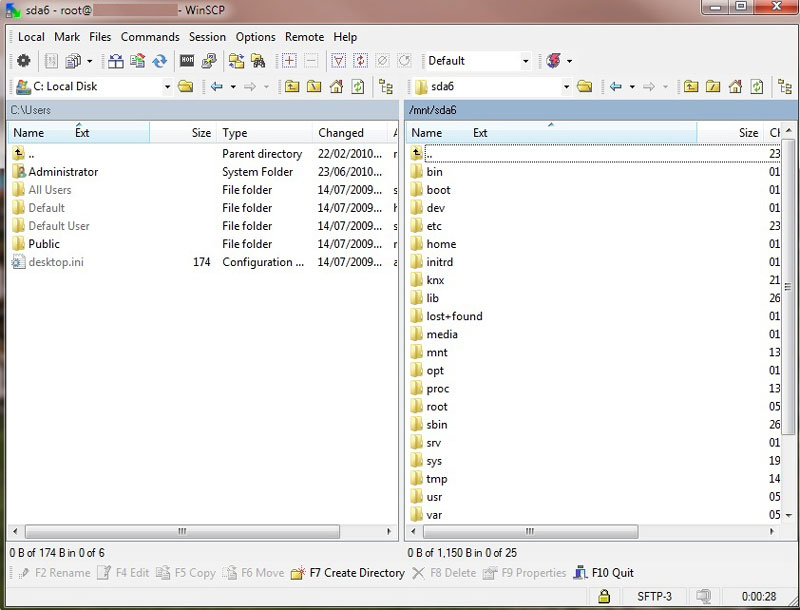
(Screen 14)
Unmount
- When you have finished making changes, unmount the disk, and end rescue mode by rebooting the server from the control panel as shown in Screen 15. If necessary, reimage the server via the Simply Cloud control panel.

(Screen 15)
Источник


