- Ubuntu: как узнать IP-адрес сервера / компьютера
- Как узнать IP Ubuntu Linux через терминал
- Как посмотреть локальный IP-адрес Ubuntu: команда hostname
- Узнать IP на старых дистрибутивах Ubuntu — ifconfig
- Как проверить IP-адрес Ubuntu через графический интерфейс
- Как узнать внешний IP-адрес Ubuntu Linux
- Как узнать IP-адрес Linux
- Немного теории
- Как узнать внутренний IP Linux
- Как узнать локальный IP в Linux
- Как узнать внешний IP-адрес в Linux
- Выводы
- Network Configuration
- Ethernet Interfaces
- Identify Ethernet Interfaces
- Ethernet Interface Logical Names
- Ethernet Interface Settings
- IP Addressing
- Temporary IP Address Assignment
- Dynamic IP Address Assignment (DHCP Client)
- Static IP Address Assignment
- Loopback Interface
- Name Resolution
- DNS Client Configuration
- Static Hostnames
- Name Service Switch Configuration
- Bridging
- networkd-dispatcher for pre-up, post-up, etc. hook scripts
- Resources
Ubuntu: как узнать IP-адрес сервера / компьютера
Автор: Юрий Белоусов · 09.08.2021
Для идентификации ПК в интернете используется свой уникальный IP-адрес, с помощью которого можно обратиться к этому устройству и установить соединение. В этой статье рассмотрим, как узнать IP-адрес Ubuntu Linux на сервере или домашнем компьютере.
Как узнать IP Ubuntu Linux через терминал
Для того, чтобы узнать IP-адрес Ubuntu Linux необходимо выполнить следующую пошаговую инструкцию:
- Запустить терминал. Для этого можно воспользоваться горячими клавишами Ctrl + Shift + T или открыть его из меню с программами;
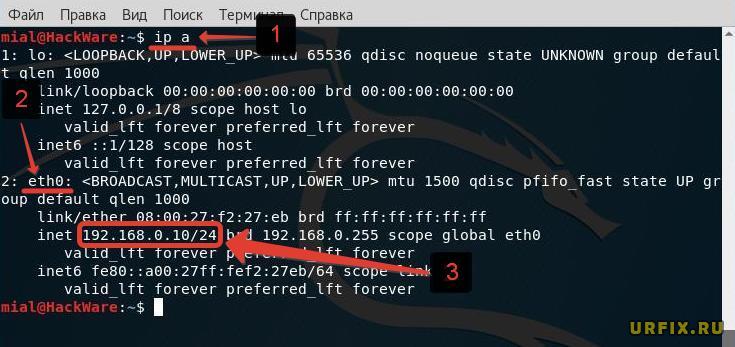
- Ввести команду $ ip address (либо – одну из вариаций данной команды: ip addr , ip addr show или ip a );
- В консоли отобразится список всех текущих сетевых интерфейсов и их параметров. В зависимости от типа подключения нужно найти Ethernet-интерфейс (подписывается следующим образом: enp0s3, eth0) или WiFi (подписывается следующим образом: wlp2s0, wlan0, цифры могут отличаться).
Внутренний IP-адрес высвечивается в строке inet . На скриншоте ниже это 192.168.0.10/24, где 192.168.0.10 — IP-адрес, а 24 – маска подсети.
Данная команда работает и в других версиях Linux: Debian, Centos.
Как посмотреть локальный IP-адрес Ubuntu: команда hostname
Еще одна команда, которой можно воспользоваться для того, чтобы посмотреть IP-адрес Ubuntu:
В результате на экран выведется информация о всех сетевых адресах хоста, за исключением loopback интерфейса. Если установлено одно единственное соединение, то покажется лишь IP.

Узнать IP на старых дистрибутивах Ubuntu — ifconfig
В старых дистрибутивах Ubuntu можно прописать команду:
В новых она уже не поддерживается.
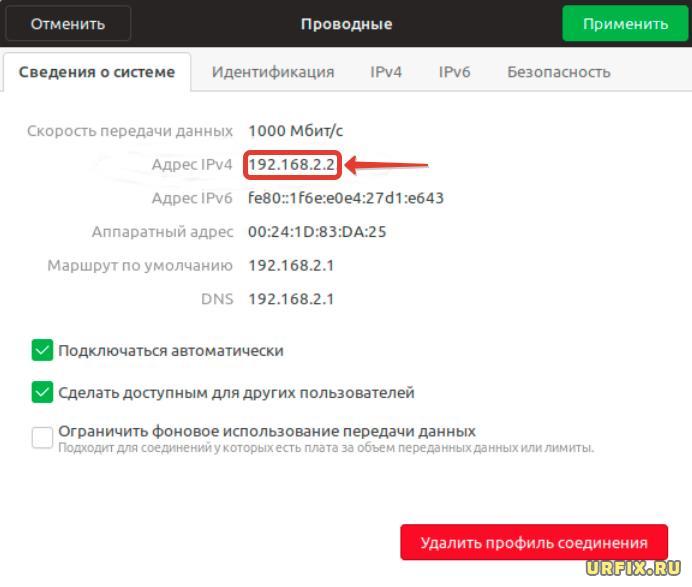
Как проверить IP-адрес Ubuntu через графический интерфейс
Если в системе присутствует встроенный графический интерфейс, то можно узнать IP-адрес компьютера следующим образом:
- Открыть параметры системы;
- Перейти в раздел «Сеть»;
- Нажать на кнопку с иконкой шестеренки рядом с информацией о сетевом подключении;
- В первой вкладке «Сведения о системе» отобразится текущий IP.

Как узнать внешний IP-адрес Ubuntu Linux
Что касается IP-адреса внешнего – публичного, глобально маршрутизируемого, назначаемому устройству, позволяя ему получить доступ в сеть интернет, то для его определения необходимо связаться с удаленным сервером посредством протоколов HTTP / HTTPS или DNS.
Чтобы узнать внешний IP-адрес Ubuntu Linux можно в терминале, запускаемом сочетанием клавиш Ctrl + Shift + T , ввести одну из следующих команд:
$ wget -qO- ifconfig.co
$ wget -qO- ident.me
Запрос к серверу Google:
$ dig TXT +short o-o.myaddr.l.google.com @ns1.google.com | awk -F’»‘ ‘< print $2>’
Если есть GUI, то можно просто зайти через браузер на любой сайт, показывающий внешний IP.
Не нашли ответ? Тогда воспользуйтесь формой поиска:
Источник
Как узнать IP-адрес Linux
Каждый компьютер в сети интернет нужно определённым образом идентифицировать. Для этого используются IP-адреса. Каждый компьютер, подключённый к интернету, имеет свой адрес, с помощью которого можно очень просто обратиться к этому компьютеру.
Если вы хотите каким-либо образом взаимодействовать с другим компьютером по Сети, вам нужно узнать его IP-адрес Linux. Очень часто приходится работать по IP-адресу с серверами, но это может быть полезно и для домашних компьютеров, и для локальных сетей. В этой небольшой статье мы рассмотрим, как узнать IP Linux разными способами. Поговорим о том, как узнать внешний IP, выданный провайдером, и внутренний IP в вашей локальной сети. Но сначала давайте попытаемся понять, что такое IP-адрес, и как всё работает.
Немного теории
Мы можем выделить три типа IP-адресов, с которыми вам придётся сталкиваться:
- Внутренний адрес (IP-адрес компьютера);
- Адрес в локальной сети;
- Внешний IP доступный во всём интернете.
Внутренний IP-адрес нужен для того, чтобы программы могли взаимодействовать между собой в пределах этого компьютера, используя сетевые протоколы. Например, так браузер может получить доступ к локальному web-серверу или mysql-серверу. Внутренний IP довольно часто используется в системных утилитах, и узнать его очень просто — он всегда одинаковый — 127.0.0.1.
Но с локальной сетью всё немного сложнее. В идеале, каждый компьютер в мире должен был бы иметь уникальный IP-адрес для полноценного доступа в интернет. Но с ростом популярности этой технологии свободные адреса скоро начали заканчиваться, и теперь уникальные IP имеют только серверы, а обычные пользователи размещаются провайдерами по несколько сотен на одном IP с помощью NAT.
Технология NAT позволяет компьютеру подключиться к любому серверу в интернете и получить от него ответ, но инициировать подключение к такому компьютеру невозможно, поскольку фактически один IP принадлежит сотне компьютеров, и система просто не знает, к какому из них обращаются.
Ваша локальная сеть тоже работает по принципу NAT, и задача у неё похожая — защитить ваши домашние устройства от несанкционированного доступа, и позволить вам подключать к сети несколько устройств, например два ноутбука. Если бы не было NAT, вам бы пришлось покупать два отдельных интернет подключения для каждого из них.
Как вы поняли, ваш домашний компьютер мог бы иметь внешний IP-адрес доступный всем, но это нецелесообразно как минимум по двум причинам. Во-первых, дорого, во-вторых, очень небезопасно. Поэтому подключение компьютера к интернету сейчас выглядит приблизительно так:
- Внешний и доступный всем IP, который принадлежит провайдеру и используется для выхода в интернет сотен пользователей;
- IP-адрес вашего роутера в локальной сети провайдера, той самой, с IP-адресом которой вы выходите в интернет. Он не доступен из интернета и, скорее всего, вам не понадобится;
- IP-адрес вашего компьютера в локальной (домашней) сети, созданной роутером, к которой вы можете подключать свои устройства. Именно он используется для взаимодействия между устройствами в локальной сети и отображается в информации о сетевом интерфейсе;
- Внутренний IP-адрес компьютера, недоступный извне и используемый только для внутренних коммуникаций в системе.
Теперь, когда вы немного начали ориентироваться в вопросе, давайте рассмотрим способы узнать свой IP Linux.
Как узнать внутренний IP Linux
Как я уже сказал, внутренний IP всегда одинаковый для каждого компьютера — 127.0.0.1, что спрведливо не только для Linux, но и для Windows и других операционных систем. Также к своему компьютеру можно обратиться по домену localhost.
Вы можете убедится в этом, выполнив nslookup:
Как узнать локальный IP в Linux
Узнать локальный IP компьютера тоже не очень сложно. Для этого вам не нужны никакие сервисы, мы можем просто посмотреть информацию об интерфейсах.
Чтобы узнать свой IP Linux в локальной сети? выполните такую команду:
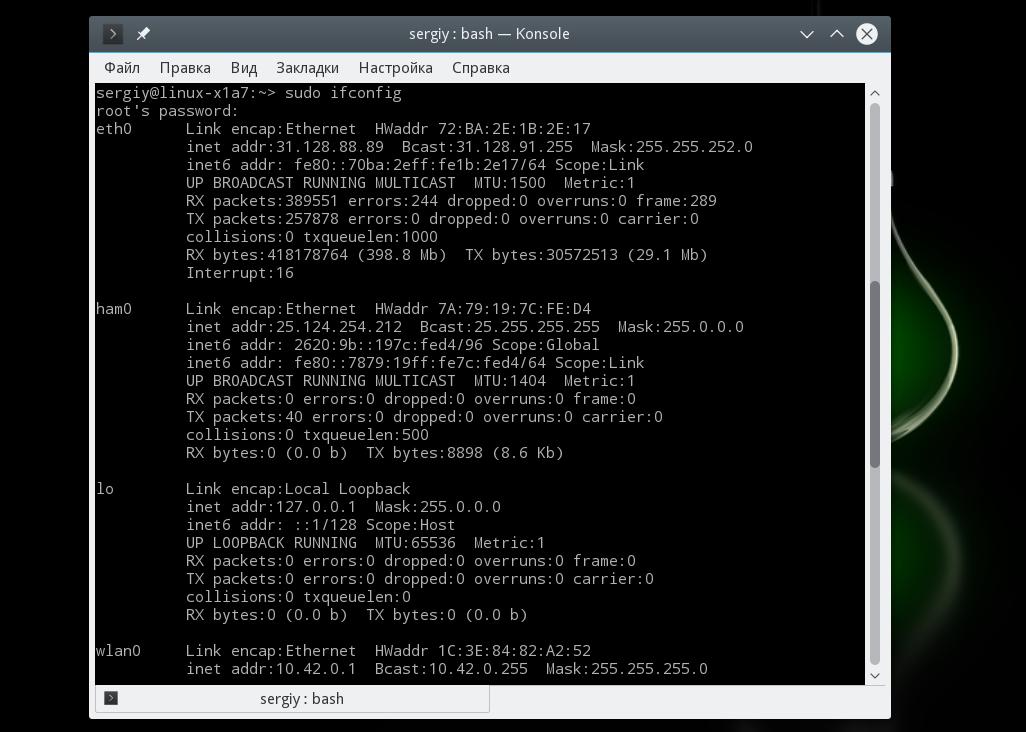
Здесь отображается довольно много информации о сетевых интерфейсах. Кроме IP, здесь можно увидеть MAC-адрес, маску сети и небольшую статистику по работе интерфейса. IP-адрес каждого интерфейса отображается после слов inet addr.
Теперь про интерфейсы: lo — это внутренний интерфейс с IP-адресом 127.0.0.1, eth0 — это проводной интерфейс, а wlan0 — интерфейс Wi-Fi. Как видите, для каждого из них установлены свои адреса.
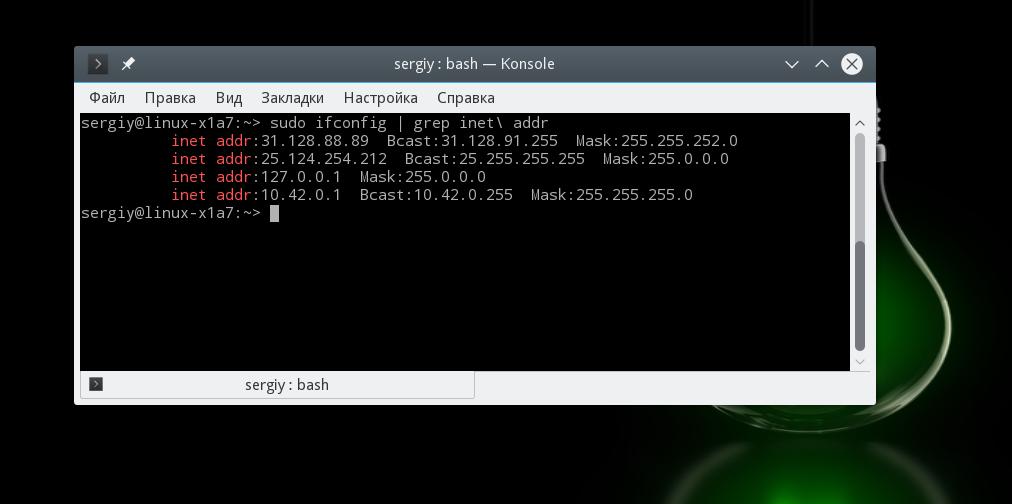
Вы можете отфильтровать лишнюю информацию и вывести только IP-адреса:
sudo ifconfig | grep «inet addr»
Утилита ifconfig уже считается устаревшей и в некоторых дистрибутивах не используется. Вместо неё предлагается новый инструмент — ip. Вы можете выполнить аналогичные действия с помощью него:

Здесь IP-адрес отображается после слова inet. Вы знаете, как посмотреть IP-адрес Linux для компьютера в локальной сети, теперь рассмотрим внешний.
Как узнать внешний IP-адрес в Linux
С внешним IP-адресом ситуация немного сложнее. Конечно, если бы у вас был доступ к серверу провайдера, вы бы могли выполнить ту же самую команду ifconfig и узнать внешний IP Linux точно так же, как и на своём компьютере.
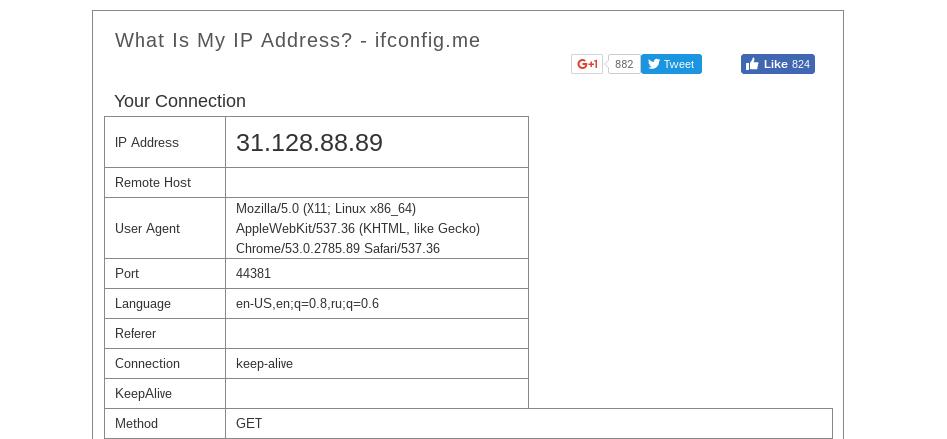
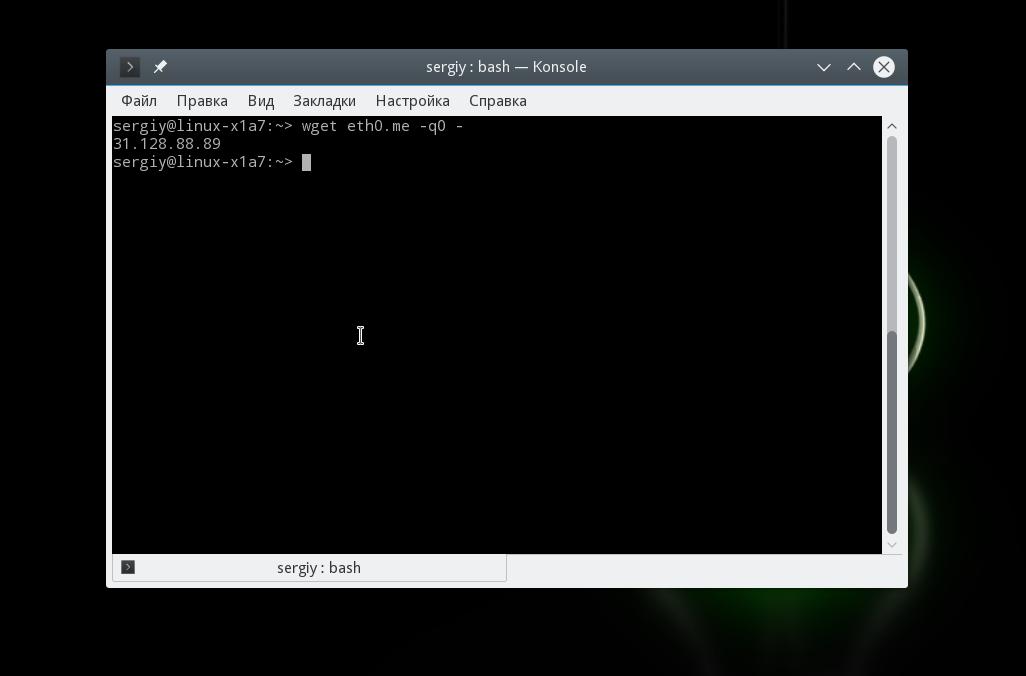
Понятное дело, что доступа к серверам провайдера у вас нет, поэтому придётся пользоваться обходными путями. Мы можем открыть специальный сайт, который посмотрит, с какого IP мы его открыли, и скажет его нам. Есть несколько таких сайтов. Проще всего сделать это с помощью браузера, например, откройте сайт ifconfig.me или eth0.me:
Но это не совсем удобно. Лучше сделать это с помощью терминала. Просто используйте команду wget. Сразу рассмотрим несколько таких сайтов, чтобы вы могли использовать любой понравившийся из них:
wget -qO- eth0.me
wget -qO- ipinfo.io/ip
wget -qO- ipecho.net/plain
wget -qO- icanhazip.com
wget -qO- ipecho.net
wget -qO- ident.me
wget -qO- myip.gelma.net
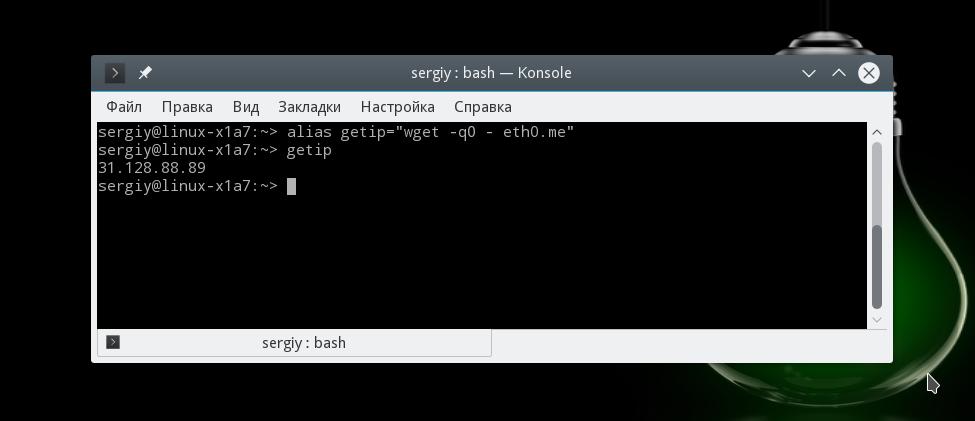
Чтобы не набирать длинную команду каждый раз, вы можете создать удобный алиас:
alias getip=»wget -qO — eth0.me»
Хочу заметить, что если вы хотите узнать не внешний IP компьютера, а именно адрес роутера в сети провайдера, то такой способ не поможет. Вам нужно посмотреть в настройках роутера или попытаться сделать это через командный интерфейс роутера, так как это описано в предыдущем варианте.
Выводы
Вот и всё, теперь вы точно знаете, как узнать IP-адрес Linux, оказывается, это не так сложно, как могло показаться сразу. Правда, во всех этих терминах можно сначала запутаться, но с практикой это проходит. Если у вас остались вопросы, спрашивайте в комментариях!
В статье мы рассмотрели, что такое IP-адрес, но маршрутизацию затронули только вскользь. Если вы хотите узнать об этом подробнее, то можете посмотреть вот это видео:
Источник
Network Configuration
Ubuntu ships with a number of graphical utilities to configure your network devices. This document is geared toward server administrators and will focus on managing your network on the command line.
Ethernet Interfaces
Ethernet interfaces are identified by the system using predictable network interface names. These names can appear as eno1 or enp0s25. However, in some cases an interface may still use the kernel eth# style of naming.
Identify Ethernet Interfaces
To quickly identify all available Ethernet interfaces, you can use the ip command as shown below.
Another application that can help identify all network interfaces available to your system is the lshw command. This command provides greater details around the hardware capabilities of specific adapters. In the example below, lshw shows a single Ethernet interface with the logical name of eth0 along with bus information, driver details and all supported capabilities.
Ethernet Interface Logical Names
Interface logical names can also be configured via a netplan configuration. If you would like control which interface receives a particular logical name use the match and set-name keys. The match key is used to find an adapter based on some criteria like MAC address, driver, etc. Then the set-name key can be used to change the device to the desired logial name.
Ethernet Interface Settings
ethtool is a program that displays and changes Ethernet card settings such as auto-negotiation, port speed, duplex mode, and Wake-on-LAN. The following is an example of how to view supported features and configured settings of an Ethernet interface.
IP Addressing
The following section describes the process of configuring your systems IP address and default gateway needed for communicating on a local area network and the Internet.
Temporary IP Address Assignment
For temporary network configurations, you can use the ip command which is also found on most other GNU/Linux operating systems. The ip command allows you to configure settings which take effect immediately, however they are not persistent and will be lost after a reboot.
To temporarily configure an IP address, you can use the ip command in the following manner. Modify the IP address and subnet mask to match your network requirements.
The ip can then be used to set the link up or down.
To verify the IP address configuration of enp0s25, you can use the ip command in the following manner.
To configure a default gateway, you can use the ip command in the following manner. Modify the default gateway address to match your network requirements.
To verify your default gateway configuration, you can use the ip command in the following manner.
If you require DNS for your temporary network configuration, you can add DNS server IP addresses in the file /etc/resolv.conf . In general, editing /etc/resolv.conf directly is not recommanded, but this is a temporary and non-persistent configuration. The example below shows how to enter two DNS servers to /etc/resolv.conf , which should be changed to servers appropriate for your network. A more lengthy description of the proper persistent way to do DNS client configuration is in a following section.
If you no longer need this configuration and wish to purge all IP configuration from an interface, you can use the ip command with the flush option as shown below.
Flushing the IP configuration using the ip command does not clear the contents of /etc/resolv.conf . You must remove or modify those entries manually, or re-boot which should also cause /etc/resolv.conf , which is a symlink to /run/systemd/resolve/stub-resolv.conf , to be re-written.
Dynamic IP Address Assignment (DHCP Client)
To configure your server to use DHCP for dynamic address assignment, create a netplan configuration in the file /etc/netplan/99_config.yaml . The example below assumes you are configuring your first Ethernet interface identified as enp3s0.
The configuration can then be applied using the netplan command.
Static IP Address Assignment
To configure your system to use static address assignment, create a netplan configuration in the file /etc/netplan/99_config.yaml . The example below assumes you are configuring your first Ethernet interface identified as eth0. Change the addresses, gateway4, and nameservers values to meet the requirements of your network.
The configuration can then be applied using the netplan command.
Loopback Interface
The loopback interface is identified by the system as lo and has a default IP address of 127.0.0.1. It can be viewed using the ip command.
Name Resolution
Name resolution as it relates to IP networking is the process of mapping IP addresses to hostnames, making it easier to identify resources on a network. The following section will explain how to properly configure your system for name resolution using DNS and static hostname records.
DNS Client Configuration
Traditionally, the file /etc/resolv.conf was a static configuration file that rarely needed to be changed or automatically changed via DCHP client hooks. Systemd-resolved handles name server configuration, and it should be interacted with through the systemd-resolve command. Netplan configures systemd-resolved to generate a list of nameservers and domains to put in /etc/resolv.conf , which is a symlink:
To configure the resolver, add the IP addresses of the nameservers that are appropriate for your network to the netplan configuration file. You can also add an optional DNS suffix search-lists to match your network domain names. The resulting file might look like the following:
The search option can also be used with multiple domain names so that DNS queries will be appended in the order in which they are entered. For example, your network may have multiple sub-domains to search; a parent domain of example.com , and two sub-domains, sales.example.com and dev.example.com .
If you have multiple domains you wish to search, your configuration might look like the following:
If you try to ping a host with the name of server1, your system will automatically query DNS for its Fully Qualified Domain Name (FQDN) in the following order:
If no matches are found, the DNS server will provide a result of notfound and the DNS query will fail.
Static Hostnames
Static hostnames are locally defined hostname-to-IP mappings located in the file /etc/hosts . Entries in the hosts file will have precedence over DNS by default. This means that if your system tries to resolve a hostname and it matches an entry in /etc/hosts, it will not attempt to look up the record in DNS. In some configurations, especially when Internet access is not required, servers that communicate with a limited number of resources can be conveniently set to use static hostnames instead of DNS.
The following is an example of a hosts file where a number of local servers have been identified by simple hostnames, aliases and their equivalent Fully Qualified Domain Names (FQDN’s).
In the above example, notice that each of the servers have been given aliases in addition to their proper names and FQDN’s. Server1 has been mapped to the name vpn, server2 is referred to as mail, server3 as www, and server4 as file.
Name Service Switch Configuration
The order in which your system selects a method of resolving hostnames to IP addresses is controlled by the Name Service Switch (NSS) configuration file /etc/nsswitch.conf . As mentioned in the previous section, typically static hostnames defined in the systems /etc/hosts file have precedence over names resolved from DNS. The following is an example of the line responsible for this order of hostname lookups in the file /etc/nsswitch.conf .
files first tries to resolve static hostnames located in /etc/hosts .
mdns4_minimal attempts to resolve the name using Multicast DNS.
[NOTFOUND=return] means that any response of notfound by the preceding mdns4_minimal process should be treated as authoritative and that the system should not try to continue hunting for an answer.
dns represents a legacy unicast DNS query.
mdns4 represents a Multicast DNS query.
To modify the order of the above mentioned name resolution methods, you can simply change the hosts: string to the value of your choosing. For example, if you prefer to use legacy Unicast DNS versus Multicast DNS, you can change the string in /etc/nsswitch.conf as shown below.
Bridging
Bridging multiple interfaces is a more advanced configuration, but is very useful in multiple scenarios. One scenario is setting up a bridge with multiple network interfaces, then using a firewall to filter traffic between two network segments. Another scenario is using bridge on a system with one interface to allow virtual machines direct access to the outside network. The following example covers the latter scenario.
Configure the bridge by editing your netplan configuration found in /etc/netplan/ :
Enter the appropriate values for your physical interface and network.
Now apply the configuration to enable the bridge:
The new bridge interface should now be up and running. The brctl provides useful information about the state of the bridge, controls which interfaces are part of the bridge, etc. See man brctl for more information.
networkd-dispatcher for pre-up, post-up, etc. hook scripts
Users of the former ifupdown may be familiar with using hook scripts (e.g pre-up, post-up, etc.) in their interfaces file. Netplan configuration does not currently support hook scripts in its configuration definition.
Instead to achieve this functionality with the networkd renderer , users can use networkd-dispatcher. The package provides users and packages hook points when specific network states are reached to aid in reacting to network state.
Note: If not on Ubuntu Server, but Desktop the network is driven by Network Manager — in that case you’d need NM Dispatcher scripts instead.
The Netplan FAQ has a great table that compares event timings between ifupdown / systemd-networkd / network-manager
It is important to be aware that those hooks run asychronous; that is they will not block transition into another state.
The Netplan FAQ also has an example on converting an old ifupdown hook to networkd-dispatcher .
Resources
The Ubuntu Wiki Network page has links to articles covering more advanced network configuration.
The netplan website has additional examples and documentation.
The netplan man page has more information on netplan.
The systemd-resolved man page has more information on systemd-resolved service.
Источник


