- Ubuntu Documentation
- Getting the Live CD
- Setting Up Your USB Stick
- Determine Which Device Your USB Stick Is
- Partitioning Your USB Stick
- Creating the «casper-rw» File System
- Using a Loopback File
- Booting the Live CD in Persistent Mode
- Verifying That Everything Worked
- Reboot the Live CD
- Investigating What Is Now On Your «casper-rw»
- Automatic Persistence
- Conclusion
- Outstanding Questions
- Ubuntu66.ru — новости, уроки, помощь, поддержка.
Ubuntu Documentation
This page explains how to enhance a read-only LiveCD by adding persistent file storage on another drive. In more recent Ubuntu versions, you can instead use the usb-creator tool to create a bootable USB flash drive from a Live CD, and its user interface has an option to add persistent storage on the same USB drive; see Installation/FromUSBStick.
Live CDs and LiveUsbs provide a highly portable, secure, dependable and familiar environment that is easy to use on almost any machine.
However, LiveCd sessions become even more useful when a persistent image can retain data and settings (even installed programs and packages) when the machine gets switched off. All the data can be easily pocketed and kept safe, perhaps to be physically carried to another machine.
The advantages over Cloud Computing are; that it does not require a working internet connection, it gives better privacy and security as it does not place your data in other peoples possession.
A persistent image will need to be kept on a Usb-stick or external hard-drive to really maximise on the usefulness of the LiveCd session so that is what this guide describes. It would also be possible to keep the image on a local hard-drive or any device the CD can see attached to the computer. Please keep it backed-up elsewhere too. The main usefulness would seem to be from using a Usb-stick.
Note that programs and packages may take up a high percentage of the valuable space so it might be worth considering creating a Customised CD or Remix every once in a while, updating with packages you have installed in the persistent image since making the last Remix.
Getting the Live CD
LiveCd is a feature of many Linux distros, not just Ubuntu. GettingUbuntu is usually fairly easy. Possibly the easiest, cheapest way is to just download Ubuntu and then make a Cd yourself. This guide helps with getting a normal LiveCd session running
You can customise a Cd with particular packages/programs but that starts getting a little complicated to set-up. See LiveCDCustomization.
Setting Up Your USB Stick
Setting up a device for use as Live CD persistent storage device is fairly simple. We just partition it and format it while giving it a special name that the Live CD recognizes. Although you can use any device visible to the CD for persistent storage, in this example we will discuss using a USB stick since they are pretty common now and are relatively inexpensive. There are no minimum size requirements for your storage device, but naturally, the more storage space you have the more applications you can install and settings you can save.
Plug your USB Stick into your computer and let’s get it ready for Live CD persistence.
Note: If you previously followed the instructions on this page for «casper-cow» and it didn’t work, that’s because it should have read «casper-rw».
Note 2: In the instructions below the ext3 file-system is used. For a memory stick however where space is tight, the ext2 file-system will use up considerably less overhead and is probably good enough for this purpose.
Note 3: The instructions use all terminal commands, many of them looking quite serious. However it can all be done using the graphical Gnome Partition Editor tool you find in the System -> Administration menu. The exception is giving the partition a label, for this you’d still need to go to a terminal and do a # sudo e2label /dev/ casper-rw
Determine Which Device Your USB Stick Is
Note: if you prefer, you can use GPartEd to identify and format the usb thumb drive to ext3 (or a different compatible format) and then skip directly to the «Creating the «casper-rw» File System» section.
In order to partition and format your USB Stick, we first need to determine which device your computer recognizes it as and what its mount point is. To find this information run the following command:
The output of df -h should look something like this:
As you can see, on my computer, my USB Stick is the last entry in the list and is seen as /dev/sda1 and is mounted and accessible at /media/USB DISK. Now that we know where our USB Stick is, let’s go ahead and partition it properly.
Partitioning Your USB Stick
Partitioning your USB Stick is a fairly simple task and only requires a few short steps. To partition your USB Stick we will use the command fdisk so run the following command to start the process (replacing /dev/sda with your device path):
Without getting in depth about how to use fdisk (which is outside the scope of this document) here is how you can partition your USB by deleting any existing partitions and creating one new partition.
First type “p” at the command prompt and hit to print the current partition table. The output of this command should look something like this:
Again, for this example, we will just delete all of the existing partitions so now type “d” at the command prompt. Then enter the number of the partition you wish to delete. Repeat this process for each partition on your USB Stick until they are all deleted. The following is a example of what your session might look like:
As you can see we have now deleted all of the partitions on our USB Stick. Now we can create one new partition by typing “n” at the command prompt followed by your desired partition number. Once that is done type “w” and hit to write the partition table changes to your USB Stick. Here is the output from my session:
Now that we have our partition table all set let’s format it.
Creating the «casper-rw» File System
Formatting your USB Stick is also a very simple task. First we will unmount the device so we can format it, then just format it.
First unmount your USB Stick by running the following command:
Now that your USB Stick is unmounted we can format it. The only special consideration is that we must give the formatted partition the label “casper-rw”. This is the name the Live CD looks for to store persistent information. You can properly format your USB Stick by issuing the following command:
The output of this command should look something like this:
NOTE: This example uses the ext3 file system, but almost any file system should work. Among the file systems which won’t work are VFAT and NTFS
Now that we have our partition created and formatted all that is left to do is use it. So let’s go use it!
Using a Loopback File
Instead of using a USB stick, you can use a file on your hard disk to store persistent information. The file must be named casper-rw and must be on the root of a partition. This partition can be any type that can be mounted automatically (e.g. vfat or ext3). (The persistent mode still works, if the file is created on the root partition of an USB stick.)
The following commands assume that a partition is mounted at /media/hda1. You can use any partition; even / will do fine. A file 128 MB in size will be created on this partition. To change the size, modify the count parameter of the «dd» command.
That’s it! You can now boot the Live CD as described below.
Booting the Live CD in Persistent Mode
Now we get to enjoy the fruits of our labor. Make sure your USB Stick is plugged into your computer and take the Live CD that you downloaded and burned earlier and put it in your CD drive (if it is not already there). Reboot your computer and boot up using this Live CD.
Before you reboot there are only two things that you need to remember. When the Live CD menu gets displayed hit the key to enter “Other Options”. This will display the arguments that the Live CD passes to the kernel. At the end of this argument list just add a space and add the word “persistent”. This will instruct the Live CD to maintain and use persistence. That is all. Go for it!
Note: It appears that with Flight 5, you need to create a new user in the Live CD session (go System -> Administration -> Users + Groups, then press the «Add User» button) for it to save your settings; it does not appear to save most changes to the default user, «ubuntu». When you create the new user, be sure to check the box in the «user privileges» tab that says «executing system administration tasks» or you’ll be pretty limited in what you can do
When you get back, or better yet, when you boot into your live environment come back to this page and see how you perform a few basic tests to make sure everything is working correctly.
Verifying That Everything Worked
Here are a few simple things you can do to verify that everything is working as expected.
Reboot the Live CD
The first simple thing you can do to verify that persistence is working is install a few applications and change some environment settings (some thing highly visible and easily recognizable) like your theme or add some GNOME panel icons. Then just reboot. Hit , enter in “persistent” on the kernel arguments list and boot into your new custom Live CD environment. Your newly installed applications and your custom settings should all still be there.
If you want to dig a little deeper you could always inspect the contents of your USB Stick. This will also give you deeper insight into how this great system works.
(you can do this from the Live CD by going System -> Administration -> Disks, selecting the appropriate drive, setting the access path to /mnt and pressing the Enable button followed by the Browse button)
Investigating What Is Now On Your «casper-rw»
Another relatively simple thing you can do to verify that everything is working and to learn more about how everything works is to just inspect what is now on your USB Stick in isolation. Reboot back into your regularly installed system, plug in your USB Stick and just have a look around. The contents of your USB Stick is what makes your custom environment your own.
Automatic Persistence
By using reconstructor a CD can be remastered and an additional menu item (Persistent Mode) added on boot. The persistent mode was added as the default. No changes were made to the CD except for adding the persistent menu item. This may be best described in another how-to. If there is a place where a persistent ISO can be uploaded I’d be glad to share
Conclusion
The new Ubuntu Live CD persistence is an excellent capability and in addition to current Live CD uses, this will certainly make Live CDs very much more viable, useful and important. Now you can carry around your own custom Ubuntu environment on a CD and USB Stick that all just fits in your pocket. Now go gloat to your friends and co-workers about how much Ubuntu ROCKS!
Outstanding Questions
- What is the min. USB key size that is needed? How about adding a swap partition to the USB key?
- Wouldn’t the Live CD rock more if the end-user didn’t have to fudge around with kernel arguments and the Live CD just did what was right, to wit: if there is a removable media device labelled «casper-rw» and formatted appropriately, use it (or at least ask) and if there isn’t, don’t? See either of these 2 guides
https://help.ubuntu.com/community/LiveCDCustomization
Every single disk write goes to the USB stick, which GNOME loves to do all the time. After following these directions, I booted the LiveCD using the «persistent» boot option. All I did was change the desktop background to a solid color and visit Slashdot’s front page in Firefox. Then I powered down the system and looked at how much written data was saved on the USB stick. 75 MB! Most was gnome-related stuff under /var/lib. Ouch. And the USB stick got written to the whole time pretty much. Won’t that wear out the USB stick much faster? Can’t the changes be dumped in bulk only once in a while, when the user presses a button on some applet? And only that data that is in the user’s home directory? This will keep the USB stick from wearing out. SLAX has got scripts to do this already that could perhaps be copied. Especially see the SLAX script called «configsave».
Keep in mind that not everybody we want to convert to Ubuntu is a power user (administrator). I can pretty much guarantee that anything that looks like typing Scary Strings is going to turn people off, not on, no matter how «powerful» it is behind the scenes.
This feature (and the whole Ubuntu Live CD release) rocks, and I agree that it would rock even more if one could do it without CLI commands. It seems there is only a small number of places where the persistence can be stored (USB key and loopback file). The ideal solution would therefore seem to be an option at startup to create persistence in the one or few places where it is possible (including the hard drive), and the default option would look for persistence file and allow a choice if more than one is found (I wonder how is that dealt with currently?). This is option is absolutely ideal for people stuck with corporate computers, that want to start moving towards Linux, but are afraid to mess with their partitions just yet.
Suggestion: Actually very little CLI commands are needed, as nearly all of it can be done using the Gnome Partition Editor which is in the Administration menu. However it does not have an option for setting the disk label. In the ‘Device’ menu there’s a ‘Set Disk Label’ item, however that’s not it. This wiki page should probably be redone using the Gnome Partition Editor tool, and loads of screen shots.
Источник
Ubuntu66.ru — новости, уроки, помощь, поддержка.

Давайте сразу разберёмся что такое live-usb и live-usb persistent.
1. Live USB — подключаемый к порту USB носитель данных, содержащий операционную систему с возможностью загрузки. Обычно в качестве Live USB используется флеш-накопители.
Применяется в основном для:
— оценки новых версий операционных систем пользователем без установки их на жёсткий диск компьютера;
— восстановления данных и/или работоспособности операционной системы компьютера;
— установки операционной системы на жёсткий диск;
— возможность настройки системы и установки новых программ;
— сброса пароля администратора и других действий.
Примечание. Все изменения сделанные пользователем в live-режиме не сохраняются.
2. live-usb persistent — это загрузочный носитель с возможностью сохранять изменённое состояние. Само слово persistent в переводе с английского означает сохраняемость данных.
live-usb persistent имеет все характеристики обычного live-usb, плюс возможность сохранять изменённое состояние системы после изменения настроек и установки доп.программ.
Т.е. загрузиться а live-режиме с флешки live-usb persistent, сделать какие-то изменения в системе и после перезагрузки с этой же флешки вы получите работоспособную live-систему с предыдущими настройками. Все пользовательские файлы хранятся в образе раздела casper-rw.
После настроек в live-usb persistent вы можете использовать флешку на других компьютерах, как обычную систему.
Примечание. Чего нельзя в live-usb persistent, например, загрузиться с новым ядром или установку видеодрайвера!
Установка инструмента mkusb для создания образа live-usb persistent.
Откройте терминал (Ctrl+Alt+T), скопируйте и выполните следующие команды:
sudo add-apt-repository ppa:mkusb/ppa
sudo apt update
sudo apt install —install-recommends mkusb mkusb-nox usb-pack-efi
Создание live-usb persistent с дистрибутивом Ubuntu/Debian
Примечание. Прежде чем начинать создание образа live-usb persistent, у вас уже должен быть загружен из сети iso-образ с дистрибутивом.
1. Запустите из системного меню программу mkusb.

2. Откроется окно с вопросом: «Хотите ли вы запустить версию DUS?», где нужно нажать на кнопке Yes (Да), либо Enter для продолжения.

Вам будет предложено ввести пароль администратора. Введите его и нажмите Enter.
3. Создание загрузочного устройства.
Примечание. Перед созданием загрузочного устройства, у вас должна быть вставлена в компьютер флешка объёмом не менее 4 ГБ.
В следующем окне выберите опцию — Install (make a boot device) и Ок.

В следующем окне выберите опцию — “Persistent live” -only Debian and Ubuntu и Ok.

Далее выберите ISO-файл операционной системы, которую вы хотите сделать, как live-usb.

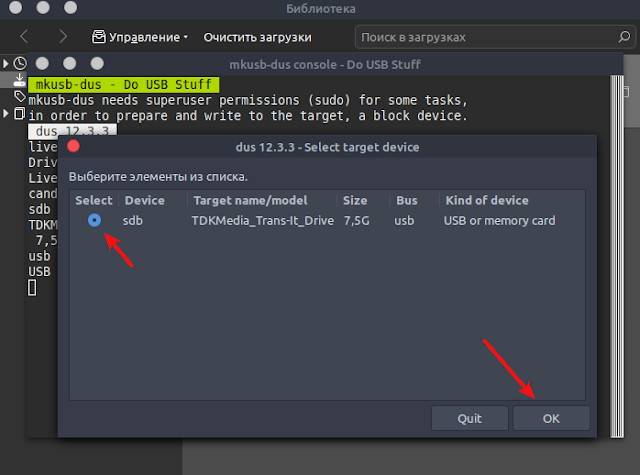
Теперь необходимо правильно выбрать вашу флешку в этом окне.
В следующем окне выберите опцию — “upefi”, которая поддерживает UEFI BIOS с безопасной загрузкой.

Оставьте процент хранения persistent данных на 50 по умолчанию. Это не имеет особого значения, если вы используете USB-накопитель объёмом 4 Гб и более.

Заключительное окно спросит вас, хотите ли вы продолжить создание persistent диска. Выберите Go и нажмите на кнопке Go.

Теперь mkusb начнёт создание live-usb persistent на основе выбранного вами ISO-образа.

Весь процесс займет несколько минут, в зависимости от вашей флешки и размера ISO-образа.
По окончании создания live-usb persistent, окно mkusb сообщит вам об этом.

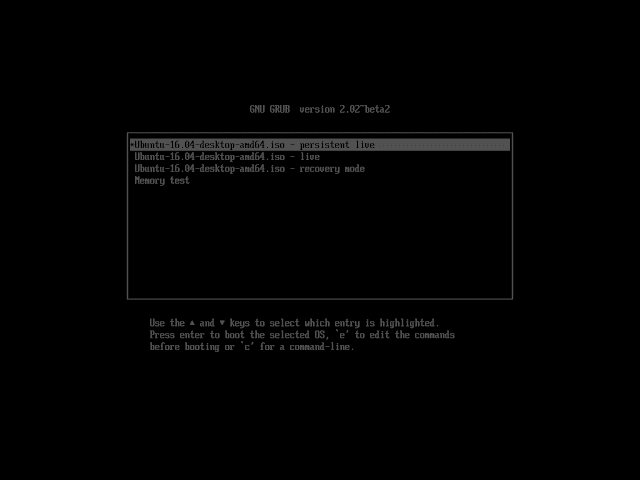
4. Теперь вы можете загрузится с созданной флешки в liv-режиме и производить необходимые изменения системы, которые теперь будут сохранены при последующих входах. А также использовать эту флешку на других компьютерах как обычную систему без установки на ж/диск..
Примечание. Iso-образ с созданной live-usb persistent, имеет свой загрузчик GRUB, т.к. флешка разбита на разделы. Не путайте его с системным GRUB.
P.S. Если у вас появились вопросы или мнения по данной статье, обсудить их можно на нашем форуме:
http://compizomania.54672.x6.nabble.com/live-usb-persistent-Ubuntu-td9226.html
Ссылка на источник compizomania
24-10-2019.
Источник


