- Как монтировать NTFS в Linux
- Установка компонентов
- Ручное монтирование
- Автоматическое монтирование
- How Do I Access or Mount Windows/USB NTFS Partition in RHEL/CentOS/Fedora
- How to Mount Windows NTFS Partition in Linux
- If You Appreciate What We Do Here On TecMint, You Should Consider:
- Как примонтировать флешку в Linux
- Монтирование флешки в Linux
- Автоматическое монтирование флешки в Linux
- Выводы
- How to Mount USB Device in CentOS 7 (NTFS and Linux FS)
- How to Mount USB Hard Disk or USB Flash Drive in CentOS 7
- How to Mount NTFS USB Device in CentOS 7 Linux
Как монтировать NTFS в Linux
Инструкция на примере Linux CentOS 7.
Установка компонентов
Для начала необходимо установить пакет ntfs-3g. В противном случае, при попытке запустить команду на монтирование раздела NTFS мы получим ошибку mount: unknown filesystem type ‘ntfs’.
Сначала устанавливаем расширенный репозиторий:
yum install epel-release
Затем сам пакет ntfs-3g
yum install ntfs-3g
После установки данного пакета в системе появятся дополнительные команды mount.ntfs-fuse и mount.ntfs-3g., а также команда mount распознает опцию -t ntfs.
Ручное монтирование
Монтирование NTFS на чтение и запись выполняется любой из трех команд:
mount -t ntfs /dev/sdb1 /mnt
mount -t ntfs-3g /dev/sdb1 /mnt
mount.ntfs-3g /dev/sdb1 /mnt
* в данном примере, примотировано устройство /dev/sdb1 в раздел /mnt. Понять, какой устройство нужно монтировать можно при помощи команды fdisk -l
Автоматическое монтирование
Чтобы раздел автоматически монтировался при перезапуске компьютера, открываем на редактирование файл:
/dev/sdb1 /mnt ntfs defaults 0 0
* в данном примере мы раздел /dev/sdb1 будем монтировать в каталог /mnt.
Чтобы применить настройку и проверить ее, вводим:
Посмотреть примонтированные разделы и файловые системы можно командой:
Источник
How Do I Access or Mount Windows/USB NTFS Partition in RHEL/CentOS/Fedora
Sometimes it may happens in some stage, you may have to access data on a Windows partition, USB device or any similar device. Today most of the modern Linux systems automatically recognize and mount any disks.
However, in some occasions where you may required to configure your system manually to mount ntfs partitions on your Linux system. Specially when you are using dual boot operating environment. Fortunately, this process is not so complicated task its just very fairly straight forward.
![]() How to mount Windows NTFS Partition in Linux
How to mount Windows NTFS Partition in Linux
This article explains you on how to access or mount Windows XP, Vista NTFS or USB filesystem using the ‘mount‘ command in RHEL/CentOS/Fedora systems.
How to Mount Windows NTFS Partition in Linux
First you need to enable EPEL (Extra Packages for Enterprise Linux) Repository. You may refer the article on how to enable EPEL Repository under RHEL, CentOS and Fedora systems.
To mount any NTFS based filesystem, you need to install a tool called NTFS3G. Before heading up for installation let’s understand NTGS3G.
What is NTFS3G
NTFS3G is an open source cross-platform, stable, GPL licensed, POSIX, NTFS R/W driver used in Linux. It provides safe handling of Windows NTFS file systems viz create, remove, rename, move files, directories, hard links, etc.
Once EPEL is installed and enabled, let’s install ntfs-3g package using the below command with root user.
Fuse Install
Next, install and load FUSE driver to mount detected devices with below command. FUSE module is included in the kernel itself in version 2.6.18-164 or newer.
Identify NTFS Partition
Once fuse module is loaded, type below command to find out NTFS Partitions in Linux.
Mount NTFS partition
First create a mount point to mount the NTFS partition.
Simply run the following command to mount the partition. Replace sda1 with your actual partition found.
Once it’s mounted on /mnt/ntfs, you may use regular Linux ls -l command to list the content of mounted filesystem.
If you want to make mount point permanent at the boot time, then simple add the following line at the end of /etc/fstab file. This will remain as permanent.
Umount NTFS Partition
Simply, use the following command to unmount the mounted partition.
If You Appreciate What We Do Here On TecMint, You Should Consider:
TecMint is the fastest growing and most trusted community site for any kind of Linux Articles, Guides and Books on the web. Millions of people visit TecMint! to search or browse the thousands of published articles available FREELY to all.
If you like what you are reading, please consider buying us a coffee ( or 2 ) as a token of appreciation.

We are thankful for your never ending support.
Источник
Как примонтировать флешку в Linux
В наши дни очень большую популярность у пользователей набрали USB флешки. Они используются для обмена файлами, различными фильмами и документами, установки операционных систем, а также восстановления системы после сбоя. Чтобы работать с флешкой в Linux ее нужно примонтировать в корневую файловую систему.
Дело в том, что организация файловой системы Linux немного отличается от того, что мы привыкли видеть в Winodws. Здесь нет никаких дисков C,D,E и так далее, есть только корень, самая верхняя точка файловой системы, в подкаталоги которой подключаются все жесткие диски и внешние носители.
Если в системе используется окружение рабочего стола, то оно, как правило, берет на себя всю низкоуровневую работу чтобы выполнить монтирование флешки в linux. Система обнаруживает подключенную флешку и в системном лотке всплывает уведомление о подключенном устройстве. Дальше остается кликнуть по значку флешки, чтобы система выполнила все нужные для ее монитрования действия. Но если окружение рабочего стола не запущенно или вам нужно работать в консоли можно выполнить все действия по монтированию флешки вручную.
В этой инструкции мы рассмотрим монтирование usb флешки в linux через терминал, а также настройку автоматического монтирования для оконных менеджеров, которые не поддерживают такую возможность.
Монтирование флешки в Linux
Самое первое, что нужно сделать после того, как вы подключили флешку — узнать имя ее файла в системе. В Unix все устройства имеют свои файлы и именно через эти файлы система и программное обеспечение взаимодействуют с ними.
Файлы флешек и других устройств хранения данных находятся в каталоге /dev. Устройства нумеруются по алфавиту sda, sdb, sdc, sdd и т д. Так как флешка подключается последней у нее будет старшая буква. Например, sdb или sdc. Имя sda принадлежит жесткому диску. Можно, конечно, просто посмотреть содержимое каталога /dev/, но такой способ ненадежный. Мы воспользуемся утилитой fdisk.
Подключите флешку и выполните:

Как видите, здесь мы можем посмотреть детальную информацию об устройстве. Имя файла, список разделов, формат таблицы разделов, список разделов. А главное для нас, размер раздела и его файловую систему. Теперь не сложно понять какая из них флешка. В этом примере это /dev/sdc1
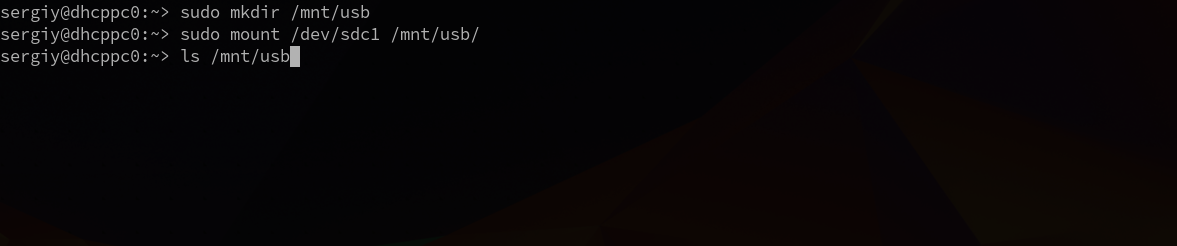
Создаем папку для монтирования:
sudo mkdir /mnt/usb
Теперь монтируем флешку с помощью команды mount:
sudo mount /dev/sdc1 /mnt/usb
Если знаете файловую систему флешки, то лучше ее указать с помощью опции -t. Чаще всего используется FAT, так как ее легко открывают как Windows так и Linux системы:
sudo mount -t vfat /dev/sdc1 /mnt/usb
Монтирование осуществляется от суперпользователя, но если нужно чтобы отмонитровать флешку мог любой нужно указать опцию users:
sudo mount -t vfat -o users /dev/sdc1 /mnt/usb
По умолчанию владельцем файлов на флешке при монтировании устанавливается root, поэтому если вы захотите работать с флешкой через файловый менеджер, то нужно будет его запускать с правами суперпользователя или же сразу примонтировать флешку в linux таким образом, чтобы владельцем был ваш пользователь. Для этого укажите группу и id своего пользователя в опциях uid и gid:
sudo mount -o users,uid=1000,gid=1000 /dev/sdc1 /mnt/usb
Удостовериться что флешка подключена можно посмотрев содержимое каталога, в который мы ее монтировали:
Или выполнив команду mount:

После завершения работы с флешкой не забудьте ее отмонтировать. Потому что иначе данные могут быть не сохранны или вообще повреждена файловая система флешки:
sudo umount /dev/sdc1
Автоматическое монтирование флешки в Linux
Популярные окружения рабочего стола выполняют монтирование флешки linux автоматически, как только она подключена к системе или по клику на ярлыке. Мы можем это реализовать с помощью службы udisks2.
Udisks — это служба dbus, позволяющая другим программам и пользователю взаимодействовать с udev. Мы можем получать сообщения о только что подключенных устройствах, выполнять их монтирование и отключение. Окружения рабочего стола используют именно этот сервис для монтирования устройств.
Мы тоже можем использовать его для ручного монтирования. Здесь даже есть несколько плюсов. Во-первых, мы можем монтировать без прав суперпользователя, во-вторых, не нужно создавать папку.
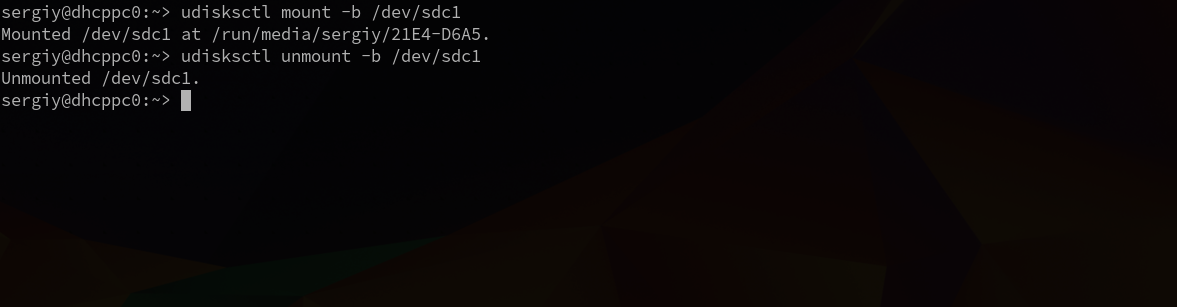
Для монтирования используется такая команда:
udisksctl mount -b /dev/sdc1

Здесь /dev/sdc1 — файл нашей флешки, а опция -b указывает, что нужно монтировать блочное устройство. Так же как и в mount здесь можно задать опции монтирования -o и файловую систему -t. Флешка будет примонтирована в папку /run/имя_пользователя/uuid-флешки/
Для размонтирования используется аналогичная команда:
udisksctl unmount -b /dev/sdc1
Автоматическое монтирование usb флешки в linux можно настроить с помощью утилиты udiskie. Все новые подключенные флешки будут автоматически подключаться, после подключения устройства будет всплывать окно с предложением открыть файловый менеджер, а также значок, с помощью которого можно получить доступ к каждому из устройств.
Устанавливается утилита в Ubuntu командой:
sudo apt install udiskie
Дальше остается запустить программу:
Теперь все подключаемые устройства будут автоматически монтироваться с помощью udisks. Рассмотрим что значат опции:
- -a — выполнять автоматическое монтирование
- -n — показывать всплывающее уведомление
- -t — показывать значок в трее.
Выводы
Теперь монтирование флешки linux не вызовет у вас проблем. Даже если у вас не будет работать окружение рабочего стола и придется делать все вручную. Если остались еще вопросы, спрашивайте в комментариях.
Источник
How to Mount USB Device in CentOS 7 (NTFS and Linux FS)
USB Hard Disk Drive or USB Flash Drive (Pen drive) is a popular external device that can be used to backup data or transfer data from one device to other device. In GUI (Graphical User Interface) Operating System such as Window or GNOME Desktop in Linux can automatically mount USB device and can show data in it if the File System of that device is supported. But all users do not like or always do not have GUI mode of Operating System specially the CentOS or Red Hat Linux user. In this case, USB device must be mounted manually and then access data from it. On the other hand, by default Linux (CentOS or Red Hat) does not support NTFS File System. But most of the USB devices are usually formatted with NTFS which is a Windows supported file system. To read or write data from NTFS formatted disk in CentOS or Red Hat Linux, a third party application named NTFS-3G have to be used. How to create or delete disk partition with fidisk utility was discussed in my previous article. In this article, I will discuss how to format USB devices and how to mount USB devices in CentOS or Red Hat Linux to read or write data from USB devices. I will also discuss how to install NTFS-3G to read or write data from NTFS USB device from CentOS or Red Hat Linux.
How to Mount USB Hard Disk or USB Flash Drive in CentOS 7
If you insert a USB Hard Disk or USB Flash Drive in CentOS 7 or Red Hat 7 Linux, you will find a new SD (SCSI Disk) drive with available drive letter (such as sdb or sdc) is attached in /dev directory. You will also find that a partition is automatically created such as sdb1 or sdc1. After inserting USB device, issue the flowing command to find your newly created partition.
Disk /dev/sda: 21.5 GB, 21474836480 bytes, 41943040 sectors
Units = sectors of 1 * 512 = 512 bytes
Sector size (logical/physical): 512 bytes / 512 bytes
I/O size (minimum/optimal): 512 bytes / 512 bytes
Disk label type: dos
Disk identifier: 0x00096c2a
Device Boot Start End Blocks Id System
/dev/sda1 * 2048 1026047 512000 83 Linux
/dev/sda2 1026048 5220351 2097152 82 Linux swap / Solaris
/dev/sda3 5220352 41943039 18361344 83 Linux
Disk /dev/sdb: 1073 MB, 1073741824 bytes, 2097152 sectors
Units = sectors of 1 * 512 = 512 bytes
Sector size (logical/physical): 512 bytes / 512 bytes
I/O size (minimum/optimal): 512 bytes / 512 bytes
Disk label type: dos
Disk identifier: 0x100d3780
Device Boot Start End Blocks Id System
/dev/sdb1 2048 1026047 512000 83 Linux
Disk /dev/sdc: 15.9 GB, 15938355200 bytes, 31129600 sectors
Units = sectors of 1 * 512 = 512 bytes
Sector size (logical/physical): 512 bytes / 512 bytes
I/O size (minimum/optimal): 512 bytes / 512 bytes
Disk label type: dos
Disk identifier: 0xfdc01076
Device Boot Start End Blocks Id System
/dev/sdc1 * 63 31129599 15564768+ c W95 FAT32 (LBA)
From the above output, you can see a new device /dev/sdc is attached and its size is 15.9 GB. You can also see a new partition /dev/sdc1 has been created automatically and the partition is with FAT32 which is supported both Window and Linux Operating System. So, we can easily mount this partition to a mount point such as /usb directory in our CentOS 7 or Red Hat 7 Linux with the following commands.
]# mount /dev/sdc1 /usb
Filesystem Type Size Used Avail Use% Mounted on
/dev/sda3 xfs 19G 5.1G 14G 28% /
devtmpfs devtmpfs 506M 0 506M 0% /dev
tmpfs tmpfs 514M 127k 514M 1% /dev/shm
tmpfs tmpfs 514M 7.5M 507M 2% /run
tmpfs tmpfs 514M 0 514M 0% /sys/fs/cgroup
/dev/sda1 xfs 521M 122M 400M 24% /boot
/dev/sdb1 xfs 521M 27M 495M 6% /data
/dev/sdc1 vfat 16G 8.2k 16G 1% /usb
From the above output, we can see that our USB device (/dev/sdc1) has been mounted to /usb directory. Now you can keep data or copy data from this USB device by browsing /usb directory with cd command.
[root@localhost usb]# ls
But FAT32 (vfat) has a limitation. It cannot transfer more than 2 GB file size at a time in Linux and in Windows it can transfer 4 GB file size at a time. So, if you need to transfer more than 2GB file size at a time, you have to first format it to other Linux supported file system such as ext4 or xfs that can overcome this limitation.
So, if you wish to transfer more than 2 GB file size at a time, format the USB device with Linux supported file system with following command and then mount the partition to the mount point ( /usb directory).
]# mkfs.xfs -f /dev/sdc1
meta-data=/dev/sdc1 isize=256 agcount=4, agsize=972798 blks
= sectsz=512 attr=2, projid32bit=1
data = bsize=4096 blocks=3891192, imaxpct=25
= sunit=0 swidth=0 blks
naming =version 2 bsize=4096 ascii-ci=0 ftype=0
log =internal log bsize=4096 blocks=2560, version=2
= sectsz=512 sunit=0 blks, lazy-count=1
realtime =none extsz=4096 blocks=0, rtextents=0
]# mount /dev/sdc1 /usb
Filesystem Type Size Used Avail Use% Mounted on
/dev/sda3 xfs 19G 5.1G 14G 28% /
devtmpfs devtmpfs 506M 0 506M 0% /dev
tmpfs tmpfs 514M 127k 514M 1% /dev/shm
tmpfs tmpfs 514M 7.5M 507M 2% /run
tmpfs tmpfs 514M 0 514M 0% /sys/fs/cgroup
/dev/sda1 xfs 521M 122M 400M 24% /boot
/dev/sdb1 xfs 521M 27M 495M 6% /data
/dev/sdc1 xfs 16G 34M 16G 1% /usb
Now you can see the USB device is formatted with xfs file system. So, you are now eligible to transfer more than 2GB file at a time.
After using USB device, you generally remove the USB device from your system. But before removing you should unmount the USB device from the mount point (/usb directory) with the following command.
How to Mount NTFS USB Device in CentOS 7 Linux
The NTFS is a Windows Operating System supported File System. So, CentOS or Red Hat Linux cannot usually mount a NTFS formatted USB HDD or USB Flash Drive. If you insert a NTFS USB device and run fdisk command, you will find a new partition and the partition file system is NTFS.
Disk /dev/sda: 21.5 GB, 21474836480 bytes, 41943040 sectors
Units = sectors of 1 * 512 = 512 bytes
Sector size (logical/physical): 512 bytes / 512 bytes
I/O size (minimum/optimal): 512 bytes / 512 bytes
Disk label type: dos
Disk identifier: 0x00096c2a
Device Boot Start End Blocks Id System
/dev/sda1 * 2048 1026047 512000 83 Linux
/dev/sda2 1026048 5220351 2097152 82 Linux swap / Solaris
/dev/sda3 5220352 41943039 18361344 83 Linux
Disk /dev/sdb: 1073 MB, 1073741824 bytes, 2097152 sectors
Units = sectors of 1 * 512 = 512 bytes
Sector size (logical/physical): 512 bytes / 512 bytes
I/O size (minimum/optimal): 512 bytes / 512 bytes
Disk label type: dos
Disk identifier: 0x100d3780
Device Boot Start End Blocks Id System
/dev/sdb1 2048 1026047 512000 83 Linux
Disk /dev/sdc: 16.2 GB, 16231956480 bytes, 31703040 sectors
Units = sectors of 1 * 512 = 512 bytes
Sector size (logical/physical): 512 bytes / 512 bytes
I/O size (minimum/optimal): 512 bytes / 512 bytes
Disk label type: dos
Disk identifier: 0xc3072e18
Device Boot Start End Blocks Id System
/dev/sdc1 * 48 31703039 15851496 7 HPFS/NTFS/exFAT
As it is a NTFS USB device, CentOS 7 or Red Hat Linux cannot usually mount it until you format it with Linux supported File System or use a third party tool. As we do not want to format it and want to use NTFS USB device, we will us third party open source tool named NTFS-3G that will help to mount NTFS formatted Disk in CentOS 7 or Red Hat 7 Linux.
The NTFS-3G is present in EPEL (Extra Packages for Enterprise Linux) repository. So, we have to enable EPEL repository before installing NTFS-3G. The following commands show how to enable EPEL Repository in CentOS 7 or Red Hat 7 Linux.
]# yum install wget –y
]# rpm -Uvh remi-release-7.rpm epel-release-latest-7.noarch.rpm
EPEL Repository is now enabled and we are ready to install NTFS-3G. To install NTFS-3G, issue the following command from your command prompt.
]# yum install ntfs-3g –y
NTFS-3G is now installed and ready to work. NTFS-3G works with FUSE module. FUSE module is by default included with CentOS 7 or Red Hat 7 Linux. However, if you find that FUSE module is not present in your kernel, issue the following command to install and load the FUSE driver module.
]# yum install fuse –y
We are now ready to mount the above NTFS USB device in our CentOS 7 or Red Hat 7 Linux. First create the mount point for NTFS device with the following command.
Now mount the NTFS USB device to the mount point with the following command.
]# mount -t ntfs-3g /dev/sdc1 /backup
You can now find that the NTFS USB device is mounted to the mount point with the following command.
Filesystem Type Size Used Avail Use% Mounted on
/dev/sda3 xfs 19G 5.2G 14G 28% /
devtmpfs devtmpfs 506M 0 506M 0% /dev
tmpfs tmpfs 514M 127k 514M 1% /dev/shm
tmpfs tmpfs 514M 7.5M 507M 2% /run
tmpfs tmpfs 514M 0 514M 0% /sys/fs/cgroup
/dev/sda1 xfs 521M 122M 400M 24% /boot
/dev/sdb1 xfs 521M 27M 495M 6% /data
/dev/sdc1 fuseblk 17G 5.0G 12G 31% /backup
Now go to your NTFS USB device by browsing backup directory and you will find that your files are present there.
[root@localhost backup]# ls
Activator Autorun.inf bootmgr BREB visit BSTI PLI sources System Volume Information AL.ico boot bootmgr.efi BREB Visit Report.docx efi setup.exe support Time extension letter.docx
You can now do any file operation here. If you want to make mount point permanent at the boot time, simply add the following line at the end of /etc/fstab file. The mount point will remain as permanent.
/dev/sdc1 /backup ntfs-3g defaults 0 0
UUID=bee34176-dd55-479e-95c5-9545912d14b9 / xfs defaults 1 1
UUID=dede0f3e-6c9a-4185-afb4-f129fb873246 /boot xfs defaults 1 2
UUID=40464ff6-29e5-4492-9698-1b8229ca58f6 swap swap defaults 0 0
/dev/sdb1 /data xfs defaults 0 0
/dev/sdc1 /backup ntfs-3g defaults 0 0
If you want to remove the NTFS USB device, just delete the above fstab (/etc/fstab) entry and unmount with the following command and then remove your device.
If you face any confusion to follow above steps properly, watch the below video about mounting USB device in CentOS 7 Linux and hope your confusion will be removed.
How to mount USB device (both Linux supported File System and NTFS) in CentOS 7 or Red Hat 7 Linux has been discussed in this article. I hope you are now able to mount your USB device in your CentOS 7 or Red Hat 7 Linux. However, if you face any confusion to follow above steps properly, feel free to discuss in comment or contact with me from Contact page. I will try my best to stay with you.
Источник


