- Detect and mount USB devices in Linux from console
- Overview
- Understanding
- Listing
- 1. Identify the newly attached device
- 1.1 Using blk commands
- 1.2 Inspect Kernel ring buffer
- 1.3 dev-by- directories
- 2. Mount the device
- 3. Make it permanent
- 3.1 Mount a pendrive just by specifying a directory
- 4. Remove pendrive
- Optional
- Set pendrive label
- Summary
- Resources
- Articles
- Subcategories
- доступ к консоли Linux через USB
- Re: доступ к консоли Linux через USB
- Re: Re: доступ к консоли Linux через USB
- Re: Re: доступ к консоли Linux через USB
- Re: Re: доступ к консоли Linux через USB
- Connecting to Linux console
- From SomLabs Wiki
- Contents
- Linux host PC
- Prerequisites
- Connecting to Linux console through UART-USB converter
- Connecting to Linux console via SSH client
- Connecting as root — not recommended
- Connecting as regular user
- Windows host PC
- Prerequisites
- Connecting to Linux console through UART-USB converter
- Connecting to Linux console via SSH client
- Connecting as root — not recommended
- Connecting as regular user
Detect and mount USB devices in Linux from console
Mount pendrives with commands in the Linux terminal
Overview
This is a small guide to detect a newly attached device to an USB port and mount it in Linux.
We will explore different strategies that will help when some of the tools isn’t available.
First of all, some definitions:
Understanding
What does exactly mount means?
All files accessible in a Unix system are arranged in one big tree, the file hierarchy, rooted at /. These files can be spread out over several devices. The mount command serves to attach the filesystem found on some device to the big file tree. Conversely, the umount(8) command will detach it again. The filesystem is used to control how data is stored on the device or provided in a virtual way by network or another services.
To attach these new devices filesystems we use the mount command in the form: mount -t type device dir .
In the above command, Devices (block special devices 1 ) can be indicated in one of the following three ways:
- Filename
- using the filename that is associated with the device.
- e.g.: /dev/sdb2
- Filesystem label
- Using the label associated with the device.
- e.g.: PENDRIVE
- UUID
- Universally Unique IDentifier (UUID) Uniform Resource Namespace 2 .
- e.g.: ba108o135-80bf-1cci-b2za-082eafd02y0g
Listing
To list the currently mounted devices/filesystems, findmnt (find a filesystem).
For example, in Ubuntu 18.10 it shows:
There is also the old way, maintained for compatibility only but widely used: mount -l or just mount .
Now we have just connected a pendrive (flash drive), how do we know which label or UUID it has to be able to mount the filesystem?
1. Identify the newly attached device
After we plug a pendrive, we need a method to locate the new device so we can get its label or UUID .
The following list shows the available alternatives to do it, any of them would be help you find the device information, listing most complete and easier to use first.
1.1 Using blk commands
The command lsblk prints all block devices (except RAM disks) in a tree-like format by default.
We can have a look at it to try to spot the new device with the filesystem parameter: —fs to print info of each filesystem, LABELs and UUID s on available block devices.
To directly find out the connected pendrive, save the above listing in a temporal folder and then look for the differences with the same command after plugging the pendrive:
1.2 Inspect Kernel ring buffer
Immediately after plugging the device, we can examine the kernel ring buffer with the command dmesg
There we can look for the string of type sda , or sdb , etc, that will belong to the most recent connected device.
In this case we can spot the sda: sda1 sda2 line that indicates it has two partitions: sda1 and sda2 .
Then we use the command blkid -p device to find out its UUID , label and more properties.
1.3 dev-by- directories
And a similar approach can be done to know which one was plugged in, saving the list before and after plugging the device:
2. Mount the device
Which method should we use?
Device names depend on which (physical) slot you connect the device, and if there are other devices already attached or not, so the filename to refer to them may change over time.
Labels are more stable than filenames, but they may change or have the same name as other label.
We will mount it at /media/usb-stick .
For this, create the directory: sudo mkdir /media/usb-stick
And then mount it with one of these methods, preferably UUID :
3. Make it permanent
There is a special file /etc/fstab , in which each line describes:
- what devices are usually mounted,
- where,
- using which options.
After reboot each line will be mounted automatically if the device is connected.
As we are working mostly with pendrives, we should use the special option: nofail. This avoids reporting any errors for the device if it does not exist at booting time when it tries to mount them and probably the device won’t be plugged..
3.1 Mount a pendrive just by specifying a directory
Personally, I like to have each pendrive or device identified like /media/kingstone-2gb so I can easily mount it with the directory name after plugging it.
4. Remove pendrive
sudo umount /media/usb-stick
Optional
Set pendrive label
To set create or rename the label of a pendrive there are several programs:
- e2label — Change the label on an ext2/ext3/ext4 filesystem
- tune2fs — adjust tunable filesystem parameters on ext2/ext3/ext4 filesystems
- mke2fs — create an ext2/ext3/ext4 filesystem
To set a pendrive label as usb-stick
Or create filesystem:
And change the label
Summary
Summarizing the commands used above in a single list:
Resources
block special file: A block special file is normally distinguished from a character special file by providing access to the device in a manner such that the hardware characteristics of the device are not visible. http://pubs.opengroup.org/onlinepubs/9699919799/basedefs/V1_chap03.html#tag_03_79 ↩︎
A Universally Unique IDentifier (UUID) URN Namespace https://tools.ietf.org/html/rfc4122 ↩︎
Marcelo Canina
Articles
- Adding a swap memory to Linux from command line in 6 steps April 2, 2020
- Free up space in Linux (Ubuntu) March 27, 2020
- Switch between languages in Linux with xkb. Write in multiple languages with same keyboard. March 21, 2020
- How to make Ubuntu display emojis February 12, 2020
- Detect and mount USB devices in Linux from console
- How to make screencasts in Ubuntu Linux January 21, 2019
- Using i3 window manager in Linux January 7, 2019
- Setting Up A Fresh Linux Server August 25, 2018
- How To Download A Website With Wget The Right Way June 30, 2017
- Replicate Installed Package Selections From One Ubuntu System To Another April 24, 2017
- Using Clamav Antivirus In Ubuntu January 25, 2017
- How to Type Spanish Characters, Accents and Symbols in Linux June 6, 2016
Subcategories
Ubuntu
- How to activate tap to click touchpad’s feature in Ubuntu in 4 steps March 4, 2021
- Difference between suspend and hibernate in Ubuntu and how to execute them from command line April 12, 2020
- Solving Google Chrome’s gpu-process error message in Ubuntu Linux January 7, 2019
- Solving Google Chrome’s secret service operation error message in Ubuntu Linux January 7, 2019
- Start Emacs In Ubuntu The Right Way June 10, 2017
Unix Shell
- Connect to a Bluetooth device from command line in Ubuntu Linux June 23, 2020
- Add Infolinks Script To An Existing Website From Console With Sed Command April 4, 2017
- How to change all files permissions to 644 and directories to 755 January 10, 2017
- Shell Redirect Output And Errors To The Null Device In Bash December 9, 2016
- Prevent Running Of Duplicate Cron Jobs December 8, 2016
- Delete All Backup Files Recursively In Bash November 28, 2016
- Bash Script to Find Out If MySQL Is Running Or Not November 9, 2016
A comprehensive guide to manually mount a USB pendrive in Linux.
Источник
доступ к консоли Linux через USB
С доступом к консоли Linux через Com port все ясно и понятно. Вот ссылка на обсуждение для com-порта: http://www.opennet.ru/openforum/vsluhforumID1/37737.html
Но, к сожалению, в новых ноутбуках этот самый com-порт отсутствует.
Возможно ли организовать подобный доступ через usb интерфейс? (для com порта это выглядит так: берем ноут, подключаемся к компу через нуль-модемный кабель, запускаем какой нибудь терминальный клиент на ноуте и видим консоль другого компа.)
Почитал документацию Documentation/usb/usb-serial.txt, из которой ясно, что существуют конвертеры usb->serial port. А возможна ли организация доступа к Linux консоли без конвертеров (т.е. напрямую через кабель usb usb) ?

Re: доступ к консоли Linux через USB
нет не возможно. USB имеет древовидную структуру и в ней может быть только один root hub. Есть устройства позволяющие строить USB сети, но суть этих устройств, что они эмулируют типа сетевые карты на USB. к этой псевдо-сети и подключаются несколько USB систем. Вообщето бредовые устройства и уроды с самого рождения. 1394 позволяют строить одноранговые системы с подсоединением нескольких компов, но с ним я не работал.
Проще взять USB to Serial, с дровами поддерживающими real tty device, стоят они 20$.
Re: Re: доступ к консоли Linux через USB
Не только проще, но в данной ситуации это единственный оправдывающий себя выход.
Re: Re: доступ к консоли Linux через USB
Есть USB-Link-USB устройства, какраз для соединения 2х компов.
Re: Re: доступ к консоли Linux через USB
Спасибо, буду двигаться в предложенных направлениях.
Источник
Connecting to Linux console
From SomLabs Wiki
Connecting to Linux console
Contents
Linux host PC
Prerequisites
- PC with Ubuntu 16.04 operating system and USB port (for USB-UART converter connection) or local network connection (for SSH connection)
- VisionCB-STD board with VisionSOM-6ULL and Linux image installed
- Micro-USB cable
Connecting to Linux console through UART-USB converter
VisionCB-STD has built-in UART-USB converter, it lets you connect to the console via virtual COM port. First of all you need to determine what is the VisionCB-STD virtual COM number on your Linux system. To do that connect VisionCB-STD board to your PC with micro-USB cable and list your terminal devices:
If there is only one device then it is the terminal you are looking for (/dev/ttyUSB0 in the example above), if there are more /dev/ttyUSB* terminal then disconnect and reconnect your board to find proper one.
Now install minicom:
Enter Serial port setup, press F to disable hardware flow control, press Enter, choose Exit, now you can log in as root (password root) or som (password som). It is strongly recommended to change the default passwords of existing users. To do that enter passwd command, you will be prompted to enter password twice:
To exit minicom press Ctrl+A, Z, X, then confirm by pressing Enter.
Connecting to Linux console via SSH client
Connecting as root — not recommended
Login to the UART-USB console as described in the previous section and change the root password. Once you have changed it (still via UART-USB connection) you need to modify /etc/ssh/sshd_config file:
Restart SSH service:
Now you can log in as root via SSH, you only need IP address of VisionSOM-6ULL. Enter ip a for list of all network interfaces and their IP addresses:
In this case the IP address of the Ethernet (eth0) interface is 192.168.0.25. Now you can connect to VisionSOM-6ULL with SSH client from your Linux host PC:
Connecting as regular user
To connect as a regular user you need to create new account or use existing one. In the first case login as root through USB-UART converter or SSH, and add a new account and set password:
By default new user has no home directory and his shell is /bin/sh. To create home directory enter:
To change shell to bash enter:
Now you can log in as tom with SSH client.
Windows host PC
Prerequisites
- PC with Windows operating system and USB port (for USB-UART converter connection) or local network connection (for SSH connection)
- VisionCB-STD board with VisionSOM-6ULL and Linux image installed
- Micro-USB cable
- PuTTY terminal
Connecting to Linux console through UART-USB converter
VisionCB-STD has built-in UART-USB converter, it lets you connect to Linux console via virtual COM port. First of all you need to determine what is the VisionCB-STD virtual COM number on your Windows system, to do that open Control Panel, connect VisionCB-STD to your computer, find Ports (COM & LPT) and expand it. You should see USB Serial Port (COM
), if there is only one item with this name then it is your port, if there are more ports then disconnect and reconnect VisionCB-STD to check which port shows up. Now we can connect with PuTTY to your VisionSOM-6ULL, connect VisionCB-STD to your PC, run PuTTY and:
- Select Serial in Connection type section
- Enter VisionCB-STD port number in Serial line field
- Enter 115200 in Speed field
- Click Open
Now you can log in using one of existing user names. It is strongly recommended to change the default passwords of existing users. To do that enter passwd command, you will be prompted to enter password twice:
Connecting to Linux console via SSH client
Connecting as root — not recommended
Login to the UART-USB console as described in the previous section and change the root password. Once you have changed it (still via UART-USB connection) you need to modify /etc/ssh/sshd_config file:
Restart SSH service:
Now you can log in as root via SSH, you only need IP address of VisionSOM-6ULL. Enter ip a for list of all network interfaces and their IP addresses:
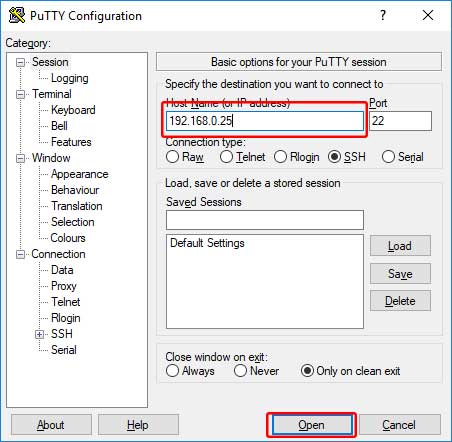
In this case the IP address of the Ethernet (eth0) interface is 192.168.0.25. Now you can connect to VisionSOM-6ULL with SSH client from your Windows host PC:
- Start PuTTY
- Enter VisionSOM-6ULL IP address in Host Name field
- Click Open button
Connecting as regular user
To connect as a regular user you need to create new account or use existing one. In the first case login as root through USB-UART converter or SSH, and add a new account and set password:
By default new user has no home directory and his shell is /bin/sh. To create home directory enter:
To change shell to bash enter:
Now you can log in as tom with SSH client.
Источник


