- Укрощаем USB/IP
- Часть первая, историческая
- Часть вторая, серверно-линуксовая
- Часть третья, клиентская и запутанная
- Create the «Ethernet-over-USB» Project
- Source Files
- Using the «Ethernet-over-USB» Project
- Hardware Setup
- Troubleshooting
- USB Networking
- From Openmoko
- Contents
- Openmoko Networking Setup
- Things to keep in mind
- Suspend
- So is it «usb0» or is it «eth1»?
- My distro
- Simple Manual Linux Configuration
- The shortest way
- The login
- The more advanced way
- Changing the Neo IP address
- Linux Kernel Support
- USB Networking support
- Masquerading support
- Firewall Issues
- Other Issues
- Regular drop-outs
- Configure Default Neo DNS
- Proxying DNS from Desktop/Laptop
- Proxying with dnrd
- Proxying with a UDP forwarder
- Proxying with iptables
- Testing Your Connection
- Connection script
- OS or Distro Specific & Automatic Configuration
- MacOS X
- Windows
- FreeBSD
- FreeBSD8
- Debian, Ubuntu and others
- Systems using udev
- For devices showing as usb0
- For devices showing as eth1
- For all devices
- Systems using hotplug — Using the interfaces file
- Ubuntu 9.10 — the Karmic Koala
- Ubuntu 9.04 — the Jaunty Jackalope
- Ubuntu 8.10 — Easy Way
- Ubuntu Issues
- Iptables Configuration with GUI
- Ubuntu Workaround
- Ubuntu and QI
- Mandriva
- Fedora
- Option A — Tested with FC9, FC8 & FC5
- Option B
- Option C — tested on FC8, FC9 and F10
- Troubleshooting
- Option D — tested on Fedora 11 (Leonidas), Fedora 12 (Unite) and Fedora 13 (Goddard)
Укрощаем USB/IP
Часть первая, историческая
Если машина виртуальная — всё это несложно. Функционал проброса USB от хоста в виртуалку появился еще в VMWare 4.1. Но в моём случае ключик защиты, опознающийся как WIBU-KEY, нужно было в разное время подключать к разным машинам, и не только виртуальным.
Первый виток поиска в далеком 2009-м году привел меня к железке под названием TrendNet TU2-NU4
Плюсы:
- работает не всегда. Допустим, ключ защиты Guardant Stealth II через неё не заводится, ругаясь ошибкой «устройство не может быть запущено».
- ПО для управления (читай — монтирования и размонтирования USB-устройств) убого до крайности. Ключи командной строки, автоматизация — не, не слышали. Всё только руками. Кошмар.
- управляющее ПО ищет саму железку в сети широковещанием, поэтому работает это только в пределах одного broadcast-сегмента сети. Указать IP-адрес железки руками нельзя. Железка в другой подсети? Тогда у вас проблема.
- разработчики забили на устройство, слать баг-репорты бесполезно.
Второй виток случился во времена уже не столь отдаленные, и привел меня к теме статьи — USB/IP project. Привлекает открытостью, тем более, что ребята из ReactOS подписали им драйвер для Windows, так что теперь даже на x64 всё работает без всяких костылей вроде тестового режима. За что команде ReactOS огромное спасибо! Звучит всё красиво, попробуем пощупать, так ли оно на деле? К сожалению, сам проект тоже подзаброшен, и на поддержку рассчитывать не приходится — но где наша не пропадала, исходник есть, разберемся!
Часть вторая, серверно-линуксовая
Сервер USB/IP, расшаривающий USB-девайсы по сети, может быть поднят только в Linux-based OS. Ну что ж, линукс так линукс, устанавливаем на виртуалку Debian 8 в минимальной конфигурации, стандартное движение руками:
Установились. Дальше интернет подсказывает, что нужно бы загрузить модуль usbip, но — здравствуйте, первые грабли. Нет такого модуля. А всё оттого, что большинство руководств в сети относятся к более старой ветке 0.1.x, а в крайней 0.2.0 модули usbip имеют другие названия.
Ну и добавим в /etc/modules такие строки, чтобы загружать их автоматически при старте системы:
Запустим сервер usbip:
Дальше всемирный разум нам подсказывает, что в комплекте с usbip идут скрипты, позволяющие нам управлять сервером — показать, какое устройство он будет расшаривать по сети, посмотреть статус, и так далее. Тут нас поджидает еще один садовый инструмент — эти скрипты в ветке 0.2.x, опять же, переименованы. Получить список команд можно с помощью
Почитав описание команд, становится понятно, что для того, чтобы расшарить требуемый USB-девайс, usbip хочет узнать его Bus ID. Уважаемые зрители, на арене грабли номер три: тот Bus ID, который выдаст нам lsusb (казалось бы, самый очевидный путь) — ей не подходит! Дело в том, что железки вроде USB-хабов usbip игнорирует. Поэтому, воспользуемся встроенной командой:
Примечание: здесь и далее в листингах я буду всё описывать на примере моего конкретного USB-ключа. Ваши название железки и пара VID:PID могут и будут отличаться. Моя называется Wibu-Systems AG: BOX/U, VID 064F, PID 0BD7.
Теперь мы можем расшарить наше устройство:
Троекратное ура, товарищи! Сервер расшарил железку по сети, и мы можем её подключать! Осталось только дописать автозапуск демона usbip в /etc/rc.local
Часть третья, клиентская и запутанная
Подключить расшаренное устройство по сети к машине под управлением Debian я попробовал сразу же на том же сервере, и всё прекрасно подключилось:
Переходим к Windows. В моем случае это был Windows Server 2008R2 Standard Edition. Официальное руководство просит сначала установить драйвер. Процедура прекрасно описана в прилагаемом к windows-клиенту readme, делаем всё как написано, всё получается. На XP тоже работает без каких-либо трудностей.
Распаковав клиент, пробуем примонтировать наш ключик:
Ой-ой. Что-то пошло не так. Используем навык гугла. Встречаются отрывочные упоминания, что что-то там не так с константами, в серверной части разработчики при переходе на версию 0.2.0 изменили версию протокола, а вот в клиенте под Win сделать это забыли. Предлагаемое решение — поменяйте константу в исходнике и пересоберите клиент.
Вот только очень мне не хочется качать Visual Studio ради этой процедуры. Зато у меня есть старый-добрый Hiew. В исходнике константа объявлена как двойное слово. Поищем в файле 0х00000106, заменяя на 0х00000111. Не забываем, порядок байт обратный. Итог — два совпадения, патчим:
На этом можно было бы закончить изложение, но музыка играла недолго. Перезагрузив сервер, я обнаружил, что устройство на клиенте не монтируется!
И всё. На это мне не смог ответить даже всезнающий гугл. А при этом команда отобразить доступные на сервере устройства вполне корректно показывает — вот он, ключ, можете монтировать. Пробую примонтировать из-под Linux — работает! А если теперь попробовать из-под Windows? О ужас — это работает!
Источник
Create the «Ethernet-over-USB» Project
In this example, we are using the MCBSTM32F400 board with the STM32F407IGHx device. Create a new project in MDK (Select Device STMicroelectronics:STM32F4 Series: STM32F407:STM32F407IG:STM32F407IGHx). In the Manage Run-Time Environment window, select the following components:
- CMSIS:Core
- CMSIS:RTOS2 (API):Keil RTX5
- CMSIS Driver:Ethernet MAC (API):Ethernet MAC
- CMSIS Driver:Ethernet PHY (API):KSZ8081RNA
- CMSIS Driver:USB Device (API):High-speed
- Device:STM32Cube Framework (API):Classic
- USB:Device: 1
- USB:Device:CDC:1
Click the Resolve button and then OK.
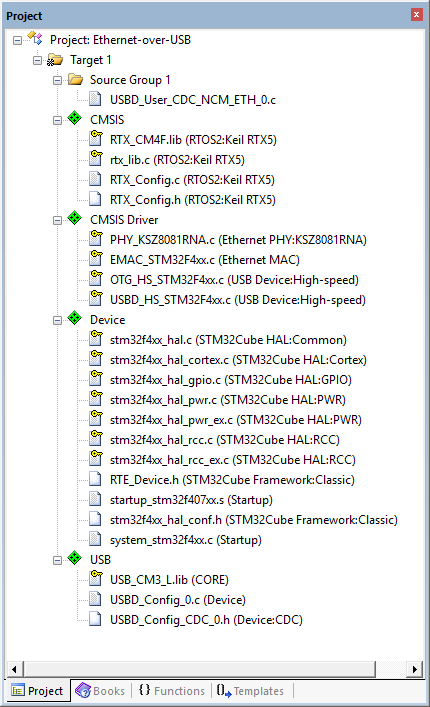
Before continuing to add the required source code, you need to add a template file called USBD_User_CDC_NCM_ETH_0.c:
- Right-click on Source Group 1 and select Add New Item to Group ‘Source Group 1’. .
- Click on User Code Template and select the USB Device CDC NCM Ethernet Bridge template.
- Click Add to copy the file USBD_User_CDC_NCM_ETH_0.c to the project.
Your Project should look like this:
Source Files
- Click on New (Ctrl + N) to create a new file.
- Save it (File -> Save) as main.h.
- Copy the following code into the main.h file and save it again:
- Right-click on Source Group 1 and select Add New Item to Group ‘Source Group 1’. .
- Click on C File (.c) and enter main in the Name box.
- Copy the following code into the main.c file:
- Right-click on Source Group 1 and select Add New Item to Group ‘Source Group 1’. .
- Click on C File (.c) and enter app_main in the Name box.
- Copy the following code into the app_main.c file:
Before building the project, you need to edit these configuration files (in Configuration Wizard view):
- Under Device, double-click RTE_Device.h and:
- enable ETH (Ethernet Interface) [Driver_ETH_MAC0] and:
- disable ENET:MII (Media Independent Interface)
- enable ENET:RMII (Reduced Media Independent Interface) and:
- set ETH_RMII_TXD0 Pin to PG13
- set ETH_RMII_TXD1 Pin to PG14
- set ETH_RMII_TX_EN Pin to PG11
- enable USB OTG High-speed and under it:
- enable Device [Driver_USBD1]
- enable ETH (Ethernet Interface) [Driver_ETH_MAC0] and:
- Under USB, double-click USBD_Config_0.c and under USB Device 0 change:
- set Connect to hardware via Driver_USBD# to 1
- enable High-speed
- under Device Settings change:
- set Max Endpoint 0 Packet Size to 64
- set Product ID to 0x3518
- Under USB, double-click USBD_Config_CDC_0.h and under USB Device: Communication Device Class (CDC) 0 change:
- set Communication Class Subclass to Network Control Model (NCM)
Before building and downloading the project to the target, make sure that the correct debugger is set in the Options for Target dialog (ALT + F7). You may then build and download the example project to the evaluation board using the ВµVision commands:
After these steps, the project should start executing on your evaluation kit. In case of errors, refer to the Evaluation Board User’s Guide for configuration information.
Using the «Ethernet-over-USB» Project
Hardware Setup
- Verify all jumper settings on the target hardware.
- Connect the development board to a host Linux PC (native or in a virtual machine) attaching a Micro-USB cable to the USBHS port and using an Ethernet cable to the ETH connector.
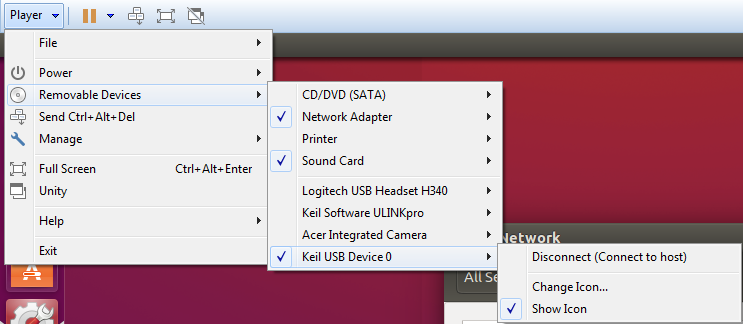
- Using a virtual machine, you need to connect to the VM:
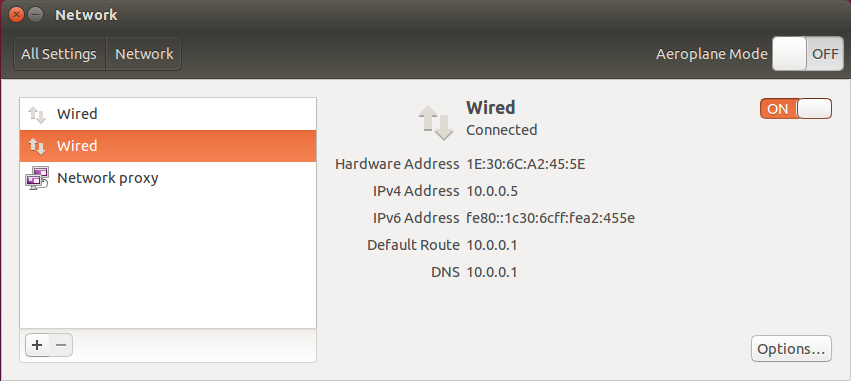
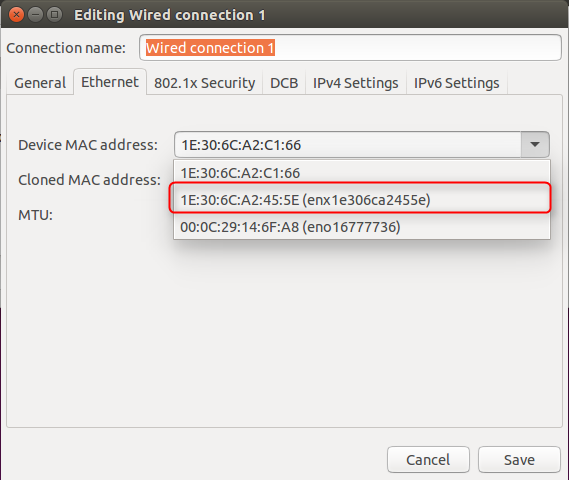
- Within the Linux system (here Ubuntu), you should be able to see a wired Ethernet connection (with the MAC address 1E:30:6C:A2:45:5E):
Troubleshooting
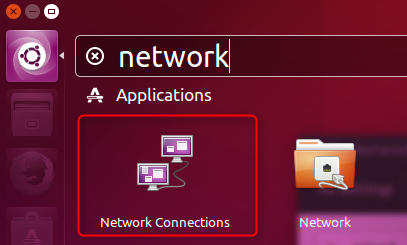
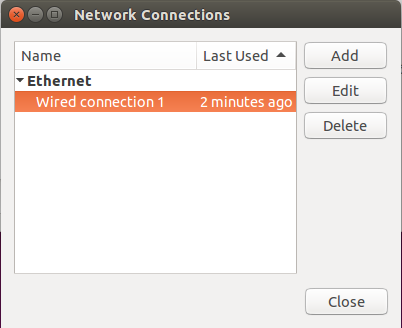
Especially when working with virtual machines, the USB connection is not passed onto the guest system properly. Then it can help to restart the guest. Also, to make Ubuntu use the network adapter that you like, do the following: In Ubuntu’s search, enter «network». The Network Connections program will be available in the search results:
Double-click to open and then mark the Wired connection 1 and click Edit:
Select the MAC address of your Ethernet-over-USB device and press Save and Close:
This should instruct Ubuntu to use your device for the network connection. Also, try to disconnect any other network adapter from the virtual machine.
Источник
USB Networking
From Openmoko
Contents
Openmoko Networking Setup
In order to communicate via TCP/IP to your FreeRunner, a basic understanding of the networking expectations is required. Each end of the USB connection forms a LAN (local area network) segment, with the FreeRunner’s USB networking device at one end (default 192.168.0.202) and your laptop or desktop at the other end (192.168.0.200 in this guide).
| NOTE: IP adresses are changed in new SHR-CORE images after 110822, phone 192.168.7.2 host: 192.168.7.1 |
Normally, your desktop machine will know how to reach the Internet, having had its gateway (the IP address of the machine or device which knows how to send packets to machines beyond your subnet) configured via DHCP or statically (probably via a router). For the FreeRunner to reach the Internet, your desktop will have to be configured to route and masquerade (NAT) packets from it.
Normally, none of this is an issue, but problems can arise when the subnet between the FreeRunner and your desktop overlap with the desktop to the router (which forms a second LAN), since your desktop might not know how to route traffic properly.
In other words: if your existing router and desktop have addresses 192.168.0.(something) changing them to e.g. 192.168.1.(something) might save you a lot of troubleshooting later. A discussion of this is here.
Things to keep in mind
Suspend
When the FreeRunner suspends it disables its USB networking interface. Therefore it is a good idea to turn off the FreeRunners suspend function when using USB networking.
So is it «usb0» or is it «eth1»?
- The documentation below refers to the network interface name on the host side as «usb0». However, the actual name is determined by your host system, and many host systems will rename the interface based on the mac (or hardware) address presented by the Neo or Freerunner. Use the ifconfig -a command, or use dmesg to examine the output from your host’s kernel, to find which interface name was actually assigned to your device. If it wasn’t «usb0», it will almost always be the next available «ethn» name.
In all the steps below where you see the interface referred to as «usb0», you may need to substitute the interface name that your host assigned.
For those interested in the technical details, the «usb0» interface name is used on the host system when the mac (hardware) address presented by the Freerunner or Neo is a locally-generated (random) address. Because the address is random, the ability to easily manage the interface with network managment tools is somewhat compromised. In fact, the Freerunner has been assigned official mac addresses, including addresses for the USB network interface. When these addresses are correctly used on the Freerunner (which is the case with the Qi bootloader, and with certain of the distros for the Freerunner), then the host system sees official mac addresses, and responds by configuring a permanent network interface for that device. By convention, this permanent interface is one of the «eth» interfaces. The specific interface name chosen will be remembered, and will be used each time that specific Freerunner is connected, and used only for that Freerunner. This is a particularly useful feature for users who have multiple USB-networked devices.
As of the time of this writing, the Android and SHR distros will correctly pass the official mac address to the host, and will appear as «ethn» interfaces on the host.
My distro
There are many differences between distributions, both on the phone and on the desktop. Also within a single distribution there can be big changes over time, so remember that solutions provided here might not always exactly match your situation.
If all your approaches fail, you might want to consider using Knoppix (6.3 WorkedForMe(tm)) or another live distribution.
| NOTE: IP adresses are changed in new SHR-CORE images, phone 192.168.7.2 host: 192.168.7.1 so use theses adresses if you use the manual |
Simple Manual Linux Configuration
Try this first (as root on your desktop, with FreeRunner attached via USB cable and booted properly, not at the Boot Menu). If it works, then you can add permanent configuration or use more sophisticated setups below.
The shortest way
This simple way has been tested with many Linux distributions (Fedora, SuSE, Red Hat, Debian and others) and network configurations. It was even successfully applied to connect another Linux based handhelds like TDS Nomad and surely can be recommended as the first attempt. The way assumes that you have the recent Linux distribution with USB networking enabled and also rather typical network setup.
With the device connected configure usb0 interface (as root or via sudo like in this example):
If your eth0 interface is also in the same ‘range’ (e.g. 192.168.0.105) then you can do the following:
The login
Log in to the Neo (you do not need to be a root on the desktop host just to log in).
On some SHR Version the default root password is blank.
If you get an error like: «Permission denied, please try again.» try to set a new password on the phone:
open a terminal on the phone and type:
then enter a new password and establish a new ssh connection.
Note that an empty passwords won’t work on some SHR releases!
Do not forget to allow ssh (open the port 22) on your firewall so that you can connect to the device. If you suspect any firewall issues, the simplest way is to unplug the main Internet cable leaving only Neo connected and then temporary turn the firewall off.
Also, some old or narrowly configured Linux distributions may not have USB networking support. For such cases the simple way might be just to upgrade.
The more advanced way
If the previously described simple approach does not work, you may try the more complex one.
If your Internet connection is also in the range 192.168.0.x then instead you might want to use only:
(This will just map the net from 192.168.0.192 to 192.168.0.207 onto usb0. If you get the error ‘Cannot find device «usb0″‘, double-check that your FreeRunner is turned on and connected by USB. Ensure also that the uhci_hcd module is loaded on your PC. If that doesn’t work, try unplugging and replugging the USB cable.)
And in this case you should enable ARP proxy on internet facing interface INSTEAD of using iptables:
This assuming that eth2 is connected to ISP.
Then (ideally, not as root):
The default password is blank.
Due to the fact that in most cases your Neo will use the same dns servers as your computer uses, you can automate the process of writing dns servers to your phone:
Again if your net already is 192.168.0.0, replace the POSTROUTING statement with
This simple script will set up routing for your Freerunner and than copy resolv.conf with dns addresses straight to the phone. All you have to do is connect phone to the computer, run the script and enjoy internet connection from your phone.
Changing the Neo IP address
Like mentioned above, if the default Neo subnet 192.168.0.X is already used, it might be necessary to change the Neo IP adress and subnet. To achieve this, edit /etc/network/interfaces on the Neo (and do «/etc/init.d/networking restart»). In the following example the Neo will use the IP address 192.168.100.1 (instead of the default 192.168.0.202) within the network 192.168.100.X (instead of 192.168.0.X), another private class C network. (The netmask indicates that the first 3 bytes (all bits set) are used to determine the subnet and the last byte (no bits set) to determine the machine.) The gateway (the computer, the Neo is attached to) also has to be part of the subnet and is expected to be 192.168.100.200 (instead of 192.168.0.200) here.
Modifications for /etc/network/interfaces:
(The network entry seems to be redundant information, since it can be derived from address and netmask?) Note that wiki articles usually expect default settings and you have to adjust the IP adress, gateway, etc entries according to your changes.
Linux Kernel Support
Your Linux desktop/laptop needs to have suitable support. In particular you will need to have enabled USB networking and masquerading support in the kernel. For default kernels in many Linux distributions this will already be the case.
USB Networking support
The following options need to be enabled:
- CONFIG_USB_USBNET (Multi-purpose USB Networking Framework. Module will be called usbnet)
- CONFIG_USB_NET_CDCETHER (CDC Ethernet support. Module will be called cdc_ether)
These options are available in Device Drivers -> USB support -> USB Network Adapters or Device Drivers -> Network Device Support -> USB Network Adapters.
In order for USB networking to work you need to load the cdc_ether module (when loading cdc_ether the module usbnet will be loaded automatically). For more info see the usbnet driver homepage.
Masquerading support
Masquerading options are found in Networking —> Networking options —> (tested on Linux 2.6.26.3).
To enable the needed options you first have to enable:
- CONFIG_NETFILTER (Network packet filtering framework (Netfilter))
Networking —> Networking options —> [*] Network packet filtering framework (Netfilter) —> Core Netfilter Configuration —>
You need at least following options enabled as modules:
- CONFIG_NF_CONNTRACK (Netfilter connection tracking support)
- CONFIG_NF_CONNTRACK_FTP (FTP protocol support)
- CONFIG_NETFILTER_XTABLES (Netfilter Xtables support)
Rest of the needed options are found from
Networking —> Networking options —> [*] Network packet filtering framework (Netfilter) —> IP: Netfilter Configuration —>
You need to enable (again, as modules is fine):
- CONFIG_NF_CONNTRACK_IPV4 (IPv4 connection tracking support (required for NAT))
- CONFIG_IP_NF_IPTABLES (IP tables support (required for filtering/masq/NAT))
- CONFIG_NF_NAT (Full NAT)
- CONFIG_IP_NF_TARGET_MASQUERADE (MASQUERADE target support)
Firewall Issues
On some systems, you may have firewall rules which prevent this working — such as added by the iptables service on Fedora. You may care to stop these, and/or review any rules or policies you think might cause issues.
The most relevant table is the nat table, which controls translation of addresses:
iptables -L -t nat -v -n
Unless you have a special setup, you’ll want to see only the MASQUERADE rule that you apply below, and ACCEPT as the default policy. Also look at the filter table:
iptables -L -t filter -v -n
If this contains anything in the FORWARD chain, then this may prevent passing packets. It can be flushed with:
iptables -t filter -F FORWARD
Other Issues
In case the Freerunner was recognized and you could assign the IP address to the device, but you get after trying to connect with ‘ssh root@192.168.0.202’ an error like:
Then your USB cable could be broken. Try to connect with another cable.
Regular drop-outs
If you’ve connected, and your connection keeps dropping and then coming back up, make sure that you don’t have automatic wireless network connections — in some distros, the the wireless connection scripts automatically disable the usb network interface.
In addition to routing issues, to be practical, DNS will need to work. In some cases, you might already be running a DNS server on your desktop such as dnsmasq or bind9, which is the default assumption the FreeRunner makes. In other cases, you’ll need to configure DNS to that of your router, or a DNS server further out on the internet such as that provided by your ISP.
Configure Default Neo DNS
DNS is configured in /etc/resolv.conf on your FreeRunner.
You should add the IP address of the DNS servers as provided by your ISP. Check your router’s or PC’s network status for the nameserver IP addresses.
You can also add the public DNS server called openDNS:
These settings will be lost on reboot. You can set the DNS for the next connect, by adding the following to the end of the usb0 setting in /etc/network/interfaces, right above the bluetooth networking section:
Proxying DNS from Desktop/Laptop
If you move about, making assumptions about the network may not be convenient, and it is possible to proxy DNS requests via your host laptop (which you are also taking with you), without running or installing a DNS server. There are a number of ways to do this:
Proxying with dnrd
The script is designed to use dnrd as the DNS proxy. The script and a copy of dnrd are available. The script also performs the initial setup of the connection as per the USB_Networking#Manual_method above.
Proxying with a UDP forwarder
Another easy setup is using a UDP forwarder like the one from (BROKEN LINK REMOVED) — use it with the command»
Proxying with iptables
It is possible to forward DNS requests with iptables using the DNAT target:
Where 192.168.0.1 is the IP of your router.
Test if it works:
If so, then this is sufficient for most internet access. But manual changes to resolv.conf are usually lost later if for example one uses DHCP, especially for WiFi, and so may not be convenient to configure manually.
Testing Your Connection
You should be able to connect to your Neo! Make sure you can ping your Neo to be sure. ping 192.168.0.202
Then log into your Neo using ssh: ssh root@192.168.0.202 The default password is blank (press enter).
You can also scp files back and forth. You can telnet, SSH, SMB or do whatever you want if you install software that enables you to set up TCP/IP network over your USB connection.
Now, make sure you can ping back to your desktop ping 192.168.0.200 (Note that some systems like Vista, don’t respond to ICMP ping by default)
Try pinging the outside world (a Google IP address) ping 74.125.19.147 This demonstrates that masquerading is working — your desktop is sending/receiving packets to the wider internet.
Lastly, verify that DNS is correctly configured between the Neo & Network: ping www.google.com
Connection script
With the contents of this page I made this script to easily get your FreeRunner connected with your PC.
All you have to do is run the script (after connect the FR to the PC):
- Disconnect FreeRunner
- Connect it again
- Re-run the script and voila the connection is there!
Notes
- It needs root privileges to be executed for the iptables and sysctl commands (if you don’t like sudo, login as root instead)
- It uses the eth1 interface so on OM and other distros different from SHR, you have to put usb0
- Thanks to Tony Berth: if the first time you run the script you can’t ping/access 192.168.0.202.
OS or Distro Specific & Automatic Configuration
Based on Hotplugging usbnet (BROKEN LINK REMOVED) by Marcin ‘Hrw’ Juszkiewicz. These instructions should keep you from having to run the Simple Manual Linux Configuration every time you plug in and want to connect to an Openmoko device. One run and then you’re done!
If the Simple Manual Linux Configuration does not work for your OS or Distro (MacOS X, MS Windows, etc) there may be instructions here that work for you.
MacOS X
Windows
There is also a very helpful tutorial for connecting with Vista at [1].
FreeBSD
You need to load the cdce kernel module (if it is not already linked into your kernel). As root do:
The Neo should then show up as cdce0 interface and you can handle the cdce0 interface just like the usb0 device under Linux. For more information see the cdce manpage. An easy way to assign the IP address to the cdce0 interface is using the devd(8) daemon. Create the following two files,
and /usr/local/etc/devd/cdce.sh as:
Then restart the devd(8) daemon with:
If you now plugin the FreeRunner into the USB port the cdce0 interface gets created and the IP addr will be assigned.
FreeBSD8
If your kernel report kernel: ugen5.2:
at usbus5
add to /etc/devd.conf:
If your kernel report kernel: ugen1.2:
at usbus5 (it happens for QtMokov28)
add to /etc/devd.conf:
The two entryes in /etc/devd.con can coexists, so it’s a good idea to have both inserted. Anyway you can collect all the required information for your actual distribution with usbconfig. For example:
Debian, Ubuntu and others
There are two systems which deal with hotplugginng devices, which is what you do when you plug in Freerunner in an USB port. udev and the older Hotplug system.
Systems using udev
There are 2 common ways the USB networking device can be handled by your systems.
If there is a definition for the USB networking device in /etc/network/interfaces, it is handled by the ifupdown system. If not, it is handled by NetworkManager.
It is possible to use network-manager to automatically connect to the Freerunner using udev. The process uses udev to run a script when the Freerunner is plugged in.
For devices showing as usb0
The script uses the ip command to set the mac address of the usb network interface.
To begin, create /etc/udev/rules.d/80-freerunner.rules :
Next, create the /usr/local/sbin/freerunner-usb-add.sh :
For devices showing as eth1
This script allows ipforwarding so your device can access the internet through your pc.
To begin, create /etc/udev/rules.d/80-freerunner.rules replacing the mac address with the one from your device (run ifconfig on the pc, or use udevinfo, note that it must match udev’s case):
Next, create the /usr/local/sbin/freerunner-usb-add.sh :
For all devices
to make it executable. Now you can use network-manager with mac-address specific settings and get it to automatically connect.
- Plug your phone into your computer’s usb port.
- Note the mac address from «ifconfig usb0» (or eth1)
- Right-click the network manager icon in the panel.
- Click «Edit Connections. «
- Delete the «Auto usb0» entry. (or eth1)
- Add a new connection named ‘freerunner’ (or whatever you fancy)
- Tick «System setting»
- Enter the mac address from above.
- Click the «IPv4 Settings» tab.
- Change «Method» to «Manual»
- Add an address of 192.168.0.200, 255.255.255.0 (address and netmask respectively).
- Click «Ok»
- Enter your system password (if prompted) to allow changing of this system setting.
You should now be able to ping/ssh your phone.
Systems using hotplug — Using the interfaces file
Edit /etc/network/interfaces and add:
This is more sophisticated than the manual setup. The ‘auto usb’ stanza ties into the Linux hotplug system so that when the device appears and vanishes, as happens when the FreeRunner is connected via USB, this is run.
In addition, the desktop-side netmask is limited to a much smaller range, so that overlapping subnets are less of a problem — Linux will use more specific routes first when deciding where to send packets.
Another possible configuration that adds DNS forward and removes the iptables changes after unplugging:
in /etc/network/interfaces add
create file /etc/network/freerunner
Make /etc/network/freerunner executable with
Ubuntu 9.10 — the Karmic Koala
Karmic has a bug in one of the upstart scripts, that makes it fail to properly bring down an unplugged network device (not just USB networking).
Edit /etc/init/network-interface.conf and replace this line
If you use /etc/network/interfaces, make sure the device is marked ‘auto’. Plugging and unplugging will then work automatically.
(‘allow-hotplug’ doesn’t work, because upstart on ubuntu doesn’t support ‘allow-hotplug’ defined devices)
Ubuntu 9.04 — the Jaunty Jackalope
One can see /etc/udev/rules.d that a device plugged in on USB will be called eth1 (or eth2 etc.). Go to System->Administration->Network (or edit /etc/network/interfaces) and add the parameters for eth1; static ip 192.168.0.200, netmask 255.255.255.192
Ubuntu 8.10 — Easy Way
Note: After reflashing the Neo you have to copy the «MAC Address» from «Auto usb0» into your new connection.
Then, based on these instructions (BROKEN LINK REMOVED), you should be able to setup masquerading by running the following commands on your Ubuntu PC:
Ubuntu Issues
Ubuntu 8.10 doesn’t work as expected if you used /etc/network/interfaces to automate the connection.
Network manager likes to latch onto the network device and add a default route through 192.168.0.202, breaking your network connection. Network manager also says you can’t edit or remove this connection from its list. I’m going back to making the connection manually.
Using the /usr/local/sbin/freerunner-usb-add.sh script for some automatism can be a workaround:
Ubuntu Feisty, Gutsy and Hardy reportedly have a bug where ifdown is not run when the interface is unplugged, meaning this only works once after the system is booted. This is mentioned at https://bugs.launchpad.net/ubuntu/+source/ifupdown/+bug/130437
One can patch /etc/udev/rules.d/85-ifupdown.rules. Moving the DRIVERS==»*?» out of the top GOTO, to ACTION==»add» line fixes the problem.
The bug is that the DRIVERS variable isn’t set at all when the device is unplugged.
This appears to be fixed in Ubuntu 8.04 Mattt 11:38, 30 July 2008 (UTC)
Actually it appears that it’s not fixed, but patching that file and disconnecting and reconnecting the phone works perfectly. —Johndoesacc 18:37, 20 August 2008 (UTC) Well, yes, it must be fixed because it worked for me out-of-the-box without tweaking the udev rule on 8.04 —EtienneG November 26th, 2008 It wasn’t solved in my case, as of 3. February 2009 in 8.04 (AMD64), the patch above solved my problem thou. —VilleWitt February 3td, 2009.
Iptables Configuration with GUI
Firestarter can be used to allow the freerunner to connect to the internet without manually running iptables commands. Firestarter is in the ubuntu repositories and can be installed with a
Once installed, the firestarter go to
- Edit > preferences dialog > network setting section,
- choose internet connection device (e.g. eth0)
- choose loacl area network device your Freerunner (generally usb0). You can select the device with a drop-down box, which is labeled «Local network connected device.» Select the freerunner, generally «Unknown device(usb0)»
- check the «Enable internet connection sharing» box. Uncheck local network DHCP and the freerunner should be able to access the internet.
- Ubuntu 8.10—Makito February 26, 2009
- Ubuntu 9:04—David September 2009
- Ubuntu 10.04 LTS, Niebert July 2010
| NOTE: Firestarter needs to run as root. Be aware that when firestarter is running it by default blocks all incoming connections, so if you where using your linux box as a mail-server, web-server or whatever those connections will be blocked. It is quick and easy to add exceptions for whatever protocol you are using in the policy tab of firestarter. |
Ubuntu Workaround
Use wicd instead of networkmanager: It is much further in development than networkmanager yet and doesn’t make any problems with USB networking. You can use the «normal» settings in /network/interfaces.
Note Because of it’s dependencies it deinstalls networkmanager.
Ubuntu and QI
If you have trouble connecting to the freerunner after installing qi, check to see if the address has changed to eth . Many host systems will assign eth addresses when they detect an official (non-locally-generated) mac address on the usb network connection. Qi passes in the official Openmoko USB mac address; u-boot does not.
Mandriva
This first file configures the network system for the usb0 interface. Any time you plug in the FreeRunner the interface will be configured.
This next file configures the static routes that we need to communicate to the subnet. Since it has «usb0» in the name, the system will automatically apply these static routes any time that the usb0 interface is configured. (i.e. when you connect the FreeRunner)
Now we need to restart the network system to pick up the changes.
This didn’t work for me (Mandriva 2008.1), giving errors from Shorewall. However, simply using MCC, Network->Sharing Internet Access worked fine. You need to connect Neo when starting it. —Alih 18:50, 22 September 2008 (UTC)
For more information on getting USB networking up using YaST, see USB Networking with openSUSE.
Fedora
Option A — Tested with FC9, FC8 & FC5
edit file /etc/sysconfig/network-scripts/ifcfg-usb0 to look like this:
and restart networking service by typing:
if your openmoko is connected when you restart network you should see system message:
Bringing up interface usb0 [OK]
Option B
This setup is probably over-complex:
If you are using NetworkManager, restart it and enable the usb device from its menu, otherwise it will disable your connection shortly after you enable it.
Option C — tested on FC8, FC9 and F10
Plug in the usb cable. NetworkManager should detect the phone automatically but you should ignore it. Open Network Configuration tool (System -> Administration -> Network) and perform following steps:
- Click New button on top bar
- Click Forward
- Select OpenMoko from device list
- Click Forward
- Select ‘Statically set IP address:’ and enter address: 192.168.0.200, netmask 255.255.255.0 (or use 255.255.255.240 if you want only route ip range 192.168.0.192-192.168.0.207). Leave gateway empty.
- Click Forward
- Click Apply to close add dialog
- Select newly added usb0 device from the device list.
- Click Edit button on top bar
- You might want to remove a tick from ‘Activate device when computer starts’ check box.
- Click Ok to close window dialog.
Save settings and close the window.
Open Firewall Configuration (System -> Administration -> Firewall) and enable masquerading:
- Select Masquerading from left panel
- Check device(s) which you’d like to share internet connection. Typically eth0 or wlan0.
- Click Apply and close application
Open terminal and perform (as root user):
The first command will remove any existing settings given by the NetworkManager and second command brings the device up with appropriate settings.
Now you should be able to ping e.g. 74.125.39.99 [www.google.com] from OpenMoko. Configure /etc/resolv.conf and you should have full a internet access.
Troubleshooting
If Network Configuration tool cannot see the the usb0 try to unplug the usb cable for a few seconds and wait until the NetworkManager finds it again.
NetworkManager will assign a new ip address for the OpenMoko if link goes down for a while. You can fix this by issuing ifup usb0 again.
Option D — tested on Fedora 11 (Leonidas), Fedora 12 (Unite) and Fedora 13 (Goddard)
Plug in the usb cable. NetworkManager should detect the phone automatically. Perform following steps:
Источник


