- 5 commands to check memory usage on Linux
- Memory Usage
- 1. free command
- 2. /proc/meminfo
- 3. vmstat
- 4. top command
- 5. htop
- RAM Information
- Summary
- 66 thoughts on “ 5 commands to check memory usage on Linux ”
- Don’t Panic! Your ram is fine!
- What’s going on?
- Why is it doing this?
- What if I want to run more applications?
- Do I need more swap?
- How do I stop Linux from doing this?
- Why does top and free say all my ram is used if it isn’t?
- How do I see how much free ram I really have?
- When should I start to worry?
- How can I verify these things?
- Нехватка оперативной памяти в Linux на рабочем ПК: оптимизация и действия при зависании
- zram и приоритеты свопов
- Быстро вырубить программу, перегружающую ОЗУ. Запас ОЗУ для SSH
5 commands to check memory usage on Linux
Memory Usage
On linux, there are commands for almost everything, because the gui might not be always available. When working on servers only shell access is available and everything has to be done from these commands. So today we shall be checking the commands that can be used to check memory usage on a linux system. Memory include RAM and swap.
It is often important to check memory usage and memory used per process on servers so that resources do not fall short and users are able to access the server. For example a website. If you are running a webserver, then the server must have enough memory to serve the visitors to the site. If not, the site would become very slow or even go down when there is a traffic spike, simply because memory would fall short. Its just like what happens on your desktop PC.
1. free command
The free command is the most simple and easy to use command to check memory usage on linux. Here is a quick example
The m option displays all data in MBs. The total os 7976 MB is the total amount of RAM installed on the system, that is 8GB. The used column shows the amount of RAM that has been used by linux, in this case around 6.4 GB. The output is pretty self explanatory. The catch over here is the cached and buffers column. The second line tells that 4.6 GB is free. This is the free memory in first line added with the buffers and cached amount of memory.
Linux has the habit of caching lots of things for faster performance, so that memory can be freed and used if needed.
The last line is the swap memory, which in this case is lying entirely free.
2. /proc/meminfo
The next way to check memory usage is to read the /proc/meminfo file. Know that the /proc file system does not contain real files. They are rather virtual files that contain dynamic information about the kernel and the system.
Check the values of MemTotal, MemFree, Buffers, Cached, SwapTotal, SwapFree.
They indicate same values of memory usage as the free command.
3. vmstat
The vmstat command with the s option, lays out the memory usage statistics much like the proc command. Here is an example
The top few lines indicate total memory, free memory etc and so on.
4. top command
The top command is generally used to check memory and cpu usage per process. However it also reports total memory usage and can be used to monitor the total RAM usage. The header on output has the required information. Here is a sample output
Check the KiB Mem and KiB Swap lines on the header. They indicate total, used and free amounts of the memory. The buffer and cache information is present here too, like the free command.
5. htop
Similar to the top command, the htop command also shows memory usage along with various other details.
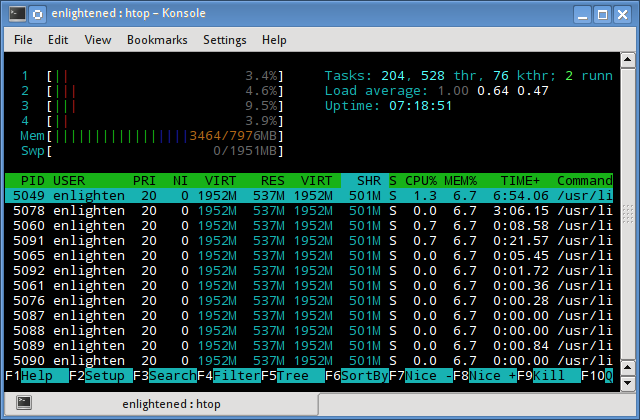
The header on top shows cpu usage along with RAM and swap usage with the corresponding figures.
RAM Information
To find out hardware information about the installed RAM, use the demidecode command. It reports lots of information about the installed RAM memory.
Provided information includes the size (2048MB), type (DDR2) , speed(667 Mhz) etc.
Summary
All the above mentioned commands work from the terminal and do not have a gui. When working on a desktop with a gui, it is much easier to use a GUI tool with graphical output. The most common tools are gnome-system-monitor on gnome and
ksysguard on KDE. Both provide resource usage information about cpu, ram, swap and network bandwidth in a graphical and easy to understand visual output.
A Tech Enthusiast, Blogger, Linux Fan and a Software Developer. Writes about Computer hardware, Linux and Open Source software and coding in Python, Php and Javascript. He can be reached at [email protected] .
66 thoughts on “ 5 commands to check memory usage on Linux ”
You have explained the topic very well. Thanks for sharing a nice article.
Thanks for these commands. It saved a lots of time.
How about explaining what we are looking for? Most people would know these commands. Waste of time.
Please correct the typo in “RAM Information” section. The command for viewing hardware info about RAM is “dmidecode” and not “demidecode”.
And it also requires root privileges.
Источник
Don’t Panic!
Your ram is fine!
What’s going on?
Linux is borrowing unused memory for disk caching. This makes it look like you are low on memory, but you are not! Everything is fine!
Why is it doing this?
Disk caching makes the system much faster and more responsive! There are no downsides, except for confusing newbies. It does not take memory away from applications in any way, ever!
What if I want to run more applications?
If your applications want more memory, they just take back a chunk that the disk cache borrowed. Disk cache can always be given back to applications immediately! You are not low on ram!
Do I need more swap?
No, disk caching only borrows the ram that applications don’t currently want. It will not use swap. If applications want more memory, they just take it back from the disk cache. They will not start swapping.
How do I stop Linux from doing this?
You can’t disable disk caching. The only reason anyone ever wants to disable disk caching is because they think it takes memory away from their applications, which it doesn’t! Disk cache makes applications load faster and run smoother, but it NEVER EVER takes memory away from them! Therefore, there’s absolutely no reason to disable it!
If, however, you find yourself needing to clear some RAM quickly to workaround another issue, like a VM misbehaving, you can force linux to nondestructively drop caches using echo 3 | sudo tee /proc/sys/vm/drop_caches .
Why does top and free say all my ram is used if it isn’t?
This is just a difference in terminology. Both you and Linux agree that memory taken by applications is «used», while memory that isn’t used for anything is «free».
But how do you count memory that is currently used for something, but can still be made available to applications?
You might count that memory as «free» and/or «available». Linux instead counts it as «used», but also «available»:
| Memory that is | You’d call it | Linux calls it |
|---|---|---|
| used by applications | Used | Used |
| used, but can be made available | Free (or Available) | Used (and Available) |
| not used for anything | Free | Free |
This «something» is (roughly) what top and free calls «buffers» and «cached». Since your and Linux’s terminology differs, you might think you are low on ram when you’re not.
How do I see how much free ram I really have?
To see how much ram your applications could use without swapping, run free -m and look at the «available» column:
(On installations from before 2016, look at «free» column in the «-/+ buffers/cache» row instead.)
This is your answer in MiB. If you just naively look at «used» and «free», you’ll think your ram is 99% full when it’s really just 47%!
For a more detailed and technical description of what Linux counts as «available», see the commit that added the field.
When should I start to worry?
A healthy Linux system with more than enough memory will, after running for a while, show the following expected and harmless behavior:
- free memory is close to 0
- used memory is close to total
- available memory (or «free + buffers/cache») has enough room (let’s say, 20%+ of total)
- swap used does not change
Warning signs of a genuine low memory situation that you may want to look into:
- available memory (or «free + buffers/cache») is close to zero
- swap used increases or fluctuates
- dmesg | grep oom-killer shows the OutOfMemory-killer at work
How can I verify these things?
See this page for more details and how you can experiment with disk cache to show the effects described here. Few things make you appreciate disk caching more than measuring an order-of-magnitude speedup on your own hardware!
Источник
Нехватка оперативной памяти в Linux на рабочем ПК: оптимизация и действия при зависании
На любой операционной системе часто не хватает оперативной памяти. Рассмотрим, как и сэкономить на увеличении аппаратных ресурсов машины с Linux, и продолжить более-менее комфортно пользоваться компьютером с Linux в условиях нехватки памяти.
Типична такая ситуация: есть своп (swap, раздел подкачки), который начинает использоваться при нехватке оперативной памяти, и размещен он на HDD, то есть жестком диске с низкой скоростью чтения информации. В таких ситуациях операционная система начинает тормозить, подвисает курсор мыши, сложно переключиться в соседнюю tty и т.д. Почему? Потому что планировщик ядра Linux не может выполнить запрос на какое-то действие в запущенной программе, пока не получит доступ к ее оперативной памяти, выполнить следующее действие тоже не может, образовывается очередь из запросов на чтение с диска, и система «подвисает» именно потому, что обработка очереди происходит гораздо медленнее, чем этого хочет пользователь.
Если в такой момент запустить htop или uptime , то показатель Load Average (LA) будет очень высоким, несмотря на низкую загруженность ядер процессора. Сочетание высокого Load Average и низкой загрузки процессора говорят о забитой очереди процессора.
Часто в интернете советуют изменить параметр ядра Linux vm.swappiness . Узнать его текущее значение на вашей системе можно так:
Ответ будет 60 почти наверняка. Это значит, что ядро Linux начинает свопить редко используемые страницы оперативной памяти, когда использование свободной оперативной памяти достигает 100%-60%=40%. Часто встречаются рекомендации поставить, например, vm.swappiness=10, чтобы своп не начинал использоваться, пока загрузка ОЗу не достигнет 90%. На самом деле не нужно трогать vm.swappiness, вы не умнее разработчиков ядра Linux, которые не просто так поставили 60 по умолчанию. Почему?
Представьте, что у вас всего 4 ГБ оперативной памяти, из них прямо сейчас занято 3 ГБ, vm.swappiness=10, своп на жестком диске (HDD) занят на 0%, и вы открываете тяжелый сайт в браузере, для чего требуется больше, чем имеющийся свободный 1 ГБ, например, 2 ГБ. Операционная система начинает в экстренном порядке отправлять в своп как минимум 0.5 ГБ (а по факту больше), чтобы можно было выделить браузеру необходимое количество оперативной памяти. Эта процедура становится самой приоритетной задачей, и придется пожертвовать даже движениями курсора мыши, чтобы ее выполнить как можно быстрее. Вы ждете. Проходит 5 минут, и система развисает, потому что окончила процедуру 100% загрузки очереди доступа к медленному жесткому диску, на котором размещена оперативная память (своп). При дефолтном vm.swappiness=60 редко используемые страницы памяти сбрасываются в своп заблаговременно, и резкого зависания на 5-10 минут не происходит.
UPD. В комментарии подсказывают, что это не точное описание работы vm.swappiness.
zram и приоритеты свопов
Рекомендую включить zram — прозрачное сжатие содержимого оперативной памяти. В Ubuntu это автоматизировано, достаточно установить пакет:
sudo apt install zram-config
Здесь и далее для дистрибутивов Rosa, Fedora все то же самое, но вместо zram-config —
Сервис systemd zram-config на Ubuntu будет автоматически добавлен в автозагрузку при установке пакета и запущен при перезагрузке системы. Для запуска вручную:
sudo systemctl start zram-config
sudo systemctl stop zram-config
Удаления из автозапуска:
sudo systemctl disable zram-config
Добавление в автозапуск:
sudo systemctl enable zram-config
При запуске zram-config берет число, равное 50% всего объема оперативной памяти, далее делает по одному виртуальному устройству /dev/zramN, где N начинается с 0, для каждого ядра процессора, а объем каждого /dev/zramN равен 50% всей оперативной памяти, деленному на количество ядер процессора. Так делалается для распараллеливания сжатия содержимого оперативной памяти по ядрам процессора; насколько я знаю, на современных ядрах Linux достаточно одного устройства /dev/zramN, а распараллелится оно само, но меня полностью устраивает искоробочная работа zram-config, и предпочитаю не лезть в нее руками.
Команда swapon -s выведет список всех задействованных свопов с указанием их приоритета. Первым используется тот своп, у которого приоритет выше. Если у вас уже есть дисковый своп и включен zram, то в случае с описанным выше пакетом-автокофигуратором приоритеты из коробки будут правильными. Например, у дискового свопа будет -1, а все /dev/zramN — 5. Таким образом, сначала используется zram, и только потом — диск.
Кстати, zram часто применяется на смартфонах, какую-либо на глаз заметную нагрузку на процессор при дефолтном методе сжатия lz4 он не создает.
Также приоритет свопа можно указать в /etc/fstab . Покажу на примере, как это сделано на моем рабочем компьютере с 6 ГБ ОЗУ.
Опцией монтирования pri=X заданы приоритеты свопов. Если еще включить zram, то картинка будет такой:
В первую очередь будет свопиться в zram, то есть сжиматься внутри оперативной памяти без использования внешнего устройства для свопа, во вторую — использовать небольшой своп на SSD. Почти никогда не будет использоваться 6 ГБ свопа на HDD, однако они понадобятся, если я захочу отправить компьютер в спящий режим в условиях большой загрузки оперативной памяти. (На самом деле у меня отключен zram).
На офисных ПК с 4 ГБ ОЗУ (Xubuntu 16.04, 17.10) всегда ставлю пакет zram-config . Chromium, по наблюдениям, на глаз, очень хорошо сжимается в оперативной памяти, в результате чего zram позволяет сделать работу намного более комфортной без модернизации железа.
Быстро вырубить программу, перегружающую ОЗУ. Запас ОЗУ для SSH
Бывает такое, что даже при vm.swappiness=60 какому-то черту, как правило, браузеру, требуется очень много оперативной памяти, и система подвисает. Решается очень просто: сочетание клавиш Alt+SysRq(PrintScreen)+F заставляет oom_killer принудительно включиться и вырубить процесс, который на момент вызова занимает больше всего памяти. Строго 1 процесс на 1 вызов, и строго обязательно что-то будет убито. Если много раз подряд нажмете, то, скорее всего, перезапустится графическая сессия. Событие убиения процесса отражается в dmesg красным цветом.
Однако эта штука, называющаяся Magic SysRq, из коробки отключена в большинстве дистрибутивов, потому что непривилегированный пользователь может убить абсолютно любой процесс. За это отчечает параметр ядра kernel.sysrq , узнать его текущее значение можно так:
Для работы Alt+SysRq+F нужно kernel.sysrq=1. Для этого отредатируем параметры ядра, расположенные в файлах /etc/sysctl.conf (обычно симлинк на /etc/sysctl.d/99-sysctl.conf) и /etc/sysctl.d/*.conf. Лучше всего создать отдельный файл:
sudo nano /etc/sysctl.d/99-dumalogiya.conf
Нажмем Ctrl+O, Enter для сохранения.
В случае с браузером Chromium Alt+SysRq(PrintScreen)+F будет вырубать по одной вкладке, не закрывая сам браузер, что очень удобно.

Сочетания клавиш Magic SysRq перехватываются напрямую ядром Linux, поэтому работают даже когда из-за очереди процессора подвисает X-сервер.
Источник


