- Создание, редактирование и удаление пользователей в Linux
- Создание
- Ключи (опции)
- 3 Ways to List Users in Linux
- List all the users on Linux
- 1. Show users in Linux using less /etc/passwd
- Why so many users? Which ones are ‘real’?
- Users and groups administrations from the command line in Linux
- Creating groups under Linux:
- Creating users under Linux:
- Command adduser vs useradd
- Creating or changing a user password under Linux:
- Modifying users under Linux:
- Lock/Unlock user account
- Deleting users under Linux:
- Modifying groups under Linux:
- Deleting groups under Linux:
- Graphic user and groups management under Ubuntu Linux (Gnome)
- About the author
- David Adams
- How to List Users in Linux, List all Users Command
- List All Linux Users, 2 Options
- List All Users in Linux with the /etc/passwd File
- List All Linux Users with the getent Command
- How to Only List Linux Usernames
- How to Search for Existing Linux Users
- System User vs Normal User
- How to Check UID_MIN and UID_MAX
- How to List Normal Users
Создание, редактирование и удаление пользователей в Linux
В данной инструкции рассказывается о работе с пользователями Linux через терминал (с применением командной строки).
Создание
* опции не являются обязательными при создании пользователя.
* в данном примере создается учетная запись dmosk.
Для учетной записи стоит сразу создать пароль:
* после ввода, система попросит ввести пароль дважды.
Ключи (опции)
| Ключ | Описание и примеры |
|---|---|
| -b | Задает базовый каталог для домашнего каталога useradd dmosk -b /var/home |
| -c | Создает комментарий для описания учетной записи useradd dmosk -c «Пользователя для управления системой» |
| -d | Полный путь к домашнему каталогу пользователя useradd dmosk -d /home/newuser |
| -D | Позволяет показать или изменить настройки по умолчанию, которые будут применяться при последующем создании пользователей useradd dmosk -Ds /bin/bash |
| -e | Дата, после которой учетная запись устареет. useradd dmosk -e 2017-12-31 |
| -f | Число дней, после которого учетная запись с устаревшим паролем будет заблокирована useradd dmosk -f 0 |
| -g | Задает основную группу useradd dmosk -g altternativegroup |
| -G | Задает дополнительные группы useradd dmosk -G wheel |
| -k | Путь к источнику скелета (файлы с шаблонами для нового пользователя) useradd dmosk -k /var/skel |
| -m | При создании пользователя создать домашний каталог useradd dmosk -m |
| -M | Не создавать домашний каталог useradd dmosk -M |
| -N | Не создавать основную группу с таким же именем, как у пользователя useradd dmosk -N |
| -o | Разрешает создание учетной записи с повторяющимся UID useradd dmosk -u 15 -o |
| -p | Задает пароль useradd dmosk -p pass |
| -r | Системная учетная запись (без домашнего каталога и с идентификаторами в диапазоне SYS_UID_MIN — SYS_UID_MAX из файла /etc/login.defs) useradd dmosk -r |
| -R | Каталог, в который выполняется chroot useradd dmosk -R /var/chroot/home |
| -s | Путь до оболочки командной строки useradd dmosk -s /bin/csh |
| -u | Задает UID useradd dmosk -u 666 |
| -U | Имя группы будет таким же, как у пользователя useradd dmosk -U |
Актуальный список ключей можно получить командой useradd -h.
Источник
3 Ways to List Users in Linux
Today different Operating Systems have the capability to use multiple users, each one with their settings and custom configurations to make things easier for administrators and operators to work in together on the same system.
Linux on the other hand is very strong on this matter as it allows multiple users to work at the same time on the system in an independent way. It can even allow a single user to open several sessions even from different locations in order to work on the system.
Here are some hints & tricks to handle users in Linux.
List all the users on Linux
Let’s say you want to create a sudo user in Linux. Probably, the very first thing to know is how to know what users are in my system. There are several ways you can obtain the list of users in Linux.
1. Show users in Linux using less /etc/passwd
This command allows sysops to list the the users that are locally stored in the system. It will give the listing in structured way as:
The structure in the above output goes as:
- User name
- Encrypted password ( x represents password is stored)
- User ID number (UID)
- User’s group ID number (GID)
- Full name
- User’s home directory
- User’s Login shell (default is bash shell)
Why so many users? Which ones are ‘real’?
The list shows a lot more users than you expected because it lists all the system users too.
Now if you want to distinguish the normal users from the system users, you can refer to the User identifier (UID) number.
Generally, a normal user has UID greater or equal to 1000. This gives you a hint that the user with UID >=1000 is a normal user and users with UID
Источник
Users and groups administrations from the command line in Linux
Linux offers us a lot of useful tools to keep our environment’s safety and order, assigning or denying permissions to users and groups is a primary tool on any linux system. For security reasons only root users and users within the sudo group are able to manage users and groups.Through the command line, it is easy to create and modify or remove users, to restrict or release permissions, while allowing us to log users activity.
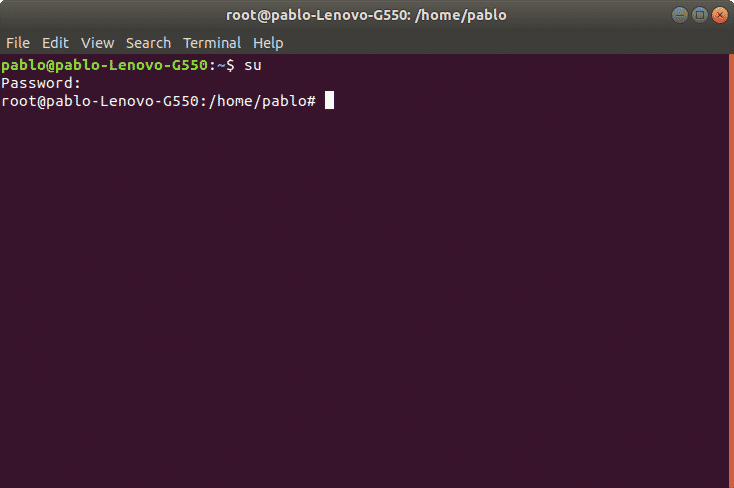
To manage permissions lets start by becoming the root user. Enter the command “su” to become root and press “Enter”, type the password when requested. If you don’t have root access we must use the sudo command before running a privileged command. For information on sudo you can read Managing sudo privileges.
Note: remember Linux is a case sensitive OS.
After authenticating we can manage users and groups.
Creating groups under Linux:
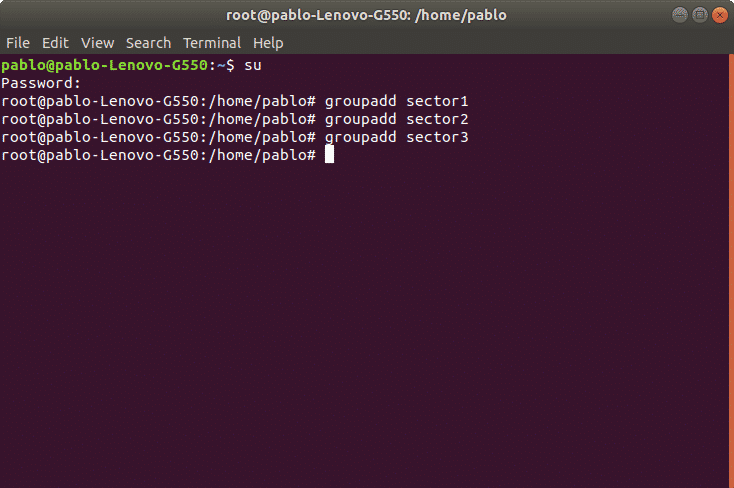
To create groups we’ll use first the command “groupadd” followed by the group’s name. The syntax is: “groupadd ”.
In the following picture is an example where I create three groups: sector1, sector2 and sector3. To do it on the command line type:
Once the groups are created we can create users to be assigned to the groups.
Creating users under Linux:
Using the command “useradd” we can add a user to our system. The proper syntax is “useradd [options] ”
Among the most used options we have:
-g Main user group (gid)
-d User Home directory, by default located at /home/
-m Create Home directory in case it doesn’t exist.
-s Assign a specific shell to the user, by default it is /bin/bash.
As an example we will create the user nicolas and will assign him the group sector1, also we’ll define the user’s home and shell.

Now we’ll do the same with user martin to be added to group sector2, and a third user ivan for sector3. We’ll use the same syntax:
Command adduser vs useradd
While the command useradd runs a system binary file the command adduser is a perl script to interact with useradd. With the adduser command, the advantage is the home is created automatically. If using the command adduser we need to specify the -m option.
Creating or changing a user password under Linux:
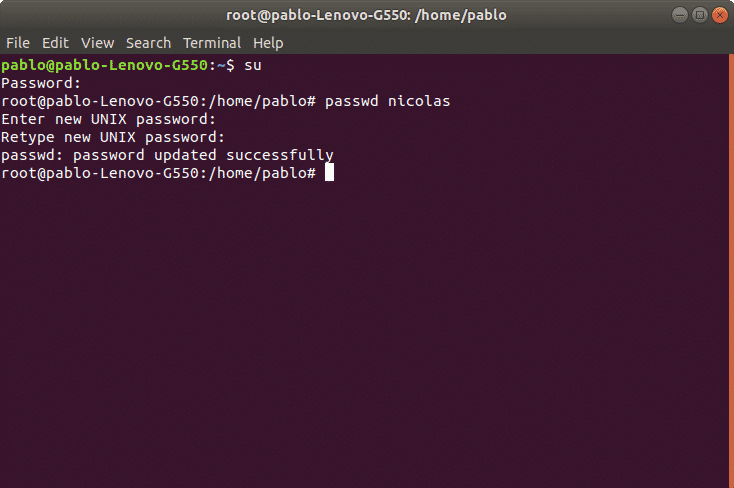
After adding a user with the command “useradd” we need to set a password for the user using the command “passwd”. Remember Linux is case sensitive.
In the following example we’ll create a password for the user nicolas using the following syntax:
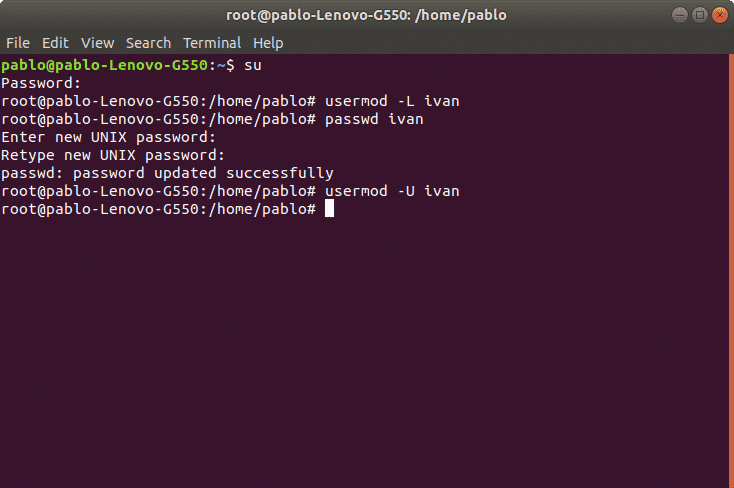
Then it will request for password and confirmation, after confirmation the password will be established. We can know the process succeeded when the system returns “password updated successfully” like in the image:
Modifying users under Linux:
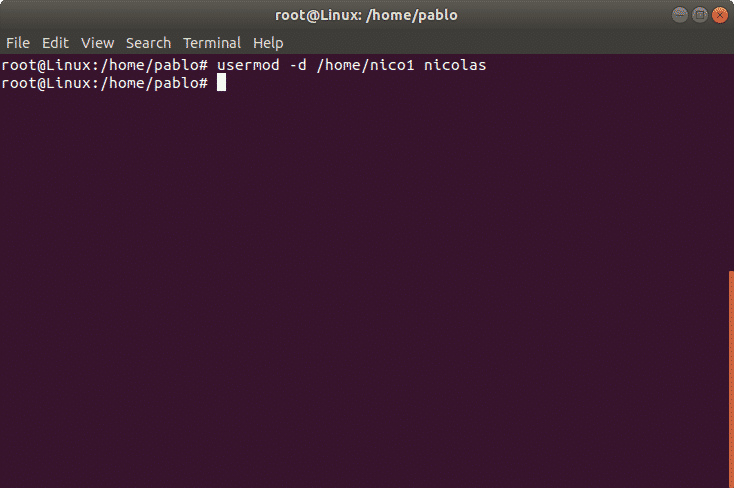
We can edit the user’s username, his home directory, his shell and groups to which he belongs among more options. For this we’ll use the command “usermod”.
As an example we’ll modify the user nicholas’ home directory which we previously defined as /home/nicolas and we’ll replace it for /home/nico1.
The previous command updated the user’s home.
Lock/Unlock user account
We can also lock a user account. In the following example we’ll lock user ivan account. The parameter -L (lock) will block the user account. The syntax is:
To enable a locked user we can use the -U (Unlock) parameter. In the following example we will unlock the user ivan:
The user is now unlocked.
Deleting users under Linux:
We can remove a user with the command userdel followed by the username. We can also combine parameters, among most used options we have:
-f remove user files.
-r remove user home and mail tail.
In the following example we’ll delete the user account “ivan”
Note: The command “userdel” won’t remove the user if is running process.
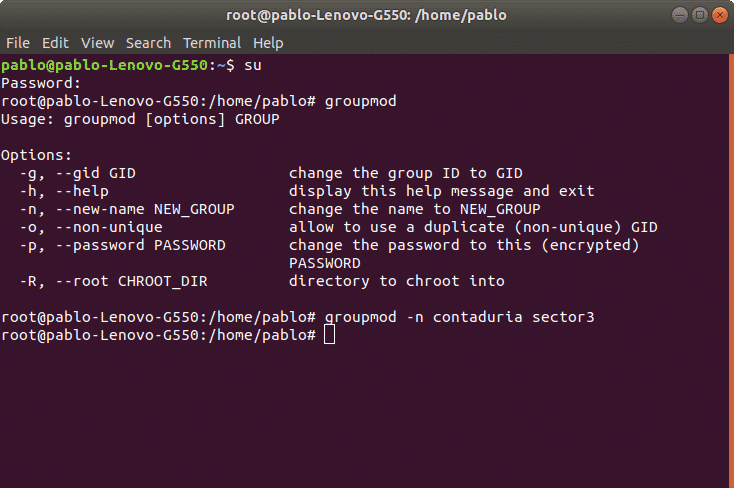
Modifying groups under Linux:
In order to modify groups we’ll use the command “groupmod”. This command allows to modify a group name or user gid. The syntax is:
In the following example we’ll modify the group name for “sector3” to “contaduria”
Deleting groups under Linux:
We can remove a group using the command “groupdel” followed by the group name. For example, to remove the group sector4 we’ll use the following syntax:
In this case it would be just:

Note: If another user is a member of the group we try to remove, the command won’t remove the group.
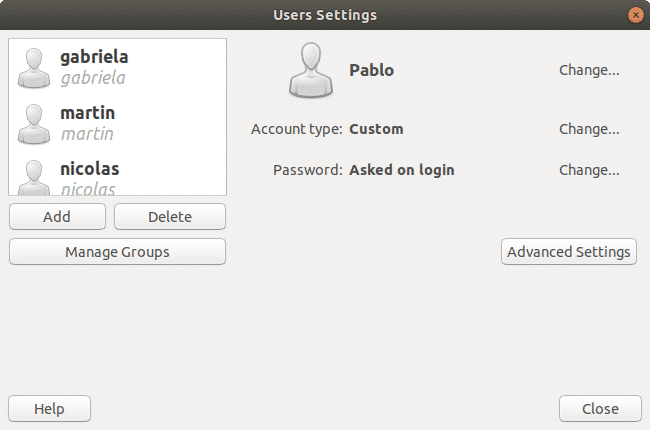
Graphic user and groups management under Ubuntu Linux (Gnome)
Ubuntu offers a graphical management for users and groups. The interface is user friendly, intuitive and easy to use.
If we haven’t installed this interface on the terminal run:
When asked for confirmation press “Y” and “enter”
The following NEW packages will be installed
Once finished we can run the tool from the command line as “users-admin”
Thank you for reading this article. Now you can easily manage users and groups on linux.
About the author
David Adams
David Adams is a System Admin and writer that is focused on open source technologies, security software, and computer systems.
Источник
How to List Users in Linux, List all Users Command
Home » SysAdmin » How to List Users in Linux, List all Users Command
Linux OS is unique because of its multi-user characteristic allowing multiple users on one system, at the same time. However, tracking all users is essential.
In this article, earn multiple commands to list all Linux users along with their login information. These commands work on CentOS, Ubuntu, Arch Linux, and other Linux distributions as well.

- A Linux distribution installed and running
- A user with sudo privileges
- Access to a terminal/command line
List All Linux Users, 2 Options
List All Users in Linux with the /etc/passwd File
Details of local users can be found in the /etc/passwd file. Every line contained in the file contains the information of one user.
There are two options.
Open the etc/passwd file by typing the command:
Alternatively, you can use the less command:
Note: To display a list of the logged-on users and the information such as boot time, processes, hostnames, and more, use the who command.
List All Linux Users with the getent Command
Database entries configured in the /etc/nsswitch.conf file include the passwd database with all the usernames and login information.
To extract this data, use the command:
Both Option 1 and Option 2 will display all the users and their login information.

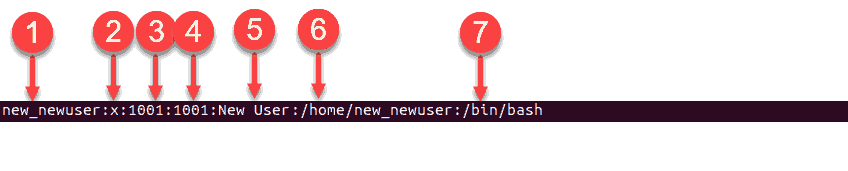
Each line represents one user and has seven (7) fields.
The fields are separated by : (colons) and each line includes the following information:
1. Username
2. The encrypted password (represented by x, located in the /etc/shadow file)
3. User ID number (known as UID)
4. User group ID (known as GID)
5. User full name
6. User home directory
7. The login shell (by default set to bin/bash)
How to Only List Linux Usernames
In case you don’t need all the information related to each user, you can list only the usernames on the system. There are two ways to see just the first field (the username) of each user.
Option 1: Using the awk or cut command.
To list usernames only, you can use either of the following two (2) commands:
Option 2: Using the getent command with awk and cut .
To read and display the username without any additional information using the getent command, run the following command:
Alternatively, use the command:
How to Search for Existing Linux Users
The getent command also allows you to check whether a user is present on the system.
Any of the following two commands will provide you with that information:
If the user exists, it will display login information. On the other hand, if there is no such user, there will be no output.
For example, in the image below, the query displays whether a user named example exists. The output proves that such a user exists.

System User vs Normal User
A system user is the one that creates normal users. Therefore, in this instance, the system user is the root. This user is created when you first install the Linux operating system. Additionally, you can create system users for particular applications.
On the other hand, normal users are all users that the root (or a user with sudo privileges) creates. Each normal and system user has a real login shell, home directory, as well as a user ID (UID) number. The user ID number is given automatically in the range between the minimum and maximum values.
How to Check UID_MIN and UID_MAX
If you want to check what the UID range for normal users is, use grep with the following command:
The output shows that all normal users have a UID anywhere from 1000 (UID_MIN) to 6000 (UID_MAX).
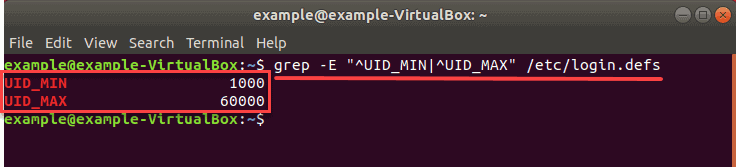
Note: Change the values in the command according to the minimum and maximum UID values for your system.
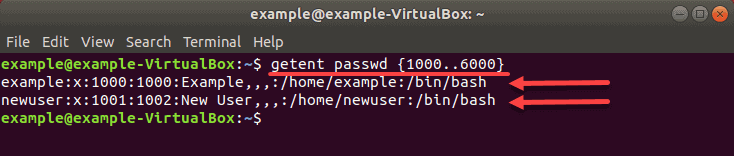
How to List Normal Users
With these numbers in mind, you ask for a list of all the users in that range with the command:
The query lists all the normal users, as seen in the image below. In this example, there are two normal users in the specified range.
After reading this guide, you should know how to list all Linux users, search for users, and find the number of Linux users in any Linux distribution ( Ubuntu, CentOS, RHEL, Debian, and Mint).
Источник


