- Как установить заголовочные файлы ядра в Linux
- Установка заголовочных файлов ядра в Debian, Ubuntu или Linux Mint
- Установка заголовочных файлов ядра в Fedora, CentOS или RHEL
- Configuring the Linux kernel
- Contents
- Installing the sources
- Kernel configuration and compilation
- Manual configuration
- Introduction
- Activating required options
- Architecture specific kernel configuration
- Compiling and installing
- Optional: Building an initramfs
- Alternative: Using genkernel
- Alternative: Using distribution kernels
- Installing correct installkernel
- Installing a distribution kernel
- Upgrading and cleaning up
- Post-install/upgrade tasks
- Kernel modules
- Configuring the modules
- Optional: Installing firmware
Как установить заголовочные файлы ядра в Linux
Когда вы компилируете драйвер устройства как модуль ядра, вам необходимы установленные заголовочные файлы ядра. Также они требуются, если вы собираете пользовательское приложение, которое взаимодействует напрямую с ядром. При установке заголовочных файлов ядра, необходимо убедиться, что их версия совпадает с версией ядра установленного в системе.
Если версия вашего ядра не менялась после установки дистрибутива, или вы обновляли его с использованием системного менеджера пакетов (то есть apt-get, aptitude или yum) из системных репозиториев, то заголовочные файлы вы также можете установить с помощью пакетного менеджера. Однако если вы скачивали исходный код ядра и компилировали его самостоятельно, то заголовочные файлы необходимо устанавливать с помощью команды make.
Здесь мы предполагаем, что ваше ядро установлено из основного системного репозитория вашего дистрибутива, и вы хотите установить соответствующие заголовочные файлы ядра.
Установка заголовочных файлов ядра в Debian, Ubuntu или Linux Mint
Если вы не компилировали ядро вручную, то можете установить соответствующие заголовочные файлы ядра с помощью команды apt-get.
Сначала проверьте, не установлены ли уже требуемые заголовочные файлы с помощью команды:
Теперь установите заголовочные файлы, как показано ниже.
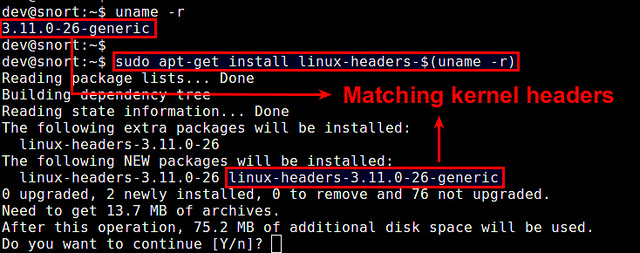
Проверьте, что установка прошла успешно.
По умолчанию в Debian, Ubuntu или Linux Mint заголовочные файлы находятся в /usr/src.
Установка заголовочных файлов ядра в Fedora, CentOS или RHEL
Если вы не обновляли ядро вручную, то можете установить соответствующие заголовочные файлы ядра с помощью команды yum.
Сначала проверьте, не установлены ли уже требуемые заголовочные файлы. По умолчанию заголовочные файлы ядра расположены в /usr/src/kernels/.
Если подходящих заголовочных файлов не установлено, вы можете установить их с помощью команды yum. Она автоматически найдет подходящий пакет.
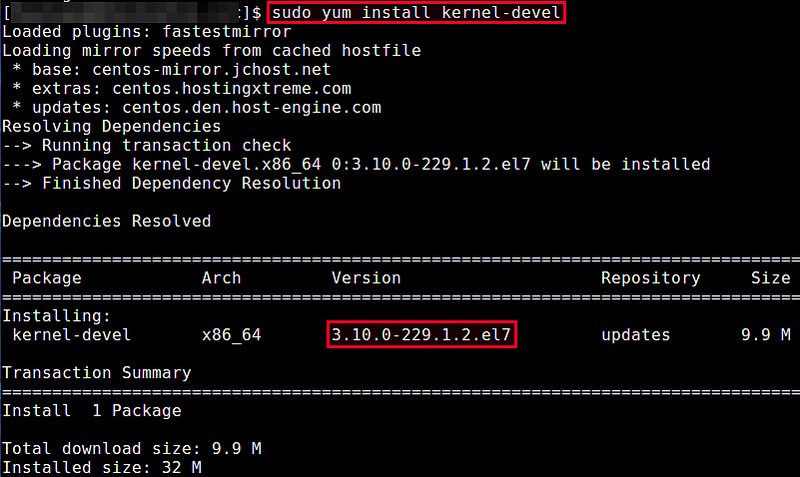
Если заголовочные файлы ядра, установленные с помощью вышеприведенной команды, не соответствуют установленному в системе ядре, значит оно устарело. В этом случае обновите ядро системы до последней версии с помощью приведенной ниже команды. После обновления необходимо перезагрузить систему.
Теперь проверьте, что установлены заголовочные файлы соответствующей версии с помощью команды:
Источник
Configuring the Linux kernel
Contents
Installing the sources
The core around which all distributions are built is the Linux kernel. It is the layer between the user programs and the system hardware. Gentoo provides its users several possible kernel sources. A full listing with description is available at the Kernel overview page.
For amd64-based systems Gentoo recommends the sys-kernel/gentoo-sources package.
Choose an appropriate kernel source and install it using emerge :
This will install the Linux kernel sources in /usr/src/ using the specific kernel version in the path. It won’t create a symbolic link by itself without USE=symlink being enabled on the chosen kernel sources package.
It is conventional for a /usr/src/linux symlink to be maintained, such that it refers to whichever sources correspond with the currently running kernel. However, this symbolic link will not be created by default. An easy way to create the symbolic link is to utilize eselect’s kernel module.
For further information regarding the purpose of the symlink, and how to manage it, please refer to Kernel/Upgrade.
First, list all installed kernels:
In order to create a symbolic link called linux , use:
Now it is time to configure and compile the kernel sources. There are three approaches for this:
- The kernel is manually configured and built.
- A tool called genkernel is used to automatically build and install the Linux kernel.
- A Distribution Kernel is used to automatically build and install the Linux kernel like any other package.
We explain the manual configuration as the default choice here as it is the best way to optimize an environment.
Kernel configuration and compilation
Manual configuration
Introduction
Manually configuring a kernel is often seen as the most difficult procedure a Linux user ever has to perform. Nothing is less true — after configuring a couple of kernels no-one even remembers that it was difficult!
However, one thing is true: it is vital to know the system when a kernel is configured manually. Most information can be gathered by emerging sys-apps/pciutils which contains the lspci command:
Another source of system information is to run lsmod to see what kernel modules the installation CD uses as it might provide a nice hint on what to enable.
Now go to the kernel source directory and execute make menuconfig . This will fire up menu-driven configuration screen.
The Linux kernel configuration has many, many sections. Let’s first list some options that must be activated (otherwise Gentoo will not function, or not function properly without additional tweaks). We also have a Gentoo kernel configuration guide on the Gentoo wiki that might help out further.
Activating required options
When using sys-kernel/gentoo-sources, it is strongly recommend the Gentoo-specific configuration options be enabled. These ensure that a minimum of kernel features required for proper functioning is available:
Naturally the choice in the last two lines depends on the selected init system (OpenRC vs. systemd). It does not hurt to have support for both init systems enabled.
When using sys-kernel/vanilla-sources, the additional selections for init systems will be unavailable. Enabling support is possible, but goes beyond the scope of the handbook.
Make sure that every driver that is vital to the booting of the system (such as SCSI controller, etc.) is compiled in the kernel and not as a module, otherwise the system will not be able to boot completely.
Next select the exact processor type. It is also recommended to enable MCE features (if available) so that users are able to be notified of any hardware problems. On some architectures (such as x86_64), these errors are not printed to dmesg , but to /dev/mcelog . This requires the app-admin/mcelog package.
Also select Maintain a devtmpfs file system to mount at /dev so that critical device files are already available early in the boot process ( CONFIG_DEVTMPFS and CONFIG_DEVTMPFS_MOUNT ):
Verify SCSI disk support has been activated ( CONFIG_BLK_DEV_SD ):
Now go to File Systems and select support for the filesystems that will be used by the system. Do not compile the file system that is used for the root filesystem as module, otherwise the system may not be able to mount the partition. Also select Virtual memory and /proc file system. Select one or more of the following options as needed by the system ( CONFIG_EXT2_FS , CONFIG_EXT3_FS , CONFIG_EXT4_FS , CONFIG_MSDOS_FS , CONFIG_VFAT_FS , CONFIG_PROC_FS , and CONFIG_TMPFS ):
If PPPoE is used to connect to the Internet, or a dial-up modem, then enable the following options ( CONFIG_PPP , CONFIG_PPP_ASYNC , and CONFIG_PPP_SYNC_TTY ):
The two compression options won’t harm but are not definitely needed, neither does the PPP over Ethernet option, that might only be used by ppp when configured to do kernel mode PPPoE.
Don’t forget to include support in the kernel for the network (Ethernet or wireless) cards.
Most systems also have multiple cores at their disposal, so it is important to activate Symmetric multi-processing support ( CONFIG_SMP ):
If USB input devices (like keyboard or mouse) or other USB devices will be used, do not forget to enable those as well ( CONFIG_HID_GENERIC and CONFIG_USB_HID , CONFIG_USB_SUPPORT , CONFIG_USB_XHCI_HCD , CONFIG_USB_EHCI_HCD , CONFIG_USB_OHCI_HCD ):
Architecture specific kernel configuration
Make sure to select IA32 Emulation if 32-bit programs should be supported ( CONFIG_IA32_EMULATION ). Gentoo installs a multilib system (mixed 32-bit/64-bit computing) by default, so unless a no-multilib profile is used, this option is required.
Enable GPT partition label support if that was used previously when partitioning the disk ( CONFIG_PARTITION_ADVANCED and CONFIG_EFI_PARTITION ):
Enable EFI stub support and EFI variables in the Linux kernel if UEFI is used to boot the system ( CONFIG_EFI , CONFIG_EFI_STUB , CONFIG_EFI_MIXED , and CONFIG_EFI_VARS ):
Compiling and installing
With the configuration now done, it is time to compile and install the kernel. Exit the configuration and start the compilation process:
When the kernel has finished compiling, copy the kernel image to /boot/ . This is handled by the make install command:
This will copy the kernel image into /boot/ together with the System.map file and the kernel configuration file.
Optional: Building an initramfs
In certain cases it is necessary to build an initramfs — an initial ram-based file system. The most common reason is when important file system locations (like /usr/ or /var/ ) are on separate partitions. With an initramfs, these partitions can be mounted using the tools available inside the initramfs.
Without an initramfs, there is a huge risk that the system will not boot up properly as the tools that are responsible for mounting the file systems need information that resides on those file systems. An initramfs will pull in the necessary files into an archive which is used right after the kernel boots, but before the control is handed over to the init tool. Scripts on the initramfs will then make sure that the partitions are properly mounted before the system continues booting.
To install an initramfs, install sys-kernel/genkernel first, then have it generate an initramfs:
In order to enable specific support in the initramfs, such as LVM or RAID, add in the appropriate options to genkernel . See genkernel —help for more information. In the next example support is enabled for LVM and software RAID ( mdadm ):
The initramfs will be stored in /boot/ . The resulting file can be found by simply listing the files starting with initramfs:
Alternative: Using genkernel
If a manual configuration looks too daunting, then consider using genkernel . It will configure and build the kernel automatically.
genkernel works by configuring a kernel nearly identically to the way the installation CD kernel is configured. This means that when genkernel is used to build the kernel, the system will generally detect all hardware at boot-time, just like the installation CD does. Because genkernel doesn’t require any manual kernel configuration, it is an ideal solution for those users who may not be comfortable compiling their own kernels. Note that genkernel does not automatically generate a custom kernel configuration the hardware on which it is being run.
Now, let’s see how to use genkernel. First, emerge the sys-kernel/genkernel ebuild:
Next, edit the /etc/fstab file so that the line containing /boot/ as second field has the first field pointing to the right device. If the partitioning example from the handbook is followed, then this device is most likely /dev/sda1 with the ext2 file system. This would make the entry in the file look like so:
Now, compile the kernel sources by running genkernel all . Be aware though, as genkernel compiles a kernel that supports almost all hardware, this compilation will take quite a while to finish!
Once genkernel completes, a kernel, full set of modules and initial ram disk (initramfs) will be created. We will use the kernel and initrd when configuring a boot loader later in this document. Write down the names of the kernel and initrd as this information is used when the boot loader configuration file is edited. The initrd will be started immediately after booting to perform hardware autodetection (just like on the installation CD) before the «real» system starts up.
Alternative: Using distribution kernels
Distribution Kernels are ebuilds that cover the complete process of unpacking, configuring, compiling, and installing the kernel. The primary advantage of this method is that the kernels are upgraded to new versions as part of @world upgrade without a need for manual action. Distribution kernels default to a configuration supporting the majority of hardware but they can be customized via /etc/portage/savedconfig .
There are other methods available to customize the kernel config such as config snippets.
Installing correct installkernel
Before using the distribution kernels, please verify that the correct installkernel package for the system is installed. When using systemd-boot (formerly gummiboot), install:
When using a traditional /boot layout (e.g. GRUB, LILO, etc.), the gentoo variant should be installed by default. If in doubt:
Installing a distribution kernel
To build a kernel with Gentoo patches from source, type:
System administrators who want to avoid compiling the kernel sources locally can instead use precompiled kernel images:
Upgrading and cleaning up
Once the kernel is installed, the package manager will automatically upgrade it to newer versions. The previous versions will be kept until the package manager is requested to clean up stale packages. Please remember to periodically run:
to save space. Alternatively, to specifically clean up old kernel versions:
Post-install/upgrade tasks
Distribution kernels are now capable of rebuilding kernel modules installed by other packages. linux-mod.eclass provides USE=dist-kernel which controls a subslot dependency on virtual/dist-kernel.
Enabling this on packages like sys-fs/zfs and sys-fs/zfs-kmod allows them to automatically be rebuilt against the new kernel and re-generate the initramfs if applicable accordingly!
Manually rebuilding the initramfs
If required, manually trigger such rebuilds by, after a kernel upgrade, executing:
If any of these modules (e.g. ZFS) are needed at early boot, rebuild the initramfs afterward:
Kernel modules
Configuring the modules
List the modules that need to be loaded automatically in /etc/modules-load.d/*.conf files one module per line. Extra options for the modules, if necessary, should be set in /etc/modprobe.d/*.conf files.
To view all available modules, run the following find command. Don’t forget to substitute » » with the version of the kernel just compiled:
For instance, to automatically load the 3c59x.ko module (which is the driver for a specific 3Com network card family), edit the /etc/modules-load.d/network.conf file and enter the module name in it. The actual file name is insignificant to the loader.
Continue the installation with Configuring the system.
Optional: Installing firmware
Some drivers require additional firmware to be installed on the system before they work. This is often the case for network interfaces, especially wireless network interfaces. Also, modern video chips, from vendors like AMD, NVidia, and Intel when using open source drivers, often need external firmware files. Most of the firmware is packaged in sys-kernel/linux-firmware:
Источник


