Библиотеки в Ubuntu
Как вы знаете каждая программа, установленная на вашем компьютере, состоит из нескольких частей. Это непосредственно исполняемый файл, который вы запускаете через терминал, а также библиотеки с набором функций, которые может использовать программа.
Все, без исключения, программы используют библиотеки. Даже если это ваша программа и у нее нет своих библиотек, она использует стандартную библиотеку языка программирования С.
В этой статье мы подробно рассмотрим что такое библиотеки Ubuntu, как их устанавливать, где брать и что делать если библиотека установлена, а программа говорит что ее нет. Мы не будем трогать создание библиотек, это совсем не наша тема. Как обычно, начнем с теории.
Что такое библиотеки
Библиотеки в Linux содержат наборы функций или если сказать проще алгоритмов или действий для решения определенных задач. Например, если программе нужно вывести строку на экран она не начинает сама закрашивать нужные пиксели, а просто обращается к отвечающей за это функции из библиотеки, то же самое если программе нужно прочитать содержимое файла, она не работает с секторами жесткого диска, ей достаточно вызвать функцию из стандартной библиотеки с (libc.so) и передать ей в параметрах имя нужного файла, а библиотека уже вернет ей запрашиваемые данные.
На самом деле, такая структура реализации программного обеспечения очень выгодна, поскольку достаточно написать алгоритм лишь один раз и его смогут использовать все программы просто загружая библиотеку.
Не нужно думать что библиотеки есть только в Linux, в Windows они тоже есть, только имеют другой формат и расширение dll. В Linux же все библиотеки находятся в папах /lib/, /usr/lib, /usr/local/lib или для 64 битных систем также появляется папка lib64 во всех этих подкаталогах, для библиотек специфичных для этой архитектуры. Библиотека имеет расширение .so и ее название начинается со слова lib. Например, libfuse.so, libc.so.
Дальше, после расширения файла .so идет номер версии библиотеки. Номер версии меняется всякий раз, когда разработчики вносят в нее изменения ломающие совместимость со всеми рассчитанными на нее программами. В таком случае в системе будут уже две библиотеки и каждая программа будет использовать правильную версию. Например, glibc.so.6 и glibc.so.5.
Если интересно можно даже посмотреть какие библиотеки и каких версий, использует та или иная программа, например:
linux-vdso.so.1 (0x00007ffd99167000)
libmount.so.1 => /usr/lib64/libmount.so.1 (0x00007f0f6beb0000)
libc.so.6 => /lib64/libc.so.6 (0x00007f0f6bb08000)
libblkid.so.1 => /usr/lib64/libblkid.so.1 (0x00007f0f6b8c8000)
libselinux.so.1 => /lib64/libselinux.so.1 (0x00007f0f6b6a4000)
/lib64/ld-linux-x86-64.so.2 (0x000055aca8227000)
libuuid.so.1 => /usr/lib64/libuuid.so.1 (0x00007f0f6b49f000)
libpcre.so.1 => /usr/lib64/libpcre.so.1 (0x00007f0f6b238000)
libdl.so.2 => /lib64/libdl.so.2 (0x00007f0f6b034000)
libpthread.so.0 => /lib64/libpthread.so.0 (0x00007f0f6ae17000)
Также эта информация может быть полезна при создании портативных версий программ. А теперь давайте рассмотрим как устанавливаются библиотеки в Ubuntu.
Установка библиотек в Ubuntu
Обычно, если вы используете менеджер пакетов вашего дистрибутива для установки новых программ, то библиотеки устанавливаются автоматически. Но если вы хотите собрать программу из исходников или запустить 32 битную программу на 64 битной системе могут начаться проблемы. Например, при запуске или компиляции программы вы получаете ошибку:
error while loading shared libraries: xxxx.so.0
cannot open shared object file no such file or directory
Обычно, в Ubuntu имена пакетов библиотек соответствуют имени нужной библиотеки. Поэтому чтобы определить точное имя в большинстве случаев достаточно воспользоваться поиском по базе пакетов:
apt search libfuse

Как видите, найдено два варианта библиотеки, libfuse2 и libfuse-dev.
Если библиотека нужна обычной программе и ее не нужно собирать из исходников, то будет достаточно установить библиотеку ubuntu без префикса dev. Например:
sudo apt install libfuse2
Если же вам нужно собрать приложение из исходников, то кроме обычной библиотеки понадобятся заголовочные файлы, в которых содержится описание реализованных в библиотеке функций. Такие пакеты имеют приставку dev, например, libfuse-dev, тогда нужно устанавливать этот пакет, а он уже в зависимостях потянет и обычную библиотеку, если она еще не установлена:
sudo apt install libfuse-dev
Много проблем может вызвать ситуация, когда вам нужно запустить 32 битную программу в 64 битной системе. Например, если вы установили 64 битную версию библиотеки, а программа все равно говорит о том, что не может ее найти, возможно это 32 битная программа и ей необходима именно 32 библиотека. Если программа не устанавливается с помощью пакетного менеджера, вам тоже придется устанавливать библиотеки вручную.
Посмотреть разрядность бинарника можно с помощью утилиты file:
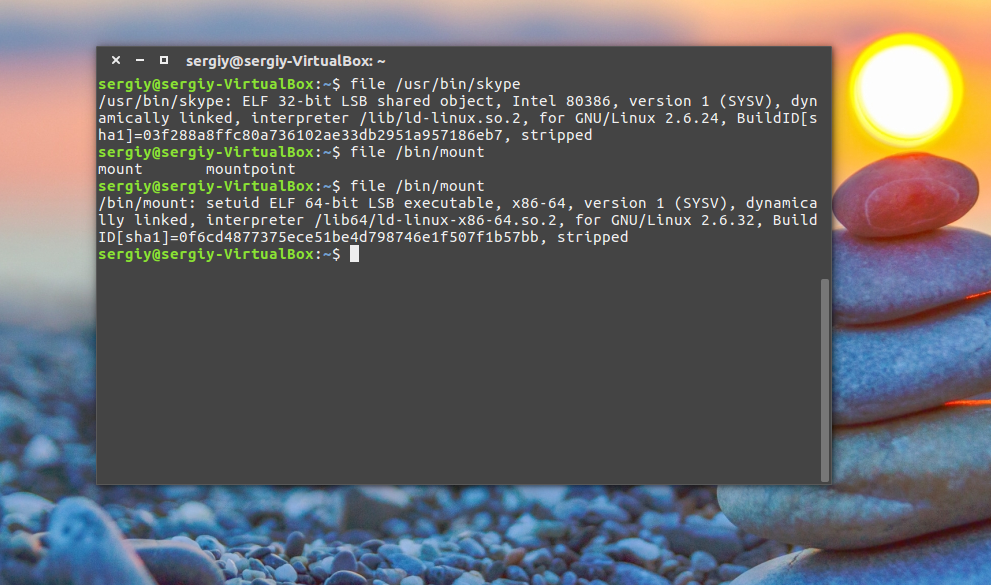
На скриншоте показаны два варианта вывода программы, для 32 бит, в нашем случае Skype и для 64 — mount.
Для того чтобы установить библиотеку Ubuntu с архитектурой i386 сначала необходимо добавить поддержку архитектуры i386 в dpkg:
sudo dpkg —add-architecture i386
Затем обновляем наши репозитории:
sudo apt update
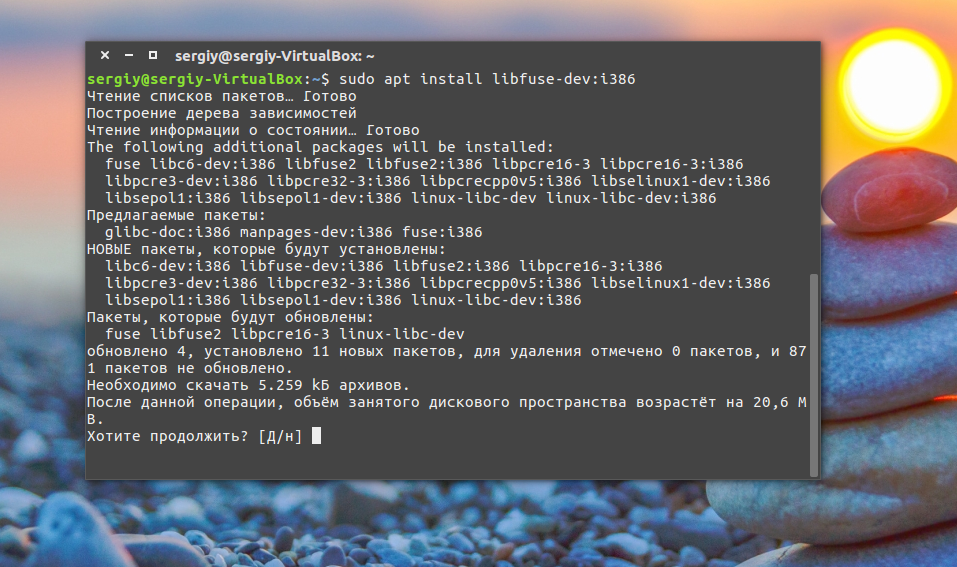
А во время установки нужной вам библиотеки теперь необходимо указать архитектуру через двоеточие после имени пакета:
sudo apt install libfuse-dev:i386
Если вы уверенны, что библиотека установлена, но программа все равно говорит, что такой библиотеки нет, то возможно, ей просто нужна другая версия библиотеки. Например, в системе есть libudev.so.0, а программе нужна libudev.so.0.1. Такое случается, если вы попытаетесь установить пакет для другого дистрибутива, особенно в Red Hat системах. Если в репозиториях нет нужной версии библиотеки, то скорее всего, они одинаковы, и можно просто создать символическую ссылку:
ln -s /lib/libudev.so.0 /lib/libudev.so.0.1
Затем программа найдет нужную библиотеку.
Управление библиотеками в Linux
Установка библиотек ubuntu уже рассмотрена, но хотелось бы упомянуть еще пару моментов. Как я сказал, библиотеки ubuntu размещаются в определенных каталогах, но расположение библиотек можно настроить.
Перед тем как библиотека будет подключена к программе, ее должна найти в системе специальная программа — менеджер библиотек. Он берет адреса библиотек из файла /etc/ld.cache, а этот файл формируется утилитой ldconfig, на основе файлов конфигурации /etc/ld.so.conf.
В этом файле перечислены все пути к библиотекам. Если вы хотите добавить свою папку для библиотек просто добавьте ее в этот файл:
Затем обновите кэш просто выполнив:
Теперь ваша библиотека может быть загружена программой, например, вы можете добавить путь /opt/lib или даже /home/user/lib. И система будет нормально грузить оттуда библиотеки.
Посмотреть какие библиотеки находятся в кеше ld.cache можно командой:
Также мы можем проверить находится ли там определенная библиотека:
ldconfig -p | grep libjpeg

Еще один способ указать программе где нужно искать библиотеки — это переменная LD_LIBRARY_PATH. Например:
Теперь программы, запускаемые в этом терминале, кроме стандартных путей поиска библиотек, будут использовать и указанную папку.
Выводы
Вот и все. Теперь вы знаете как работают библиотеки Ubuntu, как выполняется установка библиотек Ubuntu и делать так, чтобы программа видела нужную ей библиотеку. У новичков это может вызвать очень много головной боли, но теперь вы знаете что делать и избежите многих ошибок. Если у вас остались вопросы, пишите в комментариях!
Источник
System calls in the Linux kernel. Part 3.
vsyscalls and vDSO
This is the third part of the chapter that describes system calls in the Linux kernel and we saw preparations after a system call caused by a userspace application and process of handling of a system call in the previous part. In this part we will look at two concepts that are very close to the system call concept, they are called vsyscall and vdso .
We already know what system call s are. They are special routines in the Linux kernel which userspace applications ask to do privileged tasks, like to read or to write to a file, to open a socket, etc. As you may know, invoking a system call is an expensive operation in the Linux kernel, because the processor must interrupt the currently executing task and switch context to kernel mode, subsequently jumping again into userspace after the system call handler finishes its work. These two mechanisms — vsyscall and vdso are designed to speed up this process for certain system calls and in this part we will try to understand how these mechanisms work.
Introduction to vsyscalls
The vsyscall or virtual system call is the first and oldest mechanism in the Linux kernel that is designed to accelerate execution of certain system calls. The principle of work of the vsyscall concept is simple. The Linux kernel maps into user space a page that contains some variables and the implementation of some system calls. We can find information about this memory space in the Linux kernel documentation for the x86_64:
After this, these system calls will be executed in userspace and this means that there will not be context switching. Mapping of the vsyscall page occurs in the map_vsyscall function that is defined in the arch/x86/entry/vsyscall/vsyscall_64.c source code file. This function is called during the Linux kernel initialization in the setup_arch function that is defined in the arch/x86/kernel/setup.c source code file (we saw this function in the fifth part of the Linux kernel initialization process chapter).
Note that implementation of the map_vsyscall function depends on the CONFIG_X86_VSYSCALL_EMULATION kernel configuration option:
As we can read in the help text, the CONFIG_X86_VSYSCALL_EMULATION configuration option: Enable vsyscall emulation . Why emulate vsyscall ? Actually, the vsyscall is a legacy ABI due to security reasons. Virtual system calls have fixed addresses, meaning that vsyscall page is still at the same location every time and the location of this page is determined in the map_vsyscall function. Let’s look on the implementation of this function:
As we can see, at the beginning of the map_vsyscall function we get the physical address of the vsyscall page with the __pa_symbol macro (we already saw implementation if this macro in the fourth path of the Linux kernel initialization process). The __vsyscall_page symbol defined in the arch/x86/entry/vsyscall/vsyscall_emu_64.S assembly source code file and have the following virtual address:
in the .data..page_aligned, aw section and contains call of the three following system calls:
Let’s go back to the implementation of the map_vsyscall function and return to the implementation of the __vsyscall_page later. After we received the physical address of the __vsyscall_page , we check the value of the vsyscall_mode variable and set the fix-mapped address for the vsyscall page with the __set_fixmap macro:
The __set_fixmap takes three arguments: The first is index of the fixed_addresses enum. In our case VSYSCALL_PAGE is the first element of the fixed_addresses enum for the x86_64 architecture:
It equal to the 511 . The second argument is the physical address of the page that has to be mapped and the third argument is the flags of the page. Note that the flags of the VSYSCALL_PAGE depend on the vsyscall_mode variable. It will be PAGE_KERNEL_VSYSCALL if the vsyscall_mode variable is NATIVE and the PAGE_KERNEL_VVAR otherwise. Both macros (the PAGE_KERNEL_VSYSCALL and the PAGE_KERNEL_VVAR ) will be expanded to the following flags:
that represent access rights to the vsyscall page. Both flags have the same _PAGE_USER flags that means that the page can be accessed by a user-mode process running at lower privilege levels. The second flag depends on the value of the vsyscall_mode variable. The first flag ( __PAGE_KERNEL_VSYSCALL ) will be set in the case where vsyscall_mode is NATIVE . This means virtual system calls will be native syscall instructions. In other way the vsyscall will have PAGE_KERNEL_VVAR if the vsyscall_mode variable will be emulate . In this case virtual system calls will be turned into traps and are emulated reasonably. The vsyscall_mode variable gets its value in the vsyscall_setup function:
That will be called during early kernel parameters parsing:
More about early_param macro you can read in the sixth part of the chapter that describes process of the initialization of the Linux kernel.
In the end of the vsyscall_map function we just check that virtual address of the vsyscall page is equal to the value of the VSYSCALL_ADDR with the BUILD_BUG_ON macro:
That’s all. vsyscall page is set up. The result of the all the above is the following: If we pass vsyscall=native parameter to the kernel command line, virtual system calls will be handled as native syscall instructions in the arch/x86/entry/vsyscall/vsyscall_emu_64.S. The glibc knows addresses of the virtual system call handlers. Note that virtual system call handlers are aligned by 1024 (or 0x400 ) bytes:
And the start address of the vsyscall page is the ffffffffff600000 every time. So, the glibc knows the addresses of the all virtual system call handlers. You can find definition of these addresses in the glibc source code:
All virtual system call requests will fall into the __vsyscall_page + VSYSCALL_ADDR_vsyscall_name offset, put the number of a virtual system call to the rax general purpose register and the native for the x86_64 syscall instruction will be executed.
In the second case, if we pass vsyscall=emulate parameter to the kernel command line, an attempt to perform virtual system call handler will cause a page fault exception. Of course, remember, the vsyscall page has __PAGE_KERNEL_VVAR access rights that forbid execution. The do_page_fault function is the #PF or page fault handler. It tries to understand the reason of the last page fault. And one of the reason can be situation when virtual system call called and vsyscall mode is emulate . In this case vsyscall will be handled by the emulate_vsyscall function that defined in the arch/x86/entry/vsyscall/vsyscall_64.c source code file.
The emulate_vsyscall function gets the number of a virtual system call, checks it, prints error and sends segmentation fault simply:
As it checked number of a virtual system call, it does some yet another checks like access_ok violations and execute system call function depends on the number of a virtual system call:
In the end we put the result of the sys_gettimeofday or another virtual system call handler to the ax general purpose register, as we did it with the normal system calls and restore the instruction pointer register and add 8 bytes to the stack pointer register. This operation emulates ret instruction.
That’s all. Now let’s look on the modern concept — vDSO .
Introduction to vDSO
As I already wrote above, vsyscall is an obsolete concept and replaced by the vDSO or virtual dynamic shared object . The main difference between the vsyscall and vDSO mechanisms is that vDSO maps memory pages into each process in a shared object form, but vsyscall is static in memory and has the same address every time. For the x86_64 architecture it is called — linux-vdso.so.1 . All userspace applications that dynamically link to glibc will use the vDSO automatically. For example:
Here we can see that uname util was linked with the three libraries:
The first provides vDSO functionality, the second is C standard library and the third is the program interpreter (more about this you can read in the part that describes linkers). So, the vDSO solves limitations of the vsyscall . Implementation of the vDSO is similar to vsyscall .
Initialization of the vDSO occurs in the init_vdso function that defined in the arch/x86/entry/vdso/vma.c source code file. This function starts from the initialization of the vDSO images for 32-bits and 64-bits depends on the CONFIG_X86_X32_ABI kernel configuration option:
Both functions initialize the vdso_image structure. This structure is defined in the two generated source code files: the arch/x86/entry/vdso/vdso-image-64.c and the arch/x86/entry/vdso/vdso-image-32.c. These source code files generated by the vdso2c program from the different source code files, represent different approaches to call a system call like int 0x80 , sysenter and etc. The full set of the images depends on the kernel configuration.
For example for the x86_64 Linux kernel it will contain vdso_image_64 :
But for the x86 — vdso_image_32 :
If our kernel is configured for the x86 architecture or for the x86_64 and compatibility mode, we will have ability to call a system call with the int 0x80 interrupt, if compatibility mode is enabled, we will be able to call a system call with the native syscall instruction or sysenter instruction in other way:
As we can understand from the name of the vdso_image structure, it represents image of the vDSO for the certain mode of the system call entry. This structure contains information about size in bytes of the vDSO area that always a multiple of PAGE_SIZE ( 4096 bytes), pointer to the text mapping, start and end address of the alternatives (set of instructions with better alternatives for the certain type of the processor) and etc. For example vdso_image_64 looks like this:
Where the raw_data contains raw binary code of the 64-bit vDSO system calls which are 2 page size:
The init_vdso_image function is defined in the same source code file and just initializes the vdso_image.text_mapping.pages . First of all this function calculates the number of pages and initializes each vdso_image.text_mapping.pages[number_of_page] with the virt_to_page macro that converts given address to the page structure:
The init_vdso function passed to the subsys_initcall macro adds the given function to the initcalls list. All functions from this list will be called in the do_initcalls function from the init/main.c source code file:
Ok, we just saw initialization of the vDSO and initialization of page structures that are related to the memory pages that contain vDSO system calls. But to where do their pages map? Actually they are mapped by the kernel, when it loads binary to the memory. The Linux kernel calls the arch_setup_additional_pages function from the arch/x86/entry/vdso/vma.c source code file that checks that vDSO enabled for the x86_64 and calls the map_vdso function:
The map_vdso function is defined in the same source code file and maps pages for the vDSO and for the shared vDSO variables. That’s all. The main differences between the vsyscall and the vDSO concepts is that vsyscall has a static address of ffffffffff600000 and implements 3 system calls, whereas the vDSO loads dynamically and implements four system calls:
- __vdso_clock_gettime ;
- __vdso_getcpu ;
- __vdso_gettimeofday ;
- __vdso_time .
Conclusion
This is the end of the third part about the system calls concept in the Linux kernel. In the previous part we discussed the implementation of the preparation from the Linux kernel side, before a system call will be handled and implementation of the exit process from a system call handler. In this part we continued to dive into the stuff which is related to the system call concept and learned two new concepts that are very similar to the system call — the vsyscall and the vDSO .
After all of these three parts, we know almost all things that are related to system calls, we know what system call is and why user applications need them. We also know what occurs when a user application calls a system call and how the kernel handles system calls.
The next part will be the last part in this chapter and we will see what occurs when a user runs the program.
If you have questions or suggestions, feel free to ping me in twitter 0xAX, drop me email or just create issue.
Please note that English is not my first language and I am really sorry for any inconvenience. If you found any mistakes please send me PR to linux-insides.
Источник


