- Знакомство с Veeam Agent for Linux
- Выполняем установку
- Приступаем к резервному копированию
- Полезные ссылки
- Upgrading Veeam Agent for Linux
- Veeam Agent for Linux is now available!
- What is it?
- Backup through the user interface
- Backup through command lines
- Restore
- Veeam Agent for Linux editions
- Workstation
- Server
- Conclusion
Знакомство с Veeam Agent for Linux
Как вы, возможно, уже знаете, в недалеком будущем увидит свет наш новый продукт — Veeam Agent for Linux. И уже сейчас все желающие могут оценить это решение в ходе анонсированной программы бета-тестирования. Чтобы получить доступ к бета-версии, нужно зарегистрироваться здесь, и вы получите на email ссылку для скачивания. Обратите внимание, что период бета-тестирования закончится 1 сентября 2016 года – затем вы сможете установить уже релизную версию.
Итак, что же умеет бета? За ответом добро пожаловать под кат.

Veeam Agent for Linux — это наше новое бесплатное решение для резервного копирования машин под управлением Linux. Его основные характеристики:
- Может использоваться как для виртуальных, так и для физических машин.
- Работает с машинами семейств Debian и RedHat. Доступен в виде пакетов RPM и DEB.
- Поддерживаются версии ядра Linux, начиная с 2.6.32 (т е. даже если у вас очень старенькая инсталляция, то и она будет поддержана при условии, что у вас стоит официальное ядро для данного дистрибутива).
- Работает с 32-битной и 64-битной архитектурой.
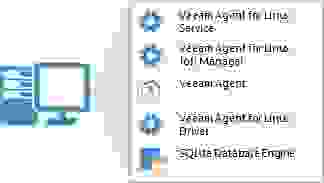
Решение включает в себя следующие компоненты:
- Veeam Agent for Linux Service – компонент, отвечающий за работу со всеми задачами и необходимыми ресурсами. Регистрируется как обычный сервис, автоматически стартует при старте ОС и работает в фоновом режиме.
- Veeam Agent for Linux Job Manager – процесс, который запускается вышеназванным сервисом для каждой сессии задания резервного копирования и отвечает за ее работу.
- Veeam Agent – это, собственно, рабочая лошадка, которая выполняет операции передачи данных: во время бэкапа копирует их в репозиторий, а во время восстановления – наоборот, а также выполняет дедупликацию, компрессию, и т.д.
- Veeam Agent for Linux Driver – модуль ядра Linux, который отвечает за создание снапшотов томов вашей машины.
- SQLite database engine — используется для хранения конфигурации; если у вас его нет – то поставится в процессе установки продукта.
Veeam Agent for Linux умеет выполнять резервное копирование на уровне образа, работая внутри гостевой ОС, причем можно делать бэкапы на уровне томов и файлов. Для создания инкрементальных резервных копий нами был разработан специальный драйвер, который отслеживает измененные блоки (его модуль динамически подгружается в ядро).
Читателей, вероятно, порадует, что этот модуль поставляется в виде исходного кода. Поскольку версий ядра великое множество, то мы решили не пытаться написать и скомпилировать бинарную версию модуля для каждой из них – в итоге вполне могло оказаться, что на какой-то из версий что-то не поддерживается, и соответствующая часть пользователей не сможет использовать решение. Поэтому мы решили пойти по традиционному для Linux-сообщества пути – поставлять исходный код и компилировать модуль в процессе установки продукта, уже конкретно для той версии ядра, с которой ему предстоит работать. Пользователю не придется ничего компилировать вручную – все необходимые операции выполнит менеджер пакетов вашего дистрибутива: проверит наличие необходимых зависимостей, выдаст список недостающих, чтобы вы могли все поправить, и в ходе инсталляции автоматически скомпилирует и установит наш модуль.
Выполняем установку
Для работы решения необходимо наличие пакета Dynamic Kernel Module Support (DKMS), который требуется для компиляции модуля ядра, а также пакета LVM2, который требуется для поддержки операции с томами LVM. Если их нет на машине, то установите их – к примеру, DKMS на CentOS можно поставить из дополнительного репозитория EPEL.
После того, как прошла установка первого компонента, можно переходить к установке собственно Veeam Agent for Linux (для установки понадобятся права root):
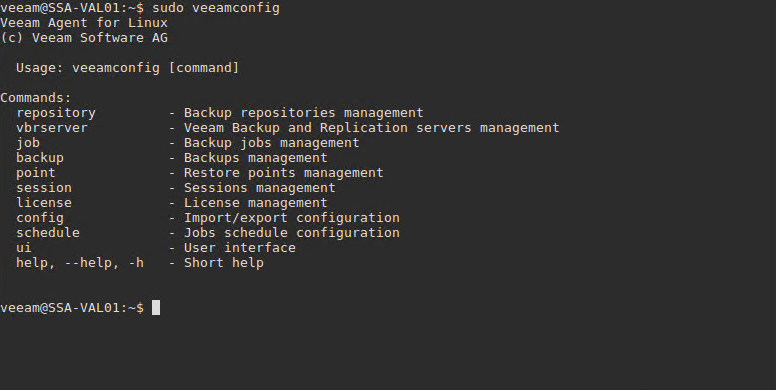
Агент Veeam Agent for Linux устанавливается в виде сервиса, с которым затем можно работать, применяя команду veeamconfig. Для просмотра списка ее опций после команды veeamconfig введите —help. Ну и затем можно переходить уже непосредственно к работе – а там уже практически все понятно и без подсказок, но мы все же вкратце рассмотрим сначала процесс бэкапа.
Приступаем к резервному копированию
Поскольку среди пользователей Linux есть как продвинутые, так и начинающие, то мы в дополнение к командной строке предлагаем простенький графический интерфейс. Для его запуска используется командная строка – в ней вводим команду veeam. На экране появится GUI с приветственным сообщением и кнопками меню:
Чтобы создать новое задание резервного копирования, нажимаем C (Configure). Проходим по шагам мастера:
- Вводим имя, которое хотим дать заданию.
- На шаге Backup mode выбираем, хотим ли мы бэкапить всю машину (Entire machine), какой-либо том (Volume level backup) или отдельные файлы и папки (File level backup):
- Затем указываем тип репозитория (Destination Location), куда будут сохраняться резервные копии. Если репозитория у нас еще нет, то мастер попросит его создать. В качестве репозитория поддерживаются:
- устройства с прямым подключением (USB, eSATA, FС и т.п.)
- сетевые файловые системы NFS, SMB (CIFS)
- локальное устройство хранения (не рекомендуется)
В данном примере в качестве репозитория выбирается папка NFS с общим доступом:
После того, как все настройки сделаны, мастер предложит вам запустить задание сразу же. Если вы еще раз хотите пройтись по настройкам и, возможно, что-то поменять, можно либо вернуться к предыдущему шагу, нажав Prev, либо, если вы уже нажали Finish и вернулись в главное меню, нажать C. Для запуска задания из главного меню нажмите S. Если же вы захотите запустить задание в какой-то момент по требованию, то к вашим услугам соответствующая команда:
veeamconfig job start —name «BackupJob1»
В ходе выполнения задания по нажатию Enter можно посмотреть, что как идет и что пишется в лог:
Наше задание успешно отработало, и на экране появилась соответствующая информация в поле Status:
В репозитории на NFS-сервере теперь лежат файлы резервной копии (.VBK и .VBM), поименованные согласно названию задания и времени создания:
Имея резервную копию, можно посмотреть, как Veeam Agent for Linux умеет выполнять восстановление Linux-сервера на уровне файла, тома, или же вообще «на голое железо» — но об этом в следующем посте.
Полезные ссылки
UPD: Обратите внимание — по ссылке с 1 сентября выдается бета#2. Подробнее о ней можно прочитать тут. В топике есть инструкция и пароль для скачивания (он тот же, что и был для беты#1). Из свежедобавленного, в частности — появились пакеты для Fedora 23, Fedora 24, расширился набор команд CLI, появилась поддержка pre/post job scripts.
С информацией о найденных issues ждем вас на форуме — в новых топиках или в личных сообщениях (ответственному пользователю PTide).
Источник
Upgrading Veeam Agent for Linux
For Veeam Agent for Linux , upgrade to newer versions is supported . You can start the upgrade process when the new version becomes available.
During the upgrade process, configuration and backup files that were created with the previous version of Veeam Agent are not impacted in any way.
IMPORTANT
Before starting the upgrade process, make sure that there are no jobs running on the Veeam Agent computer.
The upgrade procedure differs depending on the Linux distribution that you use:
To upgrade Veeam Agent for Linux , use the following commands :
yum update veeam
rpm -e —nodeps dkms veeamsnap
yum install kmod-veeamsnap*
yum install kmod-veeamsnap*
yum update veeam
rpm -e dkms veeamsnap
* With these commands, a p re-built veeamsnap binary package will be installed in your system. To stay on the DKMS version of the veeamsnap kernel module , use the following command for upgrade:
yum update veeamsnap && yum update veeam
To upgrade Veeam Agent for Linux , use the following command :
yum update veeam
To upgrade Veeam Agent for Linux , use the following commands :
For openSUSE Tumbleweed
zypper up veeam
For openSUSE Leap 15.2
zypper in veeamsnap-kmp-default-5.0.1.4493_k5.3.18_lp152.19-2.x86_64
zypper in —force veeamsnap-kmp-default-5.0.1.4493_k5.3.18_lp152.19-2.x86_64
For openSUSE Leap 15.3
zypper in veeamsnap-kmp-default-5.0.1.4493_k5.3.18_57-2.x86_64
zypper in —force veeamsnap-kmp-default-5.0.1.4493_k5.3.18_57-2.x86_64
With these commands, a p re-built veeamsnap binary package will be installed in your system. The —force key is required to properly replace the missing link to .ko in case of update from the DKMS version of the veeamsnap kernel module to a pre-built binary. To stay on the DKMS version, use the following command for upgrade:
zypper update veeam
To upgrade Veeam Agent for Linux , use the following commands :
For Default kernel
zypper in veeamsnap-kmp-default
zypper in –-force veeamsnap-kmp-default
zypper in veeamsnap-kmp-xen
zypper in –-force veeamsnap-kmp-xe
For Trace kernel
zypper in veeamsnap-kmp-trace
zypper in –-force veeamsnap-kmp-trace
zypper in veeamsnap-kmp-pae
zypper in –-force veeamsnap-kmp-pae
With these commands, a p re-built veeamsnap binary package will be installed in your system. The —force key is required to properly replace the missing link to .ko in case of update from the DKMS version of the veeamsnap module to a pre-built binary. To stay on the DKMS version, use the following command for upgrade:
zypper update veeam
To upgrade Veeam Agent for Linux :
- Download the Veeam software repository installation package ( veeam-release ) from the Veeam Download page , and save the downloaded package on the computer where you plan to install the product.
- Install the Veeam software repository installation package with the following command:
zypper in ./veeam-release* && zypper refresh
- Upgrade Veeam Agent for Linux with the following commands:
For Default kernel
zypper in veeamsnap-kmp-default
zypper in —force veeamsnap-kmp-default
zypper in veeamsnap-kmp-xen
zypper in —force veeamsnap-kmp-xen
With these commands, a pre-built veeamsnap binary package will be installed in your system. The —force key is required to properly replace the missing link to .ko in case of update from the DKMS version of the veeamsnap module to a pre-built binary. To stay on the DKMS version, use the following command for upgrade:
zypper update veeam
To upgrade Veeam Agent for Linux , use the following commands :
Источник
Veeam Agent for Linux is now available!
Even though Veeam has made a name for itself with industry-leading, agentless backup solutions for virtualized environments, we are still constantly asked about backing up non-virtualized systems. Based on feedback and as a growth opportunity, we decided to launch Veeam Agent for Microsoft Windows (formerly known as Veeam Endpoint Backup FREE). Veeam Agent for Microsoft Windows will be available soon and it includes many top-requested features! We were also constantly asked about Linux systems, so we finally announced Veeam Agent for Linux and launched a beta.
Before we dive into the product itself, let’s discuss why a company like Veeam that makes agentless backups, decided to start making agent-based products. As you may know, not every workload can be virtualized due to hardware dependencies, heavy loads on servers or for other reasons. Then there are the Linux machines in the public cloud that need an agent to interact with them.
Long story short, agentless backups are superior for virtualized environments, but when it comes down to a physical server, agents are preferred.
What is it?
Veeam Agent for Linux is a tool that backs up physical Linux systems such as a workstation, a server or machines in the public cloud. This tool creates image-based backups that are stored in VBK format, the same as in Veeam Backup & Replication and Veeam Agent for Microsoft Windows. Veeam Agent for Linux comes with its own snapshot and change block tracking (CBT) driver that allows for creating incremental backups without rescanning.
Veeam Agent for Linux use requirements include:
- CPU: x86/x64
- Kernel: 2.6.32 or higher
- OS: 32 and 64-bit versions of:
- Debian 6.x-8.x
- Ubuntu 10.04-16.10
- RHEL/CentOS/Oracle Linux 6.x-7.x
- Fedora 23-25
- openSUSE 11.3-13.x, Leap 42.1-42.2
- SLES 11 SP2 – 12
The installation has become much easier since the beta: no more installs of manual packages! You are now able to install Veeam Agent for Linux and update it via the Veeam Repository. Be sure to check out the release notes for more installation instructions.
After you install the product, you have two options to interact with it: Via a step-by-step wizard or through the command line.
Backup through the user interface
To launch the UI wizard, you just need to open shell and type in:
If you have already tried Veeam Agent for Microsoft Windows, you’ll see the familiar stages of the backup creation process:
- Backup mode: Bare-metal, volume level or file-level
- Backup repository: Local disk, shared folder or Veeam Backup & Replication repository (requires 9.5 Update 1)
- Scheduling and number of restore points

Backup through command lines
For those who want more agile control over backups, this gives you the ability to use command lines, so you can create your own scripts to automate deployment and backups.
In this case, the command will be:
To create a backup job here, use the command:
# veeamconfig job create
And add the parameters of the job.

As you can see from the screenshots, you can specify such parameters as compressionLevel and blockSize, that are not available in the UI. You can also specify pre-freeze and post-thaw scripts here, which will allow you, for example, to get consistent database server backups.
If you decide to leverage a Veeam Backup & Replication server to store your backups, you’ll be able to see all of them in a new tab called Agents.

Restore
If you need to perform a file-level restore, just launch a Veeam Agent for Linux UI, select the Recover Files command and your backup will be mounted as a directory, so your preferred file manager can be used to get your files.
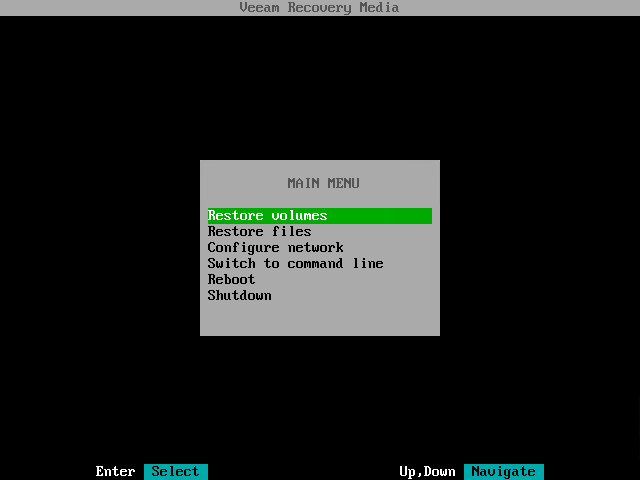
Veeam Agent for Linux also comes with recovery media that you boot into to perform a restore on any level: bare-metal, volume or individual file.
Veeam Agent for Linux editions
Veeam Agent for Linux comes in three editions: Free, Workstation and Sever.
With a Free edition of backup agent for Linux you get all the basic features such as snapshots and CBT, all levels of backup and restore (both UI and command line) and integration with Veeam Backup & Replication. It’s perfect for home use or some non-critical systems.
Workstation
The key feature with the Workstation edition is that you get 24.7.365, enterprise-level support, plus all of the free edition features.
Server
The Server edition is the most advanced version. It includes pre-freeze and post-thaw scripts for application processing, and it supports multiple jobs.
Edition feature comparison chart

Conclusion
Veeam Agent for Linux allows you to protect your on-premises Linux systems or the systems in the public cloud. It is a standalone product that doesn’t require Veeam Backup & Replication, although it can leverage its backup repositories.
Read previous blogposts to learn more information about using Veeam Agent for Linux:
Источник


