- How to Create a Virtual HardDisk Volume Using a File in Linux
- Create a New Image to Hold Virtual Drive Volume
- Removing Virtual Drive Volume
- If You Appreciate What We Do Here On TecMint, You Should Consider:
- How to mount Virtual Hard disk (VHD) file in Ubuntu Linux?
- Expand virtual hard disks on a Linux VM with the Azure CLI
- Expand an Azure Managed Disk
- Expand a disk partition and filesystem
- 2.15. Performing Virtual Machine-Specific Operations
- 2.15.1. Pausing Virtual Machines
- 2.15.2. Managing Virtual Machine Devices
- 2.15.2.1. Adding New Devices
- 2.15.2.1.1. Adding Hyper-V SCSI Devices to Windows Virtual Machines
- 2.15.2.2. Initializing Newly Added Disks
- 2.15.2.2.1. Initializing the New Virtual Hard Disk in Windows
- 2.15.2.2.2. Initializing the New Virtual Hard Disk in Linux
- 2.15.2.3. Configuring Virtual Devices
- 2.15.2.3.1. Connecting and Disconnecting Virtual Devices
- 2.15.2.4. Deleting Devices
- 2.15.3. Making Screenshots
- 2.15.4. Assigning Host Devices to Virtual Machines
- 2.15.4.1. Assigning USB Devices to Virtual Machines
- 2.15.4.2. Assigning PCI Devices to Virtual Machines
- 2.15.4.3. Using PCI I/O Virtualization
- 2.15.5. Configuring IP Address Ranges for Host-Only Networks
- 2.15.6. Configuring Virtual Machine Crash Mode
- 2.15.7. Enabling Secure Boot for Virtual Machines
How to Create a Virtual HardDisk Volume Using a File in Linux
Virtual Hard Disk (VHD) is a disk image file format which represents a virtual hard disk drive, capable of storing the complete contents of a physical hard drive. It’s a container file that acts similar to a physical hard drive. The disk image replicates an existing hard drive and includes all data and structural features.
Just like a physical hard drive, a VHD can contains a file system, and you can use it to store and run an operating system, applications, as well as store data. One of the typical uses of VHDs in VirtualBox Virtual Machines (VMs) to store operating systems and application, and data.
In this article, we will demonstrate how to create a virtual hard disk volume using a file in Linux. This guide is useful for creating VHDs for testing purposes in your IT environment. For the purpose of this guide, we will create a VHD volume of size 1GB, and format it with EXT4 file system type.
Create a New Image to Hold Virtual Drive Volume
There are number of ways you can do this, but the most easiest way is using the following dd command. In this example, we will be creating a VHD volume of size 1GB image.
- if=/dev/zero: input file to provide a character stream for initializing data storage
- of=VHD.img: image file to be created as storage volume
- bs=1M: read and write up to 1M at a time
- count=1200: copy only 1200M (1GB) input blocks
![]() Create VHD Image File in Linux
Create VHD Image File in Linux
Next, we need to format the EXT4 file system type in the VHD image file with the mkfs utility. Answer y , when prompted that /media/VHD.img is not a block special device as shown in the following screenshot.
![]() Format VHD Image
Format VHD Image
In order to access the VHD volume, we need to mount to a directory (mount point). Run these commands to create the mount point and mount the VHD volume, respectively. The -o is used to specify options for mounting, here, the option loop indicates the device node under the /dev/ directory.
Note: The VHD filesystem will only remain mounted until the next reboot, to mount it at system boot, add this entry in the /etc/fstab file.
Now you can verify the newly created VHD filesystem with mount point using the following df command.
![]() Check VHD Filesystem
Check VHD Filesystem
Removing Virtual Drive Volume
If you don’t need the VHD volume anymore, run the following commands to unmount the VHD filesystem, then delete the image file:
Using the same idea, you can also create a swap area/space using a file in Linux.
That’s all! In this guide, we have demonstrated how to create a virtual hard disk volume using a file in Linux. If you have any thoughts to share or questions to ask, reach us via the comment form below.
If You Appreciate What We Do Here On TecMint, You Should Consider:
TecMint is the fastest growing and most trusted community site for any kind of Linux Articles, Guides and Books on the web. Millions of people visit TecMint! to search or browse the thousands of published articles available FREELY to all.
If you like what you are reading, please consider buying us a coffee ( or 2 ) as a token of appreciation.

We are thankful for your never ending support.
Источник
How to mount Virtual Hard disk (VHD) file in Ubuntu Linux?
Tutorial to mount a VHD image on Ubuntu or Debian using a tool Guestmount and then access the same via Command line or Graphical File manager.
Virtual Hard Disk- VHD is a common virtual drive format used on Windows systems. Generally, we use them to install Virtual Machine operating systems such as in VirtualBox or Hyper-V. However, we can also create and use VHDs just like a native drive partition on Windows 10 or 7 systems.
Furthermore, backup images also save in the.VHD format, thus to access them is really a need of the hours, in case you want some file resides in them. So, what would happen, if you need to extract some files from VHD on Linux; resides on the local or remote machine. And you don’t have a Windows system. Don’t worry we can mount them on Linux as well.
For carrying out the tutorial, we are using Ubuntu 20.04 LTS focal fossa, however, the steps given here are also applicable for Ubuntu 18.04/19.04/16.04; Linux Mint, Elementary OS, ZorinOS, Kali Linux, and other similar ones.
Here we are going to mount a VHD image on Ubuntu or Debian-based systems that have some information we need to extract; using a tool called guestmounts. Let’s see how to use it.
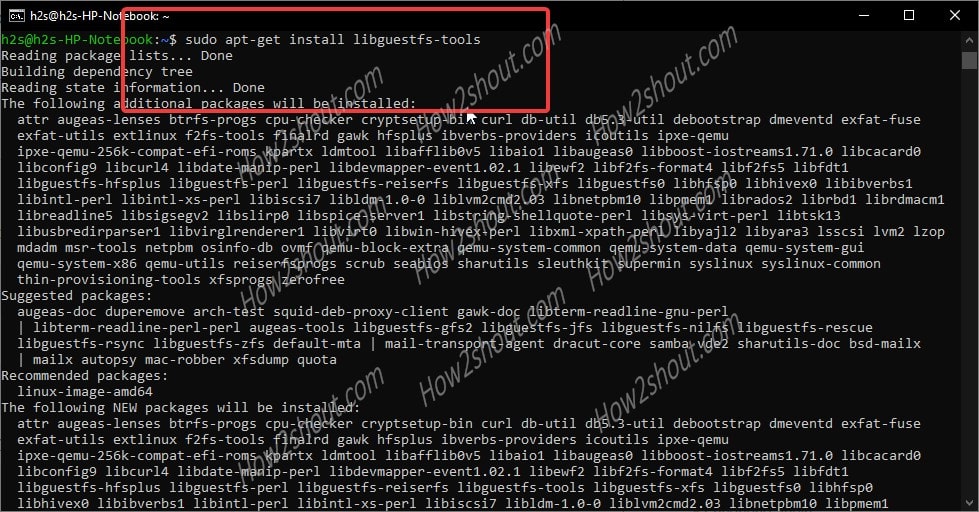
Step 1: The guestmounts tool comes in libguestfs package along with other tools, thus first we need to install the same. Here is the command to do that.

If you get any dependencies error then simply run:
After that again run the above installation command to get “guestmount” tool on your Ubuntu or Debian system.
Step 2: If the Virtual Hard disk.VHD is on your local system then we can mount it directly. However, on remote storage with SAMA/CISF shared protocol, we need to add its support to Ubuntu Linux first.
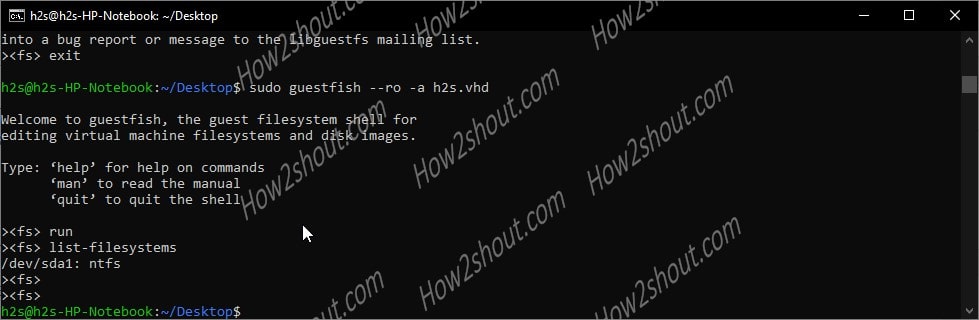
Step 3: Check the filesystem and available partitions on the Virtual Hard Disk image on Linux using “guestfish” command:
The guestfish is also a tool that comes along with the libguestfs-tools package.
Note: replace the VHD-file-path with the actual path where your VHD image located. For example: Here we have h2s.vhd located on the Desktop of Ubuntu, thus the command is:
sudo guestfish – -ro -a h2s.vhd
Once you dropped in the GuestFish Shell, type:
This will give you the partition details of the VHD image and the file system in which it has been formatted. Note down that.
As you can see that in the following image, our Virtual Disk image is in NTFS format.
Step 4: Switch to the root user. It is because we tried but couldn’t use the “guestmount” without sudo access. Thus, once you mount the VHD using under sudo rights, the mounted file image will only be accessible by the user root or the one that has the same access.
Read more: If you haven’t set the root password yet then please do that, here is the enable ubuntu root password tutorial.
Step 5: Run the guestmount command to mount the remotely or locally available.VHD image files.
*Replace: /path-to-demo.vhd with your VHD file image name and location path.
/dev/sda1: It is a device or partition of the Virtual Hard disk file system which we found with the help of guestfish command above. Replace it with yours.
–ro – It means read-only.
/path-of-the-directory-to-mount-VHD-image: Path where you want to mount your VHD image file on the system
You can see the below image for an idea:
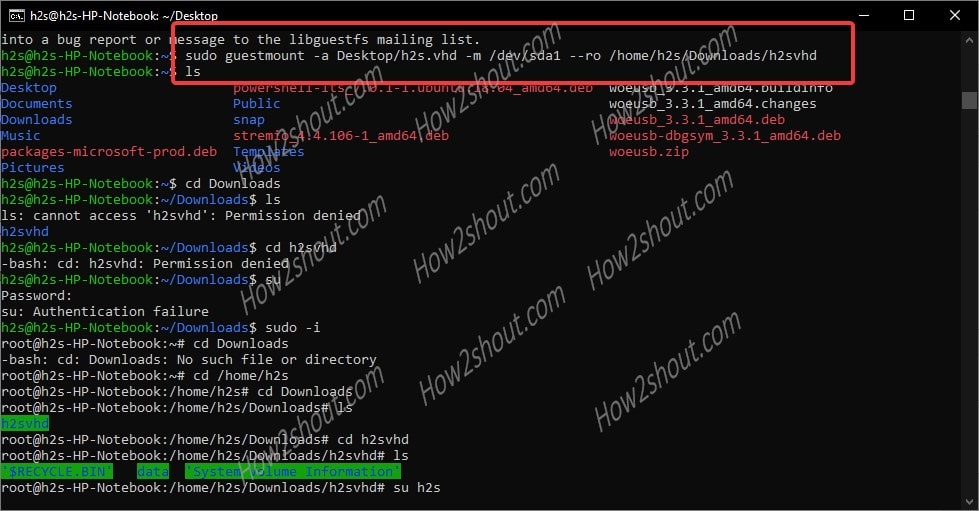
Step 6: Now, as we have mounted the VHD under sudo rights, thus only the root user can access the same. So, without exit the root shell environment, navigate to the directory where you have mounted the Virtual Hard disk file image. Afterward, you can easily access all this file inside that particular image.
Step 7: Those who want to access the VHD images using the Graphical File manager of Ubuntu. They need to first access it under administrative rights. So, run nautilus as root:
This will ask for the root password.
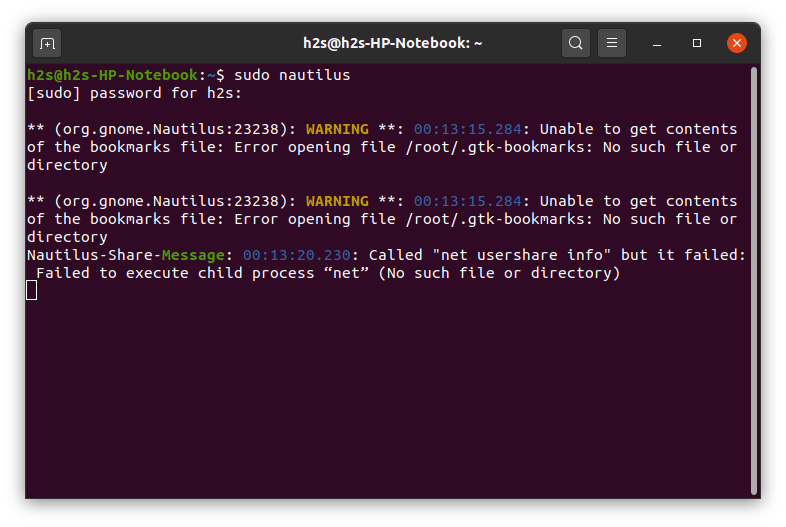
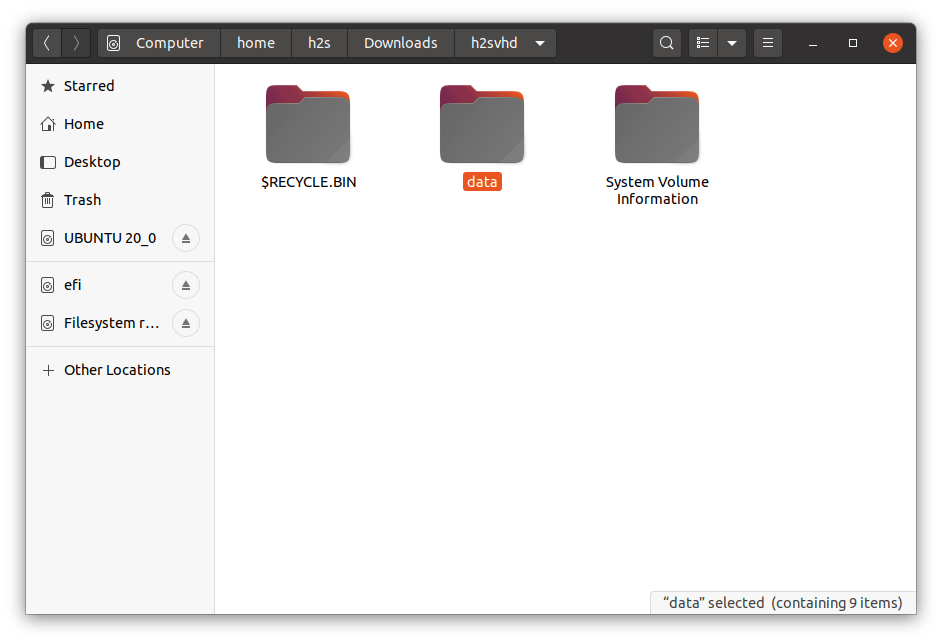
Now, the Ubuntu file manager will open under user root rights, navigate to the directory where VHD has been mounted by you. Click to open it.
Optional step:
In cases later, you want to unmount the VHD image from Ubuntu, then use the below command:
Replace: /mounted-directory-path with the path of the folder where you have actually mounted the image file.
Источник
Expand virtual hard disks on a Linux VM with the Azure CLI
Applies to: вњ”пёЏ Linux VMs вњ”пёЏ Flexible scale sets
This article describes how to expand managed disks for a Linux virtual machine (VM) with the Azure CLI. You can add data disks to provide for additional storage space, and you can also expand an existing data disk. The default virtual hard disk size for the operating system (OS) is typically 30 GB on a Linux VM in Azure.
Always make sure that your filesystem is in a healthy state, your disk partition table type will support the new size, and ensure your data is backed up before you perform disk resize operations. For more information, see the Azure Backup quickstart.
Expand an Azure Managed Disk
Make sure that you have the latest Azure CLI installed and are signed in to an Azure account by using az login.
This article requires an existing VM in Azure with at least one data disk attached and prepared. If you do not already have a VM that you can use, see Create and prepare a VM with data disks.
In the following samples, replace example parameter names such as myResourceGroup and myVM with your own values.
Operations on virtual hard disks can’t be performed with the VM running. Deallocate your VM with az vm deallocate. The following example deallocates the VM named myVM in the resource group named myResourceGroup:
The VM must be deallocated to expand the virtual hard disk. Stopping the VM with az vm stop does not release the compute resources. To release compute resources, use az vm deallocate .
View a list of managed disks in a resource group with az disk list. The following example displays a list of managed disks in the resource group named myResourceGroup:
Expand the required disk with az disk update. The following example expands the managed disk named myDataDisk to 200 GB:
When you expand a managed disk, the updated size is rounded up to the nearest managed disk size. For a table of the available managed disk sizes and tiers, see Azure Managed Disks Overview — Pricing and Billing.
Start your VM with az vm start. The following example starts the VM named myVM in the resource group named myResourceGroup:
Expand a disk partition and filesystem
To use an expanded disk, expand the underlying partition and filesystem.
SSH to your VM with the appropriate credentials. You can see the public IP address of your VM with az vm show:
Expand the underlying partition and filesystem.
a. If the disk is already mounted, unmount it:
b. Use parted to view disk information and resize the partition:
View information about the existing partition layout with print . The output is similar to the following example, which shows the underlying disk is 215 GB:
c. Expand the partition with resizepart . Enter the partition number, 1, and a size for the new partition:
d. To exit, enter quit .
With the partition resized, verify the partition consistency with e2fsck :
Resize the filesystem with resize2fs :
Mount the partition to the desired location, such as /datadrive :
To verify the data disk has been resized, use df -h . The following example output shows the data drive /dev/sdc1 is now 200 GB:
Источник
2.15. Performing Virtual Machine-Specific Operations
This section focuses on operations specific to virtual machines.
2.15.1. Pausing Virtual Machines
Pausing a running virtual machine releases the resources, such as RAM and CPU, currently used by this virtual machine. The released resources can then be used by the hardware node or other running virtual machines and containers.
To pause a virtual machine, you can use the prlctl pause command. For example, the following command pauses the virtual machine MyVM :
You can check that the virtual machine has been successfully paused by using the prlctl list -a command:
The command output shows that the virtual machine MyVM is paused at the moment. To continue running this virtual machine, execute this command:
2.15.2. Managing Virtual Machine Devices
Virtuozzo Hybrid Server allows you to manage the following virtual machine devices:
hard disk drives
floppy disk drives
When managing devices, keep in mind the following limits for VM devices:
4 IDE devices (virtual disks or CD/DVD-ROM drives)
15 SCSI devices (virtual disks or CD/DVD-ROM drives)
15 VirtIO virtual disks
Floppy disk drive
1 floppy disk drive
15 virtual NICs
Serial (COM) Ports
4 serial (COM) ports
1 USB controller
The main operations you can perform on VM devices are:
Add a new device to the virtual machine.
Configure device properties.
Remove a device from the virtual machine.
2.15.2.1. Adding New Devices
This section provides information on adding new devices to your virtual machines. You can add new virtual devices to your virtual machine using the prlctl set command. The options responsible for adding particular devices are listed in the following table:
Adds a new hard disk drive to a virtual machine. You can either connect an existing image to the virtual machine or create a new one.
SCSI and VirtIO hard disks can be added to both running and stopped VMs; IDE disks can only be added to stopped VMs.
Adds a new CD/DVD-ROM drive to the virtual machine that must be stopped first.
Adds a new network adapter to a stopped virtual machine.
Adds a new floppy disk drive to a stopped virtual machine.
Adds a new serial port to a stopped virtual machine.
Adds a new USB controller to a stopped virtual machine.
For example, you can execute the following command to add a new virtual disk to the virtual machine MyVM :
This command creates a new virtual disk with the following default parameters:
Disk subtype: VirtIO SCSI
Image file name and location: /vz/vmprivate/d35d28e5-11f7-4b3f-9065-8fef6178bc5b/harddisk1.hdd
Disk format: expanded
Disk capacity: 65536 MB
You can change some of these parameters with prlctl . For example, to create an 84 GB IDE virtual disk, run
The virtual disk has been added to your virtual machine. However, before you can use it, you need to initialize it as described in the next subsection.
2.15.2.1.1. Adding Hyper-V SCSI Devices to Windows Virtual Machines
Virtuozzo Hybrid Server supports Hyper-V paravirtualized device emulation of SCSI hard disks and CD/DVD-ROM drives. The emulation allows to use these devices with native Windows drivers. It is recommended for all the supported Windows guests (see Supported Guest Operating Systems ).
To add, for example, a SCSI CD/DVD-ROM and HDD emulated via Hyper-V to a VM, run the following commands:
2.15.2.2. Initializing Newly Added Disks
After you added a new blank virtual hard disk to the virtual machine configuration, it will be invisible to the operating system installed inside the virtual machine until the moment you initialize it.
2.15.2.2.1. Initializing the New Virtual Hard Disk in Windows
To initialize a new virtual hard disk in a Windows guest OS, you will need the Disk Management utility available. For example, in Windows Server 2012 you can access this utility by clicking Start > Control Panel > System and Security > Administrative Tools > Computer Management > Storage > Disk Management.
When you open the Disk Management utility, it automatically detects that a new hard disk was added to the configuration and launches the Initialize Disk wizard:
In the Select disks section, select the newly added disk.
Choose the partition style for the selected disk: MBR (Master Boot Record) or GPD (GUID Partition Table).
The added disk will appear as a new disk in the Disk Management utility window, but its memory space will be unallocated. To allocate the disk memory, right-click this disk name in the Disk Management utility window and select New Volume. The New Volume Wizard window will appear. Follow the steps of the wizard and create a new volume in the newly added disk.
After that your disk will become visible in My Computer and you will be able to use it as a data disk inside your virtual machine.
2.15.2.2.2. Initializing the New Virtual Hard Disk in Linux
Initializing a new virtual hard disk in a Linux guest OS comprises two steps: (1) allocating the virtual hard disk space and (2) mounting this disk in the guest OS.
To allocate the space, you need to create a new partition on this virtual hard disk using the fdisk utility:
You need the root privileges to use fdisk .
Launch a terminal window.
To list the IDE disk devices present in your virtual machine configuration, enter:
If you added a SCSI disk to the virtual machine configuration, use the fdisk /dev/sd* command instead.
By default, the second virtual hard disk appears as /dev/hdc in your Linux virtual machine. To work with this device, enter:
If this is a SCSI disk, use the fdisk /dev/sdc command instead.
To get detailed information about the disk, enter:
To create a new partition, enter:
To create the primary partition, enter:
Specify the partition number. By default, it is 1.
Specify the first cylinder. If you want to create a single partition on this hard disk, use the default value.
Specify the last cylinder. If you want to create a single partition on this hard disk, use the default value.
To create a partition with the specified settings, enter:
When you allocated the space on the newly added virtual hard disk, you should format it by entering the following command in the terminal:
system> stands for the file system you want to use on this disk. It is recommended to use ext4 .
When the added virtual hard disk is formatted, you can mount it in the guest OS.
To create a mount point for the new virtual hard disk, enter:
You can specify a different mount point.
To mount the new virtual hard disk to the specified mount point, enter:
When you mounted the virtual hard disk, you can use its space in your virtual machine.
2.15.2.3. Configuring Virtual Devices
You can configure the parameters of an existing virtual device in your virtual machine using the —device-set option of the prlctl set command.
To change the virtual device parameters, do the following:
List the VM information to find out the name of the device you wish to configure. For example, to obtain the list of virtual devices in the virtual machine MyVM , run:
All virtual devices currently available to the virtual machine are listed under Hardware . In our case the virtual machine MyVM has the following devices: 2 CPUs, main memory, video memory, a floppy disk drive, 2 hard disk drives, a CD/DVD-ROM drive, a USB controller, and a network card.
Configure the properties of the virtual device. For example, to configure the current type of the virtual disk hdd1 in the virtual machine MyVM from SCSI to IDE, execute:
To check that the virtual disk type has been successfully changed, use the prlctl list -i command:
2.15.2.3.1. Connecting and Disconnecting Virtual Devices
In Virtuozzo Hybrid Server, you can connect or disconnect certain devices when a virtual machine is running. These devices include:
Floppy disk drives
Usually, all virtual devices are automatically connected to a virtual machine when you create them. To disconnect a device from the virtual machine, you can use the prlctl set command. For example, the following command disconnects the CD/DVD-ROM drive cdrom0 from the virtual machine MyVM :
To connect the CD/DVD-ROM drive back, you can run the following command:
2.15.2.4. Deleting Devices
You can delete a virtual device that you do not need any more in your virtual machine using the —device-del option of the prlctl set command. The options responsible for removing particular devices are listed in the following table:
Deletes the specified hard disk drive from a stopped virtual machine.
Deletes the specified CD/DVD-ROM drive from a running or stopped virtual machine.
Deletes the specified network adapter from a stopped virtual machine.
Deletes the floppy disk drive from a running or stopped virtual machine.
Deletes the specified serial port from a stopped virtual machine.
Deletes the USB controller from a running or stopped virtual machine.
To remove a virtual device, do the following:
List the VM information to find out the name of the device you wish to delete. For example, to obtain the list of virtual devices in the virtual machine MyVM , run:
Remove the virtual device from your virtual machine. For example, to remove the virtual disk hdd1 from the virtual machine MyVM , execute:
If you do not want to permanently delete a virtual device, you can temporarily disconnect it from the virtual machine using the —disable option.
2.15.3. Making Screenshots
When a virtual machine stops responding to requests, you can check its state by capturing an image (or screenshot) of its screen with the prlctl capture command. A screenshot is saved in PNG format.
You can take screenshots of running virtual machines only.
To take a screenshot of the MyVM virtual machine screen and save it to the /usr/screenshots/image1.png file:
Make sure that the virtual machine is running:
Take the virtual machine screenshot:
If the —file option is not specified, a screenshot is dumped to the command output.
Check that the image1.png file has been successfully created:
2.15.4. Assigning Host Devices to Virtual Machines
Starting from Virtuozzo Hybrid Server 7 Update 11, you can assign a host device to a virtual machine so that the device is automatically connected to the VM when you connect the device to the hardware node or start the VM. This method, also known as passthrough, allows host devices to appear and behave as if they were physically attached to the guest operating system. Virtuozzo Hybrid Server supports assigning USB, PCI devices (physical NICs), and SR-IOV devices (virtual NICs). Ways to do this are described in the following sections.
When assigning host devices to VMs, keep in mind that:
After a VM is migrated to another server, all its assignments are lost.
All assignments are preserved if you restore a VM to its original location. Otherwise they are lost.
2.15.4.1. Assigning USB Devices to Virtual Machines
This feature is experimental and tested only with some USB devices.
To assign a USB device to a VM, specify two parameters:
The USB device ID that you can get by running the prlsrvctl usb list command. For example:
The virtual machine UUID that you can obtain by running the prlctl list -a command. For example:
Once you know the necessary parameters, do the following:
Make sure the VM is stopped. For example:
Assign the USB device to the VM using the prlsrvctl usb set command. For example:
This command assigns the USB device Sony — Storage Media with ID ‘3-2|054c|05ba|high|—|CB070B7B49A7C06786|3’ to the virtual machine MyVM with UUID To check that the USB device has been successfully assigned to the VM, use the prlsrvctl usb list command. For example: The command output shows that the USB device Sony — Storage Media will be automatically connected to the VM with UUID To remove the assignment, use the prlsrvctl usb del command. For example: Assigning PCI devices to VMs is available only on server platforms that support Intel Virtualization Technology for Directed I/O (VT-d) or AMD I/O Virtualization Technology (IOMMU). This feature must be supported by both the motherboard chipset and CPU. For a list of IOMMU-supporting hardware, see this Wikipedia article. Before assigning PCI devices, prepare your system as follows: Enable the CPU virtualization extensions (VT-d or AMD IOMMU) in the host BIOS. Enable the IOMMU support in the kernel: In the /etc/default/grub file, locate the GRUB_CMDLINE_LINUX line and add within the quotes either intel_iommu=on iommu=pt or amd_iommu=pt , depending on the platform. For example, on an Intel-based system, the line will be: Regenerate the grub config file: On a BIOS-based system, run: On a UEFI-based system, run: Reboot the system to apply the changes. To check that IOMMU is enabled, run one of the following commands: On an Intel-based system: On an AMD-based system: Now you can proceed to assign the PCI device to a VM. Do the following: Find the ID of the desired device in the output of the prlsrvctl info | grep pci command. For example: Make sure the VM that you will assign the PCI device to is stopped. For example: Assign the PCI device to the VM. For example, to assign the network adapter X540 Ethernet Controller with the ID ‘8:0:1:8086.1521’ to the virtual machine MyVM , run: To check that the PCI device has been successfully assigned to the VM, run the following command: Now the PCI device X540 Ethernet Controller will automatically connect to the MyVM virtual machine every time this VM is started and the device is connected to the hardware node. To remove the assignment, use the prlctl set —device-del command: Single Root I/O Virtualization (SR-IOV) is a specification that allows a single physical PCI device to appear as multiple virtual devices and thus be shared by multiple virtual machines. Virtuozzo Hybrid Server supports assigning Virtual Functions of SR-IOV-capable PCI devices, namely network adapters, to virtual machines. Before creating virtual PCI devices, make sure the following requirements are met: The system is prepared to support IOMMU as described in Assigning PCI Devices to Virtual Machines . SR-IOV is enabled in the system BIOS. To create virtual network adapters, or Virtual Functions of a network adapter, you need to specify their number in the /sys/class/net/ /device/sriov_numvfs file. For example, to create two Virtual Functions of the Ethernet adapter enp2s0 , run: To ensure that the intended number of Virtual Functions is persistent across server reboots, create a udev rule similar to the following: where enp2s0 is the name of the network adapter, ixgbe is the name of the network driver in use, and 2 is the number of Virtual Functions to be created at boot time. The maximum number of Virtual Functions supported by a network device can be queried by reading the /sys/class/net/ /device/sriov_totalvfs file. For example, for the Ethernet adapter enp2s0 , run: To check that Virtual Functions have been successfully created, execute: After creating virtual network adapters, you can assign them to VMs as described in Assigning PCI Devices to Virtual Machines . For them to work properly, install appropriate network drivers inside the VMs. All virtual machines connected to networks of the host-only type receive their IP addresses from the DHCP server. This DHCP server is set up during the Virtuozzo Hybrid Server installation and includes by default IP addresses from 10.37.130.1 to 10.37.130.254. You can redefine the default IP address range for host-only networks and make virtual machines get their IP addresses from different IP address ranges. For example, you can run the following command to set the start and end IP addresses for the Host-Only network (this network is automatically created during the Virtuozzo Hybrid Server installation) to 10.10.11.1 and 10.10.11.254, respectively: You can also specify a custom IP address range directly when creating a new network of the host-only type. Assuming that you want to create a network with the Host-Only2 name and define for this network the IP addresses range from 10.10.10.1 to 10.10.10.254, you can execute the following command: When working with IP address ranges, pay attention to the following: The start and end IP addresses of an IP address range must belong to the same subnetwork. IP address ranges can be defined for each network of the host-only type separately. For example, you can set the IP address range from 10.10.11.1 to 10.10.11.254 for the Host-Only network and from 10.10.10.1 to 10.10.10.254 for the Host-Only2 network. In Virtuozzo Hybrid Server 7, you can configure a virtual machine behavior after the guest OS crash: restart or pause. By default, when a virtual machine fails, a crash dump is created and sent in the problem report to the Virtuozzo technical support team, and the virtual machine is restarted with the same configuration. To address the problem yourself, you can switch the virtual machine crash mode to pause using the prlctl set command. For example: The virtual machine resources will be preserved to allow analysis and its crash dump will be sent in the problem report. As crash dumps can take up significant disk space and lead to the whole server malfunction, the crash mode is automatically switched to pause , if a virtual machine fails more than three times within twenty-four hours since the last crash. If you want to skip creating the crash dump and sending the problem report, add :no-report to the command. For example: Secure Boot is a UEFI feature that provides security in the pre-boot environment. It works by ensuring that only trusted software components signed by the Original Equipment Manufacturer (OEM) are loaded during the boot process. Secure boot can only be used if the system boots using UEFI, instead of BIOS. Secure Boot is supported in Virtuozzo Hybrid Server 7 virtual machines running the following operating systems: Windows Server 2012 and newer, CentOS 7, Ubuntu 14.04 LTS and newer. If you want to enable Secure Boot in your virtual machine, make sure it boots with the EFI firmware before installing a guest OS inside it. To configure the EFI boot, use the prlctl set —efi-boot command. For example: To enable Secure Boot inside a guest OS, do the following: While the VM is booting up, press F2 in the VNC console to open the EFI setup. On the EFI setup screen, select Device Manager > Secure Boot Configuration. Locate the Attempt Secure Boot option and press Spacebar to toggle the checkbox. Press F10 to save the changes and reset the platform. You can check that Secure Boot is successfully enabled as follows: In Windows VMs, check the Secure Boot State field in the System Information window: Источник2.15.4.2. Assigning PCI Devices to Virtual MachinesВ
2.15.4.3. Using PCI I/O Virtualization
2.15.5. Configuring IP Address Ranges for Host-Only Networks
2.15.6. Configuring Virtual Machine Crash Mode
2.15.7. Enabling Secure Boot for Virtual Machines


