- How to Create/Add a New Virtual Disk for an Existing Linux Virtual Machine
- Solution
- How to Create a Virtual HardDisk Volume Using a File in Linux
- Create a New Image to Hold Virtual Drive Volume
- Removing Virtual Drive Volume
- If You Appreciate What We Do Here On TecMint, You Should Consider:
- Create a virtual hard drive volume within a file in Linux
- Why would I want this?
- What are the steps to creating a file container?
- Create a new file to hold the virtual drive volume
- Format and mount the virtual volume
- How to mount Virtual Hard disk (VHD) file in Ubuntu Linux?
How to Create/Add a New Virtual Disk for an Existing Linux Virtual Machine
This article helps you to create and add a new virtual disk to an existing Linux virtual machine on VMware. Here are some steps for adding a new SCSI based virtual disk on a CentOS Linux virtual machine. We are assuming that you are already familiar with Linux system administration skills and having knowledge of vCenter Server or vSphere Client. For a full description of the utilities mentioned in this article, please refer to the manuals.
Solution
To add a new virtual disk for an existing Linux virtual machine, Log in as root on your Linux virtual machine. Run this below command and make note of the sdx entries, means list of existing hard disks.
Log into the vCenter Server using the vSphere Client.

In the vSphere Client inventory, right-click the virtual machine and select Edit Settings.
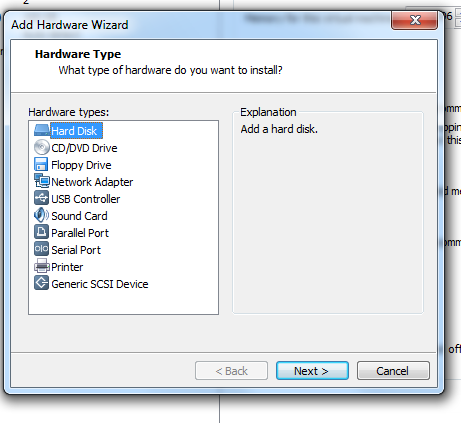
Click the Hardware tab and click Add.
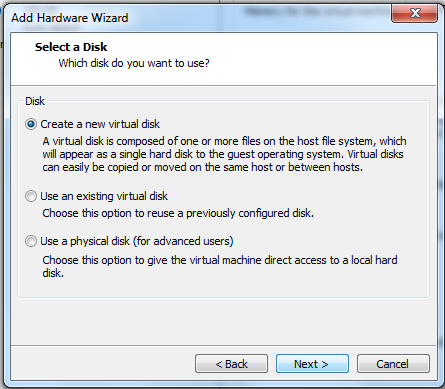
Select Hard Disk and click Next.
Complete the wizard. After adding the Hard disk to VMware/vSphere/vCenter it looks like this.

Reboot the Linux virtual machine.
Log into the Virtual machine using the root credentials and run this command.
We will find new entry.
Create an ext3 file system on the new disk using the new ‘sdb’ disk from the above list of disks
You may see an alert that, you are performing this operation on an entire device, not a partition. That is correct, as you created a single virtual disk of the intended size. This is assuming you have specified the correct device.
Caution: Ensure that you have the selected the right device, there is no undo.
Run the fdisk command to verify the existence of the disk you created.
Run this command to create a mount point for the new disk and mount that disk
To verify the mount run below command –
Now the new disk is available to you for usage. To mount the new disk or volume automatically at the boot time follow the below procedure –
Run this command to display the current /etc/fstab
Using a text editor to edit fstab and add this line to add the disk to /etc/fstab so that it is available across reboots
After this configuration you are able to add new Virtual hard disk drives to existing Linux machines on VMware/vSphere/vCenter. This will help in the provision of a hard disk for backups or stored data to the existing Centos Linux machines.
Источник
How to Create a Virtual HardDisk Volume Using a File in Linux
Virtual Hard Disk (VHD) is a disk image file format which represents a virtual hard disk drive, capable of storing the complete contents of a physical hard drive. It’s a container file that acts similar to a physical hard drive. The disk image replicates an existing hard drive and includes all data and structural features.
Just like a physical hard drive, a VHD can contains a file system, and you can use it to store and run an operating system, applications, as well as store data. One of the typical uses of VHDs in VirtualBox Virtual Machines (VMs) to store operating systems and application, and data.
In this article, we will demonstrate how to create a virtual hard disk volume using a file in Linux. This guide is useful for creating VHDs for testing purposes in your IT environment. For the purpose of this guide, we will create a VHD volume of size 1GB, and format it with EXT4 file system type.
Create a New Image to Hold Virtual Drive Volume
There are number of ways you can do this, but the most easiest way is using the following dd command. In this example, we will be creating a VHD volume of size 1GB image.
- if=/dev/zero: input file to provide a character stream for initializing data storage
- of=VHD.img: image file to be created as storage volume
- bs=1M: read and write up to 1M at a time
- count=1200: copy only 1200M (1GB) input blocks
![]() Create VHD Image File in Linux
Create VHD Image File in Linux
Next, we need to format the EXT4 file system type in the VHD image file with the mkfs utility. Answer y , when prompted that /media/VHD.img is not a block special device as shown in the following screenshot.
![]() Format VHD Image
Format VHD Image
In order to access the VHD volume, we need to mount to a directory (mount point). Run these commands to create the mount point and mount the VHD volume, respectively. The -o is used to specify options for mounting, here, the option loop indicates the device node under the /dev/ directory.
Note: The VHD filesystem will only remain mounted until the next reboot, to mount it at system boot, add this entry in the /etc/fstab file.
Now you can verify the newly created VHD filesystem with mount point using the following df command.
![]() Check VHD Filesystem
Check VHD Filesystem
Removing Virtual Drive Volume
If you don’t need the VHD volume anymore, run the following commands to unmount the VHD filesystem, then delete the image file:
Using the same idea, you can also create a swap area/space using a file in Linux.
That’s all! In this guide, we have demonstrated how to create a virtual hard disk volume using a file in Linux. If you have any thoughts to share or questions to ask, reach us via the comment form below.
If You Appreciate What We Do Here On TecMint, You Should Consider:
TecMint is the fastest growing and most trusted community site for any kind of Linux Articles, Guides and Books on the web. Millions of people visit TecMint! to search or browse the thousands of published articles available FREELY to all.
If you like what you are reading, please consider buying us a coffee ( or 2 ) as a token of appreciation.

We are thankful for your never ending support.
Источник
Create a virtual hard drive volume within a file in Linux
If you are not familiar with the concept of virtual hard drive volumes, sometimes called file containers, they are basically regular looking files that can be used by your computer as if they were real hard drives. So for example you could have a file called MyDrive.img on your computer and with a few quick actions it would appear as though you had just plugged in an external USB stick or hard drive into your computer. It acts just like a normal, physical, drive but whenever you copy anything to that location the copied files are actually being written to the MyDrive.img file behind the scenes. This is not unlike the dmg files you would find on a Mac or even something akin to TrueCrypt file containers.
Why would I want this?
There are a number of reasons why you may be interested in creating virtual volumes. From adding additional swap space to your computer (i.e. something similar to a page file on Windows without needing to create a new hard drive partition) to creating portable virtual disk drives to back up files to, or even just doing it because this is Linux and it’s kind of a neat thing to do.
What are the steps to creating a file container?
The process seems a bit strange but it’s actually really straight forward.
- Create a new file to hold the virtual drive volume
- (Optional) Initialize it by filling it with data
Create a new file to hold the virtual drive volume
There are probably a million different ways to do this but I think the most simple way is to run the following command from a terminal:
So let’s say you wanted to create a virtual volume in a file called MyDrive.img in the current directory with a size of 500MiB. You would simply run the following command:
You may notice that this command finishes almost instantly. That’s because while the system created a 500MiB file it didn’t actually write 500MiB worth of data to the file.
This is where the optional step of ‘initializing’ the file comes into play. To be clear you do not need to do this step at all but it can be good practice if you want to clean out the contents of the allocated space. For instance if you wanted to prevent someone from easily noticing when you write data to that file you may pre-fill the space with random data to make it more difficult to see or you may simply want to zero out that part of the hard drive first.
Anyway if you choose to pre-fill the file with data the easiest method is to use the dd command. PLEASE BE CAREFUL – dd is often nicknamed disk destroyer because it will happily overwrite any data you tell it to, including the stuff you wanted to keep if you make a mistake typing the command!
To fill the file with all zeros simply run this command:
So for the above file you would run:
If you want to fill it with random data instead just swap /dev/zero for /dev/urandom or /dev/random in the command:
Format and mount the virtual volume
Next up we need to give the volume a filesystem. You can either do this via the command line or using a graphical tool. I’ll show you an example of both.
From the terminal you would run the appropriate mkfs command on the file. As an example this will format the file above using the ext3 filesystem:
You may get a warning that looks like this
Simply type the letter ‘y’ and press Enter. With any luck you’ll see a bunch of text telling you exactly what happened and you now have a file that is formatted with ext3!
If you would rather do things the graphical way you could use a tool like Disks (gnome-disk-utility) to format the file.
From the menu in Disks, select Disks -> Attach Disk Image and browse to your newly created file (i.e. MyDrive.img).
 Don’t forget to uncheck the box!
Be sure to uncheck “Set up read-only loop device”. If you leave this checked you won’t be able to format or write anything to the volume. Select the file and click Attach.
This will attach the file, as if it were a real hard drive, to your computer:

Next we need to format the volume. Press the little button with two gears right below the attached volume and click Format. Make sure you do this for the correct ‘drive’ so that you don’t accidentally format your real hard drive!
 Make sure you’re formatting the correct drive!
From this popup you can select the filesystem type and even name the drive. You may also use the “Erase” option to write zeros to the file if you wanted to do it here instead of via the terminal as shown previously. In the image above the settings will format the drive using the ext4 filesystem. Click Format, confirm the action and you’re done. Disks will format the file and even auto-mount it for you. You can now copy files to your mounted virtual drive. When you’re done simply eject the drive like normal or press the square Stop button in Disks. To use that same volume again in the future just re-attach the disk image using the steps above.
To mount the formatted file from the terminal you will need to first create a folder to mount it to. Let’s say we wanted to mount it to the folder /media/MyDrive. First create the folder there:
Next mount the file to the folder:
Now you can copy files to the drive just like before. When you’re finished unmount the volume by running this command:
And there you have it. Now you know how to create virtual volume files that you can use for just about anything and easily move from computer to computer.
Источник
How to mount Virtual Hard disk (VHD) file in Ubuntu Linux?
Tutorial to mount a VHD image on Ubuntu or Debian using a tool Guestmount and then access the same via Command line or Graphical File manager.
Virtual Hard Disk- VHD is a common virtual drive format used on Windows systems. Generally, we use them to install Virtual Machine operating systems such as in VirtualBox or Hyper-V. However, we can also create and use VHDs just like a native drive partition on Windows 10 or 7 systems.
Furthermore, backup images also save in the.VHD format, thus to access them is really a need of the hours, in case you want some file resides in them. So, what would happen, if you need to extract some files from VHD on Linux; resides on the local or remote machine. And you don’t have a Windows system. Don’t worry we can mount them on Linux as well.
For carrying out the tutorial, we are using Ubuntu 20.04 LTS focal fossa, however, the steps given here are also applicable for Ubuntu 18.04/19.04/16.04; Linux Mint, Elementary OS, ZorinOS, Kali Linux, and other similar ones.
Here we are going to mount a VHD image on Ubuntu or Debian-based systems that have some information we need to extract; using a tool called guestmounts. Let’s see how to use it.
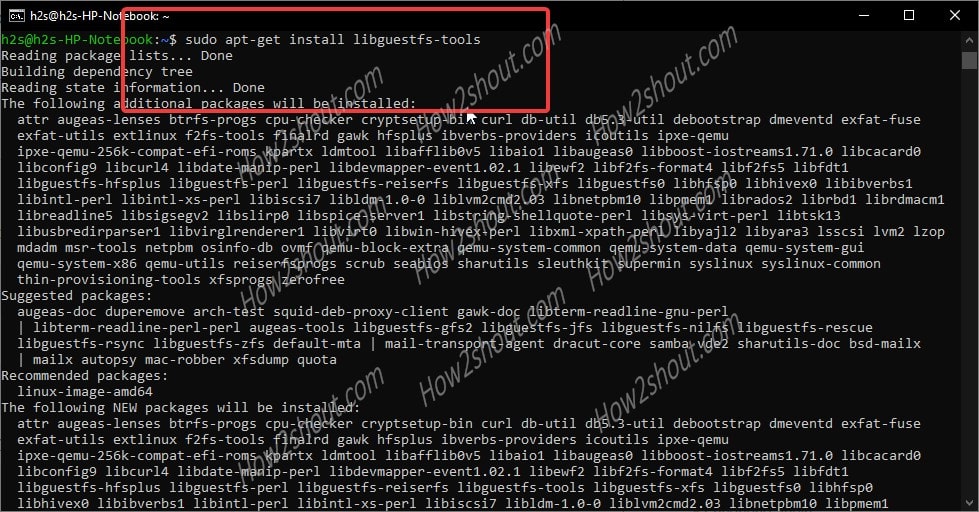
Step 1: The guestmounts tool comes in libguestfs package along with other tools, thus first we need to install the same. Here is the command to do that.

If you get any dependencies error then simply run:
After that again run the above installation command to get “guestmount” tool on your Ubuntu or Debian system.
Step 2: If the Virtual Hard disk.VHD is on your local system then we can mount it directly. However, on remote storage with SAMA/CISF shared protocol, we need to add its support to Ubuntu Linux first.
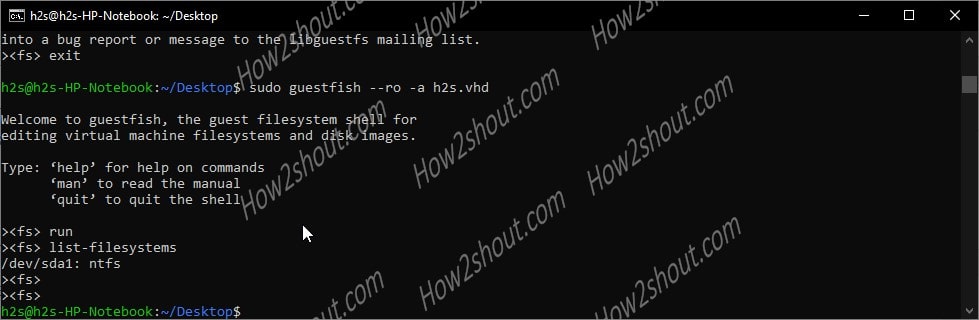
Step 3: Check the filesystem and available partitions on the Virtual Hard Disk image on Linux using “guestfish” command:
The guestfish is also a tool that comes along with the libguestfs-tools package.
Note: replace the VHD-file-path with the actual path where your VHD image located. For example: Here we have h2s.vhd located on the Desktop of Ubuntu, thus the command is:
sudo guestfish – -ro -a h2s.vhd
Once you dropped in the GuestFish Shell, type:
This will give you the partition details of the VHD image and the file system in which it has been formatted. Note down that.
As you can see that in the following image, our Virtual Disk image is in NTFS format.
Step 4: Switch to the root user. It is because we tried but couldn’t use the “guestmount” without sudo access. Thus, once you mount the VHD using under sudo rights, the mounted file image will only be accessible by the user root or the one that has the same access.
Read more: If you haven’t set the root password yet then please do that, here is the enable ubuntu root password tutorial.
Step 5: Run the guestmount command to mount the remotely or locally available.VHD image files.
*Replace: /path-to-demo.vhd with your VHD file image name and location path.
/dev/sda1: It is a device or partition of the Virtual Hard disk file system which we found with the help of guestfish command above. Replace it with yours.
–ro – It means read-only.
/path-of-the-directory-to-mount-VHD-image: Path where you want to mount your VHD image file on the system
You can see the below image for an idea:
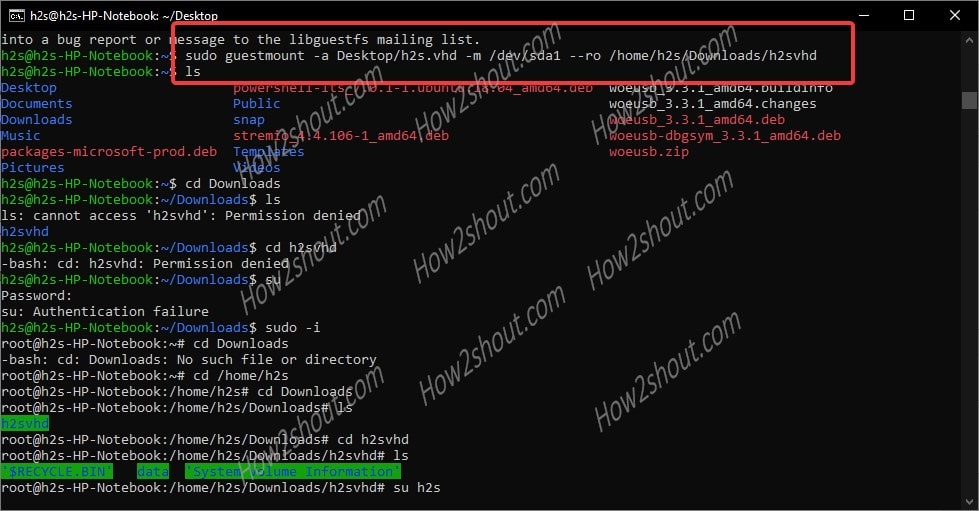
Step 6: Now, as we have mounted the VHD under sudo rights, thus only the root user can access the same. So, without exit the root shell environment, navigate to the directory where you have mounted the Virtual Hard disk file image. Afterward, you can easily access all this file inside that particular image.
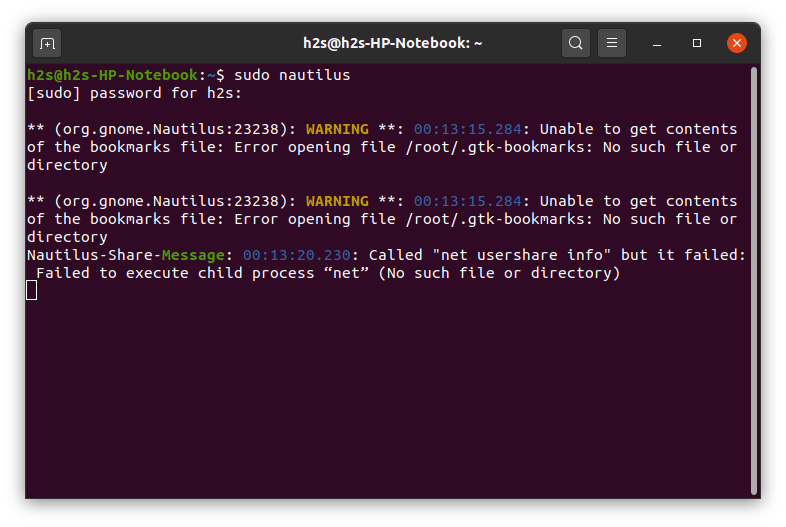
Step 7: Those who want to access the VHD images using the Graphical File manager of Ubuntu. They need to first access it under administrative rights. So, run nautilus as root:
This will ask for the root password.
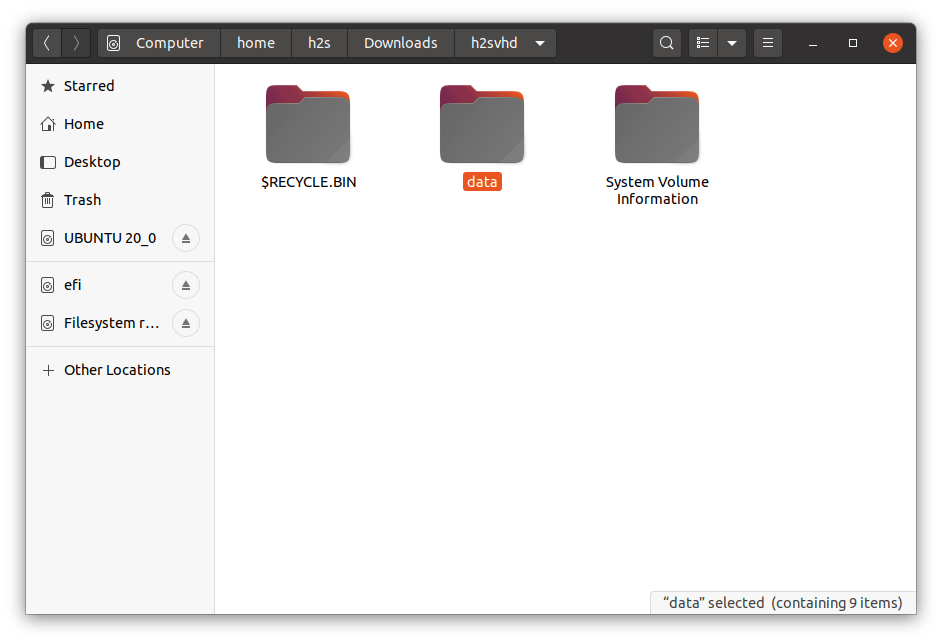
Now, the Ubuntu file manager will open under user root rights, navigate to the directory where VHD has been mounted by you. Click to open it.
Optional step:
In cases later, you want to unmount the VHD image from Ubuntu, then use the below command:
Replace: /mounted-directory-path with the path of the folder where you have actually mounted the image file.
Источник


