- Documentation:Streaming HowTo New
- Contents
- Introduction
- Transcoding
- Transcoding using the GUI
- Using the commandline
- Windows-based systems
- Unix systems
- Transcoding commandline string structure
- Example commandline: Converting an audio file to a MP3 file
- Other examples commandline strings
- Streaming
- Streaming using the GUI
- Streaming using the command line interface
- Documentation:Command line
- Contents
- Use the command line
- Getting help
- Opening streams
- Opening a file
- Opening a DVD or VCD, or an audio CD
- Receiving a network stream
- Modules selection
- Stream Output
- Other Options
- Audio options
- Video options
- Desktop/Screen grab options
- Playlist options
- Network options
- CPU options
- Miscellaneous options
- Item-specific options
- Filters
- Deinterlacing video filter
- Invert video filter
- Image properties filter
- Wall video filter
- Video transformation filter
- Distort video filter
- Clone video filter
- Crop video filter
- Motion blur filter
- Video pictures blending
- Video scaling filter
- Subpictures Filters
- Marquee display sub filter
- Logo video filter
Documentation:Streaming HowTo New
This documentation explains how to stream, transcode and save streams using VLC media player.
NOTE: This is work in progress. For a more complete, yet outdated, documentation on Streaming with VLC please see the old Streaming HowTo.
Contents
Introduction
VLC media player is able to stream, transcode and save different media streams. For more information about the formats and codecs supported please see the VideoLAN Streaming Features list.
Transcoding
Transcoding is the process of taking a media file or stream and converting it to a different format or bitrate.
There are two methods for transcoding in VLC: via the GUI (VLC’s default interface) or via the commandline. The term transcode by itself normally refers to converting one media format to another and saving the output to a file (i.e. no streaming involved).
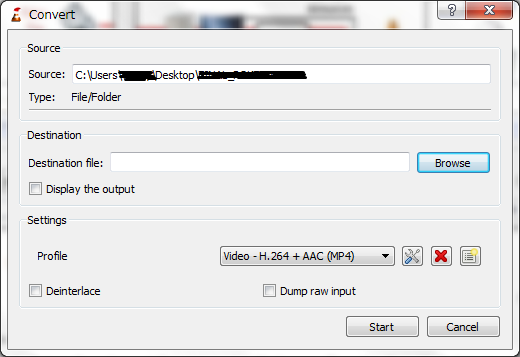
Transcoding using the GUI
One of the methods of transcoding is via the GUI. To access this:
- In VLC, go to «Media >> Convert / Save. » (Ctrl+R).
- Add the input file(s) or stream(s) you want to transcode. Press «Convert / Save».
- In the «Convert» windows specify the destination file name (including file extension — e.g. on Windows «C:\out.mp3»).
- Select the desired codec from the profile list. To check/edit the settings of a given profile press the «Edit selected profile» button. Profiles can also be added/deleted.
- Press «Start».
If the profile settings were compatible and transcoding was successful, a playable destination file should be created.
Using the commandline
Another method of transcoding is via the commandline. This is more flexible than via the GUI as it enables full usage of the modules and options available in VLC.
To use the VLC’s commandline you need to have access to the commandline interface, for example via a shell.
Windows-based systems
On Windows-based systems the Command Prompt can be used. This can be found in the «Accessories» folder of the Start menu. Alternatively by going to «Start >> Run. » or pressing «Windows key + R», entering «cmd» into the text field and press «OK» or Enter.
Once the Command Prompt window is opened navigating to the folder/directory where VLC is located is easiest for using the commandline as only «vlc.exe» or «vlc» (as the .exe part is assumed) needs to entered to run VLC. If VLC is installed in the default location (on a 32-bit system) running:
Should change to the directory where vlc.exe is located.
Unix systems
On Unix-based system (such as Linux and macOS) a terminal window can be opened. Running «vlc» should be all that is needed to open VLC:
Transcoding commandline string structure
A typical commandline string for converting a file to another format is:
Where INPUT is the input stream, [TRANSCODE_OPTIONS] are the options set for the desired output format, codecs, bitrate etc. and [OUTPUT_OPTIONS] are the option set for the output type. —sout is the stream output commandline option.
Example commandline: Converting an audio file to a MP3 file
An example usage might be converting an audio file to a MP3 file:
Where INPUT is the input file and OUTPUT is the destination file (for example «C:\out.mp3» on Windows or «/home/username/out.mp3» on a *nix system). The above sout string is the default «Audio — MP3» profile setting accessible via the GUI. It will convert an audio input to a 128kbps CBR MP3 file (sample rate 44100Hz, 2 channels).
Other examples commandline strings
Convert an audio input to an uncompressed WAVE (*.wav) file:
Convert an audio input to an AAC file (MP4 container):
Streaming
Streaming using the GUI
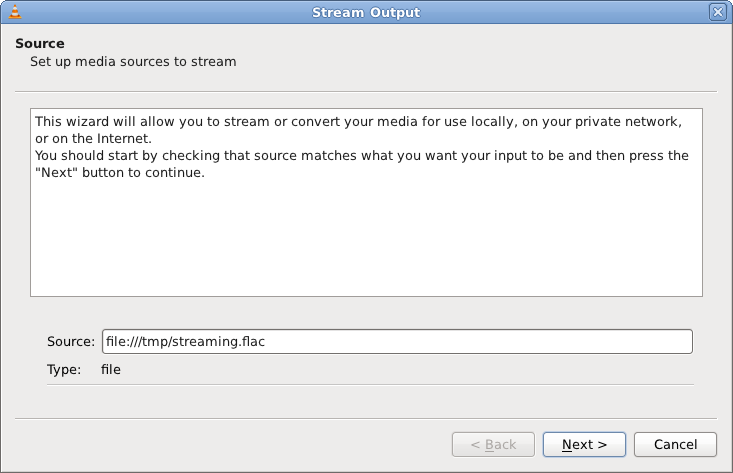
Streaming using the GUI is only available on the Qt interface. To stream using the GUI, open VLC, then Media [menu] -> Stream:
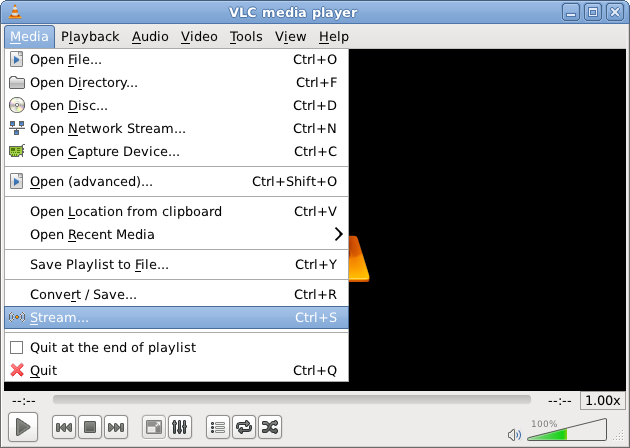
Select a stream (such as a file, a network stream, a disk, a capture device . ) from the «Open Media» dialogs that pops up.
The following streaming methods are available for use with VLC:
- Display locally: display the stream on your screen. This allows you to display the stream you are actually streaming. Effects of transcoding, rescaling, etc. can be monitored locally using this function.
- File: Save the stream to a file.
- HTTP: Use the HTTP streaming method. Specify the TCP port number on which to listen.
- MS-WMSP (MMSH): This access method allows you to stream to Microsoft Windows Media Player. Specify the IP address and TCP port number on which to listen. Note: This will only work with the ASF encapsulation method.
- UDP: Stream in unicast by providing an address in the 0.0.0.0 — 223.255.255.255 range or in multicast by providing an address in the 224.0.0.0 — 239.255.255.255 range. It is also possible to stream to IPv6 addresses. Note: This will only work with the TS encapsulation method.
- RTP: Use the Real-Time Transfer Protocol. Like UDP, it can use both unicast and multicast addresses.
- IceCast: Stream to an IceCast server. Specify the address, port, mount point and authentication of the IceCast server to stream to.
The most common way is via HTTP. To stream via HTTP, click on «Destinations», choose HTTP from the drop down as a «New Destination» and click add. Now if you are streaming video, you will want to stream to something like «/go.mpg.» Now hit stream, and you should be able to use a different instance of VLC as a client, and listen to that stream now (ex: on the same computer it would be «Media» [menu] -> Open Network Stream -> «http://localhost:8080/go.mpg» and it should work.

- even though you click on «enable transcoding» and specify some other container type, it will give you the flv container type unless you use a suffix, like «.mpg» ref
- VLC client cannot receive a stream at less than 5 fps, though it can stream it alright for those speeds (and other players can receive it). ref.
- NB that *many* times when using the GUI to stream it will choose the wrong thing. For example, if you give a path of «/» it will use FLV container type (which you probably didn’t want, and which overrides your transcoding settings’ container type *silently*), and if you give it «/go.mp4» it will *silently* fail (you can look at the log messages to see what the error is—it says «mp4 type is not supported except for files»). It is tricky to get it set up. It’s like the GUI sets it up wrong most times. Here is a laundry list.
Select a transcoding profile that fits the codecs and access method of your stream, such as MPEG-TS, MPEG-PS, MPEG-1, Ogg, Raw, ASF, AVI, MP4 and MOV. You can also create or modify profiles by clicking the «Edit selected profile» button next to the selection combobox.
![]()
Select methods to announce your stream. You can use SAP (Service Announce Protocol) or SLP (Service Location Protocol). You must also specify a channel name. The macOS interface also allows you to export the description (SDP) file of a RTP session using the internal HTTP or RTSP server of VLC, or as a file. This can be done using the according checkboxes. The SDP URL text box allows to give the url or destination where the SDP file will be available. There is a text box displays the Stream Output MRL (Media Resource Locator). This is updated as you change options in the Stream output dialog, and can be tweaked by hand if necessary.
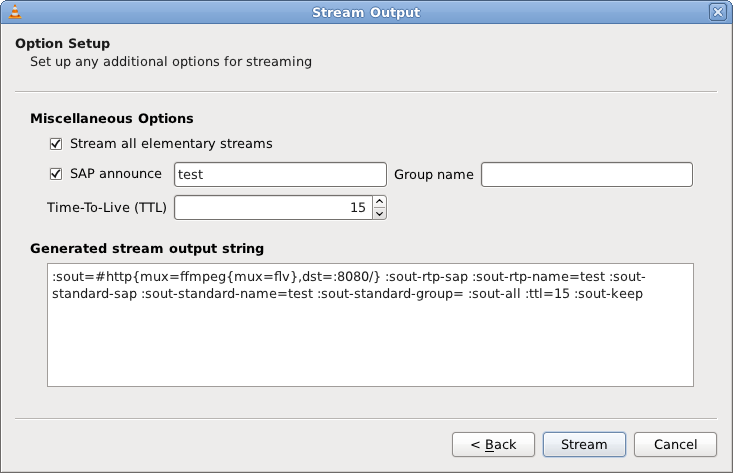
Click «Stream» to start streaming.
Streaming using the command line interface
If you want to stream using the command line interface instead of the GUI (more control, for example you can specify your own container), you can «sniff» the options the GUI is using by opening up the logger (Tools menu -> message) and setting verbosity level to «2» then doing a stream. It will output debug messages that basically tell you what it is using for command line parameters, then you will take those same parameters and use them on the command line (you may need to add quotation marks around words that have spaces in them, and you may need to add —‘s).
Источник
Documentation:Command line
 | This page is outdated and information might be incorrect. Create an account to start editing, and then click here to update this article. |
|
Contents
Use the command line
TODO: completely outdated
You need to be quite comfortable with command line usage to use this.
Getting help
VLC uses a modular structure. The core mainly manages communication between modules. All the multimedia processing is done by modules. There are input modules, demultiplexers, decoders, video output modules, .
This chapter will only describe the «general» options, i.e., the core options. Each module adds new options. For example, the HTTP input module will add options for caching, proxy, authentication, .
By using vlc —help, you will get the basic core options. vlc —longhelp will give all the basic options (core + modules). Adding —advanced will give the «advanced options» (for advanced users). So vlc —longhelp —advanced will give you all options. You can also append —help-verbose if you want more detailed help.
Also, you might want to get debug informations. To do this, use -v or -vv (this will show lower severity messages). If your console supports it, you can add —color to get messages in color.
Opening streams
The following commands start VLC and start reading the given element(s):
Opening a file
VLC should be able to recognize the file type. If it does not, you can force demultiplexer and decoder (see below).
A list of all video and audio codecs supported by VLC is available on the VLC features list.
Opening a DVD or VCD, or an audio CD
In most cases, vlc dvd:// or vlc dvd://[device] will do.
- On GNU/Linux [device] is the path to the block device: e.g., vlc dvd:///dev/dvd.
- On Windows, [device] is the drive letter with / and :/: e.g., vlc dvd:///D:/.
Receiving a network stream
To receive an unicast RTP/UDP stream (sent by VLC’s stream output), start VLC with:
If 5004 is the port to which packets are sent. 1234 is another commonly used port number. you use the default port (1234), vlc rtp:// will do. For more information, look at the Streaming Howto.
To receive an multicast UDP/RTP stream (sent by VLC’s stream output), start VLC with:
To receive a SSM (source specific multicast) stream, you can use:
This only works on OSs that support SSM (Windows XP and Linux).
To receive a HTTP stream, start VLC with:
To receive a RTSP stream, start VLC with:
Modules selection
VLC always tries to select the most appropriate interface, input and output modules, among the ones available on the system, according to the stream it is given to read. However, you may wish to force the use of a specific module with the following options.
- —intf allows you to select the interface module.
- —extraintf allows you to select extra interface modules that will be launched in addition to the main one. This is mainly useful for special control interfaces, like HTTP, RC (Remote Control), . (see below)
- —aout allows you to select the audio output module.
- —vout allows you to select the video output module.
- —memcpy allows you to choose a memory copy module. You should probably never touch that.
You can get a listing of the available modules by using vlc -l
Stream Output
The Stream output system allows vlc to become a streaming server.
For more details on the stream output system, please have a look at the Streaming HowTo.
Other Options
Audio options
Note that in recent versions (3.x.x branch, possibly earlier):
- —mono no longer exists: use —stereo-mode=0 instead
- —volume no longer exists but —volume-step and —gain may be used
- —aout-rate no longer exists: —audio-resampler might be equivalent?
- —desync no longer exists: use —audio-desync instead
- —audio, —no-audio disables audio output. Note that if you are streaming (ex: to a file) this has no effect (streaming copies the audio verbatim). Use —sout-xxx instead (ex: —no-sout-audio)
- —gain audio gain (between 0 and 8)
- —volume-step audio output volume step (between 1 and 256)
- —volume-save, —no-volume-save remember the volume (default enabled)
- —spdif, —no-spdif Force S/PDIF support (default disabled)
- —force-dolby-surround<0 (auto), 1 (on), 2 (off)>Force detection of Dolby Surround
- —stereo-mode<0 (unset), 1 (stereo), 2 (reverse stereo), 3 (left), 4 (right), 5 (dolby surround), 6 (headphones)>Stereo audio output mode
- —audio-desync Audio desynchronization compensation
- —audio-replay-gain-mode
- —audio-replay-gain-preamp Replay preamp
- —audio-replay-gain-default Default replay gain
- —audio-replay-gain-peak-protection, —no-audio-replay-gain-peak-protection Peak protection (default enabled)
- —audio-time-stretch, —no-audio-time-stretch Enable time stretching audio (default enabled)
- -A, —aout
- —role
- —audio-filter adds audio filters to the processing chain. Available filters are visual (visualizer with spectrum analyzer and oscilloscope), headphone (virtual headphone spatialization) and normalizer (volume normalizer)
- —audio-visual
- —audio-resampler
Video options
- —no-video disables video output.
- —grayscale turns video output into grayscale mode.
- —fullscreen ( or -f) sets fullscreen video.
- —nooverlay disables hardware acceleration for the video output.
- —width, —height sets the video window dimensions. By default, the video window size will be adjusted to match the video dimensions.
- —start-time starts the video here; the integer is the number of seconds from the beginning (e.g. 1:30 is written as 90)
- —stop-time stops the video here; the integer is the number of seconds from the beginning (e.g. 1:30 is written as 90)
- —zoom adds a zoom factor.
- —aspect-ratio forces source aspect ratio. Modes are 4×3, 16×9, .
- —spumargin forces SPU subtitles postion.
- —video-filter adds video filters to the processing chain. You can add several filters, separated by commas
- —video-splitter adds video splitters to the processing chain. (wall, panoramix, clone)
- —sub-filter adds video subpictures filter to the processing chain.
Desktop/Screen grab options
You can see the various options for «grabbing the desktop» (VLC’s built-in screen grabber capture device) by using the GUI. See http://forum.videolan.org/viewtopic.php?f=4&t=46971
Playlist options
- —random plays files randomly forever.
- —loop loops playlist on end.
- —repeat repeats current item until another item is forced
- —play-and-stop stops the playlist after each played item.
- —no-repeat —no-loop prevents the video from being executed again. (Useful when want to encode a file)
Network options
- —server-port sets server port.
- —iface specifies the network interface to use.
- —iface-addr specifies your network interface IP address.
- —mtu specifies the MTU of the network interface.
- —ipv6 forces IPv6.
- —ipv4 forces IPv4.
CPU options
You should probably not touch these options unless you know what you are doing.
- —nommx disables the use of MMX CPU extensions.
- —no3dn disables the use of 3D Now! CPU extensions.
- —nommxext disables the use of MMX Ext CPU extensions.
- —nosse disables the use of SSE CPU extensions.
- —noaltivec disables the use of Altivec CPU extensions.
Miscellaneous options
- —quiet deactivates all console messages.
- —color displays color messages.
- —search-path specifies interface default search path.
- —plugin-path specifies plugin search path.
- —no-plugins-cache disables the plugin cache (plugins cache speeds up startup)
- —dvd specifies the default DVD device.
- —vcd specifies the default VCD device.
- —program specifies program (SID) (for streams with several programs, like satellite ones).
- —audio-type specifies the default audio type to use with dvds.
- —audio-channel specifies the default audio channel to use with dvds.
- —spu-channel specifies the default subtitle channel to use with dvds.
- —version gives you information about the current VLC version.
- —module displays help about specified module. (Shortcut: -p)
Item-specific options
There are many options that are related to items (like —novideo, —codec, —fullscreen).
For all of these, you have the possibility to make them item-specific, using «:» instead of «—» and putting the option just after the concerned item.
will play file1.mpg in fullscreen mode and file2.mpg in the default mode (which is generally no fullscreen), whereas
will play both files in fullscreen mode
will play file1.mpg in windowed (no-fullscreen) mode with the subtitles file file1.srt and will play file2.mpg with video filter distort enabled in fullscreen mode (item-specific options override global options).
Filters
These are the old style VLC filters. They only apply to on screen display and thus cannot be streamed. However, on version 1.1.11 you are still able to apply these filters in transcode module using parameter vfilter. More information can be found on Advanced Streaming Using the Command Line.
Deinterlacing video filter
Module name: deinterlace
- sout-deinterlace-mode : Streaming deinterlace mode. Deinterlace method to use for streaming
- sout-deinterlace-phosphor-chroma : Phosphor chroma mode for 4:2:0 input. Choose handling for colours in those output frames that fall across input frame boundaries.
- Latest (1): take chroma from new (bright) field. Good for interlaced input, such as videos from a camcorder
- AltLine (2): take chroma line 1 from top field, line 2 from bottom field, etc. Default, good for NTSC telecined input (anime DVDs, etc.)
- Blend (3): average input field chromas. May distort the colours of the new (bright) field, too
- Upconvert (4): output in 4:2:2 format (independent chroma for each field). Best simulation, but requires more CPU and memory bandwidth default value: 2
- sout-deinterlace-phosphor-dimmer : Phosphor old field dimmer strength: 1 (Off), 2 (Low), 3 (Medium), 4 (High). This controls the strength of the darkening filter that simulates CRT TV phosphor light decay for the old field in the Phosphor frameratedefault value: 2
Invert video filter
Module name: invert
Image properties filter
Module name: adjust
- contrast : Contrast default value: 1.0
- brightness : Brightness default value: 1.0
- hue : Hue default value: 0
- saturation : Saturation default value: 1.0
- gamma : Gamma default value: 1.0
- brightness-threshold : When this mode is enabled, pixels will be shown as black or white. Also may invert the brightness value. The threshold value will be the brightness defined below default value: disabled
Wall video filter
Module name: wall
This filter splits the output in several windows.
- wall-cols : Number of horizontal windows in which to split the video default value: 3
- wall-rows : Number of vertical windows in which to split the video default value: 3
- wall-active : Comma-separated list of active windows, defaults to all default value: NULL
- wall-element-aspect : Aspect ratio of the individual displays building the wall default value: 4:3
Note: for —wall-active , to select windows 2 and 4 you would write —wall-active 2,4. When this option isn’t specified, all windows are displayed.
Video transformation filter
Module name: transform
- transform-type : Transformation type default value: «90»
Distort video filter
Module name: distort
Clone video filter
This filter clones the output window.
Module name: clone
- clone-count : Number of video windows in which to clone the video. default value: 2
- clone-vout-list : You can use specific video output modules for the clones. Use a comma-separated list of modules. default value: «»
Crop video filter
Module name: crop
- crop-geometry : Set the geometry of the zone to crop. This is set as × + +
- autocrop : Automatically detect black borders and crop them default value: disabled
- autocrop-ratio-max : Maximum image ratio. The crop plugin will never automatically crop to a higher ratio (ie, to a more «flat» image). The value is ×1000: 1333 means 4⁄3 default value: 2405
- crop-ratio : Force a ratio (0 for automatic). Value is ×1000: 1333 means 4⁄3 default value: 0
- autocrop-time : The number of consecutive images with the same detected ratio (different from the previously detected ratio) to consider that ratio changed and trigger recrop default value: 25
- autocrop-diff : The minimum difference in the number of detected black lines to consider that ratio changed and trigger recrop default value: 16
- autocrop-non-black-pixels : The maximum of non-black pixels in a line to consider that the line is black default value: 3
- autocrop-skip-percent : Percentage of the line to consider while checking for black lines. This allows skipping logos in black borders and crop them anyway default value: 17
- autocrop-luminance-threshold : Maximum luminance to consider a pixel as black (0-128) default value: 40
Motion blur filter
Module name: motionblur
- motionblur-factor : The bluring factor (1 to 127). Higher values mean more blurring default value: 80
Video pictures blending
Module name: blend
Video scaling filter
Module name: scale
Subpictures Filters
These are the new VLC filters. They can be streamed.
Marquee display sub filter
Module name: marq
- marq-marquee : Marquee text to display. default value: VLC
- marq-file : File to read the marquee text from. default value: NULL
- marq-x : X offset, from the left screen edge. default value: 0
- marq-y : Y offset, down from the top. default value: 0
- marq-position : Marquee position: 0=center, 1=left, 2=right, 4=top, 8=bottom, you can also use combinations of these values, eg 6 = top-right. default value: -1
- marq-opacity : Opacity (inverse of transparency) of overlaid text. 0 = transparent, 255 = totally opaque. default value: 255
- marq-color : Color of the text that will be rendered on the video. This must be an hexadecimal (like HTML colors). The first two chars are for red, then green, then blue. default value: 0xFFFFFF
- marq-size : Font size, in pixels. 0 uses the default font size. default value: 0
- marq-timeout : Number of milliseconds the marquee must remain displayed. 0 means forever. default value: 0
- marq-refresh : Number of milliseconds between string updates. This is mainly useful when using meta data or time format string sequences. default value: 1000
The time sub filter was merged into this module.
Logo video filter
Module name: logo
This filter can be used both as an old style filter or a subpictures filter.
Note: You can move the logo by left-clicking on it.
Источник


