- Connecting to Access Server with Linux
- Client software choice
- Linux Packages Discussed
- OpenVPN 3 Linux Client
- OpenVPN open source OpenVPN CLI program
- Ubuntu network management program
- How to set up a Linux VPN server (Beginner’s Guide)
- Requirements
- Install and Configure VPN
- Server computer
- Client computer
- Connect to a VPN
- Command line
- Graphical connection in Network Manager
- Troubleshooting
- Add more VPN users
Connecting to Access Server with Linux
Client software choice
Connecting to OpenVPN Access Server from Linux requires a client program. It will capture the traffic you wish to send through the OpenVPN tunnel, encrypting it and passing it to the OpenVPN server. And of course, the reverse, to decrypt the return traffic.
Linux Packages Discussed
| OpenVPN Access Server | openvpn-as |
| OpenVPN 3 Linux Client | openvpn3 |
| OpenVPN open source | openvpn |
OpenVPN 3 Linux Client
The OpenVPN 3 Linux project is a new client built on top of the OpenVPN 3 Core Library. This client is the official OpenVPN Linux Client program. You can find an overview of the features, frequently asked questions, and instructions on installing the openvpn3 package on our OpenVPN 3 for Linux site.
After following the instructions there to install the client, you’ll need a connection profile. This is a file generated by your OpenVPN Access Server installation for your specific user account. It contains the required certificates and connection settings. Go to the Client web interface of your Access Server (the main address, not the /admin portion). Log in with your user credentials. You will be shown a list of files available to download. Pick the user-locked profile or the auto-login profile, and you will be sent a client.ovpn file. Save this file to your Linux operating system.
Once you’ve moved the file to your Linux system, you can import it.
You can start a new VPN session:
You can manage a running VPN session:
And so on. More details can be found here: OpenVPN3Linux.
OpenVPN open source OpenVPN CLI program
The open source project client program can also connect to the Access Server. The package is available in most distributions and is known simply as openvpn. It supports the option to connect to multiple OpenVPN servers simultaneously, and it comes with a service component that can automatically and silently start any auto-login profiles it finds in the /etc/openvpn folder, even before a user has logged in. This service component can be set to automatically start at boot time with the tools available in your Linux distribution if supported. On Ubuntu and Debian, when you install the openvpn package, it is automatically configured to start at boot time.
To install the OpenVPN client on Linux, it is possible in many cases to just use the version that is in the software repository for the Linux distribution itself. If you run into any connectivity problems when using outdated software, it may be due to a possible lack of support for higher TLS versions in older versions of OpenVPN. Follow the instructions found on the open source openvpn community wiki if you wish to install the OpenVPN client on your Linux system.
After installing, you will need a connection profile. This is a file generated by your OpenVPN Access Server installation for your specific user account. It contains the required certificates and connection settings. Go to the Client web interface of your Access Server (the main address, not the /admin portion). Log in with your user credentials. You will be shown a list of files available to you for download. Pick the user-locked profile or the auto-login profile, and you will be sent a client.ovpn file. Save this file to your Linux operating system somewhere. OpenVPN Access Server supports server-locked, user-locked, and auto-login profiles, but the OpenVPN command line client is only able to connect with user-locked or auto-login connection profiles.
We are assuming you are going to start the connection through either the command line as a root user, or via the service daemon. If you want unprivileged users to be able to make a connection, take a look at the community wiki for more information on how to implement that. Here we are going to focus on the simplest implementation; run the connection as root user directly, or via the service daemon.
Start a connection with an auto-login profile manually:
Start a connection with a user-locked profile manually:
If you use Google Authenticator or another extra factor authentication, add the auth-retry parameter:
To start an auto-login connection via the service daemon, place client.ovpn in /etc/openvpn/ and rename the file. It must end with .conf as file extension. Ensure the service daemon is enabled to run after a reboot, and then simply reboot the system. The auto-login type profile will be picked up automatically and the connection will start itself. You can verify this by checking the output of the ifconfig command; you should see a tun0 network adapter in the list.
One major feature that is missing with the command line client is the ability to automatically implement DNS servers that are pushed by the VPN server. It is possible, but it requires you to install a DNS management program such as resolvconf or openresolv, and it may or may not clash with existing network management software in your OS. The idea here, however, is that you use a script that runs when the connection goes up, and when it goes down, that uses resolvconf or openresolv to implement the DNS servers for you. The reason why this client is not able to manage it completely by itself is mainly because in an operating system like Windows, Macintosh, Android, or iOS, there is already an established single method of handling DNS management. It is therefore easy for us to create a software client for those operating systems that already knows how to handle DNS. But Linux is available in so many variations and also supports different programs and methods of implementing DNS servers, and so it was only reasonable to leave built-in DNS support out of the OpenVPN program and instead to provide, where possible, a script that handles DNS implementation. Such a script could even be written by yourself to do whatever tasks are necessary to implement the DNS servers in your unique situation.
Fortunately on Ubuntu and Debian, for example, there is the /etc/openvpn/update-resolv-conf script that comes with the openvpn package that handles DNS implementation for these operating systems. You need only to activate the use of these by following the instructions:
Open your client.ovpn file in a text editor:
At the very bottom simply add these lines:
The first line enables the use of external scripts to handle the DNS implementation tasks. The up and down lines are there to implement DNS servers pushed by the VPN server when the connection goes up, and afterwards to undo it, when the connection goes down.
Ubuntu network management program
There is also the option of connecting through the GUI using the openvpn extension for the Gnome network manager plugin. But this is currently a bit tricky to set up. There is for example the incorrect assumption that all VPNs will be able to redirect Internet traffic, and older versions might not understand the .ovpn file format, requiring you to split up the certificate embedded in it into separate file. And you would likely have to dig into the options to ensure that a default Internet traffic route going through the VPN server is not always enabled by default, especially for servers where you only give access to some internal resources, and not the entire Internet. However the advantage of using the GUI component is that you can start/stop the connection from the desktop environment on Linux.
Источник
How to set up a Linux VPN server (Beginner’s Guide)
A VPN, or Virtual Private Network, creates an encrypted tunnel between your computer and a remote server. This has two major advantages. First, you mask your real location because you will have the IP address of the VPN server. Second, all the traffic between your computer and the server is encrypted. So, if you connect to a public WiFi, your data remains safe even if it intercepted by someone. Similarly, your Internet Service provider cannot read your data.
There are three ways to get a VPN service.
- You can get a free VPN. This is obviously the worst option because there is nothing free and most likely such VPN providers sell your data to the third parties. Free VPN is also usually very slow.
- You can sign up for a VPN service for a monthly fee. This is the most popular option. It is more reliable than a free VPN but you have to trust your VPN provider.
- You can get a personal VPN on your own server. This is the most secure option because you have maximum control over your traffic.
This post is about the third option.
Requirements
To get your own personal VPN, you need two computers:
A client computer, most likely it is your home computer or a laptop. You use it to connect to a VPN.
A private server, this where you install a VPN and use it as a VPN provider. This can be your own physical server or a virtual server.
There are several programs you can use to configure personal VPN. I will use OpenVPN. It is open-source, it is available in all Linux distro and I believe it is one of the most popular VPN programs.
Install and Configure VPN
Server computer
You need to install OpenVPN and cURL programs:
cURL is needed to download the VPN installation script openvpn-install.sh. This script makes the installation very easy and error save. You can, of course, install everything manually, and there are good instructions on how to do that on Debian Wiki or Arch Linux Wiki. But I believe most of my readers prefer the simplest ways. This VPN installation script is a result of the work of 36 contributors, you can check what it does, and I personally trust it.
So, you need to download the script and make it executable:
Then run this script as a superuser to install and configure OpenVPN on your server:
You need to follow the assistant and answer a few questions. You can keep everything by default, just press Enter for every question. Only give a name to your VPN configuration and I also recommend to encrypt the configuration with a password:
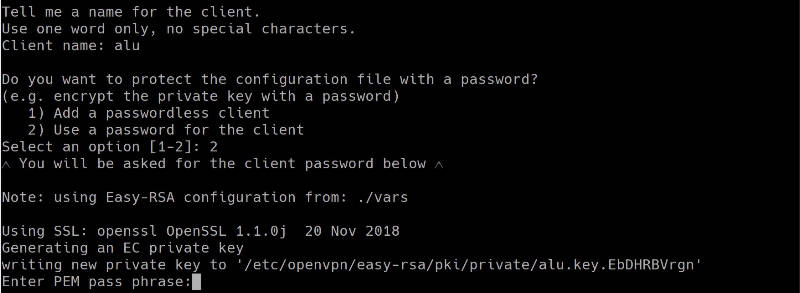
When everything is done. You should see a file that ends with .ovpn . This is a configuration file you will need to configure the client computer.

Client computer
On a client computer, also install OpenVPN and OpenVPN extension for your network manager:
I install networkmanager-openvpn for Plasma 5 on Arch Linux. Search for these two packages in your distro. Their names may differ slightly. If you use Ubuntu GNOME, for example, you need to install networkmanager-openvpn-gnome :
Next, download the VPN configuration file from your server:
The file will be downloaded to your local Downloads folder.
You can also use FileZilla if you prefer graphical programs. I explained how to use FileZilla and scp command in my previous post.
Connect to a VPN
First, I will show you the command line way to connect to a VPN. This way is more reliable and you make sure that your VPN works. Next, configure your graphical network manager.
Command line
So, copy the downloaded *.ovpn configuration file to the client folder of your OpenVPN:
Test the connection:
You may need to enter the password if you set one and then you will see something like this:

If you do not see any error, your VPN works fine. To test it, open your internet browser and visit any website. You can also check your public IP address and it should be your server address.

Graphical connection in Network Manager
Although I like the command line, it is much nice to be able to connect to the VPN with just with one click from your system tray:

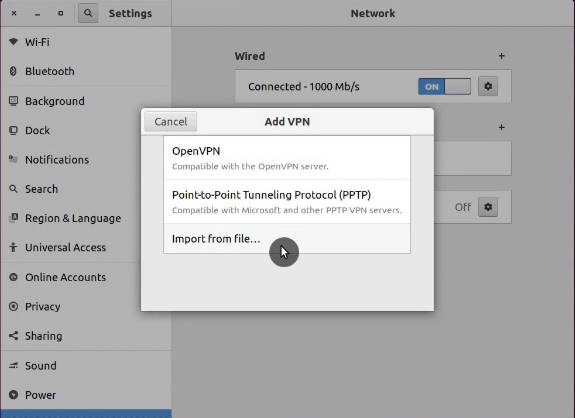
So, to add your VPN configuration to the Network Manager, open the Network Manager settings. Click on Add new connection, and import the configuration file you have downloaded from the server:
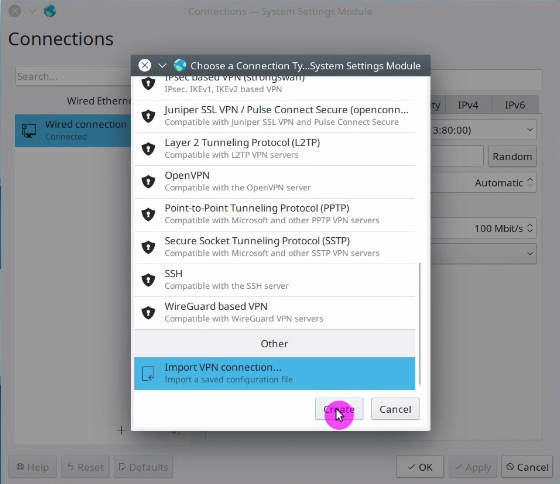
Above screenshots are from Plasma 5 Network Manager. It is almost the same in GNOME and other desktops. Just find an option to import the connection.
After that, you should see a new connection in your connection list. Try to enable it. If you see that your Network Manager icon changed, this means your VPN works. You can go to your web browser and test it.
Troubleshooting
When you start your OpenVPN connection from the command line, you will see errors right on the screen if somethings does not work. Try to understand what it says. If you do not how to fix it, google that error message.
However, when you configure the graphical interface of the Network Manager, you do not see detailed error information if it happens. You need to check the errors in your logs with this command:
For example, I did not succeed to connect to my VPN in Plasma 5 the first time. I imported the configuration and I saw that the system tried to connect, but failed after some time:

Checking the log files revealed that TLS certificate was missing:

My Network Manager imported all certificated except the TLS one. From my experience, importing the connection configuration works flawlessly in the GNOME Network Manager. But other network managers may not recognize all settings during the importing. Probably, this is because the script is optimized for GNOME. So, you may need to correct some importing errors manually.
Open the configuration file *.ovpn with a text editor and make sure you have the corresponding settings in your Network Manager.
If some certificates are missing in your Network Manager, copy it from the configuration file and save as a *.crt file on your computer. Usually, all the Network Manager certificates are stored in

You can see the screenshots of my configuration after I corrected all errors:
You may also need to change the permissions of all the certificates.
This is how I was able to troubleshoot my Plasma 5 VPN connection. Obviously, I cannot guess all the possible problems that can arise during your installation and configuration of a personal VPN service.
Add more VPN users
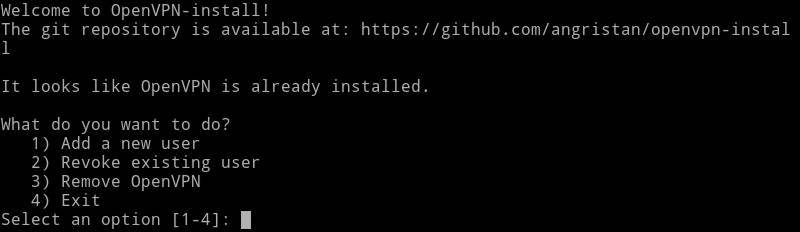
When you run the scrip openvpn-install.sh the first time, it creates a connection for one uses. However, if you run it again it, will offer you an option to add more users:
Select option 1. Add a new user and follow the instructions. The instructions are the same as above. Just provide a different Client name and you will see newuser.ovpn configuration file. Use it to connect a new user to this VPN server.
As you can see from the screenshot, running openvpn-install.sh again also gives you options to revoke a user, and remove OpenVPN from the server.
So, if you have ever thought about setting up a personal VPN, now you know how to do that. A personal VPN server is not only more secure in terms of privacy but it can also be cheaper. For example, if you connect your whole family to one VPN server, this option will be cheaper than subscribing your whole family to several VPN accounts by subscription.
Источник


