- Install, Configure, and Troubleshoot Linux Web Server (Apache)
- How web server works
- Linux web server implementations
- Understanding HTTP
- Install Apache web server
- Configuring Apache web server
- ServerRoot option
- Listen option
- ServerName option
- DocumentRoot option
- MaxRequestWorkers option
- LoadModule option
- Include option
- UserDir option
- Alias option
- ErrorLog option
- VirtualHost option
- Virtual Host types
- Apache process ownership
- User option
- Group option
- suEXEC support
- Apache authentication
- Troubleshooting Apache web server
- HTTPD — Apache2 Web Server
- Installation
- Configuration
- Basic Settings
- Default Settings
- apache2 Settings
- Apache2 Modules
- HTTPS Configuration
- Sharing Write Permission
- References
Install, Configure, and Troubleshoot Linux Web Server (Apache)
In this tutorial, we will talk about the Linux web server or Apache web server specifically and how to install it and configure it to serve your content to others.
A web server is a system that manipulates requests via the HTTP protocol, you request a file from the server, and it responds with the requested file, which might give you an idea that web servers are not only for the web.
Web servers embedded in devices such as printers, routers, when you open your router configuration page, there is a web server behind it.
When you open the printer configuration page, there is also a web server behind it serving your requests, so web servers are everywhere.
Table of Contents
How web server works
First, your browser sends a request to the server.
The server takes the requested file or page from you and maps it to the corresponding file from the server. The server sends the file back to the browser with some information such as the MIME type, the length of the content, and other useful information.
Sometimes the requested file is a static page like HTML pages or dynamic pages like PHP, Java, Perl, or any other server-side language.
For example, when you type www.yourDomain.com, the browser queries the DNS server about the IP address of the computer: www.yourDomain.com. Once the browser gets the response from the DNS, it starts a TCP connection on port 80 and asks for the default web page, then the server sends this page to you, and that’s all.
Linux web server implementations
There are many Linux web server implementations available for you to use:
- Apache server
- Nginx
- Lighttpd
- Apache Tomcat
- Monkey HTTP Daemon (used especially for embedded systems)
There are more Linux web servers, but this list is the most used web server.
The most used web servers are Apache and Nginx.
In this post, we will use the Apache server for several reasons:
We’ll install and configure Apache server on Linux, but at first, let’s review some of the basics of HTTP protocol basics.
Understanding HTTP
When you request a file or a page from a web server, the client at first connects to the server on port 80. After a successful connection, the client then sends HTTP commands (also methods) to the server. This command includes a request header, which includes information about the client.
To view these request headers in chrome, open chrome devtools, then open network panel and visit google.com and check the request headers, you should see something like this:
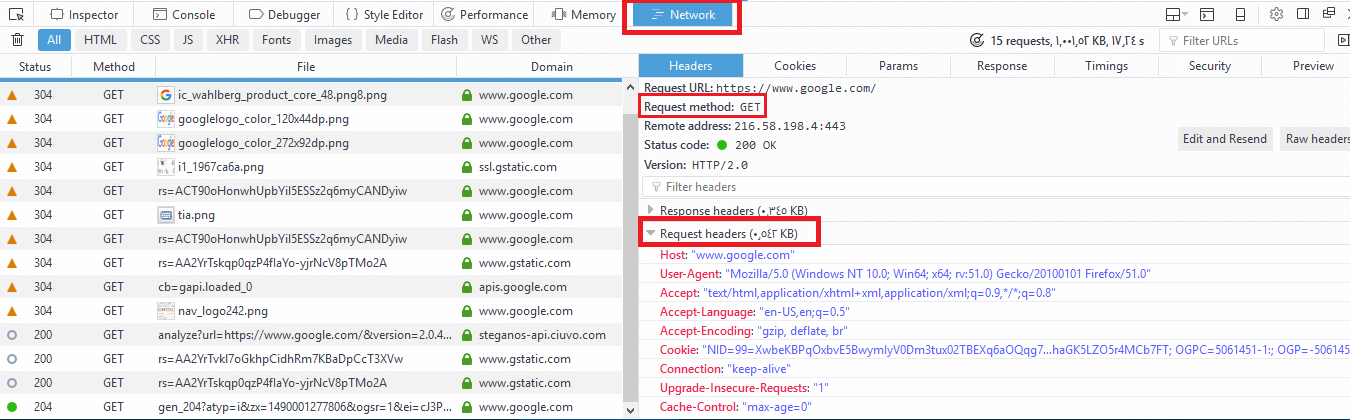
The request header also includes information about the client, like the user agent and the accepted formats.
The web server may send additional information with the request header. For example, if you click on a link that will open another website, the header will include the referral site.
After receiving the request header completely, the server responds with the requested file or page along with a response header.
The response header includes information about the received content, its type, and other information.
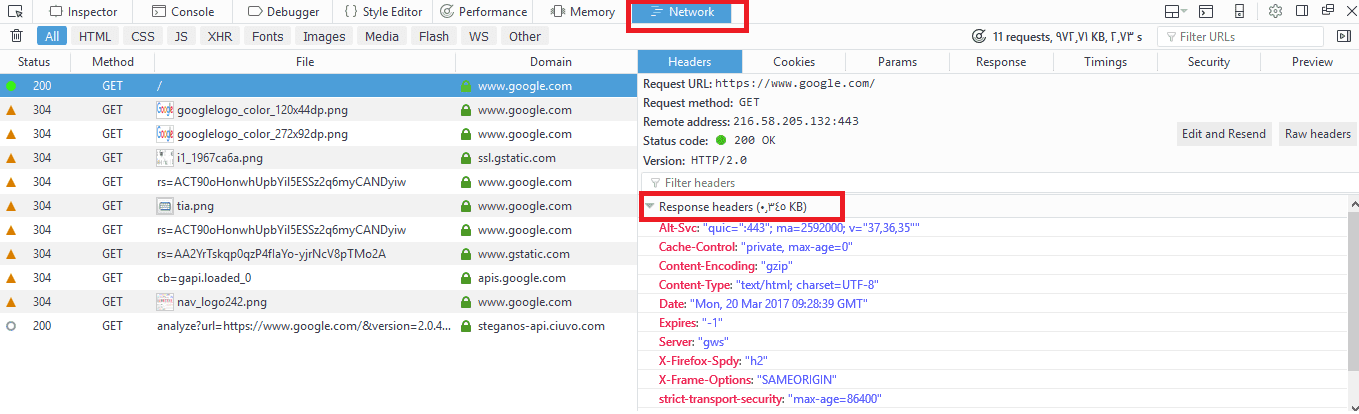
You can check the response headers from the browser network panel.
Install Apache web server
You can install Apache server on Red Hat based distros using the following command:
Or if you are using a Debian-based distro, you can install it like this:
The Apache web server service is called httpd on Red Hat based distros like CentOS, while it is called apache2 in Debian based distros.
If you are using a firewall like iptables, you should add a rule for port 80.
Or if you are using firewalld, you can use the following command:
To start your service and enable it on boot:
You can check if your service is running or not, using the following command:
Now open your browser and visit http://localhost or http://[::1]/ if you are using IP v6, and if your installation goes well, you should see your HTML homepage.
Configuring Apache web server
You can add files to Apache in the
directory for top-level pages.
Just remember to make sure that any files or directories placed in that directory are world-readable.
The default index page is index.html.
The Apache configuration files are in
On Debian based systems like Ubuntu, you may find it at
We can’t discuss every option for Apache on a single post, but we will discuss the most important options.
You call them options or directives.
ServerRoot option
This option specifies the configuration folder for the Apache web server. On Red Hat based distros, the ServerRoot option is /etc/httpd/ directory. On Debian distros the ServerRoot option is /etc/apache2/.
Listen option
The Listen option specifies the port that the Apache web server will use to wait for incoming connections.
The default value for this option is 80 for nonsecure connections and 443 for secured connections.
If you have multiple IP addresses on your server, you can assign which IP should listen for connection using the Listen option.
You can specify a different port other than 80, just make sure that it’s not in use.
You can run many HTTP servers on the same hardware every one on a unique port.
When a server runs on a non-standard port such as port 8080, it will require the port number to be explicitly stated like this:
ServerName option
This option specifies the hostname of the web server that appears to the visitors.
DocumentRoot option
The DocumentRoot option defines the path that will contain your files that will be served.
The default path is /var/www/html .
MaxRequestWorkers option
This option sets the maximum number of concurrent connections that the server will receive.
LoadModule option
We use this option to load modules into the Apache web server.
There are a lot of Apache modules like these:
mod_cgid: This module runs CGI scripts using the Apache web server.
mod_ssl: Provides secure connections via SSL and TLS protocols.
mod_userdir: This module allows you to serve content from users’ specific directories.
If you want to disable loading a specific module, you can comment the Load module line that contains that module.
Or if you use Debian based distros like Ubuntu, you can use these commands:
The a2enmod enables the module.
This command to disable the module.
All these commands do is create a symlink under
And if you use a2dismod, the symlink will be removed.
If you enable or disable a module, you have to reload or restart the Apache web server.
Include option
This option allows you to include other configuration files.
You can store all the configuration for different virtual domains, and Apache will include them at runtime.
UserDir option
This option specifies the directory that will contain the files that will be accessible via the web server. This directory is usually is public_html and its location in the user’s home directory.
For example, if you have a user adam who wants to make his web content available via the Apache web server.
First, we make a public_html folder under his home directory.
Then set the permission for the public_html folder:
Now if we put an index.html file, it will be accessible via the browser like this:
Alias option
This option specifies the location of the files that are outside the DocumentRoot location and need to be served by the Apache web server.
Like you have files outside DocumentRoot, and you want them to be available to the visitors.
ErrorLog option
This option specifies the error log file for the Apache web server.
VirtualHost option
This option allows you to host multiple websites on the same server.
The idea is that the content is served based on the requested hostname.
To setup a virtual host for the host www.example.com. First, create a VirtualHost option in /etc/httpd/conf/httpd.conf file.
And specify the DocumentRoot and ServerName like this:
Keep in mind that the ServerName option must be resolvable via DNS.
These are the most used Apache options.
Virtual Host types
There are two types of virtual hosts that you can define in Apache web server:
- Name-based virtual hosts
- IP-based virtual hosts
The NameVirtualHost directive defines which addresses can be virtual hosts; the asterisk (*) means any name or address on this server. You can write them like this:
If you have more than one IP address and you want to use an SSL certificate, the website must be on a dedicated IP address. You can write IP-based virtual hosts like this:
Apache process ownership
We know from the Linux process management that each process inherits its permissions from its parent process.
This fact is true for all processes except for applications with the SETUID bit set; they inherit permissions from the owner, not the parent process. A good example is the /bin/su.
If a normal user runs /bin/su program, it does not inherit the permission from adam, but it acts as a root user running it.
Since Apache web server needs to bind port 80, and this needs root privileges.
After binding to port 80, Apache can run as a normal user and only read files that have permissions to read them.
Based on the Linux distro you use, the user could be one of the following:
nobody, www, apache, www-data, or daemon.
I delayed introducing two more options for Apache till reaching that point.
User option
The User option specifies the user ID which the web server will use to answer requests.
Group option
The Group option specifies the group that the Apache web server will use to read files.
Security is very important for sites that use executable scripts such as CGI or PHP scripts.
The user you will use will have the permission to read and write the content of all sites on the server. But we want to ensure that only the members of a particular site can read their site only.
This is very important because if an attacker compromises your website, he will be able to read all files since the Apache user has permission to do that.
So how to solve this problem?
suEXEC support
A popular method is to use suEXEC. suEXEC is a program that runs with root permissions and makes CGI programs run as the user and group IDs of a specific user, not the Apache server user.
You can specify the user on each virtual host like this:
Just that simple.
Apache authentication
You may want to restrict some parts to specific visitors. It’s like a password-protected directory.
In Apache, you can store the authentication information file called .htpasswd file.
You can use the htpasswd command to do that.
First, create the .htpasswd file using the htpasswd command:
You need the -c option the first time you run htpasswd, but when you need to add more users, you shouldn’t use -c because it will overwrite the file.
Then create a .htaccess file in the public_html folder and write the following:
AuthName is required, you can use any string you want.
AuthType Basic says that you’re using an htpasswd style user file.
AuthUserFile points to the file that contains the generated password from the htpasswd command.
The Order line indicates that Apache must deny access by default, and only allow access for users specified in the htpasswd file.
The require directive means any user in the .htpasswd file is allowed.
Troubleshooting Apache web server
If you modify the httpd.conf file and restart or reload Apache web server and it did not work, then you have typed a wrong configuration. However, this is not the only case that you need to troubleshoot Apache. You may look at the Apache logs to see how the service works so you can diagnose the problem and solve it.
The two main log files for Apache are error_log and access_log files.
You can find these files in
directory if you are using Debian based distros.
The access_log file contains every request to the Apache web server with the details about the client requested that resource.
The error_log file contains errors of the Apache web server.
You can use the tail command to watch the log file:
I recommend you review the Linux syslog server to know more about logging.
I hope you find working with the Apache web server easy and interesting. Keep coming back.
Источник
HTTPD — Apache2 Web Server
Apache is the most commonly used Web server on Linux systems. Web servers are used to serve Web pages requested by client computers. Clients typically request and view Web pages using Web browser applications such as Firefox, Opera, Chromium, or Internet Explorer.
Users enter a Uniform Resource Locator (URL) to point to a Web server by means of its Fully Qualified Domain Name (FQDN) and a path to the required resource. For example, to view the home page of the Ubuntu Web site a user will enter only the FQDN:
To view the community sub-page, a user will enter the FQDN followed by a path:
The most common protocol used to transfer Web pages is the Hyper Text Transfer Protocol (HTTP). Protocols such as Hyper Text Transfer Protocol over Secure Sockets Layer (HTTPS), and File Transfer Protocol (FTP), a protocol for uploading and downloading files, are also supported.
Apache Web Servers are often used in combination with the MySQL database engine, the HyperText Preprocessor (PHP) scripting language, and other popular scripting languages such as Python and Perl. This configuration is termed LAMP (Linux, Apache, MySQL and Perl/Python/PHP) and forms a powerful and robust platform for the development and deployment of Web-based applications.
Installation
The Apache2 web server is available in Ubuntu Linux. To install Apache2:
At a terminal prompt enter the following command:
Configuration
Apache2 is configured by placing directives in plain text configuration files. These directives are separated between the following files and directories:
apache2.conf: the main Apache2 configuration file. Contains settings that are global to Apache2.
httpd.conf: historically the main Apache2 configuration file, named after the httpd daemon. In other distributions (or older versions of Ubuntu), the file might be present. In Ubuntu, all configuration options have been moved to apache2.conf and the below referenced directories, and this file no longer exists.
conf-available: this directory contains available configuration files. All files that were previously in /etc/apache2/conf.d should be moved to /etc/apache2/conf-available .
conf-enabled: holds symlinks to the files in /etc/apache2/conf-available . When a configuration file is symlinked, it will be enabled the next time apache2 is restarted.
envvars: file where Apache2 environment variables are set.
mods-available: this directory contains configuration files to both load modules and configure them. Not all modules will have specific configuration files, however.
mods-enabled: holds symlinks to the files in /etc/apache2/mods-available . When a module configuration file is symlinked it will be enabled the next time apache2 is restarted.
ports.conf: houses the directives that determine which TCP ports Apache2 is listening on.
sites-available: this directory has configuration files for Apache2 Virtual Hosts. Virtual Hosts allow Apache2 to be configured for multiple sites that have separate configurations.
sites-enabled: like mods-enabled, sites-enabled contains symlinks to the /etc/apache2/sites-available directory. Similarly when a configuration file in sites-available is symlinked, the site configured by it will be active once Apache2 is restarted.
magic: instructions for determining MIME type based on the first few bytes of a file.
In addition, other configuration files may be added using the Include directive, and wildcards can be used to include many configuration files. Any directive may be placed in any of these configuration files. Changes to the main configuration files are only recognized by Apache2 when it is started or restarted.
The server also reads a file containing mime document types; the filename is set by the TypesConfig directive, typically via /etc/apache2/mods-available/mime.conf , which might also include additions and overrides, and is /etc/mime.types by default.
Basic Settings
This section explains Apache2 server essential configuration parameters. Refer to the Apache2 Documentation for more details.
Apache2 ships with a virtual-host-friendly default configuration. That is, it is configured with a single default virtual host (using the VirtualHost directive) which can be modified or used as-is if you have a single site, or used as a template for additional virtual hosts if you have multiple sites. If left alone, the default virtual host will serve as your default site, or the site users will see if the URL they enter does not match the ServerName directive of any of your custom sites. To modify the default virtual host, edit the file /etc/apache2/sites-available/000-default.conf .
The directives set for a virtual host only apply to that particular virtual host. If a directive is set server-wide and not defined within the virtual host settings, the default setting is used. For example, you can define a Webmaster email address and not define individual email addresses for each virtual host.
If you wish to configure a new virtual host or site, copy that file into the same directory with a name you choose. For example:
Edit the new file to configure the new site using some of the directives described below.
The ServerAdmin directive specifies the email address to be advertised for the server’s administrator. The default value is webmaster@localhost. This should be changed to an email address that is delivered to you (if you are the server’s administrator). If your website has a problem, Apache2 will display an error message containing this email address to report the problem to. Find this directive in your site’s configuration file in /etc/apache2/sites-available.
The Listen directive specifies the port, and optionally the IP address, Apache2 should listen on. If the IP address is not specified, Apache2 will listen on all IP addresses assigned to the machine it runs on. The default value for the Listen directive is 80. Change this to 127.0.0.1:80 to cause Apache2 to listen only on your loopback interface so that it will not be available to the Internet, to (for example) 81 to change the port that it listens on, or leave it as is for normal operation. This directive can be found and changed in its own file, /etc/apache2/ports.conf
The ServerName directive is optional and specifies what FQDN your site should answer to. The default virtual host has no ServerName directive specified, so it will respond to all requests that do not match a ServerName directive in another virtual host. If you have just acquired the domain name mynewsite.com and wish to host it on your Ubuntu server, the value of the ServerName directive in your virtual host configuration file should be mynewsite.com . Add this directive to the new virtual host file you created earlier ( /etc/apache2/sites-available/mynewsite.conf ).
You may also want your site to respond to www.mynewsite.com , since many users will assume the www prefix is appropriate. Use the ServerAlias directive for this. You may also use wildcards in the ServerAlias directive.
For example, the following configuration will cause your site to respond to any domain request ending in .mynewsite.com.
The DocumentRoot directive specifies where Apache2 should look for the files that make up the site. The default value is /var/www/html, as specified in /etc/apache2/sites-available/000-default.conf . If desired, change this value in your site’s virtual host file, and remember to create that directory if necessary!
Enable the new VirtualHost using the a2ensite utility and restart Apache2:
Be sure to replace mynewsite with a more descriptive name for the VirtualHost. One method is to name the file after the ServerName directive of the VirtualHost.
Similarly, use the a2dissite utility to disable sites. This is can be useful when troubleshooting configuration problems with multiple VirtualHosts:
Default Settings
This section explains configuration of the Apache2 server default settings. For example, if you add a virtual host, the settings you configure for the virtual host take precedence for that virtual host. For a directive not defined within the virtual host settings, the default value is used.
The DirectoryIndex is the default page served by the server when a user requests an index of a directory by specifying a forward slash (/) at the end of the directory name.
For example, when a user requests the page http://www.example.com/this_directory/ , he or she will get either the DirectoryIndex page if it exists, a server-generated directory list if it does not and the Indexes option is specified, or a Permission Denied page if neither is true. The server will try to find one of the files listed in the DirectoryIndex directive and will return the first one it finds. If it does not find any of these files and if Options Indexes is set for that directory, the server will generate and return a list, in HTML format, of the subdirectories and files in the directory. The default value, found in /etc/apache2/mods-available/dir.conf is “index.html index.cgi index.pl index.php index.xhtml index.htm”. Thus, if Apache2 finds a file in a requested directory matching any of these names, the first will be displayed.
The ErrorDocument directive allows you to specify a file for Apache2 to use for specific error events. For example, if a user requests a resource that does not exist, a 404 error will occur. By default, Apache2 will simply return a HTTP 404 Return code. Read /etc/apache2/conf-available/localized-error-pages.conf for detailed instructions for using ErrorDocument, including locations of example files.
By default, the server writes the transfer log to the file /var/log/apache2/access.log . You can change this on a per-site basis in your virtual host configuration files with the CustomLog directive, or omit it to accept the default, specified in /etc/apache2/conf-available/other-vhosts-access-log.conf . You may also specify the file to which errors are logged, via the ErrorLog directive, whose default is /var/log/apache2/error.log . These are kept separate from the transfer logs to aid in troubleshooting problems with your Apache2 server. You may also specify the LogLevel (the default value is “warn”) and the LogFormat (see /etc/apache2/apache2.conf for the default value).
Some options are specified on a per-directory basis rather than per-server. Options is one of these directives. A Directory stanza is enclosed in XML-like tags, like so:
The Options directive within a Directory stanza accepts one or more of the following values (among others), separated by spaces:
ExecCGI — Allow execution of CGI scripts. CGI scripts are not executed if this option is not chosen.
Most files should not be executed as CGI scripts. This would be very dangerous. CGI scripts should kept in a directory separate from and outside your DocumentRoot, and only this directory should have the ExecCGI option set. This is the default, and the default location for CGI scripts is /usr/lib/cgi-bin .
Includes — Allow server-side includes. Server-side includes allow an HTML file to include other files. See Apache SSI documentation (Ubuntu community) for more information.
IncludesNOEXEC — Allow server-side includes, but disable the # exec and #include commands in CGI scripts.
Indexes — Display a formatted list of the directory’s contents, if no DirectoryIndex (such as index.html) exists in the requested directory.
For security reasons, this should usually not be set, and certainly should not be set on your DocumentRoot directory. Enable this option carefully on a per-directory basis only if you are certain you want users to see the entire contents of the directory.
Multiview — Support content-negotiated multiviews; this option is disabled by default for security reasons. See the Apache2 documentation on this option.
SymLinksIfOwnerMatch — Only follow symbolic links if the target file or directory has the same owner as the link.
apache2 Settings
This section explains some basic apache2 daemon configuration settings.
LockFile — The LockFile directive sets the path to the lockfile used when the server is compiled with either USE_FCNTL_SERIALIZED_ACCEPT or USE_FLOCK_SERIALIZED_ACCEPT. It must be stored on the local disk. It should be left to the default value unless the logs directory is located on an NFS share. If this is the case, the default value should be changed to a location on the local disk and to a directory that is readable only by root.
PidFile — The PidFile directive sets the file in which the server records its process ID (pid). This file should only be readable by root. In most cases, it should be left to the default value.
User — The User directive sets the userid used by the server to answer requests. This setting determines the server’s access. Any files inaccessible to this user will also be inaccessible to your website’s visitors. The default value for User is “www-data”.
Unless you know exactly what you are doing, do not set the User directive to root. Using root as the User will create large security holes for your Web server.
Group — The Group directive is similar to the User directive. Group sets the group under which the server will answer requests. The default group is also “www-data”.
Apache2 Modules
Apache2 is a modular server. This implies that only the most basic functionality is included in the core server. Extended features are available through modules which can be loaded into Apache2. By default, a base set of modules is included in the server at compile-time. If the server is compiled to use dynamically loaded modules, then modules can be compiled separately, and added at any time using the LoadModule directive. Otherwise, Apache2 must be recompiled to add or remove modules.
Ubuntu compiles Apache2 to allow the dynamic loading of modules. Configuration directives may be conditionally included on the presence of a particular module by enclosing them in an block.
You can install additional Apache2 modules and use them with your Web server. For example, run the following command at a terminal prompt to install the Python 3 WSGI module:
The installation will enable the module automatically, but we can disable it with a2dismod :
And then use the a2enmod utility to re-enable it:
See the /etc/apache2/mods-available directory for additional modules already available on your system.
HTTPS Configuration
The mod_ssl module adds an important feature to the Apache2 server — the ability to encrypt communications. Thus, when your browser is communicating using SSL, the https:// prefix is used at the beginning of the Uniform Resource Locator (URL) in the browser navigation bar.
The mod_ssl module is available in apache2-common package. Execute the following command at a terminal prompt to enable the mod_ssl module:
There is a default HTTPS configuration file in /etc/apache2/sites-available/default-ssl.conf . In order for Apache2 to provide HTTPS, a certificate and key file are also needed. The default HTTPS configuration will use a certificate and key generated by the ssl-cert package. They are good for testing, but the auto-generated certificate and key should be replaced by a certificate specific to the site or server. For information on generating a key and obtaining a certificate see Certificates.
To configure Apache2 for HTTPS, enter the following:
The directories /etc/ssl/certs and /etc/ssl/private are the default locations. If you install the certificate and key in another directory make sure to change SSLCertificateFile and SSLCertificateKeyFile appropriately.
With Apache2 now configured for HTTPS, restart the service to enable the new settings:
Depending on how you obtained your certificate you may need to enter a passphrase when Apache2 starts.
You can access the secure server pages by typing https://your_hostname/url/ in your browser address bar.
Sharing Write Permission
For more than one user to be able to write to the same directory it will be necessary to grant write permission to a group they share in common. The following example grants shared write permission to /var/www/html to the group “webmasters”.
These commands recursively set the group permission on all files and directories in /var/www/html to allow reading, writing and searching of directories. Many admins find this useful for allowing multiple users to edit files in a directory tree.
The apache2 daemon will run as the www-data user, which has a corresponding www-data group. These should not be granted write access to the document root, as this would mean that vulnerabilities in Apache or the applications it is serving would allow attackers to overwrite the served content.
References
Apache2 Documentation contains in depth information on Apache2 configuration directives. Also, see the apache2-doc package for the official Apache2 docs.
O’Reilly’s Apache Cookbook is a good resource for accomplishing specific Apache2 configurations.
Источник


