- 4 Useful Way to Know Plugged USB Device Name in Linux
- Find Out Plugged USB Device Name Using df Command
- Use lsblk Command to Find USB Device Name
- Identify USB Device Name with fdisk Utility
- Determine USB Device Name with dmesg Command
- If You Appreciate What We Do Here On TecMint, You Should Consider:
- List USB Devices Linux
- Listing USB Devices using lsusb Command
- Listing USB devices with usb-devices Command
- Listing Block USB Devices
- How To List USB Devices On Ubuntu – Find USB Device Name On Linux Ubuntu
- Detect USB Devices – Find USB Device Name
- 1. fdisk
- 2. dmesg
- 3. lsblk
- Linux-форензика в лице трекинга истории подключений USB-устройств
- Скриншоты
- Описание
- Справка
- Синтаксис
- Опции
- Примеры использования
- Ссылки и постскриптум
4 Useful Way to Know Plugged USB Device Name in Linux
As a newbie, one of the many things you should master in Linux is identification of devices attached to your system. It may be your computer’s hard disk, an external hard drive or removable media such USB drive or SD Memory card.
Using USB drives for file transfer is so common today, and for those (new Linux users) who prefer to use the command line, learning the different ways to identify a USB device name is very important, when you need to format it.
Once you attach a device to your system such as a USB, especially on a desktop, it is automatically mounted to a given directory, normally under /media/username/device-label and you can then access the files in it from that directory. However, this is not the case with a server where you have to manually mount a device and specify its mount point.
Linux identifies devices using special device files stored in /dev directory. Some of the files you will find in this directory include /dev/sda or /dev/hda which represents your first master drive, each partition will be represented by a number such as /dev/sda1 or /dev/hda1 for the first partition and so on.
![]() List All Linux Device Names
List All Linux Device Names
Now let’s find out device names using some different command-line tools as shown:
Find Out Plugged USB Device Name Using df Command
To view each device attached to your system as well as its mount point, you can use the df command (checks Linux disk space utilization) as shown in the image below:
![]() Find USB Device Name Using df Command
Find USB Device Name Using df Command
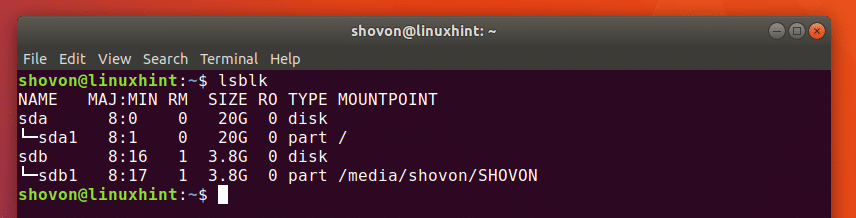
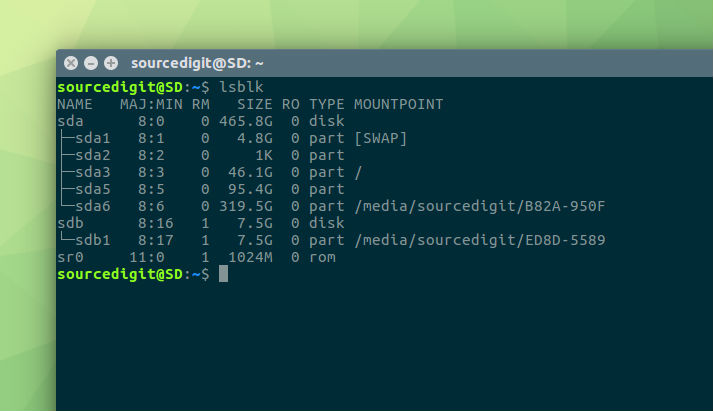
Use lsblk Command to Find USB Device Name
You can also use the lsblk command (list block devices) which lists all block devices attached to your system like so:
![]() List Linux Block Devices
List Linux Block Devices
Identify USB Device Name with fdisk Utility
fdisk is a powerful utility which prints out the partition table on all your block devices, a USB drive inclusive, you can run it will root privileges as follows:
![]() List Partition Table of Block Devices
List Partition Table of Block Devices
Determine USB Device Name with dmesg Command
dmesg is an important command that prints or controls the kernel ring buffer, a data structure which stores information about the kernel’s operations.
Run the command below to view kernel operation messages which will as well print information about your USB device:
![]() dmesg – Prints USB Device Name
dmesg – Prints USB Device Name
That is all for now, in this article, we have covered different approaches of how to find out a USB device name from the command line. You can also share with us any other methods for the same purpose or perhaps offer us your thoughts about the article via the response section below.
If You Appreciate What We Do Here On TecMint, You Should Consider:
TecMint is the fastest growing and most trusted community site for any kind of Linux Articles, Guides and Books on the web. Millions of people visit TecMint! to search or browse the thousands of published articles available FREELY to all.
If you like what you are reading, please consider buying us a coffee ( or 2 ) as a token of appreciation.

We are thankful for your never ending support.
Источник
List USB Devices Linux
In the world of USB computer peripherals, almost everyone uses some sort of USB devices in their computer. These days there are USB webcams, USB hard drives, USB stick also known as PenDrive etc. Almost every device has a USB version of it. So if you’re using Linux, listing what USB device is connected to your system might be necessary at some point.
There are many programs and many ways to list USB devices on Linux.
In this article, I will show you how to list USB devices on Linux. I am using Ubuntu 18.04 Bionic Beaver for the demonstration, but these commands are available on every Linux distribution. So let’s get started.
Listing USB Devices using lsusb Command
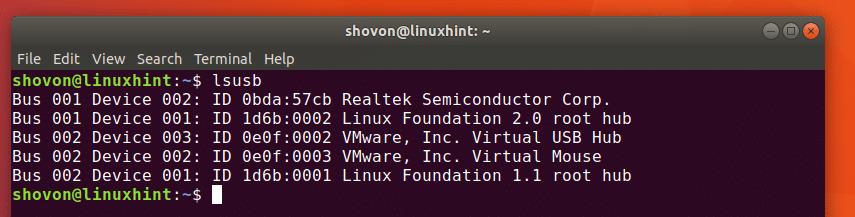
The widely used lsusb command can be used to list all the connected USB devices in Linux.

As you can see from the output of the lsusb command in the screenshot below, all the connected USB device is listed. The Bus ID, Device ID, USB ID, and a title is displayed in the output of lsusb command.
As you can see in the marked section of the screenshot below, Realtek Semiconductor Corp. with ID 0bda:57cb, this is my USB Webcam.
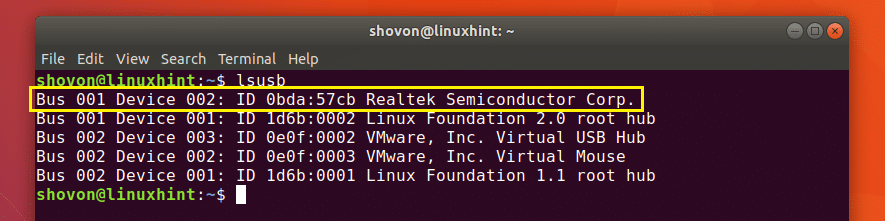
You can’t tell that it’s a Webcam by looking at the output of lsusb command, Can you? Nope! So how do I know this? It’s because I checked the output of the lsusb command before and after connecting the USB Webcam and once I compared the outputs, the newly added row is the USB device I connected. Plain! But there are ways to find out what the USB device is.
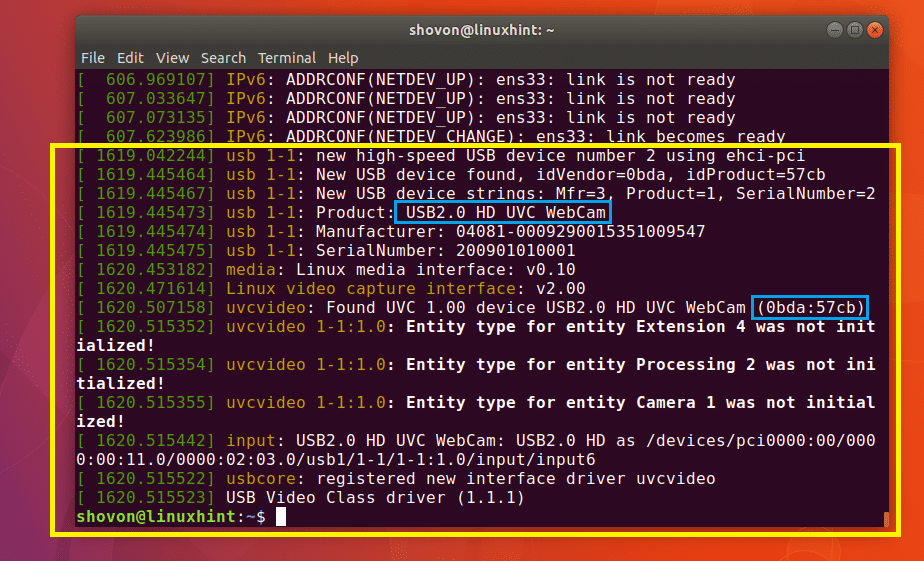
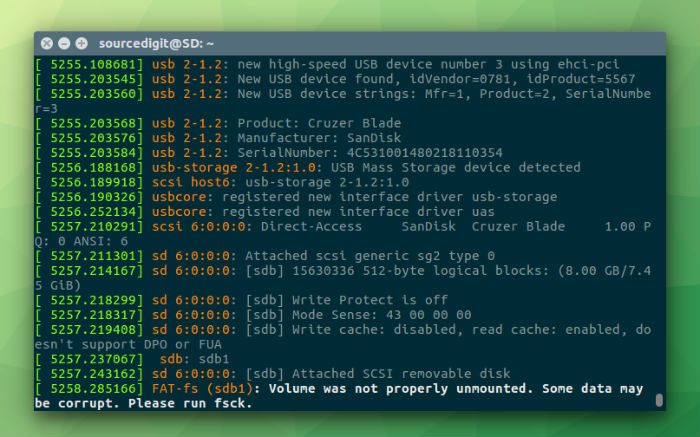
You can use the dmesg command to find out more information about the connected USB devices. The last connected USB device is the easiest to find with dmesg command. It is more widely used for debugging purpose. You will shortly see why.
You run dmesg command as follows:

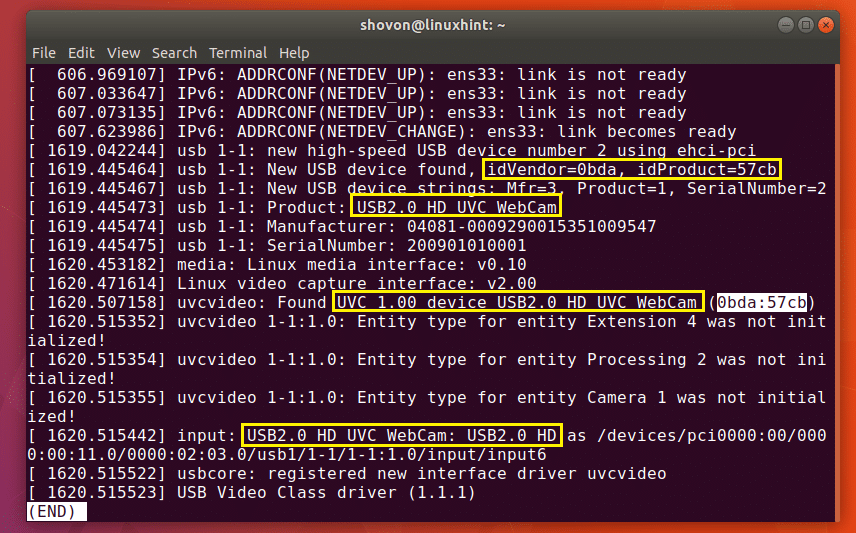
As you can see in the yellow marked box in the screenshot below, these are information about the USB device I connected last, which was my USB Webcam. You can see in one of the blue marked box, the USB device I connected is a HD UVC WebCam and its ID is 0bda:57cb.
By now you may have found out that the output of dmesg command is system log messages. Well yes, it is.
You can also search for a specific USB device by its ID in the dmesg system log.
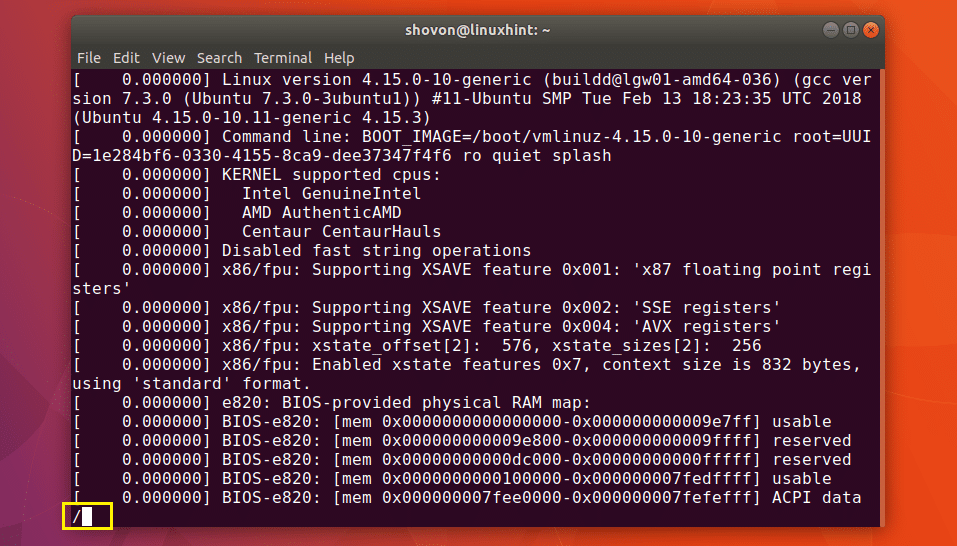
Run the following command to open the output of dmesg command with less text pager:

You should see the following window:
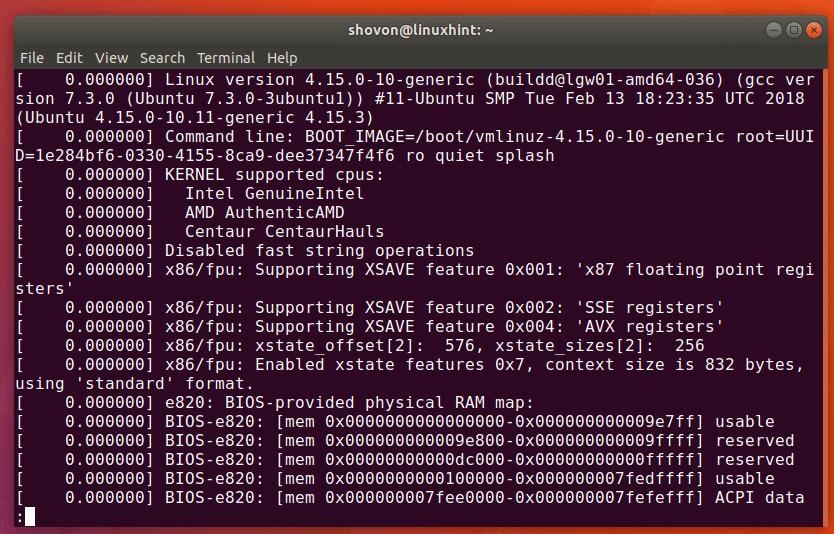
Now to search for a string, press / key on your keyboard. And you should the a / appear on the bottom of terminal window as marked in the screenshot below.
Now type in the USB device ID. For example, earlier when I listed the connected USB devices with lsusb command, one of the USB device had ID 0bda:57cb
Type in the USB Device ID and press . As you can see in the marked section of the screenshot below, the search string is marked white.
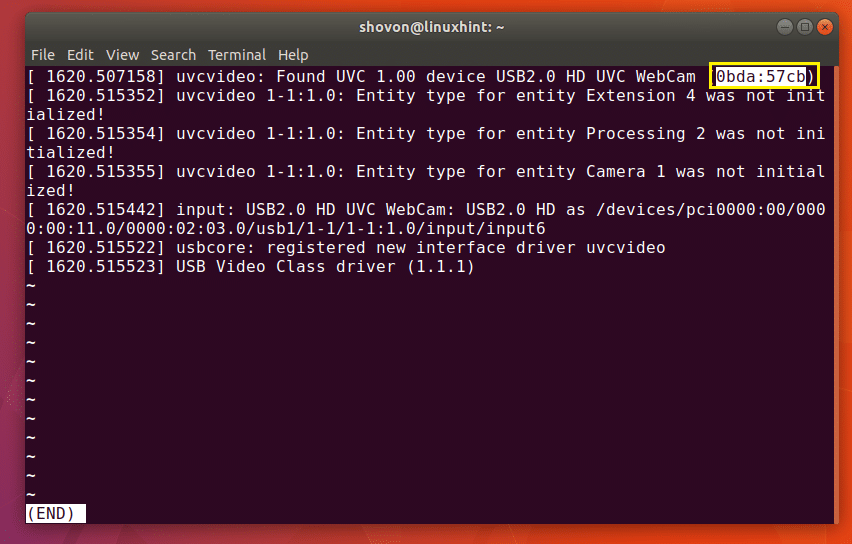
You may press and arrow keys to navigate up and down and read through it. You should find a lot of information about that USB device as you can see in the marked section of the screenshot below.
Listing USB devices with usb-devices Command
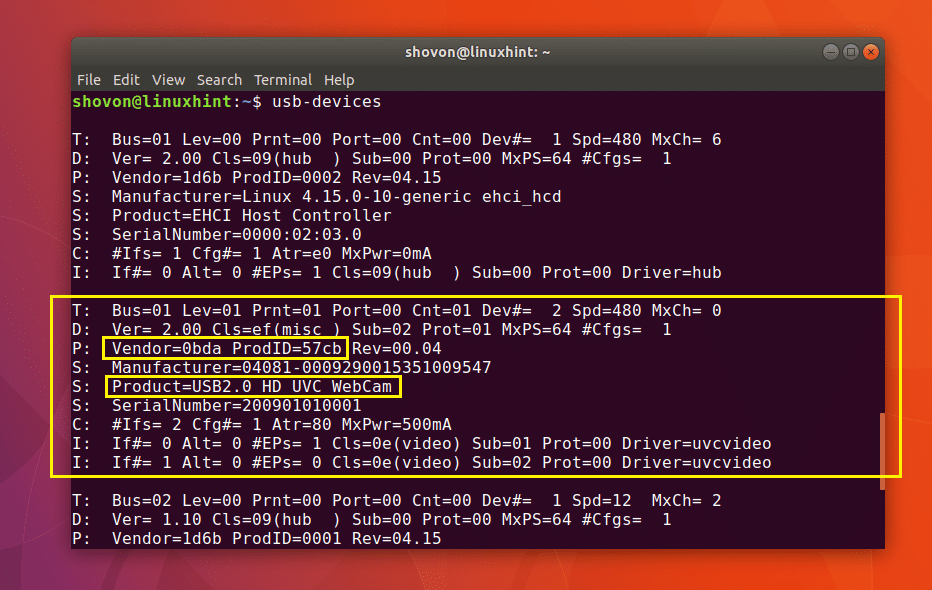
You can run the following command to list all the connected USB devices of your system:

As you can see in the screenshot below, all the connected USB devices are listed. we can find out pretty much the same information as before with usb-devices command.
Listing Block USB Devices
If you want to list all the USB block storage devices, that is all the USB storage devices, then you can use the lsblk or fdisk command to do so.
Listing USB block storage devices with lsblk:
As you can see in the screenshot below, all the available block storage devices (including the USB block storage devices) are listed.
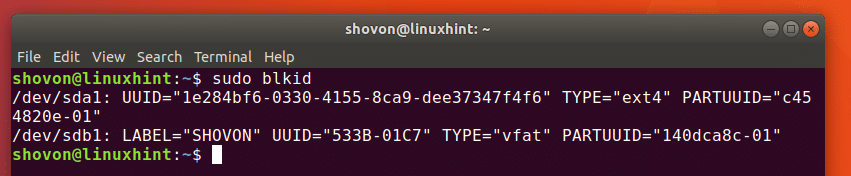
You can get almost the same information as lsblk command with blkid command. But you have to run it as root as follows:
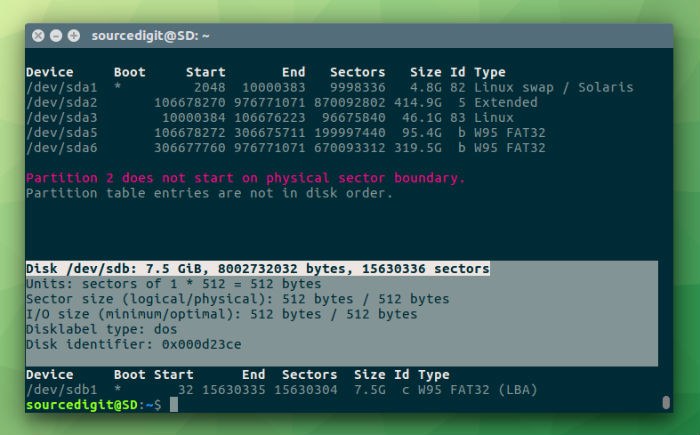
You can also use fdisk command to list all the USB block storage devices as follows:
As you can see in the screenshot below, the connected block storage devices (including the USB devices) are listed.

That’s how you list all the USB devices on Linux. Thanks for reading this article.
Источник
How To List USB Devices On Ubuntu – Find USB Device Name On Linux Ubuntu
By Sourabh / December 26, 2018 Category: How To, Ubuntu
How to get device name of USB device on Ubuntu? Command to list USB devices in Ubuntu or on Linux, find USB Device name. This post describes how to find the /dev name of my USB device. By default, when a storage devices is plugged into the system, it mount automatically in the /media/ directory.
Detect USB Devices – Find USB Device Name
There are many ways to get the info about USB device and find the name of USB device connected to the system. Before we begin, you must know about the following two basic commands:
1.To see a list of your USB devices (the vendor and device ID’s), run:
lsusb
2. To see information about currently mounted systems, simply run:
mount
1. fdisk
fdisk is a disk partition manipulation program, which allows you to create, destroy, resize, move and copy partitions on a hard drive using a menu-driven interface. It is useful for organising the disk space on a new drive, reorganising an old drive, creating space for new operating systems, and copying data to new hard disks. fdisk prints the partition table including any USB drive if present:
sudo fdisk -l
The argument -l, –list shows the partition table on the specified device and exits. If there is no device specified, lists the partition tables on all detected devices. Another argument -s, –size=DEVICE prints the size of the partition on DEVICE is printed on the standard output.
2. dmesg
dmesg is used to examine or control the kernel ring buffer. The default action is to display all messages from the kernel ring buffer.
dmesg is an important command that prints or controls the kernel ring buffer, a data structure which stores information about the kernel’s operations.
dmesg
When we use the command dmesg with argument -L it colorize the output.
3. lsblk
lsblk is another command to find the USB device name. The lsblk command lists all the block devices that are attached to the system. lsblk lists information about all available or the specified block devices. The lsblk command reads the sysfs filesystem and udev db to gather information. The command prints all block devices (except RAM disks) in a tree-like format by default. Use lsblk –help to get a list of all available columns.
lsblk
If you want to list empty devices also, run the command with -a, –all argument. By default the lsblk command doesn’t show empty devices.
You can also use df command to check the Linux disk space utilization alongwith the device name. df displays the amount of disk space available on the file system containing each file name argument. If no file name is given, the space available on all currently mounted file systems is shown.
Источник
Linux-форензика в лице трекинга истории подключений USB-устройств

В рамках погружения в одну из дисциплин (в процессе обучения по специальности компбеза) я работал над одним занимательным проектом, который бы мне не хотелось просто похоронить в недрах папки «Универ» на внешнем винчестере.
Сей проект носит название usbrip и представляет собой небольшую консольную опенсорс утилиту для Linux-форензики, а именно для работы с историей подключений USB-устройств. Программа написана на чистом Python 3 (с использованием некоторых сторонних модулей) и не требует зависимостей помимо Python 3.x интерпретатора и пары строк из requirements.txt, разрешающихся одной строкой с помощью pip.
В этом посте я опишу некоторые возможности данного софта и оставлю краткий мануал со ссылкой на источник загрузки.
Снято! (… в смысле Cut!)
Примечание. Описываемый в статье функционал актуален для первой версии утилиты. За последней версией с множеством новых плюшек предлагаю перейти в репозиторий.
Скриншоты
Получение истории подключений съёмных USB-устройств:
Поиск дополнительной информации о USB-устройстве по идентификатору модели (PID’у):
Описание
Как известно, операционные системы на базе GNU/Linux очень трепетно относятся к логированию разного рода событий, и подключение/отключение USB-устройств не является исключением. В совокупности с одним из пунктов UNIX-философии о «текстовых потоках, как универсальных интерфейсах» информацию об артефактах таких событий (с разной степенью подробности) в зависимости от дистрибутива можно обнаружить в одном или нескольких из следующих текстовых файлов:
- /var/log/kern.log* ;
- /var/log/syslog* ;
- /var/log/messages* ;
- /var/log/dmesg* ;
- /var/log/daemon.log* .
FORENSIC-PROOF даже показывает нам такую картинку на этот счет (немного неполную, но неважно):
Для своей работы usbrip находит универсальные для всех сборок Linux, основанных на Debian (Ubuntu, Linux Mint и др.) и RPM (CentOS, Fedora, openSUSE и др.), лог-файлы, а именно: /var/log/syslog* или /var/log/messages* , парсит их в поисках нужной информации и обликает найденные следы подключений USB-устройств в красивые таблички (или списки — как угодно).
Также usbrip умеет:
- создавать списки авторизированных (доверенных) устройств в виде JSON-файлов;
- искать «события-нарушителей» на основе списка доверенных устройств: такие события (подключение/отключение USB), в которых участвовали USB-устройства, не отмеченные как доверенные;
- искать дополнительную информацию о USB-устройстве по его VID (Vendor ID) и/или PID (Product ID).
Справка
Получить список доступных модулей:
Получить список доступных подмодулей для конкретного модуля:
Получить список доступных опций для конкретного подмодуля:
Синтаксис
Опции
Примеры использования
Показать историю подключений всех USB-устройств, опуская баннер, информационные (зелёные) сообщения, а также не задавая вопросы по ходу выполнения ( -q, —quite ), сформировав вывод в виде списка ( -l, —list ), включив в него 100 последних найденных событий ( -n КОЛИЧЕСТВО_СОБЫТИЙ, —number КОЛИЧЕСТВО_СОБЫТИЙ ):
Показать историю подключений съёмных USB-устройств ( -e, —external ), сформировав вывод в форме таблицы с полями (столбцами) «Connected», «VID», «PID», «Disconnected» и «Serial Number» ( -c СТОЛБЕЦ [СТОЛБЕЦ . ], —column СТОЛБЕЦ [СТОЛБЕЦ . ] ), отфильтровав поиск по датам ( -d ДАТА [ДАТА . ], —date ДАТА [ДАТА . ] ), взяв при этом информацию из внешних лог-файлов ( -f ЛОГ_ФАЙЛ [ЛОГ_ФАЙЛ . ], —file ЛОГ_ФАЙЛ [ЛОГ_ФАЙЛ . ] ):
Построить таблицу истории подключений всех USB-устройств и перенаправить вывод в файл для дальнейшего анализа. В том случае, если поток вывода не стандартный stdout ( «|» либо «>» к примеру) в выходных данных не будут присутствовать спец. символы, отвечающие за цвет шрифта в терминале, поэтому текстовый файл не будет замусорен нечитаемыми символами. Также нужно отметить, что usbrip использует некоторые UNICODE-константы, поэтому было бы неплохо сразу конвертировать кодировку создаваемого файла в UTF-8 для их корректного отображения (например с помощью encov ), а также использовать символы новой строки в Windows-стиле для лучшей переносимости (например с помощью awk ):
Примечание: избавиться от спец. символов, отвечающих за цвет можно и в том случае, если вывод уже был направлен в stdout. Для этого необходимо скопировать полученные данные в новый файл usbrip.txt и добавить еще одну awk -инструкцию:
Создать список доверенных устройств в виде JSON-файла ( trusted/auth.json ), содержащего поля «VID» и «PID» первых трех устройств, подключенных 26-го сентября:
Найти среди истории подключений съёмных USB-устройств «события-нарушители» на основе списка доверенных устройств ( trusted/auth.json ) по полю «PID» и сформировать вывод в виде таблицы с полями «Connected», «VID» и «PID»:
Найти дополнительную информацию о USB-устройстве на основе его VID’а и PID’а:
Загрузить/обновить базу данных идентификаторов USB-устройств (источник здесь):
Ссылки и постскриптум
Забрать утилиту можно с Гитхаба, все зависимости для запуска и корректной работы указаны в requirements.txt.
Благодарю за внимание!
P. S. да, стиль баннера и информационных сообщений вдохновлен проектом sqlmap (*^.^*)
UPD 13.06.2018. Появилось расследование реального (?) кейса с участием моей утилиты от человека с Codeby (сам в шоке, если честно).
Источник


