- Изучаем команды Linux: nice и renice
- 1. Введение
- 2. Что такое процесс
- 2.1. Планирование процессов
- 2.2. Жизненный цикл процесса
- 3. Использование команды nice
- 4. Использование команды renice
- 5. Заключение
- A brief guide to priority and nice values in the linux ecosystem
- How to Set Linux Process Priority Using nice and renice Commands
- Understanding the Linux Kernel Scheduler
- Understanding Process Priority and Nice Value
- How to Check Nice Value of Linux Processes
- Difference Between PR or PRI and NI
- How to Run A Command with a Given Nice Value in Linux
- Change the Scheduling Priority of a Process in Linux
- How To Set Default Nice Value Of a Specific User’s Processes
- If You Appreciate What We Do Here On TecMint, You Should Consider:
Изучаем команды Linux: nice и renice
1. Введение
Возможность для пользователя задавать значение приоритета его собственных процессов определяет ваше отношение к другим пользователям системы. Даете ли вы им возможность использовать поцессор или просто злоупотребляете системными ресурсами без достаточных оснований? В этой статье вы узнаете, как управлять процессами в плане потребления ими ресурсов процессора и изменения приоритета ваших процессов, используя команды nice и renice. Мы начнем с азов теории, поговорим о том, что такое процесс, планирование, как создать дочерний процесс. Затем мы перейдем к команде nice и узнаем, как изменить значение приоритета процесса.
2. Что такое процесс
Простыми словами процесс — это соглашение об именовании, используемое в Linux для обозначения роли запущенной программы. Процесс — это набор правил, которым руководствуется данная программа при использовании выделенного процессорного времени, памяти и ресурсов ввода/вывода. Каждый процесс, запущенный в системе Linux, имеет свой ID (PID), по которому его можно отслеживать.
Ядро Linux позволяет собирать различную информацию о каждом процессе, которая включает, но не ограничивается:
— статус процесса ( работает, спит, зомби или остановлен)
— приоритет выполнения процесса
— информация об используемых ресурсах
— владелец процесса
— сетевые порты и файлы, открытые процессом
— и так далее.
Итак, теперь мы кое-что знаем процессах и можем продвинуться дальше и создать какой-нибудь процесс. Чтобы сделать это, просто откройте терминал и выполните команду yes в фоне, перенаправив ее вывод в /dev/null:
После это воспользуемся командой ps -l, чтобы извлечь информацию о нашем процессе:
Из этой таблицы мы можем узнать немало интересного:
F — FLAG: процесс запущен без привилегий суперпользователя. В противном случае мы могли бы увидеть число 4 или сумму 1 и 4. Подробности можно узнать, посмотрев man-страницу ps.
S — STATE: процесс в настоящее время работает.
UID — ID пользователя, инициализировавшего процесс. UID на самом деле является алиасом EUID (Effective User ID)
PID — ID процесса нашей команды yes 5997.
PPID — Parent Process ID. Это ID родительского для нашей команды yes процесса. В нашем случае это bash с PID 5830.
C — загрузка процессора, целое число, выражается в %.
PRI — Приоритет процесса. Большее значение означает меньший приоритет.
NI — Значение Nice, которое находится в диапазоне от -20 до 19. Большее значение означает меньший приоритет.
2.1. Планирование процессов
Если вы не хотите слишком глубоко вникать в детали планирования и приоритета процессов, то можете пропустить этот раздел. Здесь мы сосредоточимся на описании процессов в Linux и попытаемся обобщить некоторые моменты, так как подробное описание их может занять множество страниц.
С нашей точки зрения необходимо понимать, что принцип работы планировщика Linux (для ядра версии >= 2.6) вытесняющий. Под этим понимается способность ядра выбирать среди всех заданий то, которое имеет наивысший приоритет. Далее, ядро делит списки приоритета на задачи реального времени и пользовательские задания, ранжирующиеся от 1 — 100 и 101 — 140 соответственно.
Далее, ядро Linux выделяет задачам с более высоким приоритетом больший квант времени, а задачам с меньшим приоритетам — меньший квант времени, который в среднем составляет 200 и 10 мс соответственно. Другими словами, каждое задание допускается к выполнению только, если у него остается какая-либо часть времени. Поэтому меньший отрезок времени для выполнения означает, что процесс получает меньше времени в очереди выполнения и, соответственно, получает меньше ресурсов. Когда отрезок времени процесса заканчивается, он помещается в очередь выполнения с истекшим временем, затем его приоритет пересчитывается, и он снова помещается в активную очередь выполнения. Эта зависимость иллюстрируется приведенной здесь диаграммой. Важно помнить, что обе очереди выполнения содержат списки задач, отсортированных по их приоритету.
2.2. Жизненный цикл процесса
Основной принцип управления процессами в Linux включает две важные операции, создающие новый процесс. Операция, при которой процесс копирует себя, и тем самым создает новый процесс с уникальным ID, осуществляется при помощи вызова fork(). За ней часто следует операция exec(), запускающая новую программу. Первый процесс, создающийся при загрузке системы, называется init, он всегда получает PID 1. Все остальные процессы считаются дочерними по отношению к процессу init. В нормальных условиях перед завершением дочернего процесса требуется, чтобы родительский процесс послал ему значение exit. При успешном завершении процесса он отправляет родительскому процессу значение 0. Если по каким-либо причинам дочерний процесс пережил родительский, init отмечает его как не имеющий родителей.
3. Использование команды nice
Так как мощь процессоров на протяжении многих лет возрастает в геометрической прогрессии, соответственно уменьшается важность команды nice. В результате сегодня редко приходится вручную изменять приоритет процессов. Тем не менее, такая возможность имеется и она может быть полезной в некоторых ситуациях. По умолчанию nice устанавливает значение приоритета 10.
Чтобы запустить процесс со значением nice, отличным от 10, можно использовать ключ -n.
Чтобы установить значение nice ниже нуля, требуются права суперпользователя. В противном случае будет установлено значение 0. Ниже мы пробуем задать значение nice -1 без прав root:
Поэтому, чтобы задать значение nice меньше 0, необходимо запускать программу как root, или использовать sudo.
4. Использование команды renice
В предыдущем разделе мы узнали, как запускать программу с заданным значением nice. Теперь мы попробуем изменить значение nice у запущенной программы с помощью команды renice. Итак, у нас есть работающая программа yes со значением nice 10:
Чтобы изменить его значение, мы можем использовать команду renice со значением nice и PID процесса. Давайте изменим значение nice на 15:
Согласно правилам, обычный пользователь может только увеличивать значение nice (уменьшать приоритет) любого процесса. Если попробовать изменить значение nice с 15 до 10, мы получим следующее сообщение об ошибке:
Также, команда renice позволяет суперпользователю изменять значение nice процессов любого пользователя. Это делается с помощью ключа -u. Следующая команда изменяет значение приоритета всех процессов пользователя на -19:
5. Заключение
Команда nice может быть удобным инструментом и она очень проста в использовании. Пожалуйста, отметьте, что для изменения значения приоритета также может использоваться команда top.
Источник
A brief guide to priority and nice values in the linux ecosystem

Apr 16, 2019 · 4 min read
How does Linux do memory management to execute your processes is a little complicated thing to explain. But luckily all the abstracted details around memory management like memory allocation and context switching b/w processes are very well optimized and developers don’t have to worry about these things while writing high-level code.
What we should generally take into consideration is the amount of CPU bandwidth that our processes are eligible for, especially in cases of contention with other processes sharing the processing power of the CPU.
Before we jump i nto the priority and nice values and how they help us; It is important to have a top-level understanding of how CPUs run multiple processes at the same time.
Basically, if a CPU has n cores then it can only execute n processes in parallel.
When the number of processes is more than n, the processes are switched between very fast using advanced context-switching mechanisms to provide multitasking. This lets us run multiple processes on a CPU even if it has just 1 core.
Why worry about the priority of your process?
Some processes may be highly CPU-intensive but not as important as others and hence can have a lower priority while others may or may not be highly CPU-intensive but are very important and hence should have higher priority.
For example- if there is a process A, which detects fraud with input data and there is another process B, which makes hourly backups of some data, then the priority(A) > priority(B)!
This ensures that if both A and B are running at the same time, A would be allocated more processing bandwidth.
Now that we have enough context, let’s dive into the specifics.
Priority value — The priority value is the process’s actual priority which is used by the Linux kernel to schedule a task.
In Linux system priorities are 0 to 139 in which 0 to 99 for real-time and 100 to 139 for users.
Nice value — Nice values are user-space values that we can use to control the priority of a process. The nice value range is -20 to +19 where -20 is highest, 0 default and +19 is lowest.
The relation between nice value and priority is as such —
Priority_value = Nice_value + 20
To see how these work together let us take a process that takes a lot of processing power continuously. I’ll use a shell script (infinite.sh) which has an infinite loop in it to demonstrate how this works.
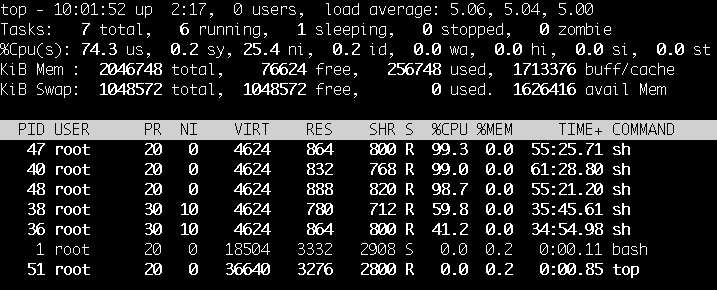
We’ll run this on a single core CPU for easy understanding & use top command (a program that periodically displays a sorted list of system processes and their details like pid, priority value, nice value, CPU usage, etc.) to monitor processes.
The output for top before running infinite.sh:

Once we run infinite.sh in the background using sh infinite.sh & we see that this process (PID-28) is taking 100% processing power of the CPU.

If I run two more processes of infinite.sh then all of them (PID-28,30,32) get equal CPU as all have the same priority.

Now let us give these processes different nice values.
There are two ways to do this:
1. Start the process with the nice value in the command as
nice -n nice_val [command]
For us, it could be something like nice -n 10 sh infinite.sh &
When we run this we get another process (PID-34) with the priority as 30 (as priority = 20 + nice_value). As it has the least priority, it gets the least amount of CPU.

2. Change the nice value of a running process using its PID using renice as renice -n nice_val -p [pid]
For us, it could be something like renice -n 5 -p 28
When we run this, the process with PID-28 gets its priority set from 20 to 25 and the CPU is allocated accordingly.

Note: Only root user can set the nice value from -20 to 19. Other users can only set nice values from 0 to 19.
You can also use renice to set nice values to all processes by a user using renice -n nice_val -u [user]
Источник
How to Set Linux Process Priority Using nice and renice Commands
In this article, we’ll briefly explain the kernel scheduler (also known as the process scheduler), and process priority, which are topics beyond the scope of this guide. Then we will dive into a little bit of Linux process management: see how to run a program or command with modified priority and also change the priority of running Linux processes.
Understanding the Linux Kernel Scheduler
A kernel scheduler is a unit of the kernel that determines the most suitable process out of all runnable processes to execute next; it allocates processor time between the runnable processes on a system. A runnable process is one which is waiting only for CPU time, it’s ready to be executed.
The scheduler forms the core of multitasking in Linux, using a priority-based scheduling algorithm to choose between the runnable processes in the system. It ranks processes based on the most deserving as well as the need for CPU time.
Understanding Process Priority and Nice Value
The kernel stores a great deal of information about processes including process priority which is simply the scheduling priority attached to a process. Processes with a higher priority will be executed before those with a lower priority, while processes with the same priority are scheduled one after the next, repeatedly.
There are a total of 140 priorities and two distinct priority ranges implemented in Linux. The first one is a nice value (niceness) which ranges from -20 (highest priority value) to 19 (lowest priority value) and the default is 0 , this is what we will uncover in this guide. The other is the real-time priority, which ranges from 1 to 99 by default, then 100 to 139 are meant for user-space.
One important characteristic of Linux is dynamic priority-based scheduling, which allows the nice value of processes to be changed (increased or decreased) depending on your needs, as we’ll see later on.
How to Check Nice Value of Linux Processes
To see the nice values of processes, we can use utilities such as ps, top or htop.
To view processes nice value with ps command in user-defined format (here the NI the column shows the niceness of processes).
![]() View Linux Processes Nice Values
View Linux Processes Nice Values
Alternatively, you can use top or htop utilities to view Linux processes nice values as shown.
![]() Check Linux Process Nice Values using Top Command
Check Linux Process Nice Values using Top Command ![]() Check Linux Process Nice Values using Htop Command
Check Linux Process Nice Values using Htop Command
Difference Between PR or PRI and NI
From the top and htop outputs above, you’ll notice that there is a column called PR and PRI receptively which shows the priority of a process.
This, therefore, means that:
- NI – is the nice value, which is a user-space concept, while
- PR or PRI – is the process’s actual priority, as seen by the Linux kernel.
How To Calculate PR or PRI Values
Nice value range (NI): -20 to 19
But if you see a rt rather than a number as shown in the screenshot below, it basically means the process is running under real-time scheduling priority.
![]() Linux rt Process
Linux rt Process
How to Run A Command with a Given Nice Value in Linux
Here, we will look at how to prioritize the CPU usage of a program or command. If you have a very CPU-intensive program or task, but you also understand that it might take a long time to complete, you can set it a high or favorable priority using the nice command.
The syntax is as follows:
- If no value is provided, nice sets a priority of 10 by default.
- A command or program run without nice defaults to a priority of zero.
- Only root can run a command or program with increased or high priority.
- Normal users can only run a command or program with low priority.
For example, instead of starting a program or command with the default priority, you can start it with a specific priority using following nice command.
You can also use the third method which is a little confusing especially for negative niceness values.
Change the Scheduling Priority of a Process in Linux
As we mentioned before, Linux allows dynamic priority-based scheduling. Therefore, if a program is already running, you can change its priority with the renice command in this form:
![]() Change Process Priority
Change Process Priority
From the sample top output below, the niceness of the teamspe+ with PID 1055 is now -12 and for all processes owned by user apache is -2 .
Still using this output, you can see the formula PR = 20 + NI stands,
![]() Watch Processes Nice Values
Watch Processes Nice Values
Any changes you make with renice command to a user’s processes nice values are only applicable until the next reboot. To set permanent default values, read the next section.
How To Set Default Nice Value Of a Specific User’s Processes
You can set the default nice value of a particular user or group in the /etc/security/limits.conf file. Its primary function is to define the resource limits for the users logged in via PAM.
The syntax for defining a limit for a user is as follows (and the possible values of the various columns are explained in the file):
Now use the syntax below where hard – means enforcing hard links and soft means – enforcing the soft limits.
Alternatively, create a file under /etc/security/limits.d/ which overrides settings in the main file above, and these files are read in alphabetical order.
Start by creating the file /etc/security/limits.d/tecmint-priority.conf for user tecmint:
Then add this configuration in it:
Save and close the file. From now on, any process owned by tecmint will have a nice value of 10 and PR of 30.
For more information, read the man pages of nice and renice:
You might also like to read these following articles about Linux process management.
In this article, we briefly explained the kernel scheduler, process priority, looked at how to run a program or command with modified priority and also change the priority of active Linux processes. You can share any thoughts regarding this topic via the feedback form below.
If You Appreciate What We Do Here On TecMint, You Should Consider:
TecMint is the fastest growing and most trusted community site for any kind of Linux Articles, Guides and Books on the web. Millions of people visit TecMint! to search or browse the thousands of published articles available FREELY to all.
If you like what you are reading, please consider buying us a coffee ( or 2 ) as a token of appreciation.

We are thankful for your never ending support.
Источник


