- How to Check Java Version Installed on Linux
- Method 1: Check the Java Version On Linux
- Method 2: Find Version by Checking Path Where Java is Installed
- Method 3: Search for Java in the Installed Packages List
- 5 Installation of the JDK and JRE on Linux Platforms
- General Notes About Installing the JDK and JRE on Linux Platforms
- System Requirements for Installing JDK and JRE on Linux Platforms
- JDK and JRE Installation Instruction Notation for Linux Platforms
- Installation of the JDK on Linux from Archive Binaries and RPM Packages
- Installing the 64-Bit JDK 10 on Linux Platforms
- Installing the 64-Bit JDK on RPM-Based Linux Platforms
- Installation of the JRE on Linux from Archive Binaries and RPM Packages
- Installing the 64-Bit JRE 10 on Linux Platforms
- Installing the 64-Bit JRE 10 on RPM-Based Linux Platforms
- How to Install Java on Ubuntu and Linux Mint
- JRE vs OpenJDK vs Oracle JDK
- Check if Java is already installed in Ubuntu
- Install Java in Ubuntu and Linux Mint
- Install JRE in Ubuntu and Linux Mint (for running Jar applications)
- Install OpenJDK in Ubuntu and Linux Mint (for compiling and running Java programs)
- Install Oracle JDK in Ubuntu and Linux Mint
How to Check Java Version Installed on Linux
Home » SysAdmin » How to Check Java Version Installed on Linux
How do I check my current Java version? There are several ways to check if Java is installed and which version is running on your system.
In this tutorial, learn how to check the Java version installed on Linux distros, including Ubuntu, CentOS, and Debian.
- A user account with sudo privileges
- Access to the command-line/terminal window
- A version of Java
Method 1: Check the Java Version On Linux
To check the Java version on Linux Ubuntu/Debian/CentOS:
1. Open a terminal window.
2. Run the following command:
3. The output should display the version of the Java package installed on your system. In the example below, OpenJDK version 11 is installed.

Note: If the output indicates there is no such package on the system, you can install it with the help of one of our guides – How to install Java on Ubuntu or How to Install Java on CentOS.
You can also check the version of the primary Java compiler – javac (pronounced “java-see”) with the command:

Method 2: Find Version by Checking Path Where Java is Installed
There are two ways to find the path of the Java directory.
The first option includes running a single command:
The system should respond with the path where Java is installed.

Note: This option may not work on CentOS systems. If you have issues finding the path of the Java directory with the command above, use the alternative outlined below.
Alternatively, you can use the whereis command and follow the symbolic links to find the Java path.
1. Run the command:

The output tells you that Java is located in /usr/bin/java.
2. List the content of the /usr/bin/java directory:

Inspecting the directory shows that /usr/bin/java is only a symbolic link for /etc/alternatives/java.
3. Just like in the previous step, list the content of the provided path by running:

Finally, the output displays /etc/alternatives/java is another symbolic link and that the real path of the Java directory is /usr/lib/jvm/java-11-openjdk-amd64/bin/java.
Method 3: Search for Java in the Installed Packages List
You can also prompt the system to list installed packages and search for Java, with its version number.
Find Java by listing all installed packages.
1. To generate a list of all installed packages, use the command:
2. Scroll up/down until you find the Java packages as shown in this example.
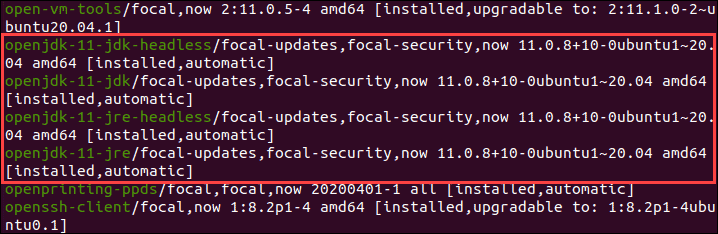
To avoid searching through all installed packages, list Java packages only. Prompt the system to list a specific software package. In this case, the package name is openjdk:
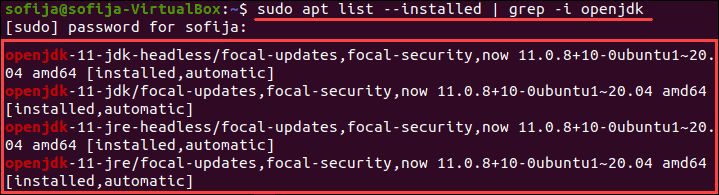
Note: CentOS users need to modify the commands for listing installed packages for their package manager. Use the commands: sudo yum list installed and sudo yum list installed | grep -i openjdk instead.
With this article, you have successfully checked the Java version installed on Linux. We also covered checking the Java path and searching for Java among the installed packages.
Once the Java version is confirmed, you can start developing anything from lightweight mobile to desktop applications.
Источник
5 Installation of the JDK and JRE on Linux Platforms
This topic describes the installation procedures of the JDK and JRE on the Linux platform, along with the system requirements.
General Notes About Installing the JDK and JRE on Linux Platforms
This topic describes general information about installing JDK and JRE 10 on Linux platforms.
Installing the JDK automatically creates a directory called jdk– 10 . interim.update.patch . For the JRE, the software automatically creates a directory called jre– 10 . interim.update.patch .
If you install Java SE Runtime Environment in a specific location such as /usr/jdk (for JDK) or /usr/jre (for JRE), then you must log in with root credentials to gain the necessary permissions. If you do not have root access, then either install the Java SE Runtime Environment into your home directory or a subdirectory for which you have write permissions.
If you install the software in a directory that contains a subdirectory named jdk– 10 . interim.update.patch (for JDK) or jre– 10 . interim.update.patch (for JRE), then the new software overwrites files of the same name in that directory. Ensure that you rename the old directory if it contains files that you would like to keep.
By default, the installation script configures the system such that the backing store for system preferences is created inside the JDK or JRE’s installation directory as applicable. If the JDK or JRE is installed on a network-mounted drive, then the system preferences can be exported for sharing with Java runtime environments on other machines.
System Requirements for Installing JDK and JRE on Linux Platforms
See Oracle JDK Certified Systems Configurations for information about supported platforms, operating systems, and browsers.
JDK and JRE Installation Instruction Notation for Linux Platforms
Instructions for installing either JDK or JRE contains a version notation that represents the Feature, Interim, and Update version information.
For example, if you are installing JDK 10 Interim 0, Update 2, and Patch 1, then the following string represents the name of the bundle:
jdk- 10 . interim.update.patch -linux-x64_bin.tar.gz
Installation of the JDK on Linux from Archive Binaries and RPM Packages
You can install the Java Development Kit (JDK) on a Linux platform from archive binary files or from Red Hat Package Manager (RPM) packages.
Installation can be performed by using one of the following processes:
From archive binaries ( .tar.gz ): This allows you to install a private version of the JDK for the current user into any location, without affecting other JDK installations. However, it may involve manual steps to get some of the features to work. See the following table for the options available for downloading and installing the JDK from archive binaries.
From RPM packages ( .rpm ): This allows you to perform a systemwide installation of the JDK for all users, and requires root access. RPM-based Linux platforms are based on Red Hat and SuSE. See the following table for the options available for downloading and installing the JDK from RPM packages.
When you download and install the JDK, the associated Java Runtime Environment (JRE) is also installed.
The following table lists the options and instructions for downloading and installing the JDK 10 release on a Linux platform:
| Download File | Instructions | Architecture | Who Can Install |
|---|---|---|---|
| jdk- 10 . interim.update.patch -linux-x64.tar.gz | Installing the 64-Bit JDK 10 on Linux Platforms | 64-bit | Anyone |
| jdk- 10 . interim.update.patch -linux-x64.rpm | Installing the 64-Bit JDK on RPM-Based Linux Platforms | 64-bit RPM-based Linux | Root |
Installing the 64-Bit JDK 10 on Linux Platforms
You can install the JDK for 64-bit Linux, from an archive binary file ( .tar.gz ).
- Download the file, jdk- 10 . interim.update.patch _linux-x64_bin.tar.gz .
Before you download a file, you must accept the license agreement. The archive binary can be installed by anyone (not only by root users) in any location that you can write to.
The .tar.gz archive file (also called a tarball) is a file that can be simultaneously uncompressed and extracted in one step.
$ tar zxvf jdk- 10 . interim.update.patch _linux-x64_bin.tar.gz
The Java Development Kit files are installed in a directory called jdk- 10 . interim.update.patch in the current directory.
Installing the 64-Bit JDK on RPM-Based Linux Platforms
You can install the JDK on 64-bit RPM-based Linux platforms, such as Red Hat and SuSE, by using an RPM binary file ( .rpm ) in the system location.
- Download the file, jdk- 10 . interim.update.patch _linux-x64_bin.rpm .
Before you download a file, you must accept the license agreement.
$ rpm -ivh jdk- 10 . interim.update.patch _linux-x64_bin.rpm
JDK 10 can coexist with earlier versions of JDK. For each version, a new directory is created, the default directory being /usr/java/jdk. interim.update.patch .
Upgrade the package using the following command:
$ rpm -Uvh jdk- 10 . interim.update.patch _linux-x64_bin.rpm
The JDK installation is integrated with the alternatives framework. After installation, the alternatives framework is updated to reflect the binaries from the recently installed JDK. Java commands such as java , javac , javadoc , and javap can be called from the command line.
Using the java -version command, users can confirm the default (recently installed) JDK version.
In addition, users can check which specific RPM package provides the .java files:
Installation of the JRE on Linux from Archive Binaries and RPM Packages
You can install the Java Runtime Environment (JRE) on a Linux platform from archive binary files or from RPM packages.
Use one of the following processes to install JRE:
From archive binaries ( .tar.gz ): This allows you to install a private version of the JRE for the current user into any location, without affecting other JRE installations. However, it may involve manual steps to get some of the features to work. See the following table for the options available for downloading and installing the JRE from archive binaries.
From RPM packages ( .tar.gz ): This allows you to perform a systemwide installation of the JRE for all users using root access. RPM-based Linux platforms are based on Red Hat and SuSE. See the following table for the options available for downloading and installing the JRE from RPM packages.
When you download and install the Java Development Kit (JDK), the associated JRE is also installed.
The following table lists the options and instructions for downloading and installing the JRE on a Linux platform.
| Download File | Instructions | Architecture | Who Can Install |
|---|---|---|---|
| jre- 10 . interim.update.patch _linux-x64_bin.tar.gz | Installing the 64-Bit JRE 10 on Linux Platforms | 64-bit | Anyone |
| jre- 10 . interim.update.patch _linux-x64_bin.rpm | Installing the 64-Bit JRE 10 on RPM-Based Linux Platforms | 64-bit | Anyone |
Installing the 64-Bit JRE 10 on Linux Platforms
You can install JRE 10 on a 64-bit Linux platform from an archive binary file ( .tar.gz ).
- Download the file, jre- 10 . interim.update.patch _linux-x64_bin.tar.gz .
Before downloading a file, you must accept the license agreement. The archive binary can be installed by anyone (not only root users) in any location that you can write to.
The .tar.gz archive file (also called a tarball) is a file that can be simultaneously uncompressed and extracted in one step.
$ tar zxvf jre- 10 . interim.update.patch _linux-x64_bin.tar.gz
The Java Development Kit files are installed in a directory called jre- 10 . interim.update.patch .
Installing the 64-Bit JRE 10 on RPM-Based Linux Platforms
You can install JRE 10 on 64-bit RPM-based Linux platforms, such as Red Hat and SuSE, using an RPM binary file ( .rpm ) in the system location.
- Download the file, jre- 10 . interim.update.patch _linux-x64_bin.rpm .
Before you download a file, you must accept the license agreement.
$ rpm -e package_name
$ rpm -ivh jre- 10 . interim.update.patch _linux-x64_bin.rpm
Upgrade a package using the following command:
Источник
How to Install Java on Ubuntu and Linux Mint
Last updated September 12, 2021 By Abhishek Prakash 39 Comments
Wondering about how to install Java on Ubuntu? Installing Java is certainly one of the first few things to do after installing Ubuntu and it is very easy to do so.
Many people have aversion to Java. But there are high chances that for one reason or other, you might have to install Java, no matter how much you dislike it. In this quick post, we shall see how to install Java in Ubuntu, Linux Mint and other Debian and Ubuntu based distributions.
You can get Java on Ubuntu via multiple packages. There is JRE, OpenJDK and Oracle JDK. But what is the difference between these packages and which one should you install? Let me explain that in the next section.
JRE vs OpenJDK vs Oracle JDK
Before we go on seeing the process to install Java, let’s quickly understand the difference between JRE, OpenJDK and Oracle JDK.
- JRE (Java Runtime Environment) is what you would need normally to run a Java-based application on Ubuntu. This is all you need if you are not a programmer.
- JDK (Java Development Kit) is what you need to if you have to do some programming or develop software related to Java.
- OpenJDK is Open Source implementation of Java Development Kit while Oracle JDK is the official Oracle version of Java Development Kit. While OpenJDK is sufficient for most of the cases, some programs such Android Studio suggests using Oracle JDK to avoid UI/performance issue.
Now that you know the difference between JRE, JDK, OpenJDK and Oracle JDK, you should make a decision to install one of these packages.
Once you do that, it’s time to see how to install these packages and get Java on your Ubuntu Linux.
Check if Java is already installed in Ubuntu
Before you see how to install Java, you should verify if Java is already installed. This is also helpful in knowing which version of Java is installed on your system.
Open a terminal and use the following command:
If you have Java installed, you should see an output like this:
As you can see in the above output, the system has Java 10 installed via OpenJDK.
If you don’t have Java installed on your system, you’ll see an output like this:
Basically Ubuntu is giving you hint about the various packages you can install to get Java.
Install Java in Ubuntu and Linux Mint

Once we have see the difference between various types of ‘Java’, let’s see how to install them.
Install JRE in Ubuntu and Linux Mint (for running Jar applications)
JRE is required for running Jar files on Ubuntu. Jar files are basically precompiled Java files. As an end user, you just want to use Java application and for that, you’ll need JRE.
Open terminal and use the following command to install JRE:
This will install the latest JRE available from Ubuntu. But if you want to install a specific version, you can use openjdk-8-jre, openjdk-7-jre/openjdk-6-jre instead of default-jre in the above command.
Install OpenJDK in Ubuntu and Linux Mint (for compiling and running Java programs)
As mentioned previously, if you want to compile and run Java programs on Ubuntu, you need the JDK. It contains the Java Compiler (javac) package.
In a terminal, use the following command to install OpenJDK Java Development Kit:
If you are specifically looking to install Java 8, Java 7 or Java 6 etc, you can use openjdk -8- jdk , openjdk -7- jdk / openjdk -6- jdk .
Install Oracle JDK in Ubuntu and Linux Mint
Use the following commands to install Oracle JDK in Ubuntu and Linux Mint. Just a heads up, it will download plenty of files. So make sure you have good internet speed:
If you want to install Java 11 and set it as default, use the following command:
If you want to use this recently installed Oracle Java 11 as the default Java version on your system, use the following command:
It will change the default Java version to Oracle Java 11, setting it in the JAVA_HOME variable and PATH variables.
Similarly, if you want to install Java 16 and set it as default, use the following command:
Now that you learned to install Java on Ubuntu, you may want to improve your Java skills. I suggest trying the interactive Java Tutorial by CodeGym. It’s a fun and engaging way to learn Java.
Any questions or suggestions are always welcomed.
Like what you read? Please share it with others.
Источник


