- How to Load and Unload Kernel Modules in Linux
- List All Loaded Kernel Modules in Linux
- How to Load and Unload (Remove) Kernel Modules in Linux
- How to Manage Kernel Modules Using modprobe Command
- If You Appreciate What We Do Here On TecMint, You Should Consider:
- Linux: Find out what kernel drivers (modules) are loaded
- lsmod command
- Get more information about the driver
- Howto: Display List of Modules or Device Drivers In the Linux Kernel
- Task: List or display loaded modules
- Finding more info about any module or driver
- Ethical hacking and penetration testing
- InfoSec, IT, Kali Linux, BlackArch
- Linux kernel modules
- Table of contents
- What are kernel modules
- Getting information about modules
- Automatic module loading using systemd
- Manual processing of modules (enable and disable modules and drivers)
- How to use the driver without installing it
- Modules blacklisting
- How to block all network interfaces on a computer
- How to reliably turn off the webcam
- Setting module options
- Aliases
- Kernel modules troubleshooting
- Modules do not load
- modprobe: ERROR: could not insert ‘…’: Unknown symbol in module, or unknown parameter (see dmesg)
- modprobe: FATAL: Module … not found in directory /lib/modules/…
How to Load and Unload Kernel Modules in Linux
A kernel module is a program which can loaded into or unloaded from the kernel upon demand, without necessarily recompiling it (the kernel) or rebooting the system, and is intended to enhance the functionality of the kernel.
In general software terms, modules are more or less like plugins to a software such as WordPress. Plugins provide means to extend software functionality, without them, developers would have to build a single massive software with all functionalities integrated in a package. If new functionalities are needed, they would have to be added in new versions of a software.
Likewise without modules, the kernel would have to be built with all functionalities integrated directly into the kernel image. This would mean having bigger kernels, and system administrators would need to recompile the kernel every time a new functionality is needed.
A simple example of a module is a device driver – which enables the kernel to access a hardware component/device connected to the system.
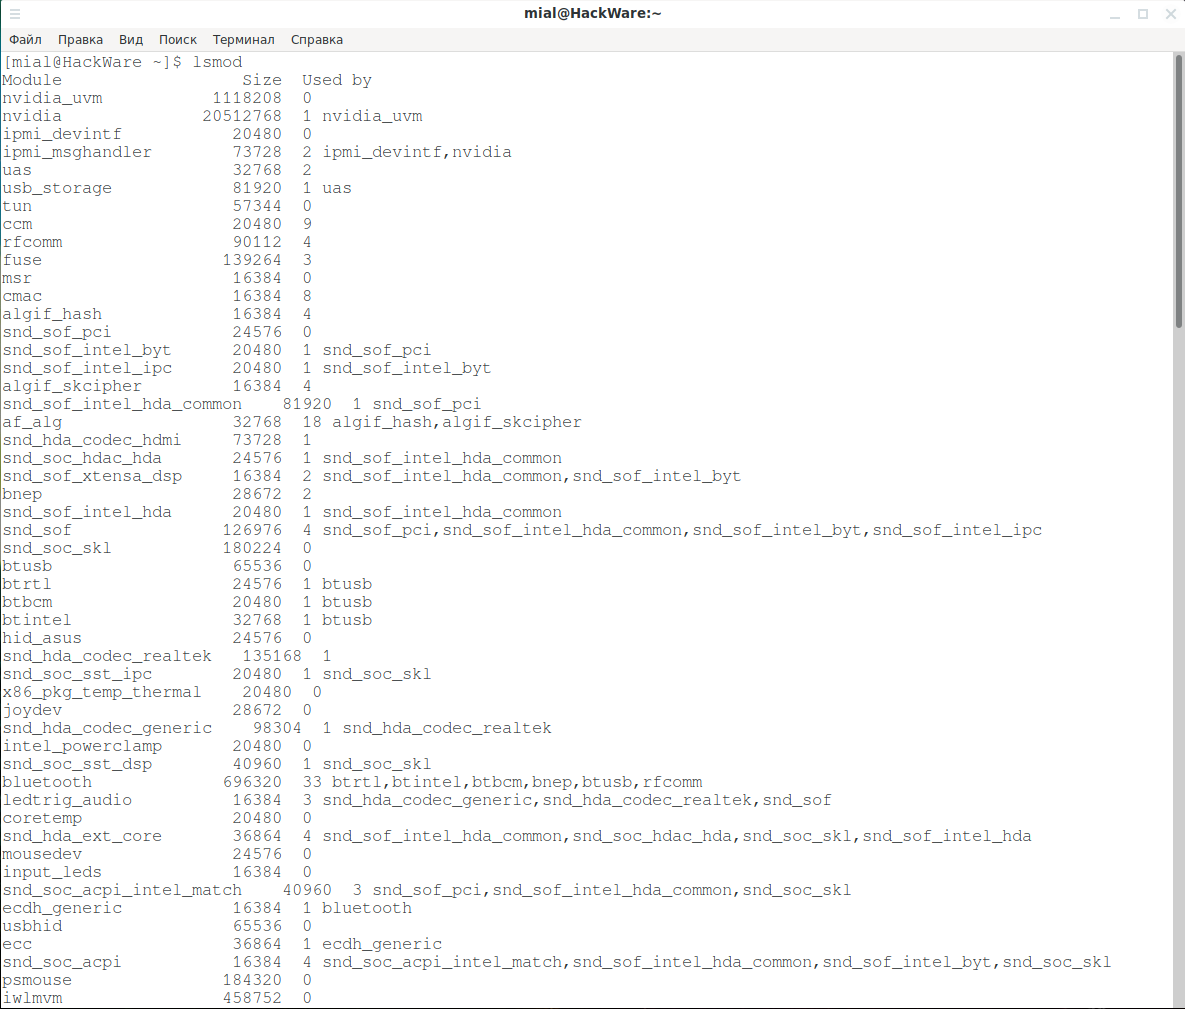
List All Loaded Kernel Modules in Linux
In Linux, all modules end with the .ko extension, and they are normally loaded automatically as the hardware is detected at system boot. However a system administrator can manage the modules using certain commands.
To list all currently loaded modules in Linux, we can use the lsmod (list modules) command which reads the contents of /proc/modules like this.
How to Load and Unload (Remove) Kernel Modules in Linux
To load a kernel module, we can use the insmod (insert module) command. Here, we have to specify the full path of the module. The command below will insert the speedstep-lib.ko module.
To unload a kernel module, we use the rmmod (remove module) command. The following example will unload or remove the speedstep-lib.ko module.
How to Manage Kernel Modules Using modprobe Command
modprobe is an intelligent command for listing, inserting as well as removing modules from the kernel. It searches in the module directory /lib/modules/$(uname -r) for all the modules and related files, but excludes alternative configuration files in the /etc/modprobe.d directory.
Here, you don’t need the absolute path of a module; this is the advantage of using modprobe over the previous commands.
To insert a module, simply provide its name as follows.
To remove a module, use the -r flag like this.
Note: Under modprobe, automatic underscore conversion is performed, so there is no difference between _ and – while entering module names.
For more usage info and options, read through the modprobe man page.
Do not forget to check out:
That’s all for now! Do you have any useful ideas, that you wanted us to add to this guide or queries, use the feedback form below to drop them to us.
If You Appreciate What We Do Here On TecMint, You Should Consider:
TecMint is the fastest growing and most trusted community site for any kind of Linux Articles, Guides and Books on the web. Millions of people visit TecMint! to search or browse the thousands of published articles available FREELY to all.
If you like what you are reading, please consider buying us a coffee ( or 2 ) as a token of appreciation.

We are thankful for your never ending support.
Источник
Linux: Find out what kernel drivers (modules) are loaded

lsmod command
You need to use lsmod command to show the status of modules in the Linux Kernel. Simply type the lsmod at a shell prompt to list all loaded modules:
$ lsmod
Sample outputs:
Get more information about the driver
To get more information about specific driver use modinfo command. The syntax is:
modinfo < driver-name >
To see information about a Linux Kernel module called e1000, enter:
$ modinfo e1000
Sample outputs:
- No ads and tracking
- In-depth guides for developers and sysadmins at Opensourceflare✨
- Join my Patreon to support independent content creators and start reading latest guides:
- How to set up Redis sentinel cluster on Ubuntu or Debian Linux
- How To Set Up SSH Keys With YubiKey as two-factor authentication (U2F/FIDO2)
- How to set up Mariadb Galera cluster on Ubuntu or Debian Linux
- A podman tutorial for beginners – part I (run Linux containers without Docker and in daemonless mode)
- How to protect Linux against rogue USB devices using USBGuard
Join Patreon ➔
See modinfo and lsmod man pages for more info.
🐧 Get the latest tutorials on Linux, Open Source & DevOps via
Источник
Howto: Display List of Modules or Device Drivers In the Linux Kernel
H ow do I display the list of loaded Linux Kernel modules or device drivers on Linux operating systems?
You need to use lsmod program which show the status of loaded modules in the Linux Kernel. Linux kernel use a term modules for all hardware device drivers.
| Tutorial details | |
|---|---|
| Difficulty level | Easy |
| Root privileges | Yes |
| Requirements | lsmod |
| Est. reading time | Less than a one minute |
Please note hat lsmod is a trivial program which nicely formats the contents of the /proc/modules , showing what kernel modules are currently loaded.
This is an important task. With lsmod you can verify that device driver is loaded for particular hardware. Any hardware device will only work if device driver is loaded.

Task: List or display loaded modules
Open a terminal or login over the ssh session and type the following command
$ less /proc/modules
Sample outputs:
To see nicely formatted output, type:
$ lsmod
Sample outputs:
First column is Module name and second column is the size of the modules i..e the output format is module name, size, use count, list of referring modules.
- No ads and tracking
- In-depth guides for developers and sysadmins at Opensourceflare✨
- Join my Patreon to support independent content creators and start reading latest guides:
- How to set up Redis sentinel cluster on Ubuntu or Debian Linux
- How To Set Up SSH Keys With YubiKey as two-factor authentication (U2F/FIDO2)
- How to set up Mariadb Galera cluster on Ubuntu or Debian Linux
- A podman tutorial for beginners – part I (run Linux containers without Docker and in daemonless mode)
- How to protect Linux against rogue USB devices using USBGuard
Join Patreon ➔
Finding more info about any module or driver
Type the following command:
# modinfo driver-Name-Here
# modinfo thermal_sys
# modinfo e1000e
Sample outputs:
Источник
Ethical hacking and penetration testing
InfoSec, IT, Kali Linux, BlackArch
Linux kernel modules
Table of contents
What are kernel modules
Kernel modules are pieces of code that can be loaded and unloaded into the kernel on demand. They extend the functionality of the kernel without having to reboot the system. The module can be configured as built-in to the kernel or loaded while the operating system is running.
Examples of kernel modules are drivers for various devices.
In this article you will learn:
- how to find out which kernel modules are running (loaded)
- how to find out which driver is used for the specified device and how to get information about this driver
- how to reliably disable devices (for example, network cards, webcams and others) so that they cannot be turned on and used
- how to try a new driver without installing it in the system
Getting information about modules
Modules are stored in the /usr/lib/modules/KERNEL_RELEASE directory. The current folder with modules can be found with the command:
Module names often contain underscores (_) or hyphens (—); these symbols are interchangeable in the modprobe commands and in the configuration files in the /etc/modprobe.d/ directory.
The lsmod command shows the drivers and other modules that are currently loaded. To see which modules are currently loaded, type:
In fact, this is one and the same. Information is read from /proc/modules and these commands only display it in a more understandable way.
To display information about the module, use the modinfo command:
If you get an error:
Then run modinfo with sudo.
For example, to find out information about the iwlwifi module:
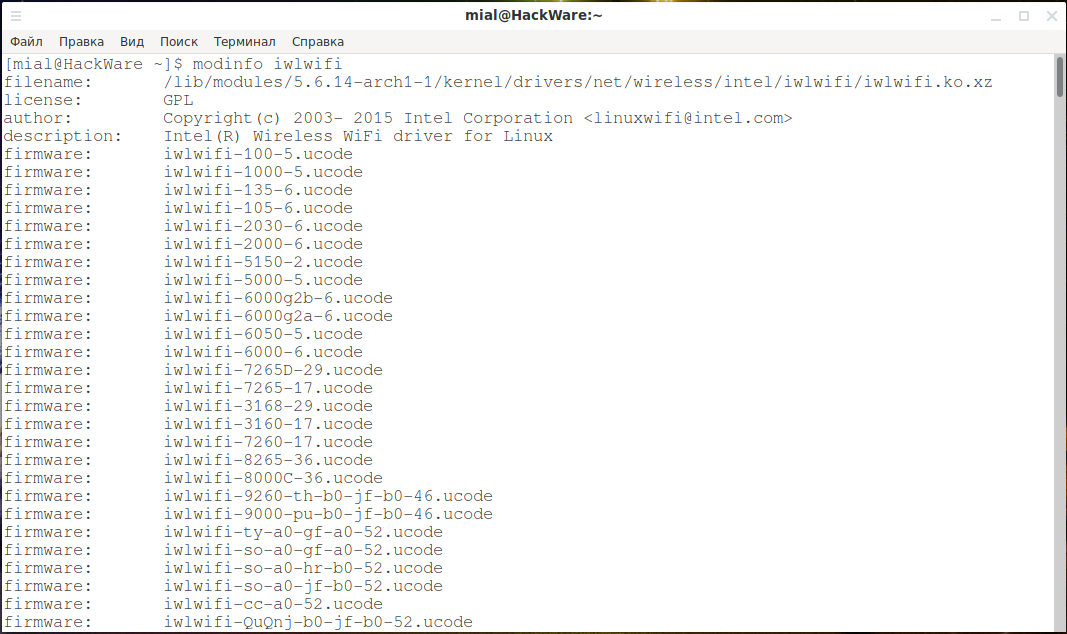
How to understand modinfo output
modinfo output is extensive and contains a lot of information.
The “filename” line shows the full path to the module file.
The line “author” contains information about the creator of the module, for example, “Copyright (c) 2003-2015 Intel Corporation
”
In the “description” line is a description of the module, for example, “Intel (R) Wireless WiFi driver for Linux”.
Let’s consider how to interpret strings
- firmware
- alias
- intree
- vermagic
on the example of the i915 module
firmware:
Many devices require two things to work properly: a driver and firmware. The driver requests firmware from the file system in /lib/firmware. This is a special file necessary for hardware, it is not a binary file. Then the diver uploads the firmware to the device. The firmware performs programming of the equipment inside the device.
alias:
This entry can be divided into parts by colons (:)
- pci: device type, pci or usb
- v00008086: v denotes the identifier of the supplier, it identifies the vendor of the equipment. This list is maintained by the PCI Special Interest Group. The number 0x8086 means “Intel Corporation”.
- d00005A84: d is the device identifier selected by the vendor. This identifier is usually connected to the vendor identifier to create a unique 32-bit identifier for the hardware device. There is no official list.
- sv*, sd*: subsystem provider version and subsystem device version for further device identification (* indicates that it will correspond to anything)
- bc03: base class. It determines what kind of device it is; IDE interface, Ethernet controller, USB controller, … bc03 means display controller. You can notice them from the output of lspci because lspci maps the number and class of the device.
- sc*: subclass of the base class.
- i*: interface
intree:
All kernel modules begin their development as outside the tree. Once a module is accepted for inclusion, it becomes a module inside the tree. Modules without this flag (set to N) can ruin the kernel.
vermagic:
When the module loads, the vermagic string is checked for compliance with the current kernel version. If they do not match, you will receive an error and the kernel will refuse to load the module. You can overcome this by using the —force flag in modprobe. Naturally, these checks exist for your protection, so using this option is dangerous.
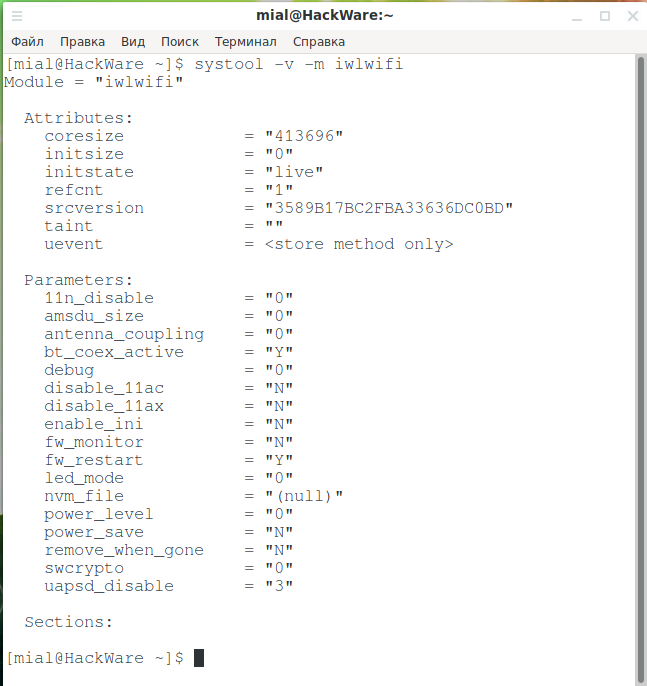
To display a list of options installed for a loaded module:
If you get an error:
Then install the sysfsutils package.
Example output for the iwlwifi module:
To display the full configuration of all modules:
To display the configuration of a specific module:
To list the dependencies of a module (or an alias), including the module itself:
Automatic module loading using systemd
Today, loading all the necessary modules is performed by udev automatically, so there is no need to put the modules in any configuration file. However, in some cases, you may need to download an additional module during the boot process of the computer or add another module to the blacklist for the computer to work properly.
Kernel modules can be explicitly listed in the files in /etc/modules-load.d/ for systemd to load them when the computer is turned on. Each configuration file has a name in the style of /etc/modules-load.d/
.conf. Configuration files simply contain a list of kernel module names for loading, separated by newline characters. Empty lines and lines whose first non-whitespace character is # (hash) or ; (semicolon) are ignored.
Sample file /etc/modules-load.d/virtio-net.conf
In addition to the specified directory, configuration files from /run/modules-load.d/*.conf and /usr/lib/modules-load.d/*.conf are also read.
Note that it is usually best to rely on automatic loading of modules using PCI identifiers, USB identifiers, DMI identifiers, or similar triggers encoded in the kernel modules themselves, instead of a static configuration like this. In fact, most modern kernel modules are already prepared for automatic loading.
Manual processing of modules (enable and disable modules and drivers)
Kernel modules are handled by the tools provided by the kmod package. You can use these tools manually.
Note. If you have updated the kernel but have not yet restarted the computer, modprobe will fail with no error message and exit with code 1, since the /usr/lib/modules/$(uname -r)/ path no longer exists.
To load a module, use a command of the form:
To load a module by file name (that is, one that is not installed in /usr/lib/modules/$(uname -r)/):
To unload (turn off) the module:
Or an alternative command:
How to use the driver without installing it
Let’s look at a real-life example when starting a driver from a file can come in handy.
These drivers are designed to operate such modern Wi-Fi dongles with support for Wi-Fi AC standard as:
- Alfa AWUS1900 (chipset: Realtek RTL8814AU)
- TRENDnet TEW-809UB (chipset: Realtek RTL8814AU)
- ASUS USB-AC68 (chipset: Realtek RTL8814AU)
- Alfa AWUS036ACH (chipset: Realtek RTL8812AU)
- Alfa AWUS036AC (chipset: Realtek RTL8812AU)
- ASUS USB-AC56 (chipset: Realtek RTL8812AU)
These drivers support monitor mode and wireless injection, that is, they are suitable for wireless security audit of Wi-Fi networks on 2.4 and 5 GHz, including those with support for Wi-Fi standard AC.
In principle, Kali Linux repositories already have this driver:
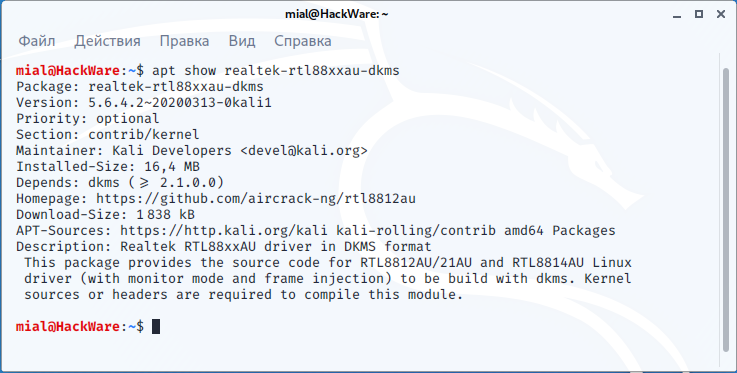
But its version is 5.6.4. But version 5.7.0 is already available. Suppose we want to try version 5.7.0 without installing it on a system.
So, delete the version from the repository (if it was installed)
Check that the module is not loaded:
And when I try to download it, an error occurs:
module not found:

Or such an error:
That is, unknown symbol in module. The essence is the same – the module was not found, but previously existed, so references to the dependency lists remained from it.
Install the dependencies necessary to compile this driver:
We clone the repository – pay attention to the use of the -b option with which the branch of interest is indicated (in this case, the name of the branch matches the version of the driver):
We compile, but do not do the installation, since we do not want to install this module:
We have two ways to load (enable) a module – using insmod or using the modprobe command. The insmod command is more convenient, because you can specify a compiled driver file, and the modprobe command handles dependencies better, so let’s consider both options.
Load a module without installing (using insmod)
To include a module from a file, use a command of the form:
The module files have the .ko extension, in our case the file name is 88XXau.ko, so the command is as follows:
Check if the module has been loaded:
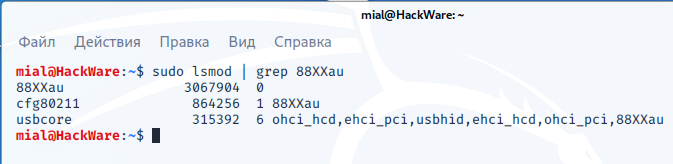
The first line shows that the 88XXau module is loaded, and the next lines show the modules that 88XXau uses (that is, which are dependencies for it).
Load a module without installing (using modprobe)
The second option is a bit more complicated to configure, but you do not need to specify the full path to the driver file to load the module.
Unload the module if it was loaded earlier:
Now we will make the system think that the module is installed, although in reality it is not. To do this, we will create a symbolic link from the .ko file to the /lib/modules/`uname -r` folder:
In our case, to do this, run the following command:
Update the list of dependencies of all modules (by the way, the -a switch in the following command can be skipped, because it is assumed by default):
Now you can use the regular modprobe command to load the module:
Check the module version:
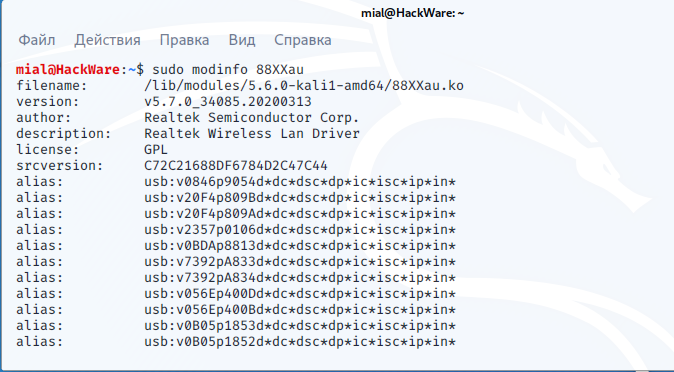
Pay attention to the lines:
Version v5.7.0 is used – this is exactly what we achieved.
The described methods for starting modules are suitable for a one-time or occasional driver launch. For permanent use, it is recommended to perform a normal installation a module, in which case it will support DKMS.
Drivers can be installed using DKMS. This is a system that automatically recompiles and installs kernel modules when installing or updating a new kernel. To use DKMS, install the dkms package.
Using DKMS, drivers from official repositories are installed. Also, using DKMS, you can install drivers from other repositories (for example, rtl8812au, which was taken as an example just above, it supports) – to do this, follow the official installation instructions from the developers, and the method for starting the driver described above is designed to testing.
Modules blacklisting
Blacklisting, in the context of kernel modules, is a mechanism that prevents the loading of a kernel module. This can be useful if, for example, related equipment is not required or if loading this module causes problems: for example, there may be two kernel modules that are trying to control the same hardware component, and loading them together will lead to a conflict.
Using Files in /etc/modprobe.d/
Create a .conf file inside /etc/modprobe.d/ and add a line for each module that you want to add to the blacklist using the blacklist keyword. For example, if you want to prevent the pcspkr module from loading, create the file /etc/modprobe.d/nobeep.conf and add the line to it:
Some modules are loaded as part of initramfs. That is, modules can be modules can be classified as:
- loaded from .ko files
- loaded as part of initramfs
To prohibit the loading of modules of the first type (loaded from .ko files), it is enough to record this module in the /etc/modprobe.d/*.conf file with the blacklist directive.
For modules of the second type (loaded as part of initramfs), in addition to creating the configuration file, it is also necessary to recreate the kernel.
Note. The blacklist command will blacklist the module so that it does not load automatically. But at the same time, the module can be loaded if another module, not included in the black list, depends on it, and you can still load the module manually. However, there is a workaround for this behavior; the install command tells modprobe to run a user command instead of inserting the module into the kernel as usual, so you can force the module to never load using the construction discussed below. Suppose you created the file /etc/modprobe.d/blacklist.conf to block the loading of the module MODULE_NAME. To do this reliably, add to this file:
This will reliably block the loading of the specified module, as well as any other, depending on it.
How to recreate the kernel to block modules
If you block modules that are loaded from initramfs, then after adding them to the /etc/modprobe.d/*.conf file, you need to recreate the kernel.
On Debian, Kali Linux, Linux Mint, Ubuntu and their derivatives this is done like this:
In Arch Linux, BlackArch, and their derivatives, this is done like this:
Arch Linux command
prints all automatically detected modules: to prevent some of these initramfs from loading, blacklist them in the .conf file in /etc/modprobe.d and it will be added by the modconf hook during image generation. Launch
to list all the modules involved by various hooks (for example, filesystems hook, block hook, etc.).
Blacklisting modules at the start of Linux boot (disabling modules on the kernel command line)
This can be very useful if a faulty module makes it impossible to boot your system. You can blacklist modules in the bootloader menu. Just add
in a line with kernel boot parameters.
Examples of editing kernel boot parameters for popular distributions can be found in the article “How to reset a forgotten login password in Linux”. Also see the article “How to change Linux boot parameters in UEFI”.
Note. If you blacklist more than one module, keep in mind that they are separated only by commas. Spaces or anything else can break the syntax.
Consider practical examples where a user may need to block the loading of kernel modules.
How to block all network interfaces on a computer
Suppose it is necessary that any network activity, that is, both wired and wireless networks, is blocked on the computer. There is an rfkill command, but it is designed to block only wireless networks. Therefore, we find another way.
The algorithm of actions is as follows:
- We will determine which drivers are used by network devices.
- Blacklist these drivers
To find out which drivers are used in Linux for network cards, run the command:
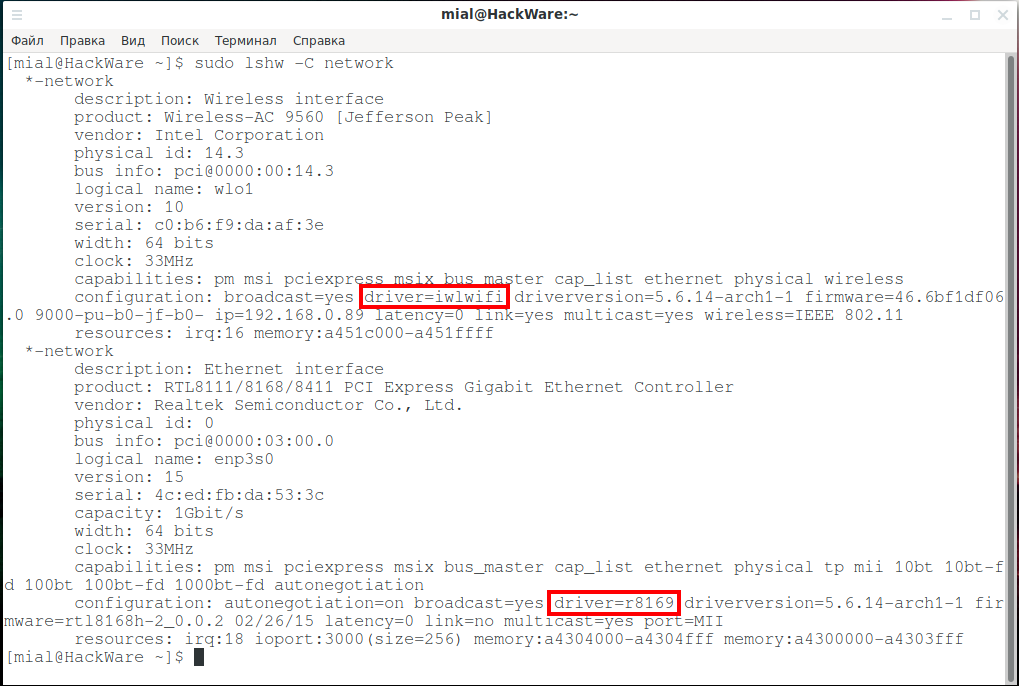
The “configuration:” lines contain information about the drivers. For a wireless card it is “driver=iwlwifi”, and for a wired network interface it is “driver=r8169”.
Create the file /etc/modprobe.d/block-network.conf and add to it:
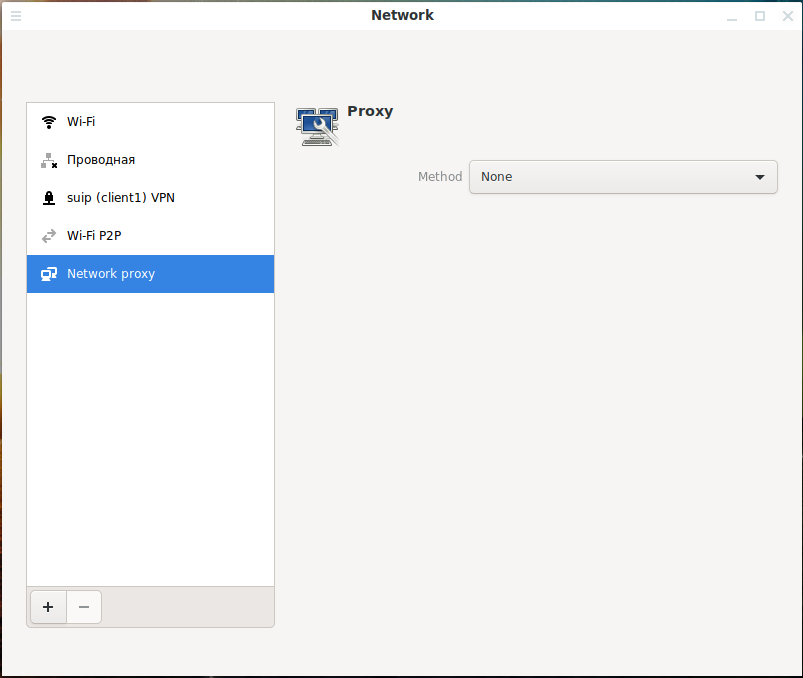
This is how the network setup looks in normal condition, the wired and wireless adapters are visible:
After reboot, it will not be possible to turn on the network, because the computer will not be able to use network interfaces without drivers:

When trying to load modules manually, for example:
These modules will not load thanks to the install command.
You cannot turn on any network until you delete the /etc/modprobe.d/block-network.conf file and reboot. However, if other network adapters are plugged, they will be used. This method will reliably protect against accidental use of the network, provided that you control the plugging of new physical devices to the computer.
How to reliably turn off the webcam
On some new laptop models, you can close the webcam with a shutter – in case you are afraid that a hacker might hack your computer and use the webcam of your laptop to look at you.
Now we will learn how to disable the webcam driver so that it cannot be used.
Even if you have a laptop, most likely the web camera is connected inside the case to a USB hub, that is, it is a USB device. To list USB devices in the system, use the command:
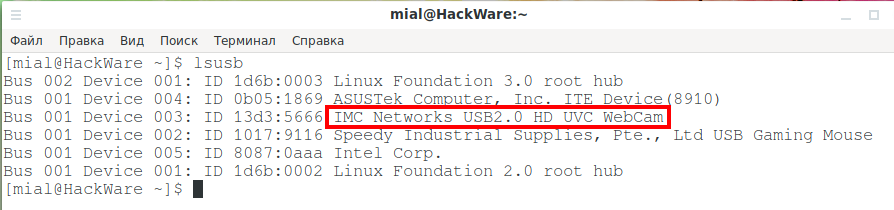
Pay attention to IMC Networks USB2.0 HD UVC WebCam in the list above – this is the laptop’s webcam.
To determine the drivers that are needed for any USB or PCI device to work on your system, use the following commands:
We use the command:
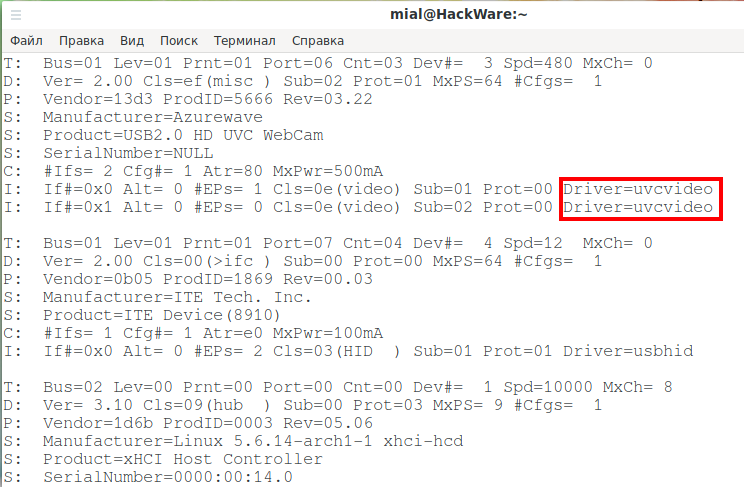
We see that the uvcvideo driver is used for the USB2.0 HD UVC WebCam device.
We create the file /etc/modprobe.d/block-webcam.conf and block the launch of the uvcvideo kernel module in it:
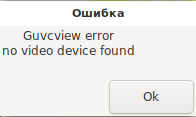
After rebooting, the system will not be able to use the webcam until the block-webcam.conf file is deleted and the system is rebooted.
Setting module options
To pass an option to the kernel module, you can pass them manually using modprobe or make sure that certain parameters are always applied using the modprobe configuration file or using the kernel command line.
Manually at boot time using modprobe
The main way to pass parameters to a module is to use the modprobe command. Parameters are specified on the command line using simple key=value assignments:
Using files in /etc/modprobe.d/
Files in the /etc/modprobe.d/ directory can be used to transfer module settings to udev, which will use modprobe to control module loading during system boot. The configuration files in this directory can have any name if they end with the .conf extension, for example /etc/modprobe.d/myfilename.conf. Syntax:
For example, the contents of the file /etc/modprobe.d/thinkfan.conf:
Adding module options during system boot (using the kernel command line)
If the module is built into the kernel, you can also pass options to the module using the kernel command line. For all common bootloaders, the correct syntax is:
Aliases
Aliases are alternative names for the module. For instance:
means you can use
You can also use shell-style wildcards, so
has the same effect.
To create an alias in the configuration file /etc/modprobe.d/myalias.conf:
Some modules have aliases that are used to automatically load them when the application needs them. Disabling these aliases can prevent automatic loading, but it still allows you to load modules manually.
Sample file /etc/modprobe.d/modprobe.conf
Kernel modules troubleshooting
Modules do not load
If a certain module does not load, and in the boot log
it says that the module is in the blacklist, but there is no corresponding entry in the /etc/modprobe.d/ directory, check another modprobe folder for the presence of the blacklist entry: /usr/lib/modprobe.d/.
A module will not be loaded if the «vermagic» string contained within the kernel module does not match the value of the currently running kernel. If it is known that the module is compatible with the current running kernel the «vermagic» check can be ignored with modprobe —force-vermagic.
Warning. Ignoring version checks for a kernel module can lead to a kernel crash or unpredictable system behavior due to incompatibility. Use —force-vermagic with extreme caution.
modprobe: ERROR: could not insert ‘…’: Unknown symbol in module, or unknown parameter (see dmesg)
The error is caused by the fact that the module was previously present in the system and an entry in the list of dependencies was left about it, but at the time of the error the module was missing (removed).
To update the list of dependencies, run the command:
Another possible reason for the error is that the dependency required for the module has not been loaded. For example, for Wi-Fi adapters, the required dependency is cfg80211, to load this module, run the command:
modprobe: FATAL: Module … not found in directory /lib/modules/…
Means that the module you are trying to run does not exist.
- typo in the module name
- the package containing the specified module is not installed or removed
If previously the module (driver) was launched, but then the indicated error appeared, then it may be due to the fact that the kernel was updated, and the module for the new version of the kernel was not compiled.
Источник


