- Shred и безвозвратное удаление файлов
- Securely wipe disk
- Contents
- Common use cases
- Wipe all data left on the device
- Preparations for block device encryption
- Data remanence
- Operating system, programs and filesystem
- Hardware-specific issues
- Flash memory
- Marked Bad Sectors
- Residual magnetism
- Select a target
- Select a data source
- Zeros
- Random data
- Select a block size
- Calculate blocks to wipe manually
- Overwrite the target
- By redirecting output
- shred
- Badblocks
- hdparm
- How to Wipe Free Disk Space in Linux
- An easy-to-follow and instructive tutorial with step-by-step instructions
Shred и безвозвратное удаление файлов
В этой статье я расскажу, каким образом можно раз и навсегда удалить файлы с жёсткого диска в ОС Ubuntu. Итак, знакомьтесь — команда shred.
Не все знают, что удаляя файл посредством rm или через файловый менеджер, сам файл не удаляется, а затирается лишь его индекс и пространство, которое занимал файл, записывается системой как свободное для записи. Файл, как вы уже поняли, так и остался на своём месте и восстановить его оттуда не составит большого труда. Он пролежит там до тех пор, пока на его место вы не запишите другую информацию.
Shred случайными числами заполняет место, занятое файлом. И уже, даже восстановив ваш удалённый файл, его будет невозможно прочитать. По умолчанию shred не удаляет файл, для этого используется параметр —remove (-u).
shred -u /path/to/file
В shred заложен 25-тикратный цикл, то есть программа перезапишет файл случайным содержимым 25 раз. Чтобы изменить это значение, например на 35-тикратный:
shred -u -n 35 /path/to/file
Если ваша паранойя достигла ещё бОльшего уровня, то вам подойдут следующие советы.
Чтобы спрятать информацию о том, что вы зачищали файл, используйте параметр -z, добавляющий нули в конец файла — это сделает файл непохожим на зашифрованный. Если вам интересно наблюдать за процессом перезаписи, параметр -v (verbose) служит для подробного вывода информации прогресса.
shred -u -z /path/to/file
Если хотите удалить сразу несколько файлов, то укажите их в таком формате:
shred -u -z -n 30 /path/to/file1 /path/to/file2 /path/to/file3
или же можно использовать маску:
shred -u -z -n *.txt
Shred также может удалить содержимое всего жёсткого диска командой
shred /dev/sda
Естественно, время выполнения операций напрямую зависит от размера файла и скорости записи.
Единственным минусом я обнаружил то, что shred не умеет удалять каталоги. В этом нам на помощь приходит утилита wipe:
wipe -rf /path/to/catalog
Для более подробной информации используйте man shred и man wipe.
Если вы уже удалили файлы, и не хотите восстанавливать их и потом «правильно» удалять, ввиду их большого размера, то остаётся одно — перезаписать другой информацией. Информацией, ничего в себе не несущей. В этом вам придёт на помощь утилита dd
dd if=/dev/zero of=/path/to/file.trash bs=1M count=1024
где значением count является нужный вам размер файла. 1024 = 1Гб, 2048 = 2Гб и т.д.
После создания файла, удалите его уже посредством shred’а.
Источник
Securely wipe disk
Wiping a disk is done by writing new data over every single bit.
Contents
Common use cases
Wipe all data left on the device
The most common usecase for completely and irrevocably wiping a device is when the device is going to be given away or sold. There may be (unencrypted) data left on the device and you want to protect against simple forensic investigation that is mere child’s play with for example File recovery software.
If you want to quickly wipe everything from the disk, /dev/zero or simple patterns allow maximum performance while adequate randomness can be advantageous in some cases that should be covered up in #Data remanence.
Every overwritten bit means to provide a level of data erasure not allowing recovery with normal system functions (like standard ATA/SCSI commands) and hardware interfaces. Any file recovery software mentioned above then would need to be specialized on proprietary storage-hardware features.
In case of a HDD, data recreation will not be possible without at least undocumented drive commands or tinkering with the device’s controller or firmware to make them read out for example reallocated sectors (bad blocks that S.M.A.R.T. retired from use).
There are different wiping issues with different physical storage technologies. Most notably, all Flash memory based devices and older magnetic storage (old HDDs, floppy disks, tape).
Preparations for block device encryption
To prepare a drive for block device encryption inside the wiped area afterwards, it is recommended to use #Random data generated by a cryptographically strong random number generator (referred to as RNG in this article from now on).
Data remanence
See also Wikipedia:Data remanence. The representation of data may remain even after attempts have been made to remove or erase the data.
Operating system, programs and filesystem
The operating system, executed programs or journaling file systems may copy your unencrypted data throughout the block device. When writing to plain disks, this should only be relevant in conjunction with one of the above.
If the data can be exactly located on the disk and was never copied anywhere else, wiping with random data can be thoroughgoing and impressively quick as long there is enough entropy in the pool.
A good example is cryptsetup using /dev/urandom for wiping the LUKS keyslots.
Hardware-specific issues
Flash memory
Write amplification and other characteristics make Flash memory, including SSDs, a stubborn target for reliable wiping. As there is a lot of transparent abstraction in between data as seen by a device’s controller chip and the operating system, sight data is never overwritten in place and wiping particular blocks or files is not reliable.
Other «features» like transparent compression (all SandForce SSDs) can compress your zeros or repetitive patterns, so if wiping is fast beyond belief this might be the cause.
Disassembling Flash memory devices, unsoldering the chips and analyzing data content without the controller in between is feasible without difficulty using simple hardware. Data recovery companies do it for cheap money.
For more information see:
Marked Bad Sectors
If a hard drive marks a sector as bad, it cordons it off, and the section becomes impossible to write to via software. Thus a full overwrite would not reach it. However because of block sizes, these sections would only amount to a few theoretically recoverable KiB.
Residual magnetism
A single, full overwrite with zeros or random data does not lead to any recoverable data on a modern high-density storage device. Note that repeating the operation should not be necessary nowadays. [1] Indications otherwise refer to single residual bits; reconstruction of byte patterns is generally not feasible.[2] See also [3], [4] and [5].
Select a target
Use fdisk to locate all read/write devices the user has read access to.
Check the output for lines that start with devices such as /dev/sd»X» .
This is an example for a HDD formatted to boot a linux system:
Or another example with the Arch Linux image written to a 4GB USB thumb drive:
If you are worried about unintentional damage of important data on the primary computer, consider using an isolated environment such as a virtual environment (VirtualBox, VMWare, QEMU, etc. ) with direct connected disk drives to it or a single computer only with a storage disk(s) that need to be wiped booted from a Live Media (USB, CD, PXE, etc. ) or use a script to prevent wiping mounted partitions by typo.
Select a data source
To wipe sensitive data, one can use any data pattern matching the needs.
Zeros
Overwriting with /dev/zero or simple patterns is considered secure in most situations. With today’s HDDs, it is deemed appropriate and fast for disk wiping.
However, a drive that is abnormally fast in writing patterns or zeroing could be doing transparent compression. It is obviously presumable not all blocks get wiped this way. Some #Flash memory devices do «feature» that.
To setup block device encryption afterwards, one should wipe the area with random data (see next section) to avoid weakening the encryption.
Random data
True random data source using /dev/random is impractical for wiping large capacities as it will take too long to wait for the entropy generation. /dev/urandom can be used as a reasonable source of pseudorandom data. For differences between random and pseudorandom data as source, please see Random number generation.
Another alternative for pseudorandom data generation is to use an encrypted datastream. For example, if one wants to prepare a device for block encryption and will use AES for the encrypted partition, it is appropriate to wipe it with a similar cipher prior to creating the filesystem to make the empty space not distinguishable from the used space.
Select a block size
If you have an Advanced Format hard drive it is recommended that you specify a block size larger than the default 512 bytes. To speed up the overwriting process choose a block size matching your drive’s physical geometry by appending the block size option to the dd command (i.e. bs=4096 for 4 KiB).
fdisk prints physical and logical sector size for every disk. Alternatively sysfs does expose information:
Calculate blocks to wipe manually
A block storage devices contains sectors and a size of a single sector that can be used to calculate the whole size of device in bytes. You can do it by multiplying sectors with size of the sector.
As an example we use the parameters with the dd command to wipe a partition:
Here, to illustrate with a practical example, we will show the output of the fdisk command on the partition /dev/sdX :
- The first line of the fdisk output shows the disk size in bytes and in logical sectors.
- The size in bytes of the storage device or of the partition can also be obtained with the command blockdev —getsize64 /dev/sdXY .
- The Units line of the fdisk output shows the size of single logical sector; the logical sector size can also be derived from the number of bytes divided by the number of logical sectors, here use: echo $((2000398934016 / 3907029168)) .
- To know the physical sector size in bytes (that will make it work faster), we can use the next line.
- To get the disk size in physical sectors, one can divide the disk size in bytes by the size of a single physical sector, here echo $((2000398934016 / 4096)) ,
To wipe partition /dev/sdX1 , the example parameters with logical sectors would be used like follows.
- By using the starting address of the partition on the device using the seek= parameter:
with Start=2048 , End=3839711231 and BytesInSector=512 .
- Or by using the partitions size in logical sectors:
Or, to wipe the whole disk by using physical sectors:
with AllDiskPhysicalSectors=488378646 and PhysicalSectorSizeBytes=4096 .
Overwrite the target
You can choose from several utilities to overwrite a drive. If you only want to wipe a single file, Securely wipe disk/Tips and tricks#Wipe a single file has considerations in addition to the utilities mentioned below.
By redirecting output
The redirected output can be used to create files, rewrite free space on the partition, and to wipe the whole device or a single partition on it.
The following examples show how to rewrite the partition or a block device by redirecting stdout from other utilities:
The file copy command cp can also be used to rewrite the device, because it ignores the type of the destination:
To show speed and time you can use pv :
Zero-fill the disk by writing a zero byte to every addressable location on the disk using the /dev/zero stream.
The process is finished when dd reports No space left on device and returns control back:
To speed up wiping a large drive, see also:
A program specialized on wiping files. It is available as part of the wipe package. To make a quick wipe of a destination, you can use something like:
See also wipe(1) . The tool was last updated in 2009. Its SourceForge page suggests that it is currently unmaintained.
shred
shred (from the coreutils package) is a Unix command that can be used to securely delete individual files or full devices so that they can be recovered only with great difficulty with specialised hardware, if at all. By default shred uses three passes, writing pseudo-random data to the device during each pass. This can be reduced or increased.
The following command invokes shred with its default settings and displays the progress.
Shred can also be used on a single partition, e.g. to wipe the first partition use shred -v /dev/sdX1 .
Alternatively, shred can be instructed to do only one pass, with entropy from e.g. /dev/urandom .
Badblocks
The tool badblocks from e2fsprogs is able to perform destructive read-write test, effectively wiping the device. By default, it performs four passes and can take very long.
hdparm
hdparm supports ATA Secure Erase, which is functionally equivalent to zero-filling a disk. It is however handled by the hard drive firmware itself, and includes «hidden data areas». As such, it can be seen as a modern-day «low-level format» command. SSD drives reportedly achieve factory performance after issuing this command, but may not be sufficiently wiped (see #Flash memory).
Some drives support Enhanced Secure Erase, which uses distinct patterns defined by the manufacturer. If the output of hdparm -I for the device indicates a manifold time advantage for the Enhanced erasure, the device probably has a hardware encryption feature and the wipe will be performed to the encryption keys only.
For detailed instructions on using ATA Secure Erase, see Solid state drive/Memory cell clearing and the Linux ATA wiki.
Источник
How to Wipe Free Disk Space in Linux
An easy-to-follow and instructive tutorial with step-by-step instructions
The following tutorial will teach all Linux users how to securely wipe the free space of a hard disk drive (HDD), solid disk drive (SSD) or USB flash drive, making it impossible for anyone to recover deleted files.
In case you didn’t know, when you delete a file from your system, even from Trash, it will disappear and can’t be found anywhere on the filesystem. However, that file is not actually gone, it resides in the free space of your disk drive and can still be recovered with data recovery applications.
For this tutorial we will provide two methods. The first one uses an application called Wipe Free Space, created by Polish developer Bogdan Drozdowski. In the second method we will use the well known BleachBit software.
While BleachBit is a graphical application, the Wipe Free Space is a command-line software. However, the developer also created an easy-to-use graphical user interface (GUI), allowing novice users to employ it in order to securely wipe the free space of their disk drives.
Editor’s note: Before we proceed, it is important to know that the applications will wipe the free space in unused clusters and blocks, in partially used blocks a.k.a. “slack space,» as well as the names of deleted files and any other data that can be used to undelete the respective files.
Method 1 — Wipe Free Space & Wipe Free Space GUI
The Wipe Free Space command-line application can be easily installed from the default software repositories of your Linux distribution, by using the provided binary file for RPM-based Linux distribution or by compiling the sources.
After installation, you can download the GUI front-end from here, save it on your home folder, extract it, and double click the run.sh file (or execute sh run.sh in a terminal window) to open the application.
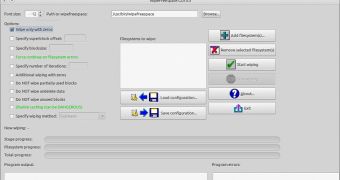
With the application opened, you will need to add the path to the wipefreespace executable, so click the «Browse» button and search it under /usr/bin/. Then add the filesystem that will be wiped.
Make sure that you check the «Wipe only with zeros» option on the left side of the window. If you need to add more options, first document yourself on how to use them, because they may crash your drive. Now press the «Start wiping» button to proceed.
Method 2 — BleachBit
This is the easy method, recommended for novice users. You can easily install the BleachBit application from your Linux distribution’s default software repositories. Open it, and make sure that you check the «Free disk space» option under the System section on the sidebar. Press the «Clean» button to proceed.
Источник


