- How to Install Kali Linux with VMware Fusion? [Step by Step Guide]
- Installation Requirements
- Download Kali Linux ISO File
- Installing Kali Linux
- How to Install Ubuntu 11.10 Using VMware Fusion
- Final Thoughts
- Related Articles
- Subscribe to our email newsletter
- Sharing a network between your VMware Fusion Linux guest and your Mac OS X host
- The Problem
- The Solution
- Step 1: Add an additional network adapter
- Step 2: Configure the new NIC
- Step 3: Configure DHCP to assign your new NIC a static IP
- Step 4: Boot the VM and verify configuration
- Step 5: Simplify access with dnsmasq (or /etc/hosts)
- Step 6: Get a beer and admire your handiwork
- Miscellaneous Thoughts
- Endnotes
How to Install Kali Linux with VMware Fusion? [Step by Step Guide]
![]()
Geekflare is supported by our audience. We may earn affiliate commissions from buying links on this site.
Kali Linux comes with more than 600 preinstalled penetration/security tools.
Having these preinstalled makes Kali Linux a true penetration testing platform for the security engineer.
Tools are categorized as follows:-
- Information Gathering
- Sniffing & Spoofing
- Vulnerability Analysis
- Exploitation Tools
- Password Attacks
- Wireless Attacks
- Forensic Tools
- Maintaining Access
- Hardware Hacking
- Web Applications
- Stress Testing
- Reverse Engineering
- Reporting Tools
To see a complete list of tools – click here
In this article, I will explain how to install Kali Linux on VMWare Fusion.
Installation Requirements
- Disk Space – Minimum 10 GB
- Architecture – i386 or adm64
- RAM – Minimum 512 MB
Download Kali Linux ISO File
Download the necessary ISO file from the official download page. For this demo, I have installed it as highlighted below.

Its more than 3 GB so based on the Internet speed, it may take a few minutes.
Installing Kali Linux
This assumes you have download kali-linux-2.0-amd64.iso and ready to install Kali Linux.
- Open VMWare Fusion on your PC (I am using MAC in this demo)
- Click on Add icon and New

- Select the installation method as “Install from disk or image” and click on Continue

- Click on “Use another disc or disc image” and locate the downloaded iso file. It will appear in the list as shown below, click on Continue

- Select Other >> Other 64-bit and click on Continue

- Here you will notice, I have hard disk capacity is 8 GB but the minimum requirement to install 10 GB so I will go to customize Settings and increase the hard disk space.

- Click on Customize Settings
- Enter the name and save it

- I will increase to 15 GB and click on Apply

- Click on the Play button to begin the installation
- You will be greeted with the following screen when I will select “Graphical Install” and press enter to proceed with the installation

- Select the language and click on Continue

- Select the location then continue

- Configure the keyboard to be used and click on continue

- Select the ethernet to be used. As I am using VMWare on MAC, I will be sharing with MAC ethernet so selected “no ethernet card” and click on Continue

- You will get a notification that “No network interface detected” but that’s fine. Click on continue

- Enter the Hostname and continue

- Enter the root password and click on Continue

- Select “Guided- user entire disk” and click on Continue

- You will get partition disk information that will data will be erased but that’s ok because there is nothing at the moment. Click on continue

- Select the partition as “all files in one partition (recommended for new users) and continue

- Confirmation before installation start writing changes to disk, click on continue

- Select “Yes” on final confirmation and click on continue

- It will take a few minutes to install the Kali Linux and during installation, you may see the following progress bar

- It will prompt you to configure the package manager but I will proceed with no to keep the installation procedure simple.

- Select Yes to install the GRUB boot loader on the hard disk and continue

- Select the disk to make it bootable and click on Continue

- And finally, you will have an “Installation Complete” message. Click on continue

- It will take few seconds will boot the Kali Linux and give you a login screen as below.

- Enter the password, which you configured during installation and you will see the first screen as shown below.

Woah! It’s a bit long, isn’t it? Well, worth it!
So this was the installation guide, and I hope it helps you to install Kali Linux on PC or macOS using VMware fusion and all of you to explore. If you are a beginner, I would recommend taking this Kali Linux tutorial.
Источник
How to Install Ubuntu 11.10 Using VMware Fusion
Everyone is talking about Ubuntu, the popular open-source operating system that’s easy to install and use. Trying out this Linux distribution on your Mac is easy. With an application called VMware Fusion, you can create a “computer within a computer” and run Ubuntu in a virtual machine on your Mac.
Here’s how to install Ubuntu 11.10 in OS X using VMware Fusion:
Download Ubuntu 11.10 from the Ubuntu website. It’s a free download. Both the 32- or 64-bit versions work, but the 32-bit version is recommended.
If you haven’t already, download the VMware Fusion application. There is a free 30-day trial available.
Open the VMware Fusion application.
From the File menu, select New. The New Virtual Machine Assistant window shown below appears.
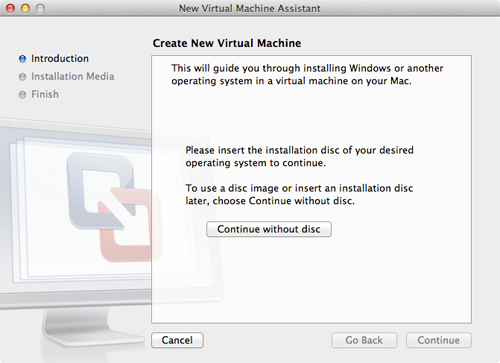
Click Continue without disc. The window shown below appears.
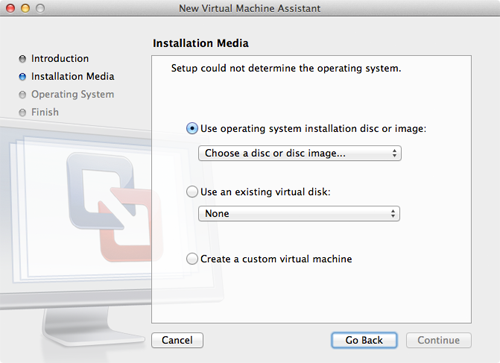
Click the Use operating system installation disc or image button, if it is not already selected.
To install Ubuntu from the .iso file you downloaded, select Choose a disc or disc image… from the menu with the same name. The selection window appears. Select the .iso file you downloaded from the Ubuntu website, and then click Open. The .iso file appears in the menu as shown below.

Click Continue. The window shown below appears.
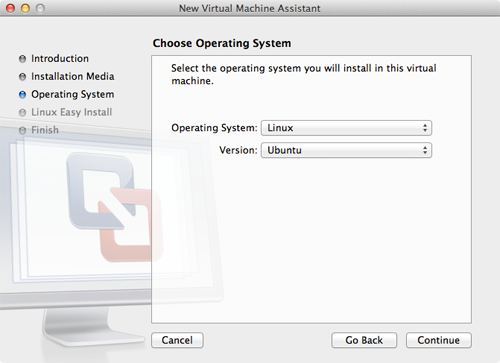
VMware Fusion analyzes the .iso file and automatically detects the operating system (Ubuntu) you are about to install. Click Continue. The window shown below appears.
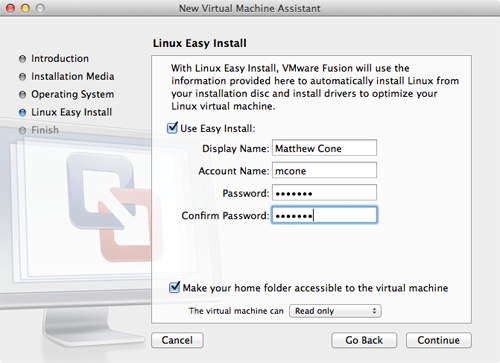
The “Easy Install” option automates part of the Ubuntu configuration during installation. Enter your name, a username, and password (6 characters or longer) and VMware Fusion will provide that information to the installer to automatically set up your account in Ubuntu.
If you’d like to be able to access the files in OS X from Ubuntu, select the the Make your home folder accessible to the virtual machine checkbox. By default, the virtual machine will only be able to read the files, not write to them. The Read only option is a security precaution designed to protect your files in OS X — the Ubuntu virtual machine will not be able to change or delete the files. On the other hand, selecting the Read & Write option allows you to save files to your home folder in OS X from Ubuntu, but it also raises the probability of accidents occurring.
Click Continue. The window shown below appears.
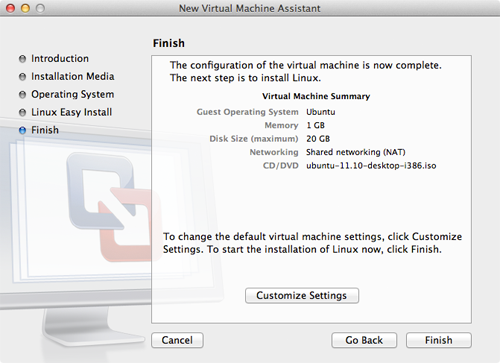
VMware Fusion displays a summary of the virtual machine you’re able to create. By default, it will allocate 1GB of RAM and a maximum of 20GB of your computer’s hard disk space to Ubuntu. (The virtual machine only uses the amount of space necessary — the base installation only consumes about 4GB of hard disk space.) You could customize these settings now, but it’s not necessary right now — you can always change them later by selecting Virtual Machine → Settings after the virtual machine has booted. Click Finish.
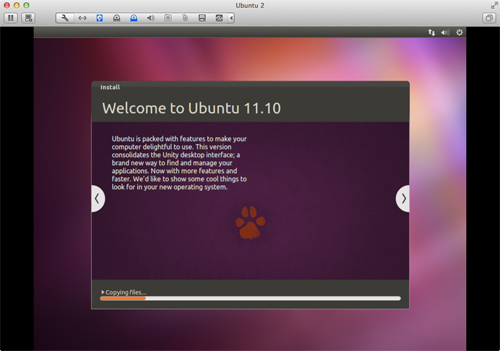
You are prompted to save the virtual machine to your hard disk. Leave the file name and location set to the default settings. Click Save. VMware creates and boots the virtual machine. Ubuntu starts installing, as shown below. Go get a cup of coffee — this can take up to half an hour.
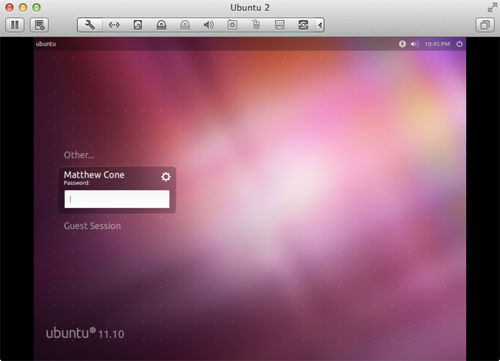
Keep an eye on the virtual machine. When Ubuntu is finished installing, you’ll see the login screen, as shown below. Enter your password and press Return. You’re logging in to Ubuntu!
Now you’re in Ubuntu. Don’t worry if it looks a little weird at first. It takes VMware Tools a couple minutes to detect your screen’s resolution and adjust Ubuntu accordingly. Once the resolution has changed, you can click the “Dash home” button in the top-left corner to play around with the new Unity user interface, as shown below.

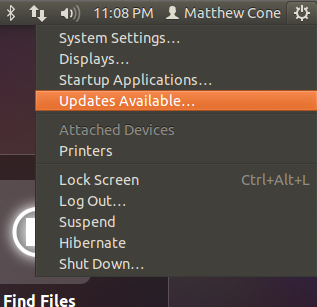
One thing you’ll want to do right away is install updates for Ubuntu and the installed applications. To do that, click the gear menu and select Updates Available, as shown below. We had over 250 updates to install!
After you install the updates and restart the virtual machine, you’re ready to rock and roll. Ubuntu is yours to discover!
Final Thoughts
What should you do next? Read the Ubuntu documentation to learn the ropes, and then check out this “Top things to do after installing Ubuntu” guide. Like any Linux distribution, Ubuntu takes a while to learn.
Related Articles
Subscribe to our email newsletter
Sign up and get Macinstruct’s tutorials delivered to your inbox. No spam, promise!
Источник
Sharing a network between your VMware Fusion Linux guest and your Mac OS X host

Instructions for adding a secondary NIC to your Linux guest, assigning it a static IP address via DHCP, and using it to communicate with your Mac.
The Problem
By default, a new VMware Fusion guest will have a single NIC configured to use Internet Sharing (e.g., “Share with my Mac”). This allows the guest to communicate with the outside world — resolve DNS records, download operating system updates, access arbitrary Internet resources — using network address translation (NAT). Through an internal DHCP service, the guest is assigned a private, RFC1918 address, which VMware translates to the host’s IP address before forwarding along to the appropriate gateway (typically, the “default gateway”, i.e., the upstream router).

While the above configuration works just fine for accessing the Internet or consuming services on the LAN, it is not ideal — or even practical — for hosting services or serving (development) websites. At CloudFlare, like many other technology companies, we host production services on Linux but develop and test on our Macs. For example, if you’re a developer working on the client dashboard, you’ll typically clone the appropriate repositories, make code changes, and then review them live in your browser before submitting pull requests. To eliminate any bugs caused by heterogenous hosting environments, you make sure your dev environment is as close to production as possible; this means using the same operating system, kernel, packages, etc. rather than trying to run something like NGINX on your Mac.
Once services are running on the Linux guest, you’ll need an easy way to communicate with them from your Mac. Ideally, they should always be found at the same IP address and hostname(s), so that you can focus on your work and not on your development environment.
The Solution
The instructions below show how to add a second NIC to your VMware Fusion[1] guest, configure it to use a static IP address, and configure your Mac to resolve all development hostnames that match a particular pattern (e.g., “.dev”) to that IP address.
Step 1: Add an additional network adapter
First, shutdown your virtual machine. Then, in the Virtual Machine Library (accessed by hitting shift+⌘+L), right-click on your VM and click Settings. In the window that appears, click the “Add Device…” button in the top-right hand corner and then click the Network Adapter icon.


Step 2: Configure the new NIC
After double-clicking the Network Adapter icon, you’ll be shown the configuration screen for a NIC labeled “Network Adapter 2”. By default, the top radio button — “Share with my Mac” — will be selected; change this selection to “Private to my Mac”.

Then, expand the Advanced options section by clicking the rightward-facing triangle. By default, the MAC Address input box will be empty, so you should click the Generate button. A random[2] MAC address will be generated; you should either write this down somewhere or copy it to your clipboard as it will be used momentarily to configure DHCP.
Step 3: Configure DHCP to assign your new NIC a static IP
If you didn’t record the MAC address of the new NIC in Step #2, go back and do that now. We are going to configure the DHCP server listening on your Mac’s vmnet1 NIC to map this MAC to a static IP address. Note that VMware Fusion (and other related VMware products) use vmnet1 for “host-only” networking and use vmnet8 for NAT/shared connections:
As you can see from the above output — run from my Mac — the vmnet1 network is using the 192.168.7.0/255 network. (You can also find these networks by cat’ing /Library/Preferences/VMware\ Fusion/networking). It is within this RFC1918 network that we need to select an unused IP address for the guest to be assigned on boot. However, we first need to check which IPs may be automatically given out by the VMware DHCP server, so that we can avoid an overlapping assignment:
The above grep output, part of a subnet stanza, instructs the DHCP server to hand out IP addresses between 192.168.7.128–254 to guests. You should choose an IP outside this range, but not .1 as that’s assigned to the vmnet1 NIC itself; for this example, I’ve chosen 192.168.7.100 for my “brady” VMware guest. Next, armed with (x) your newly selected IP address and (y) previously generated MAC address from step #2, add a reservation using either your favorite[3] editor or tee and then restart the DHCP server:
Note that I’ve instructed VMware to provide the guest with Google’s public (recursive resolving) DNS servers 8.8.8.8 and 8.8.4.4. If your guest needs to resolve local/corporate services, replace this value with a comma-separated list of the IP address(es) of your DNS server(s).
Step 4: Boot the VM and verify configuration
Back in the Virtual Machine Library, boot the machine by right-clicking on the guest and clicking “Start Up”. Log in to the machine, run /sbin/ifconfig to verify that you have a NIC with the IP address you chose in step #3, and make sure you can ping that IP from your host (Mac).
Step 5: Simplify access with dnsmasq (or /etc/hosts)
While you can now access your guest with an IP address, it’s much more practical to use a hostname (or multiple hostnames, as your application dictates). The simplest way would be to just add an /etc/hosts entry:
But then you’re stuck updating this record each time you add a new application, domain, etc. A better result would be mapping an entire TLD to that IP address; this way, you can simply configure your http daemon to expect the request and avoid doing anything on your Mac other than using the new hostname in your browser (or wherever).
Lastly, you’ll need to configure your Mac to route all DNS resolution requests for the .dev domain to the newly started server listening at 127.0.0.1. After doing so, make sure you can access using the hostname.
Step 6: Get a beer and admire your handiwork

Allagash Curieux was our first foray into barrel-aging. Curieux is made by aging our Tripel Ale in Jim Beam bourbon barrels for eight weeks in our cold cellars. The aged beer is then blended back with a portion of fresh Tripel. The resulting beer is smooth with coconut and vanilla notes and hints of bourbon.
Miscellaneous Thoughts
- Host-only network: The instructions above show one how to create a host only network. While this is advantageous in most cases — others can’t access your potentially sensitive services — you may want to let others on your LAN test your hosted resources. However, unless you have spoken with your administrator about a static DHCP reservation (or free address you can use without DHCP), you’ll need to hand out your vmnet8 IP address each time. Be sure to check that your services are bound to 0.0.0.0 on the guest, otherwise they may only be listening on the vmnet1-associated NIC.
Endnotes
[1] The screenshots were taken on VMware Fusion 8, but the technique should apply just the same to previous versions.
[2] Technically, there’s some rhyme and reason to the MAC address as the first six hexadecimal characters (XX:XX:XX) indicate the manufacturer. However, there is enough entropy in the remaining characters that, when randomly generated, should not result in any sort of LAN collision. If in the extremely rare chance that it does, you can simply update the value.
[3] Any editor on your Mac will do, but [insert your favorite deity here] looks down on those who use anything other than vi(m).
Источник


