- How to fix Broken Pipe Error in Linux
- Inspecting the Command
- Fixing a Problem with File System
- Afterwords
- How to prevent «Write Failed: broken pipe» on SSH connection?
- 10 Answers 10
- Write failed : broken pipe
- 10 Answers 10
- Fixing Broken Pipe Error With SSH Connection
- Fixing broken pipe error with SSH
- Method 1: Client side SSH configuration change
- Method 2: Server side SSH config change
How to fix Broken Pipe Error in Linux
Have you ever encountered a situation in which you were unable to download any package on your Linux machine ? Or you might have probably seen an error like package not installed? This kind of error can easily be fixed with a command like “sudo apt install –f”. On rare occasions, you may have experienced a broken pipe error.
A pipe in Linux / Unix connects two processes , one of them has read-end of the file and the other one has the write-end of the file. When a process writes to a Pipe, it gets stored in a buffer and gets retrieved by the other process. Broken pipe occurs when a process prematurely exits from either end and the other process has not yet closed the pipe.
Example use case:
A user has just recently reinstalled RVM (Ruby Version Manager) after he performed a fresh install of Ubuntu.
He then opened up the terminal and issued the command:
type rvm | head -1
This issued the following error:
rvm is a function -bash: type: write error: Broken pipe
What happened here is that when the user runs the command type rvm | head -1 , bash has actually executed type rvm in one process and head -1 in another process. The stdout of the type part is connected to the “write” end of a pipe whereas the stdin of the head part is hooked up to the “read” end. Note that the two processes have run concurrently ( at the same time ).
The head -1 process has carried out a read operation of data from stdin , then prints out a single line (as dictated by the -1 option) before exiting, causing therefore the “read” end of the pipe to be closed. Since the rvm function has quite a long data stream (about 11 kB after having been bash parsed and reconstructed), which means that head exits yet at the same time type still has some data to write out (few KB).
Since type is trying to carry out a write operation to a pipe whose other end has therefore been closed – a brokenpipe routine or the write() function that it invoked, will return an EPIPE error which is known as “Broken pipe”.
Inspecting the Command
In most cases, this might not be the case but the first step you should check is whether the command issued was right or not. You should reissue the command and check whether it gets executed or not. You can also try issuing commands like “sudo apt update” and “sudo apt install –f” as these commands are not destructive in nature. If your problem still persists, try rebooting the machine and see whether the problem was resolved or not.
Fixing a Problem with File System
When you have issued the commands mentioned earlier multiple times and you still get the error, check whether the error reads something like “read-only file system” in the terminal output. This may be caused when your boot partition gets mounted as read-only for some reason. The problem could be caused by some faulty software installation when the system decides that it is not safe to write to the drive.
The other cause might be when you try to install something from apt and the installer needs to access some resource in read mode, but cannot perform the read operation properly. It may throw an error like “sudo: cannot mount”. This error occurs because most of the ‘entities’ in Linux are files and in order to read a resource, Linux would need to open that file and read it. If however another process is currently using that resource, then it may not be possible to read the file. Also, when the reading process exits abruptly and does not close the file, it may corrupt the file until the next boot.
If you still cannot access the files even after rebooting, then the problem could be bigger than anticipated. You may have a broken file system. To resolve this issue, you may need a stable Linux environment in order to work on the broken system. The best way to do this is to boot from a Live Linux USB drive and work from it.
This is the right moment to backup all your data. Although the following steps are safe, you should make sure to store your data on a secure device.
Once you boot into a Live USB drive you should start to check for the partitions with a corrupt file system. To do so, issue the following command:
sudo fsck.ext4 -fv /dev/sdaX”
Note that here X stands for the partition that you are trying to scan. Note that this command is for partitions of type ext4. If you have a partition of type ext3 or ext2 you will need to replace the command with “fsck.ext3” and “fsck.ext2” respectively. This will scan your drive and print the output on the terminal (note the -v flag). Alternatively, you can specify a -c flag to surface-scan the drive; it will look for bad sectors on the drive.
Once you have done this, your partition should hopefully been fixed. Now Boot into your machine and issue the command:
sudo mount -o rw,remount /
This will restore the read/write permission on your drive and will therefore solve the broken pipe issue.
Afterwords
You have just seen one solution to resolve the broken pipe issue, but a broken pipe is not a problem, it could be a symptom of a larger problem more often than not. You can have a broken pipe whenever you are trying to read a stream like resource that gets closed prematurely. .
If you like the content, we would appreciate your support by buying us a coffee. Thank you so much for your visit and support.
Источник
How to prevent «Write Failed: broken pipe» on SSH connection?
What can I do to configure SSH on both client and servers to prevent Write Failed: broken pipe errors? It often occurs if you sleep your client computer and resume later.

10 Answers 10
I have tried this in /etc/ssh/ssh_config for Linux and Mac:
This is how often, in seconds, it should send a keepalive message to the server. If that doesn’t work then train a monkey to press enter every two minutes while you work.
You could set either ServerAliveInterval in /etc/ssh/ssh_config of the client machine or ClientAliveInterval in /etc/ssh/sshd_config of the server machine. Try reducing the interval if you are still getting the error.
Configuration for a single user can be set in file
/.ssh/config both on the server and client side. Make sure the file has correct permissions chmod 644
SSH sessions may break due to numerous and possibly unavoidable reasons.
A useful utility which can be used to mitigate problems caused by this is called screen . Screen is a powerful utility that allows you to control multiple terminals which will stay alive independently of the ssh session. For example, if you run screen in an ssh session you will see a new terminal open and you can use that to run jobs. Lets say your ssh session dies in the process. Running screen -d then screen -r will reopen the last session and you will be able to continue from there. Make sure you read some of the documentation before using it.
Client configuration
Try creating the file:
Add the contents:
Now ssh to your server and see if your problem is fixed. ClientAliveInterval option is only useful when configuring the ssh server (aka sshd), it does not change a thing on the ssh client side, so don’t use it in the above configuration file.
This will send a hello-are-you-there signal to the server if no packets have been received in the preceding 30 seconds (as specified above). However, if the number of consecutive hello-are-you-there signals reach ServerAliveCountMax then ssh will disconnect from the server. This value is defaulting to 3 (so 3*30 = 90 seconds without server activity), increase it if it suits your needs. There are alot more config options to the .ssh/config file and you could read:
For more information on other options. You may not want to apply this to every server you connect to which this example will. Or restrain it to only a particular server by replacing the line Host * with Host (replace by an IP address, see ssh_config man page).
Server configuration
Similarly you can tell the server to be gentle with your clients. The configuration file is /etc/ssh/sshd_config .
You can either deactivate it by setting ClientAliveInterval to 0 or tweak ClientAliveInterval and ClientAliveCountMax to set a maximum ssh client inactivity without responding to the probes. One advantage of this settings over TCPKeepAlive is that the signals are sent through the encrypted channels, so it is less likely to be spoofable.
Источник
Write failed : broken pipe
I have a headless Ubuntu server. I ran a command on the server (snapraid sync) over SSH from my Mac. The command said it would take about 6 hrs, so I left it over night.
When I came down this morning, the Terminal on the Mac said: «Write failed: broken pipe»
I’m not sure if the command executed fully. Is this a timeout issue? If so, how can I keep the SSH connection alive overnight?

10 Answers 10
This should resolve the problem for Mac osX version: 10.8.2
Or, if you want it to be a global change in the SSH client, to this file
«ServerAliveInterval 120» basically says to «ping» the server with a NULL packet every 120s, and «TCPKeepAlive no» means to not set the SO_KEEPALIVE socket option (since you shouldn’t need it with ServerAliveInterval already set, and apparently it’s «spoofable» or some odd).
The servers similarly have something they could set for the same effect (ClientKeepAliveInterval) but typically you don’t have control over those settings as much.
You can use «screen» util for that. Just connect to the server over SSH, start screen session by «screen» command execution, start your command there and disconnect (don’t exit screen session). When you think your command already done you can connect to the server and attach to your screen session where you can see the command execution result/progress (in case one should be).
See «man screen» for more details.

This should resolve the problem for ubuntu and linux mint add:
to /etc/ssh/ssh_config file

Instead of screen I’d recommend tmux, an (arguably) better competitor to screen
That command creates a session. Any time after that you want to connect:
there are two solutions
- To update server and restart server sshd
echo «ClientAliveInterval 60» | sudo tee -a /etc/ssh/sshd_config
echo «ServerAliveInterval 60» >>
After having tried to change many of above parameters in sshd_config (ClientAliveInterval, ClientMaxCount,TCPKeepAlive. ) nothing had changed. I have spend hours and days to look for a solution on forums and blogs.
It appears that the problem of broken pipe which forbids to connect with ssh/sftp came from permissions settings on ChrootDirectory. the ChrootDirectory has to be owned by root/root with 755 permision lower permissions 765/766/775. won’t work but strongers do (eg 700) if you need to give a write permission to connected user, you can give it in sub-directories. if chroot is owned by sftpUser:sftpGroup, it won’t work neither.
hope it would help

If you’re still having problem after editing /etc/ssh/sshd_config or if
/.ssh/config simply does not exist on your machine then I highly recommend reinstalling ssh. This solution took about a minute to fig both «Broken pipe» errors and «closed by remote host» errors.
Источник
Fixing Broken Pipe Error With SSH Connection
If you use SSH to connect to remote Linux servers, you’ll notice that if you keep your SSH session inactive for some time and then try to use it again, the SSH session disconnects with an error message like this:
On some systems, it will display ‘Write failed: Broken pipe’ or ‘Connection closed by remote host’.
Let’s see what causes this error and how to go about keeping your SSH connection alive.
Fixing broken pipe error with SSH
As you may have guessed, the SSH connection is closed because of inactivity. There is no set value but it usually around 5 minutes or so.
What you can do to avoid the SSH session disconnection is to send an ‘alive message’ either from the server to client ( ClientAliveInterval ) or from client to server ( ServerAliveInterval ) at certain time interval.
This way, you keep the SSH session alive because there is a communication between the client and server and the server understands that client is still there.
Now, there are two ways to do that. Either you send the alive message from the client to the server or from the server to the client.
- If you connect to multiple servers via SSH, set it on your machine.
- If you are a sysadmin and several of users complain about frequent SSH connection disconnect, you may set it on the server.
Method 1: Client side SSH configuration change
Let’s say you want to keep your SSH connection alive with up to 10 minutes (600 seconds) of idle time.
While connecting to the remote Linux system through SSH, you can mention the ServerAliveInterval value like this:
Now, this thing work but manually entering this option each time you connect to the server is tiresome. Why not make it permanent?
I hope you are aware of the SSH config files. On the client side, you can take advantage of it to set certain SSH parameters for specific connections or all of them. I have explained SSH config file in detail here.
First, make sure that you have the ssh config file. If not create it:
It is important to give it the correct file permissions otherwise you’ll have permission denied error while connecting via SSH.
Use the chmod command and add the following file permission to it:
If you’re feeling lazy or don’t want to go in detail, use this command to set the alive interval to 600 seconds (10 minutes):
This will set the ServerAliveInterval value to 10 minutes for all SSH connection you’ll use. Give it a try if you want to.
If you want to make it more proper, you should add it like this:
Method 2: Server side SSH config change
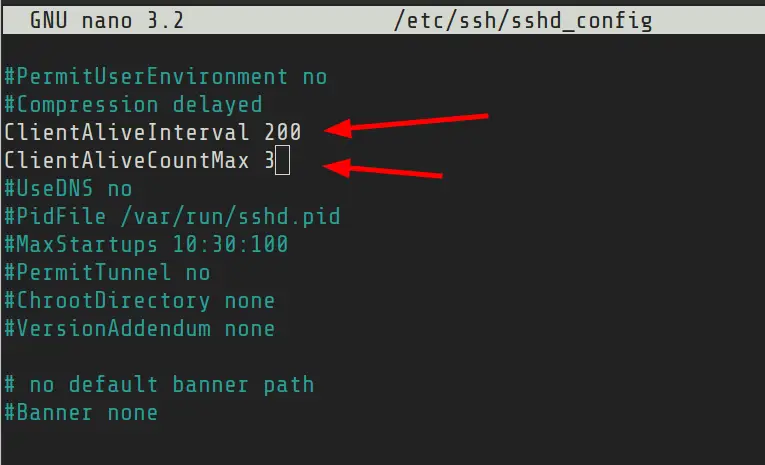
The SSH config file for the server is usually located at /etc/ssh/sshd_config.
If you open this file, you’ll find two parameters of interest here:
- ClientAliveInterval : This is the inactivity time period after which the server will send an alive message to the ssh connected client.
- ClientAliveCountMax : This is the number of attempts the server will make to send the alive message.
Say, you set ClientAliveInterval to 200 seconds and ClientAliveCountMax to 3. This means the server will send alive message after 200 seconds. If there is no activity from the client, it will again send an alive message at 400 seconds. No response/activity from the client and another alive message is sent at 600 seconds. After this (600 seconds) the SSH connection is disconnected.
You can edit the /etc/ssh/sshd_config file in your favorite terminal based text editor like Vim. Look for ClientAliveInterval and ClientAliveCountMax entries. Remove the # key at the beginning of the lines and give them the appropriate value.
Save and exit the file.
Please do not set the SSH connection timeout to several hours. That would be a waste of resources.
I hope this tutorial helped you to fix the broken pipe error issue with SSH connection. Your feedback is welcome.
Источник


