- Программы для записи образа на флешку Linux
- 2. Unetbootin
- 3. Etcher
- 4. Ventoy
- 5. Multisystem
- 6. Gnome MultiWriter
- Выводы
- Sigh.asia: Zapped Point
- How to create bootable USB flash drives from .img files in linux
- Through the command line
- Through the Graphical User Interface
- من خلال الطرفية
- من خلال الواجة الرسومية
- Как записать загрузочный IMG-образ на флешку
- Linux write img to usb
- Basics
- Fedora Media Writer
- Etcher
- UNetbootin
- If all else fails: dd
- Test it all — raw USB boot
- Other distributions & tools
- Conclusion
Программы для записи образа на флешку Linux
Запись образа на флешку — очень частая задача для тех, кто ещё пытаете выбрать дистрибутив или тестирует новые версии Linux. В Windows мы привыкли к Rufus — это одна из самых лучших, интуитивно понятных и наиболее популярных утилит для записи образов дисков на USB-флешку. Она по праву считается лучшей и используется довольно часто. Но, к сожалению, нет версии этой программы для Linux; если вы новичок и хотите записать образ на флешку, то можете столкнуться с проблемой, чем это можно сделать.
На самом деле в операционной системе Linux есть свои программы для записи образа на флешку Linux, и их достаточно много. В этой статье мы рассмотрим лучшие аналоги Rufus для Linux, а также как ими пользоваться для решения своих задач. Сразу перейдём к списку.
Если вы уже пытались спрашивать на форумах, как записать образ на флешку в Ubuntu, то, наверное, уже слышали совет использовать утилиту dd. Это простая консольная утилита, которая позволяет побайтово переносить данные из одного места в другое, например из файла на флешку.
Несмотря на свою простоту она очень популярна среди опытных пользователей Linux, поскольку может правильно записать данные в большинстве случаев. Использовать эту утилиту очень просто. Нужно указать файл образа откуда будут скопированы данные и раздел на вашей флешке, например:
/ваш_образ.iso of=/dev/sdc bs=5M
Обратите внимание, что есть два возможных способа записи образа на флешку с помощью dd. Это непосредственно на флешку /dev/sdc или на раздел флешки — /dev/sdc1. Обычно работает первый вариант, но вы можете попробовать и второй. Запись образа на флешку займет определённое время, так что вам придется подождать.
После завершения копирования флешка будет готовка к работе. Но это далеко не все способы записи образа на диск, есть программы с графическим интерфейсом, полноценные аналоги Rufus Linux.
2. Unetbootin
Unetbootin — это графическая утилита с открытым исходным кодом для записи образа на USB-флешку. Работает она совсем по-другому. В отличие от dd, здесь флешка должна быть примонтирована к системе и отформатирована в правильную файловую систему. Утилита распакует содержимое образа на флешку, а затем добавит необходимые флаги раздела и установит загрузчик, чтобы всё работало так, как нужно.
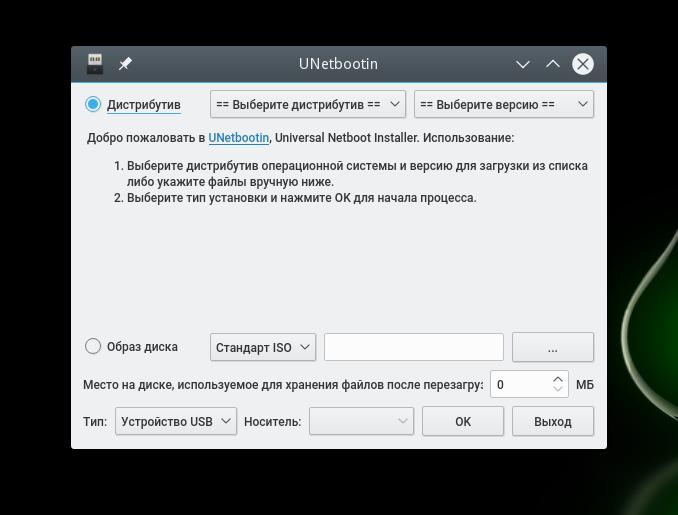
Вы можете выбрать образ из файловой системы или скачать систему автоматически через интернет. Кроме того, вы можете записывать образы дискеты, а также жестких дисков. Еще можно оставить свободное место на флешке, чтобы в будущем записать туда файлы. Это отличная альтернатива Rufus Linux и используется она настолько же часто, как и Rufus в Windows.
Установить программу можно из официальных репозиториев. В Ubuntu для установки наберите:
sudo apt install unetbootin
3. Etcher
Это следующее поколение программ для записи образа на флешку Linux. Etcher — утилита с открытым исходным кодом, которая может работать в Windows, Linux и Mac OS. Но её выгодно отличает ещё одна особенность — это современный графический интерфейс.
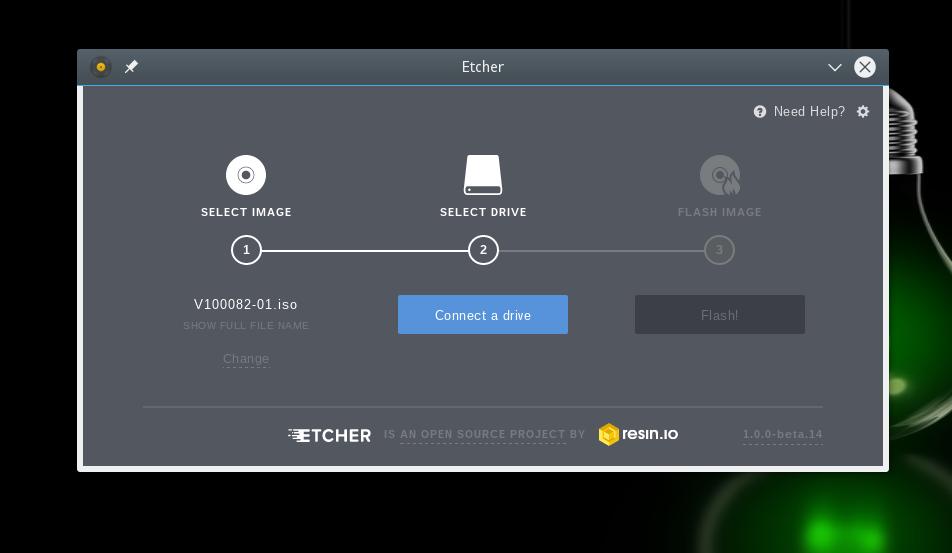
Утилита работает очень просто. Сначала вы выбираете образ диска, который нужно записать, потом флешку, а затем просто нажимаете кнопку Записать (Flash!). Программа сделает всё сама. Она новая, поэтому её ещё нет в официальных репозиториях, но вы можете найти портативный образ AppImage на официальном сайте.
4. Ventoy
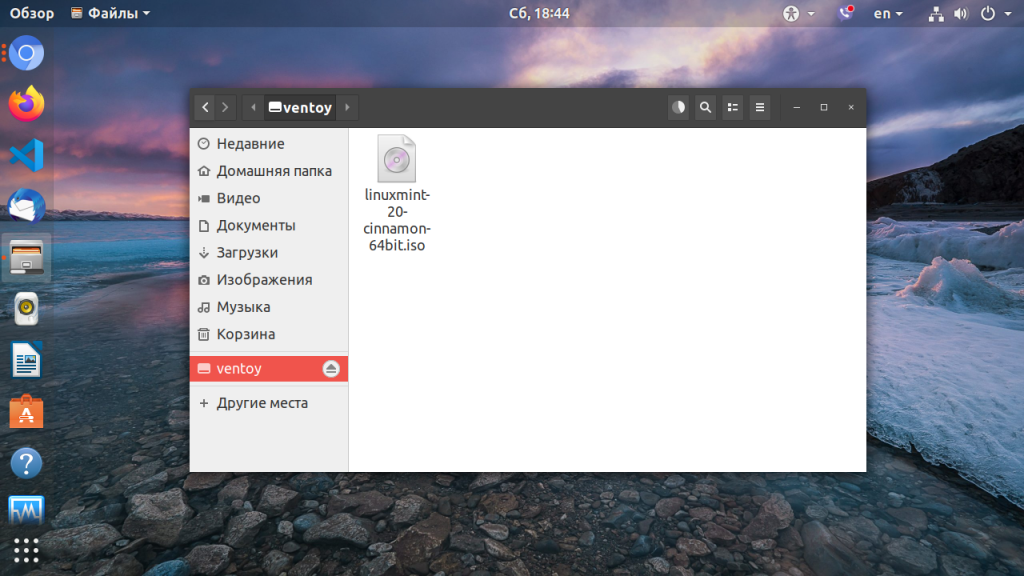
Это утилита, которая позволяет записать образ на флешку не очень стандартным образом. Вам достаточно просто установить программу на флешку, а затем скопировать туда же образ с нужным дистрибутивом. Программа сама разберется как его запустить и какие параметры передать чтобы все работало. Очень удобно. Графического интерфейса у программы нет, но он и не нужен, установку можно выполнить с помощью терминала, а затем копировать нужные образы в файловом менеджере. Более подробно об этой и следующей программе можно прочитать в этой статье.
5. Multisystem
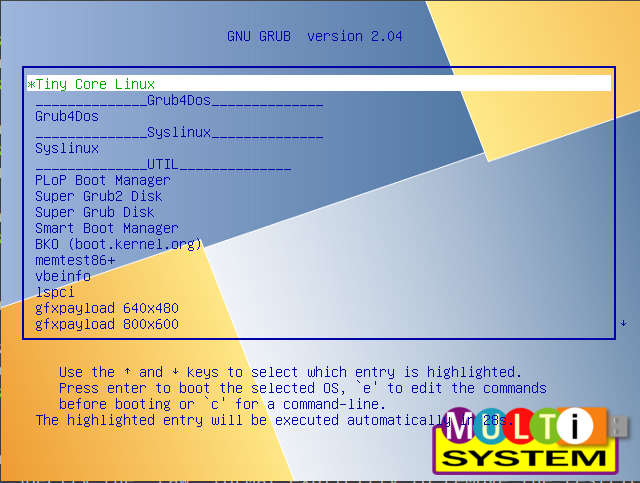
Еще одна утилита с открытым исходным кодом. Она тоже позволяет записывать несколько образов операционных систем на флешку. Всё выполняется быстро и просто. Берёте флешку, выбираете её в программе, далее выбираете несколько образов и записываете их.
Перед тем, как будут добавлены образы, программа установит загрузчик Grub2 на флешку, так что будьте аккуратны при выборе флешки, иначе можно и повредить жёсткий диск.
После этого нам остаётся записать образы и можно пользоваться. Кроме этого, в утилите есть множество настроек загрузчика Grub и Brug, резервное копирование и восстановление флешки, а также поддержка загрузки нужных вам образов из интернета.
6. Gnome MultiWriter
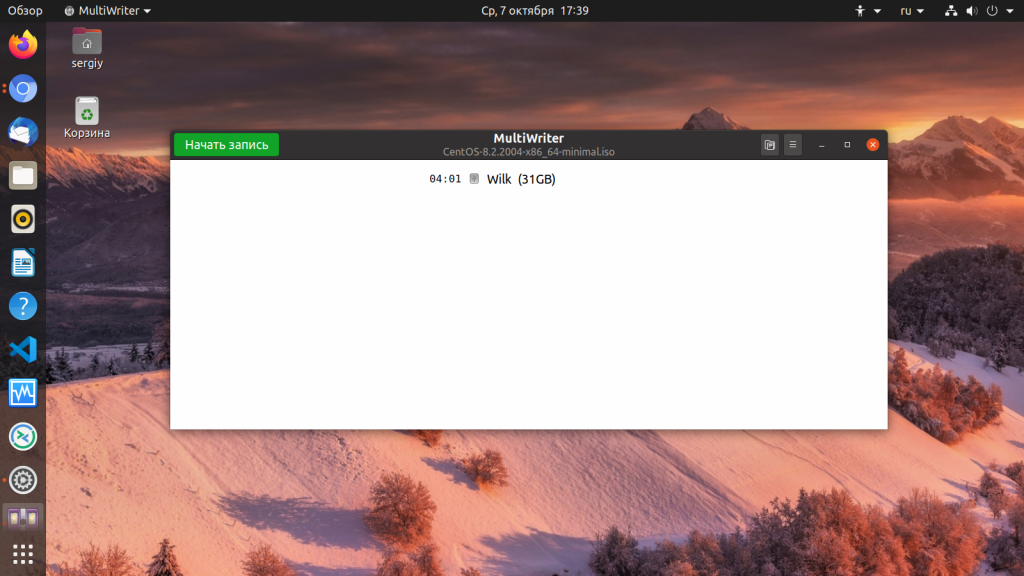
Утилита Gnome MultiWriter — это небольшая программа, разработанная в рамках проекта Gnome. Она позволяет записывать один ISO образ сразу на несколько носителей. Интерфейс программы предельно простой, но свою функцию она отлично выполняет. Для её установки в Ubuntu выполните:
sudo apt install gnome-multi-writer
Выводы
Вот и всё. Мы рассмотрели лучшие аналоги Rufus Linux, с помощью каждой из этих программ вы сможете записать свой образ на USB-флешку. В большинстве случаев всё работает достаточно хорошо. Я для своих целей использую либо dd, либо Unetbootin. А какие программы для записи ISO на флешку Linux используете вы? Напишите в комментариях!
На десерт видео о том, как пользоваться одной из самых популярных программ — Unetbootin:
Источник
Sigh.asia: Zapped Point
How to create bootable USB flash drives from .img files in linux
Through the command line
Simply open a terminal and type (in one line):
sudo dd if=/location/of/the/img/file.img of=/dev/sdx
Note:
- Make sure have unmounted the device first.
- The ‘x’ in “sdx” is different for each plugged device. You might overwrite your hard disk if you mix its device file with that of the flash drive!
- Make sure that it’s as “sdx” not as “sdxn” where ‘n’ is a number, such as ‘1’ and ‘2’.
Warning:
‘dd’ can overwrite your partition table and all data at the byte level. No software can recover that data once lost. Make sure that the device you point ‘dd’ at is the flash drive.
Through the Graphical User Interface
First, you need to install ‘usb-imagewriter’ from the repository by typing the following command in the terminal:
sudo apt-get install usb-imagewriter
After installing the tool through the command:
gksu imagewriter
Now all you have to do is to select the .img file, choose the USB Flash Disk from the other drop down menu, and finally click on the “write to device” button.
Also, please make sure you have unmounted the device first before burning the image.
من خلال الطرفية
إفتح الطرفية و ادخل الامر التالي (على سطر واحد):
sudo dd if=/موقع/الملف/المراد/كتابته/file.img of=/dev/sdx
حيث sdx هو ملف المصاحب لجهاز الفلاش و يمكن ان يكون sda او sdb او غيره من الملفات. و يمكن معرفة ملف الفلاش من خلال قراءة مخرجات dmesg بعد إدخال الفلاش مباشرة.
تحذير:
يستطيع dd إفساد البارتشن و ما يحتوي من ملفات من خلال الكتابة عليها. و لا يوجد أي برنامج يتمكن من إرجاع الملفات حال الكتابة عليها. تأكد جيداً من ان ملف البارتشن sdx (المشار اليه عند of) هو الملف للفلاش و ليس لأحد البارتشنات الموجودة على القرص الصلب.
تنبيه:
قبل ان تشرع في كتابة الملف على الفلاش، تأكد من ان الفلاش غير مثبت على نظام الملفات (من خلال الأمر mount). قد يكون على الفلاش اكثر من بارتشن تحت إسم sdx1 , sdx2 حيث يبدل حرف x بحرف الفلاش. أيضاً، تأكد من تستخدم ملف الفلاش الرئيسي (sdx) , و ليس ملفات الفرعية.
من خلال الواجة الرسومية
اولاً، ثبت البرنامج ‘usb-imagewriter’ على جهازك:
sudo apt-get install usb-imagewriter
Источник
Как записать загрузочный IMG-образ на флешку
Попался мне загрузочный образ объемом
2 Гиг, предназначенный специально для работы с флешкки.
Проблема в том, что он представлен не привычным ISO-формате, а в IMG.
Записал его на флешку с помощью утилиты Unetbootin сначала как «ISO-образ» — не грузится, затем как «Дискетта» — то же самое.
Как можно решить эту проблему?


Неужто обычная dd и это умеет? 🙂
Тогда пожалуйста, дайте готовый пример для моего случая, а то долго с ключиками разбираться.

dd if=твой.IMG of=/dev/флешка
Ура — получилось с первого захода.
Тогда спрашивается — на кой придумали эту недо-утилиту — Unetbootin ?
Тогда спрашивается — на кой придумали эту недо-утилиту — Unetbootin ?
Чтобы в два клика удалять распакованные на флешку образы, и не создавать на ЛОРе темы «Как отформатировать флешку после dd if=/путь/до/образа of=/dev/sd* bs=4M. Срочно! Спаситепомогите!»
Ну да, если бы она еще и работала бы.
Она отлично справляется с .iso минто-убунтей и др.
у него другой случай
Его случай и не оговорен в Unetbootin.
Точно. Я давно пользуюсь Unetbootin, хотя и редко, и заметил, что исошники она осиливает, но иногда бывают непонятные неудачи.
А с IMG столкнулся с ней впервые, и тут она забастовала по полной.
Unetbootin записывает файлы на обычный раздел с FAT32, поэтому флешку после этого можно использовать как обычную флешку с файлами.
И что? Как это связано с тем, что она не смогла записать IMG ?
Область применения немного другая. Это ответ на
Спасибо, хорошее пояснение, из которого понял, что Unetbootin с его сомнительными фичами надо отправить в корзину и пользоваться надежным dd.
и шо, dd сделает в один клик мыши у загрузочной флешки образ с твоим хомяком чтобы можно было на разных машинах с одной флешки работать?
Она работает, проверял в убунте

grub2 же, вроде, умеет из .img грузить систему?

Тогда спрашивается — на кой придумали эту недо-утилиту — Unetbootin ?
Я наверно неосилятор, но почему-то OpenSuse 11 у меня не хотела записываться через dd(В итоге записал с помощью Unetbootin). При этом к примеру fedora 20 beta не записывалась через Unetbootin, а через dd записывалась. Ну и как сказали выше, после Unetbootin можно писать на флешку.

grub2 умеет, но система сама должна знать, что запускается из .img.
Источник
Linux write img to usb
Updated: October 4, 2017
Captain Obvious to the rescue. This sounds like a trivial topic. You’ve downloaded an ISO file of a Linux distribution, and you want it written to a USB drive so that you can boot and test it. This should pose no problems. Alas, it’s a tricky topic.
There are dozens of different filesystem formats, packaging methods and other fine nuances used in live distributions, leading to some rather unexpected results. The issue is further compounded by the existence of multiple USB image writing tools, each one ever so slightly different from the other, usually serving a particular distro or subset thereof. In this guide, I’d like to impose some order and clarity. Let’s briefly discuss the tools and methods to foolproof USB image writing. After me.
Basics
Image files may come in different formats. For the sake of simplicity, let’s focus on ISO files, even though the principle and commands listed before are fully applicable across a wider pool of formats. Furthermore, we will focus on the Linux side of things only.
In Windows, some if not most of the tools mentioned below also exist and can be used to create bootable media. Again, the mileage may vary, but you should be good to go in about 90% of cases with either theUniversal USB Installer or UNetbootin. That covered, let’s gingerly move on into the Linux territory and crack this nut open like the gentlest of sledgehammers.
Fedora Media Writer
Fedora comes with a very neat image writing tool. It will check for updates, it can download and install new Fedora images for you, including the upcoming betas and whatnot, and it can reset the USB device (basically a single FAT32 partition). The tool is also fairly reliable, and it works with the majority of distributions, including some rather hard to crack nuts. If you’re wondering, what about Ubuntu, well, it doesn’t have any flashy tools of its own. Noticed the pun? I sure did. If you’re wondering about other distributions, we will mention them, too. Relax.
Etcher
This is a relatively new, modern USB writing tool. It’s simple, portable, designed to work across a wide range of Linux distributions without any specific dependencies, thanks to the AppImage format. Elegant, fast and efficient, and it should handle the bulk of your writing. There are some isolated cases where it may not work, but it’s a great start. In fact, I liked it enough to write an entire article on how to use it.
UNetbootin
We come back to UNetbootin. This is a cross-platform USB creation tool, and it works fairly well. It’s simple to use, and it can even download distributions for you, if you want. Now, you may encounter some startup and usage problems, but this is why I’ve written a nice little tutorial to help you work around them.
UNetbootin should be your fallback for those distributions that do not cooperate well with Etcher or Fedora Media Writer. For instance, Nitrux, which comes with the new, interesting Nomad desktop, refused all writing efforts except UNetbootin. This is a big philosophical issue, which touches the fundamentals of Linux fragmentation and standards, but we won’t solve it today, and it’s not the purpose of this guide.
If all else fails: dd
Now, we’re well familiar with dd. It’s no stranger. What it does is simple — it copies, byte for byte, from input to output. It asks no questions, and discriminates against none. To that end, it’s slightly dangerous but brutally efficient. You can use it to write your ISO files directly to external media (be very careful selecting target devices) without having to resort to any GUI tools or wondering too much about the packaging and formatting. Now, in some cases, even this may not work, but it’s as good as it gets.
ddВ if= .iso of=/dev/ bs=4M && sync
Replace /dev/* with relevant target, e.g. sdb, sdc, etc.
Test it all — raw USB boot
Now, what if you want to test the USB before you test it? In other words, how about making sure your image is sane, and it works as it should, and you can actually boot from the external media before you reboot your laptop or whatever?
Indeed, you can use virtualization software to test your USB drives. And we will do it by booting from the raw USB device. We will use the QEMU/KVM software for this purpose. VirtualBox can also do this, but you will actually need to convert the contents of the USB drive to a virtual hard disk.
There are several options here, all of which are valid. Some of the commands are symbolic links to others, but if you stumble upon a problem or there’s something missing, make sure you change them accordingly. Either one:
qemu-kvm -drive file=disk.qcow -usb -usbdevice host: -boot menu=on
Specifically for the second command, for example:
qemu-kvm -m 1024 -smp 1 -drive file=/home/roger/Downloads/disk.qcow -usb -usbdevice host:0781:5572 -boot menu=on
You can detect which USB device ID you need to use with the lsusb command:
lsusb
Bus 001 Device 002: ID 8087:8000 Intel Corp.
Bus 001 Device 001: ID 1d6b:0002 Linux Foundation 2.0 root hub
Bus 003 Device 001: ID 1d6b:0003 Linux Foundation 3.0 root hub
Bus 002 Device 005: ID 0bda:b728 Realtek Semiconductor Corp.
Bus 002 Device 004: ID 5986:0652 Acer, Inc
Bus 002 Device 003: ID 0bda:0129 Realtek Semiconductor Corp. RTS5129 Card Reader Controller
Bus 002 Device 010: ID 0781:5572 SanDisk Corp.
Bus 002 Device 002: ID 045e:0083 Microsoft Corp. Basic Optical Mouse
Bus 002 Device 001: ID 1d6b:0002 Linux Foundation 2.0 root hub
And you may need to create a disk file for this exercise:
qemu-img create -f qcow disk.qcow M
Formatting ‘disk.qcow’, fmt=qcow size=1073741824 encryption=off
If you have multiple virtualization products, you may not immediately succeed. Remember my article on KVM & VirtualBox on the same host? It is still applicable, so you need to make sure the latter is not running during the KVM test.
qemu-kvm -m 1024 -smp 1 -drive file=/home/roger/Downloads/disk.qcow -usb -usbdevice host:0781:5572 -boot menu=on
ioctl(KVM_CREATE_VM) failed: 16 Device or resource busy
failed to initialize KVM: Device or resource busy
And then, it shouldВ all be swell:
Other distributions & tools
Of course, it never ends. OpenSUSE, Manjaro, they all have their own unique features and options. But I think, in general, that Etcher and UNetbootin should satisfy most needs, and on the distro-specific front, Fedora Media Writer is ever so slightly more advanced and error-proof than others, hence its presence in the shortlist.
However, if you’re already using other Linux operating systems and their custom applications, do not let my guide deter you. After all, in this fragmented ecospace, there can be no perfection, only a rough asymptote, which we cover with the tools above. Etcher is probably the most convenient and friendly of the lot, UNetbootin is rugged but can be finnicky to operate, and Fedora has a great utility, but it mandates the use of the distro. Anyway, the world is your writer.
Conclusion
Like everything else in Linux, be it software, desktop environment, the choice of a distro, or any other aspect of the desktop usage, the methodology behind writing ISO images to a USB drive has many paths. Of course, you want the most successful one, to minimize time loss and frustration. There are no absolutes, but we can get near perfect.
Etcher and UNetbootin, in that order, are distro-agnostic tools with great value, and they will handle the bulk of tasks for you. Fedora is another great contender. You can always resort to dd, when things get tough, and wash it all down with KVM, with some funky raw USB boots, to make sure you really have nailed it. Not only do you get a bunch of tools and their reviews, but also workarounds around usage, virtualization hacks, and other neat tips and tricks. Not bad for a humble little tutorial. We’re done.
Источник


