- Updating List of Trusted Root Certificates in Windows 10/8.1/7
- Managing Trusted Root Certificates in Windows 10
- Rootsupd.exe Utility
- Certutil: Getting Latest Root Certificates from Windows Update
- The List of Root Certificates in STL Format
- Updating Root Certificates in Windows with GPO in an Isolated Environment
- Intro to certificates
- Shared certificate stores
- Certificate storage per app container
- Cache
- Shared certificates and keys
- Certificate fields
- Version 1 fields
- Version 2 fields
- Version 3 extensions
Updating List of Trusted Root Certificates in Windows 10/8.1/7
All Windows versions have a built-in feature for automatically updating root certificates from the Microsoft websites. As part of the Microsoft Trusted Root Certificate Program, MSFT maintains and publishes a list of certificates for Windows clients and devices in its online repository. If the verified certificate in its certification chain refers to the root CA that participates in this program, the system will automatically download this root certificate from the Windows Update servers and add it to the trusted ones.
Windows requests a trusted root certificate lists (CTL) renewal once a week. If Windows doesn’t have a direct access to the Windows Update directory, the system won’t be able to update the root certificates, so a user may have some troubles when browsing websites (which SSL certificates are signed by an untrusted CA – see the article about the “Chrome SSL error: This site can’t provide a secure connection”), or with installing/running signed scripts and apps.
In this article, we’ll try to find out how to manually update the list of root certificates in TrustedRootCA on isolated networks or computers/servers without a direct Internet connection.
Managing Trusted Root Certificates in Windows 10
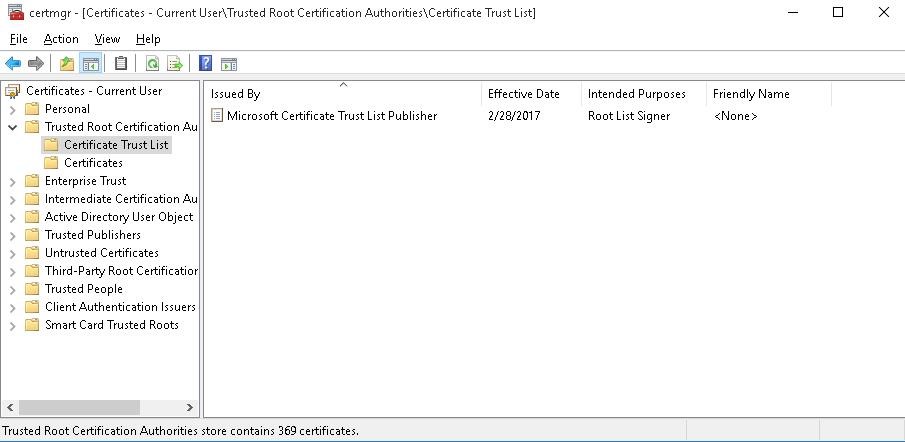
How to see the list of root certificates of a Windows computer?
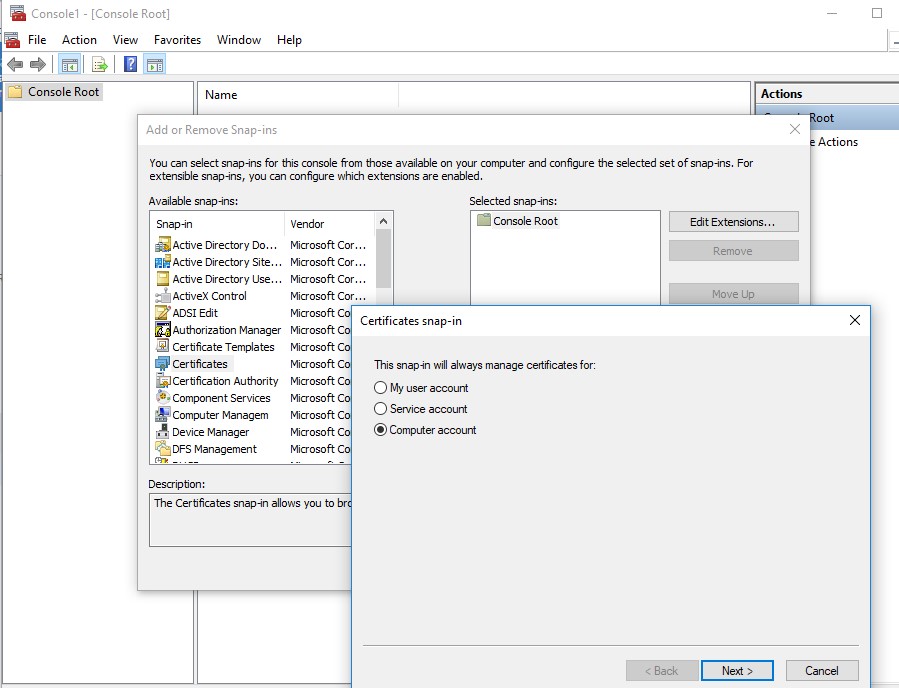
- To open the root certificate store of a computer running Windows 10/8.1/7/Windows Server, start the mmc.exe console;
- Select File ->Add/Remove Snap-in, select Certificates (certmgr) in the list of snap-ins ->Add;
- Select that you want to manage certificates of local Computer account;

- Next -> OK -> OK;
- Expand the Certificates node ->TrustedRootCertificationAuthoritiesStore. This section contains the list of trusted root certificates on your computer.
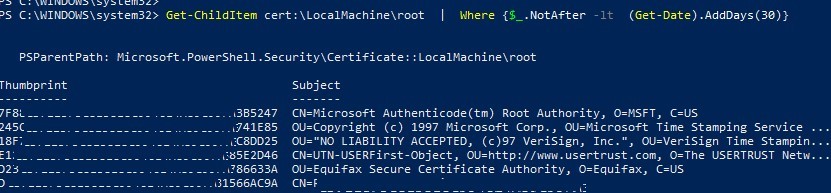
You can also get a list of trusted root certificates with expiration dates using PowerShell:
Get-Childitem cert:\LocalMachine\root |format-list
You can list the expired certificates, or which expire in the next 30 days:
Get-ChildItem cert:\LocalMachine\root | Where
In the mmc console, you can view information about any certificate or remove it from trusted ones.
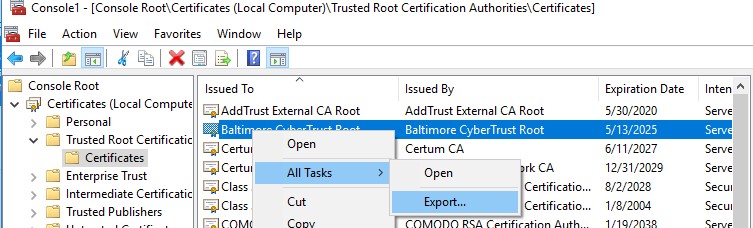
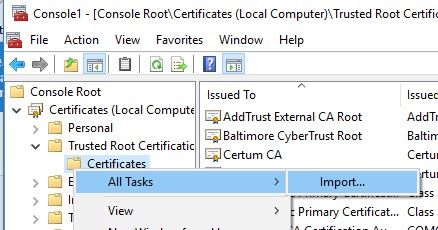
You can manually transfer the root certificate file between Windows computers using the Export/Import function.
- You can export any certificate to a .CER file by clicking on it and selecting All Tasks -> Export;
- You can import this certificate on another computer using the option All Tasks -> Import.
Rootsupd.exe Utility
In Windows XP, the rootsupd.exe utility was used to update computer`s root certificates. The list of root and revoked certificates in it was regularly updated. The utility was distributed as a separate update KB931125 (Update for Root Certificates). Let’s see if we can use it now.
- Download the rootsupd.exe utility using the following link http://download.windowsupdate.com/msdownload/update/v3/static/trustedr/en/rootsupd.exe . At the moment (August 2, 2019) the link doesn’t work, maybe Microsoft decided to remove it from the public. Today you can download the rootsupd.exe from kaspersky.com website — http://media.kaspersky.com/utilities/CorporateUtilities/rootsupd.zip ;
- To install the Windows root certificates, just run the rootsupd.exe file. But we will try to examine its contents more carefully. Extract the certificates from the executable file with the command: rootsupd.exe /c /t: C:\PS\rootsupd
- Certificates are stored in SST files, like authroots.sst, delroot.sst, etc. To delete/install a certificate, you can use the following commands:
updroots.exe authroots.sst
updroots.exe -d delroots.sst
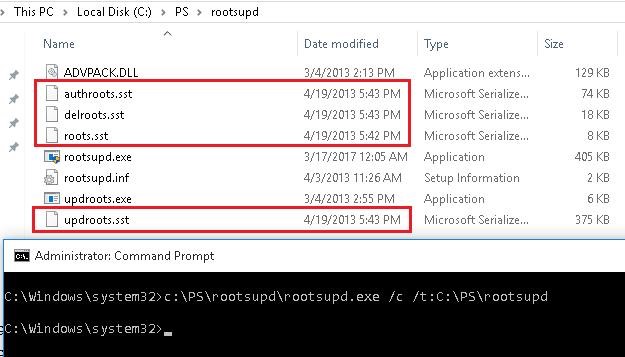
However, as you can see, these certificate files were created on April 4, 2013 (almost a year before the end of official support of Windows XP). Thus, since then the utility has not been updated and cannot be used to install up-to-date certificates. A little later we will need the updroots.exe file.
Certutil: Getting Latest Root Certificates from Windows Update
The latest version of the Certutil.exe tool for managing certificates (available in Windows 10), allows you to download from Windows Update and save the actual root certificates list to the SST file.
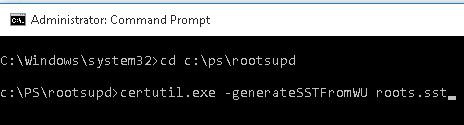
To generate an SST file, run this command with the administrator privileges on a computer running Windows 10 and having a direct access to the Internet:
certutil.exe -generateSSTFromWU roots.sst
As a result, an SST file containing up-to-date list of root certificates will appear in the target directory. Double-click to open it. This file is a container containing trusted root certificates.
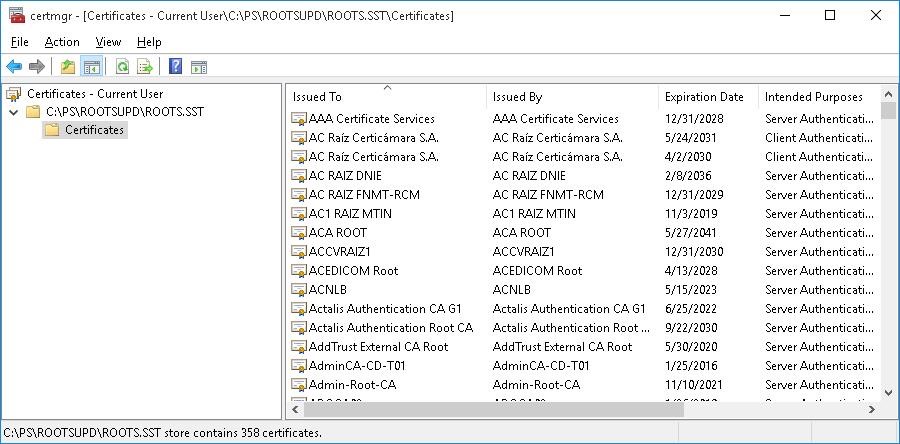
As you can see, a familiar Certificate Management snap-in opens, from which you can export any of the certificates you have got. In my case, there have been 358 items in the list of certificates. Obviously, it is not rational to export the certificates and install them one by one.
To install all the certificates from the SST file and add them to the list of trusted root certificates on a computer, you can use the PowerShell commands:
$sstStore = ( Get-ChildItem -Path C:\ps\rootsupd\roots.sst )
$sstStore | Import-Certificate -CertStoreLocation Cert:\LocalMachine\Root
To install all certificates listed in the file, use the updroots.exe (it is located in the rootsupd.exe file, which was extracted in the previous section).
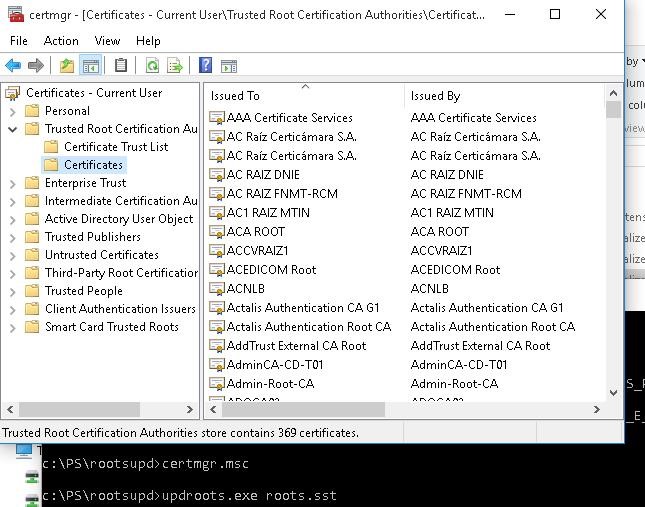
Run the certmgr.msc snap-in and make sure that all certificates have been added to the Trusted Root Certification Authority.
The List of Root Certificates in STL Format
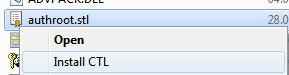
There is another way to get the list of root certificates from Microsoft website. To do it, download the file http://ctldl.windowsupdate.com/msdownload/update/v3/static/trustedr/en/authrootstl.cab (updated twice a month). Using any archiver (or even Windows Explorer) unpack authrootstl.cab. It contains one file authroot.stl.

The Authroot.stl file is a container with a list of trusted certificates in Certificate Trust List format.
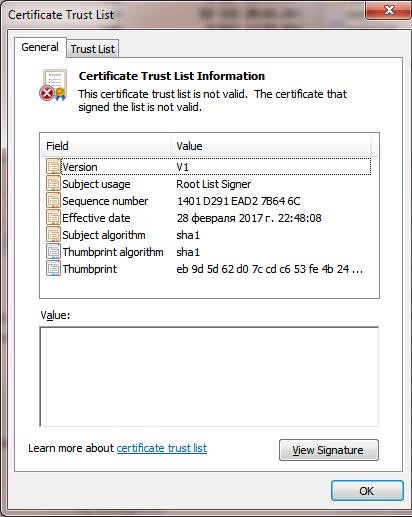
You can install this file in the system using the context menu of the STL file (Install CTL).
Or using certutil.exe tool:
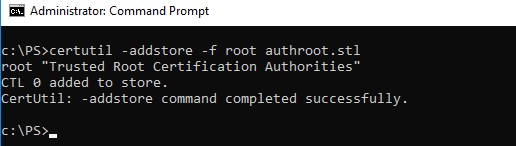
certutil -addstore -f root authroot.stl
You can also import certificates using the certificate management console (Trust Root Certification Authorities -> Certificates -> All Tasks -> Import). Specify the path to your STL file with certificates.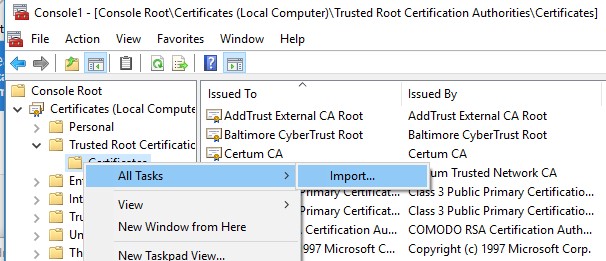
After you have run the command, a new section Certificate Trust List appears in Trusted Root Certification Authorities container of the Certificate Manager console (certmgr.msc).
In the same way, you can download and install the list of the revoked (disallowed) certificates that have been removed from Root Certificate Program. To do it, download disallowedcertstl.cab (http://ctldl.windowsupdate.com/msdownload/update/v3/static/trustedr/en/disallowedcertstl.cab), unpack it and add to the Untrusted Certificates section using this command:
certutil -addstore -f disallowed disallowedcert.stl
Updating Root Certificates in Windows with GPO in an Isolated Environment
If you have the task of regularly updating root certificates in an Internet-isolated Active Directory domain, there is a slightly more complicated scheme for updating local certificate stores on domain joined computers using Group Policies. You can configure root certificate updates on user computers in the isolated Windows networks in several ways.
The first way assumes that you regularly manually download and copy to your isolated network a file with root certificates obtained as follows:
certutil.exe –generateSSTFromWU roots.sst
Then the certificates from this file can be distributed via SCCM or PowerShell logon script in GPO:
$sstStore = (Get-ChildItem -Path \\fr-dc01\SYSVOL\woshub.com\rootcert\roots.sst )
$sstStore | Import-Certificate -CertStoreLocation Cert:\LocalMachine\Root
The second way is to obtain the actual root certificates using the command:
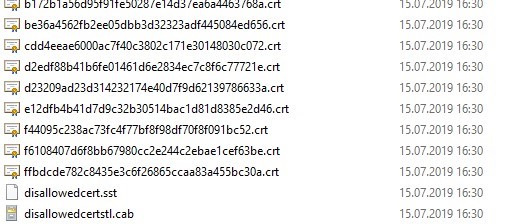
Certutil -syncWithWU -f \\fr-dc01\SYSVOL\woshub.com\rootcert\
A number of root certificate files (CRT file format) will appear in the specified network shared folder, including files (authrootstl.cab, disallowedcertstl.cab, disallowedcert.sst, thumbprint.crt).
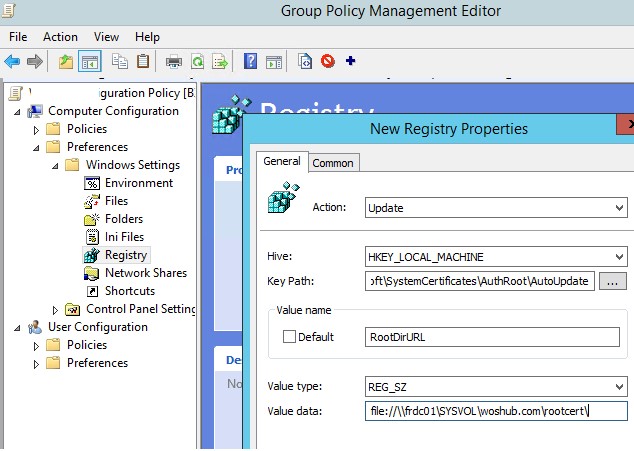
Then, using Group Policy Preference, you need to change the value of the RootDirURL parameter in the registry key HKLM\Software\Microsoft\SystemCertificates\AuthRoot\AutoUpdate. This parameter should point to the shared network folder from which your Windows computers should receive new root certificates. Run the domain GPMC console, create a new GPO, switch to the edit policy mode and expand the section Computer Configuration -> Preferences -> Windows Settings -> Registry. Create a new registry property with the following settings:
- Action: Update
- Hive: HKLM
- Key path: Software\Microsoft\SystemCertificates\AuthRoot\AutoUpdate
- Value name: RootDirURL
- Type: REG_SZ
- Value data: file://\\fr-dc01\SYSVOL\woshub.com\rootcert\
It remains to link this policy on a computer`s OU and after updating the policies to check for new root certificates in the certstore.
In this article, we looked at several ways to renew trusted root certificates on a Windows network that is isolated from the Internet.
Intro to certificates
This article discusses the use of certificates in Universal Windows Platform (UWP) apps. Digital certificates are used in public key cryptography to bind a public key to a person, computer, or organization. The bound identities are most often used to authenticate one entity to another. For example, certificates are often used to authenticate a web server to a user and a user to a web server. You can create certificate requests and install or import issued certificates. You can also enroll a certificate in a certificate hierarchy.
Shared certificate stores
UWP apps use the new isolationist application model introduced in WindowsВ 8. In this model, apps run in low-level operating system construct, called an app container, that prohibits the app from accessing resources or files outside of itself unless explicitly permitted to do so. The following sections describe the implications this has on public key infrastructure (PKI).
Certificate storage per app container
Certificates that are intended for use in a specific app container are stored in per user, per app container locations. An app running in an app container has write access to only its own certificate storage. If the application adds certificates to any of its stores, these certificates cannot be read by other apps. If an app is uninstalled, any certificates specific to it are also removed. An app also has read access to local machine certificate stores other than the MY and REQUEST store.
Cache
Each app container has an isolated cache in which it can store issuer certificates needed for validation, certificate revocation lists (CRL), and online certificate status protocol (OCSP) responses.
Shared certificates and keys
When a smart card is inserted into a reader, the certificates and keys contained on the card are propagated to the user MY store where they can be shared by any full-trust application the user is running. By default, however, app containers do not have access to the per user MY store.
To address this issue and enable groups of principals to access groups of resources, the app container isolation model supports the capabilities concept. A capability allows an app container process to access a specific resource. The sharedUserCertificates capability grants an app container read access to the certificates and keys contained in the user MY store and the Smart Card Trusted Roots store. The capability does not grant read access to the user REQUEST store.
You specify the sharedUserCertificates capability in the manifest as shown in the following example.
Certificate fields
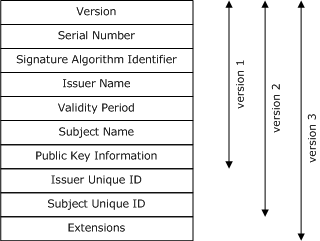
The X.509 public key certificate standard has been revised over time. Each successive version of the data structure has retained the fields that existed in the previous versions and added more, as shown in the following illustration.
Some of these fields and extensions can be specified directly when you use the CertificateRequestProperties class to create a certificate request. Most cannot. These fields can be filled by the issuing authority or they can be left blank. For more information about the fields, see the following sections:
Version 1 fields
| Field | Description |
|---|---|
| Version | Specifies the version number of the encoded certificate. Currently, the possible values of this field are 0, 1, or 2. |
| Serial Number | Contains a positive, unique integer assigned by the certification authority (CA) to the certificate. |
| Signature Algorithm | Contains an object identifier (OID) that specifies the algorithm used by the CA to sign the certificate. For example, 1.2.840.113549.1.1.5 specifies a SHA-1 hashing algorithm combined with the RSA encryption algorithm from RSA Laboratories. |
| Issuer | Contains the X.500 distinguished name (DN) of the CA that created and signed the certificate. |
| Validity | Specifies the time interval during which the certificate is valid. Dates through the end of 2049 use the Coordinated Universal Time (Greenwich Mean Time) format (yymmddhhmmssz). Dates beginning with January 1st, 2050 use the generalized time format (yyyymmddhhmmssz). |
| Subject | Contains an X.500 distinguished name of the entity associated with the public key contained in the certificate. |
| Public Key | Contains the public key and associated algorithm information. |
Version 2 fields
An X.509 version 2 certificate contains the basic fields defined in version 1 and adds the following fields.
| Field | Description |
|---|---|
| Issuer Unique Identifier | Contains a unique value that can be used to make the X.500 name of the CA unambiguous when reused by different entities over time. |
| Subject Unique Identifier | Contains a unique value that can be used to make the X.500 name of the certificate subject unambiguous when reused by different entities over time. |
Version 3 extensions
An X.509 version 3 certificate contains the fields defined in version 1 and version 2 and adds certificate extensions.


