- How to view all network shares in Windows
- Access your computer on the network
- View your computer through «Network neighborhood» or «My Network Places»
- Use the MS-DOS «net share» command
- How to see all shared folders on Windows-10 Home and Pro?
- Show all the shared folders on Windows-10, this example is also for Windows 8.1 and Windows 7!
- 1.) . Show all shared folders on Windows 10! 2.) . Prevent automatically adding shared folders to the Windows 10 Search index!
- 1.) Show all shared folders on Windows 10!
- 2.) Prevent automatically adding shared folders to the Windows 10 Search index!
- Is it possible to see all shared folder list in windows?
- 3 Answers 3
- To view a list of all shared folders
- To disable file sharing
- Command Line Way
- List All Shares
- Stop Sharing a Folder
- Stop Sharing All Folders
- Further Information
- 3 ways to view your shared folders in Windows (all versions)
- 1. View your shared folders using File Explorer or Windows Explorer (in all Windows versions)
- 2. View your shared folders using Computer Management (in all Windows versions)
- 3. View your shared folders using Command Prompt or PowerShell (in all Windows versions)
- How do you prefer to view shared folders in Windows?
- Find all shared folders in Windows 10
- Method 1. Easiest way to find out which files or folders you’ve shared over a network in Windows 10
- Method 2. View a list of all shared folders in Windows 10 in Command Prompt
- Method 3. Find all shared folders in Windows 10 from Computer Management
How to view all network shares in Windows
Below are different methods of how a Microsoft Windows users may view their shares.
Access your computer on the network
To view visible shares in Windows, open the network path to your computer. For example, if your computer was named hope, you could view your computer by clicking Start, Run, and typing \\hope. Running this command opens a window and displays all available network shares. It is important to realize that this method does not show hidden shares. You need to use the net share command explained below to view hidden shares.
View your computer through «Network neighborhood» or «My Network Places»
Opening your computer through «Network neighborhood» or «My Network Places» allows you to view your computer’s shares and any other computer’s shares in your network.
«Network neighborhood» or «My Network Places» is accessible through the desktop. If you double-click one of these icons, and then double-click the workgroup belonging to your computer, you can view your computer’s shares.
Hidden shares are not displayed.
Use the MS-DOS «net share» command
Microsoft Windows users can use the «net share» command to view all shares (including the hidden shares) on a computer. To use this command, follow the steps below.
- Click Start, Run, type cmd, and press Enter .
- At the MS-DOS prompt, type net share and press Enter . Each of the shares, the location of the resource, and any remarks for that share are displayed. Below is an example of how this may look.
How to see all shared folders on Windows-10 Home and Pro?
Show all the shared folders on Windows-10, this example is also for Windows 8.1 and Windows 7!
Content / Solution / Tip:
1.) . Show all shared folders on Windows 10!
2.) . Prevent automatically adding shared folders to the Windows 10 Search index!
In this Windows 10 FAQ «Show All Shares» is a solution / simple explain how you can view all the shared directories (folders) that exist on your computer at once! However, anyone who is new to Microsoft’s Windows OS or just starting to build a home network may not know what releases are and what shares can be used for.
1.) Show all shared folders on Windows 10!
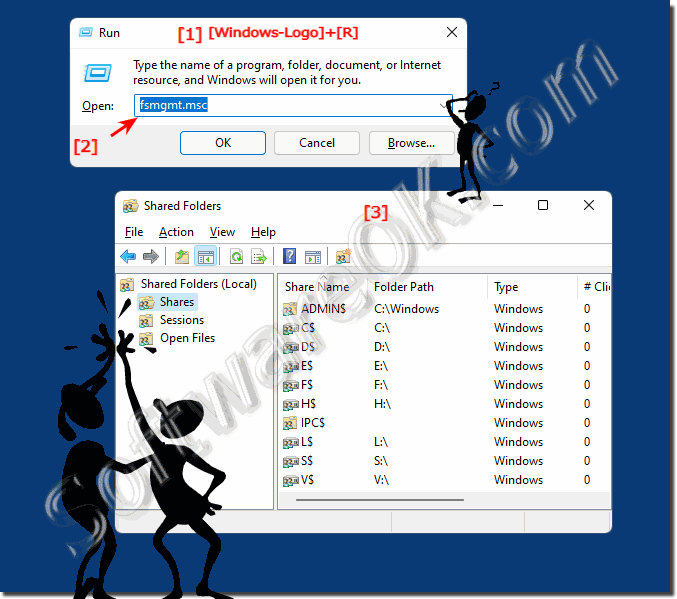
If you want to see all shared folder on Windows 10, please use the command : fsmgmt.msc via WINDOWS+R Run-Dialog
| (Image-1) All shared folders on Windows! |
 |
If you have set up your own home network, you have many functions at your disposal and you can share the files saved on your PC with your home network group for other devices. To learn how to share files, folders, and drives on the home network, read this part: ► Command to open Advanced sharing settings in Windows 10?

Useful info (c) Microsoft:
You can use in Windows 10 the Shared Folders Microsoft Management Console (MMC) snap-in to centrally manage file shares on a computer. Shared Folders enables you to create file shares and set permissions, as well as view and manage open files and users connected to file shares on the Windows 10 computer.
The maximum number of users allowed to connect to a shared folder is limited by software licensing terms.
You can disconnect users from a shared folder by using the Shared Folders MMC snap-in or by using the command prompt. You cannot disconnect users through Windows 10 Explorer.
Share permissions apply to users who connect to a shared folder over the network. Share permissions do not affect users who log on locally, or log on using Remote Desktop.
View all shared folders on example is usable on: Windows 10 Pro, Enterprise, Home, Windows 8.1, Windows 8, Windows-Server 2019, 2016, 2012, Windows 7 Basic, Professional, Starter, Ultimate
2.) Prevent automatically adding shared folders to the Windows 10 Search index!
For this action you need Admin Privileges on Windows 10
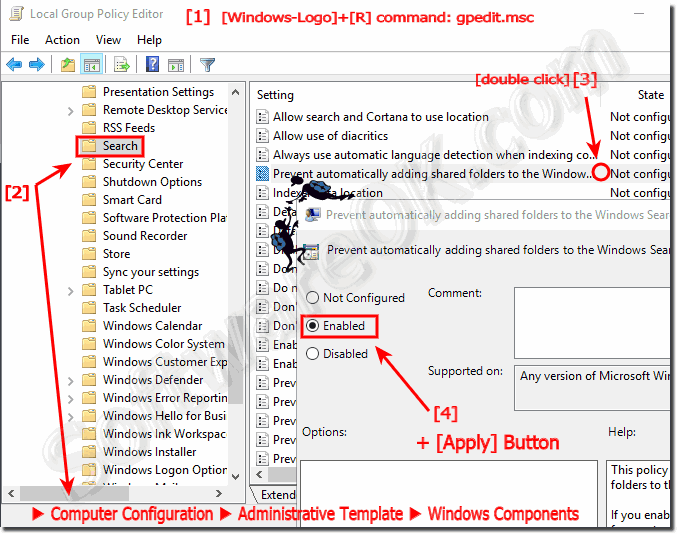
Please Run the command gpedit.msc and open the Sub Folder:
Computer Configuration ► Administrative Template ► Windows Components ►Search
Select in List View Prevent automatically adding shared folders to the Windows Search index do Right Click
| (Image-2) Shared folders Windows-10 Search Index! |
 |
Over time, you lose track: which of your own folders are actually given free? Windows has just the right tool for this purpose, which clearly shows you all important information about releases.
Info about this policy:
If you disable or do not configure this policy setting, Windows 10 Search monitors which folders are shared or not shared on this computer, and automatically adds them to or removes them from the index.
Is it possible to see all shared folder list in windows?
We have LAN connected different OS installed systems. If I want to see all shared folder list in windows 7 and its access level whether read or read and write, how and where can I see? Is there any option to stop all shared folders with a single click?

3 Answers 3
To view a list of all shared folders
- Click the Windows button
- Right-click Computer and choose Manage (requires administrative priveleges)
- Traverse to Computer Management > System Tools > Shared Folders > Shares
Note: in Windows 8 and 10 the Computer Management is easy accessible through the Windows key + x shortcut, as a part of the Power User Menu
To disable file sharing
- Click the Windows Logo button.
- Type file sharing in the search results window, and then touch Enter.
- Under «File and Printer Sharing», check to be sure that Turn off file and printer sharing is selected.
- Under «Public Folder Sharing», check to be sure that Turn off public folder sharing is selected.
- Click Save Changes.

Command Line Way
List All Shares
Stop Sharing a Folder
Stop Sharing All Folders
Write a script, and double-click it!
The following script will stop sharing sharename and Share Name 2 . Replace these with your own share names. Save as stopsharing.bat .
Note how share names with spaces in them must be enclosed by quotes.
Further Information
Learn about more features including how to add shares from the command line.
You can use Network Scanner. Tiny portable software, just input the range of ips you want to see.
SoftPerfect Network Scanner is a free multi-threaded IP, NetBIOS and SNMP scanner with a modern interface and many advanced features. It is intended for both system administrators and general users interested in computer security. The program pings computers, scans for listening TCP/UDP ports and displays which types of resources are shared on the network (including system and hidden).
In addition, it allows you to mount shared folders as network drives, browse them using Windows Explorer, filter the results list and more. SoftPerfect Network Scanner can also check for a user-defined port and report back if one is open. It can also resolve host names and auto-detect your local and external IP range. It supports remote shutdown and Wake-On-LAN.
3 ways to view your shared folders in Windows (all versions)
Are you looking for an answer to the question: “Where can I see all the folders shared on my Windows computer or device?” We thought it was a really good question and we decided to answer it. We have three different alternatives to discuss: one using File or Windows Explorer, one using Computer Management, and one using Command Prompt or PowerShell. All these methods work in all modern versions of Windows. So, if you want to learn how to find the shared folders on your Windows computer or how to find the path of a shared folder, read on:
1. View your shared folders using File Explorer or Windows Explorer (in all Windows versions)
The simplest method for viewing the folders that you have shared in Windows is from File Explorer if you’re using Windows 10 or 8.1, or Windows Explorer if you’re using Windows 7. Open it, and then expand the Network section from the left side of the window, and click or tap on the name of your Windows PC. This shows you the list of folders shared by your computer or device with the network.
The problem with this view is that it does not show hidden shares and doesn’t give too much information about how each folder is shared. However, you can right-click or press and hold on each folder and then press Properties, or hit ALT + Enter on your keyboard.
This opens the Properties window of the selected shared folder. You can use it to access more information about how the folder is shared, the security settings it has and so on.
Even though this method works, it is not an elegant way to see your shared folders or to manage them. There are better alternatives.
2. View your shared folders using Computer Management (in all Windows versions)
The best tool for getting the full list of folders that you’re sharing on your PC is Computer Management. Open Computer Management and, on the left side of the window, browse “System Tools -> Shared Folders -> Shares.”
The central panel from Computer Management loads the complete list of all the folders and partitions that are shared by your Windows computer or device. You see both the folders you shared and the default shares of Windows, such as C$ and D$ (which are the partitions on your PC), as well as the default remote administration shares created by Windows, like ADMIN$.
For each shared folder or partition, you see the official share name (as it is viewed by others on the network, if not hidden), the exact folder path, the type of share, the number of connections made from the network to that folder and a short description (if available).
If you double-click or double-tap on a shared folder, its Properties window opens. There you can manage the different sharing parameters such as the share name, description, and the maximum number of users that are allowed to connect to the shared folder simultaneously.
If you go to the Share Permissions tab from the Properties window, you can view and set which users and user groups have access to the shared folder and the type of access that each of them has.
Going back to the Computer Management window, if you click or tap the Sessions link from the left side column, you can see the list of users who are currently connected to your network shares. For each user, you can see the device from where the connection is made, how many files he or she has opened, the time since the connection was initiated, and so on.
In the same column, the Open Files link shows all the files and folders that are accessed by the users who are connected to your network shares.
All this is really useful information, isn’t it?
3. View your shared folders using Command Prompt or PowerShell (in all Windows versions)
You can also get the complete list of the folders that you’re sharing with the network, from the Command Prompt or PowerShell. Open the tool you prefer and type net share. Then press Enter on your keyboard, and the list with shared folders is instantly generated.
Furthermore, if you want to find the path of a shared folder, it’s easy because the net share command also outputs this information in the Resource column.
Neat, right? Obviously, the same command can be run in PowerShell too.
How do you prefer to view shared folders in Windows?
As always with Windows operating systems, there is more than one way of doing something. Try the methods that we have showed you in this guide and then tell us which one works best for you, in the comments below.
Find all shared folders in Windows 10

Windows 10 allows users to quickly share files and folders in the same network, at home or office. For example, you can enable File Sharing on Windows PC, then connect your Android or iPhone to PC via Windows File Sharing. When you do not want them to be shared any more, you have to disable these public and shared folders in time. Otherwise it is risky as you may put private files and documents in them unintentionally. It is not difficult to turn off the file and folder sharing in the network on a PC. Sometimes however it is easy to lose track of which files and folders we are sharing from our computer. For example, a user may share sub-folders or different folders on another hard disk other than the public folders (C:\Users\Public\Public Documents, Public Music, Public Pictures, etc.) in system drive the Windows OS provides. Today, we will share with you several ways to quickly find and view a list of all shared folders in Windows 10.
Method 1. Easiest way to find out which files or folders you’ve shared over a network in Windows 10
Open File Explorer on your Windows 10 computer, then type \\localhost into the address bar and press Enter to view all shared folders on your Windows 10 PC.
Method 2. View a list of all shared folders in Windows 10 in Command Prompt
There are different ways to access the Command Prompt in Windows 10. You can search ‘command prompt‘ in the task bar at the lower-left corner to quickly find and open the Command Prompt. You can also press the Windows+R key combination on your keyboard, type in CMD, click OK to launch the Command Prompt in Windows 10.

To display all shared folders in Windows 10 in Command Prompt is extremely easy. Just type in the command ‘net share’ and press Enter key on your keyboard to execute the command, the list of all the files, folders and actual location of them in Windows 10 will be displayed in the Command Prompt.
Method 3. Find all shared folders in Windows 10 from Computer Management
On a Windows 10 PC, right click on the Start Menu at the bottom left corner, choose the Computer Management from the pop-up menu list. Navigate to System Tools > Shared Folders > Shares in the left column to display the list of all shared folders in Windows 10 in the middle column of the Computer Management window.


