- Get-Printer
- Syntax
- Description
- Examples
- Example 1: Get a list of printers
- Example 2: Get the information for a specific printer
- Example 3: Get the detailed information for a specific printer
- Example 4: Get a list of printers on a remote computer
- Example 5: Get a list of printer objects and then rename the printers
- Parameters
- Inputs
- Outputs
- How to list all the installed Printers on Windows 10 computer
- List all the Printers installed on Windows 10
- Related Posts
- Windows cannot connect to the printer, Operation failed, Error 0x0000052e
- Unknown Printer driver error 0x80070705 on Windows 10
- How to Turn On or Off File and Printer Sharing in Windows 10
- [email protected]
- How To List Installed Printers in Windows 10
- To List Installed Printers in Windows 10,
- To List Installed Printers in Windows 10 with PowerShell,
- About Sergey Tkachenko
- 3 thoughts on “ How To List Installed Printers in Windows 10 ”
- Install a printer in Windows 10
- Need more help?
- How to Completely Remove Old Printers in Windows 10
- Contents
- How to Remove Old Printers Completely from your Computer
- Delete old Printer drivers via Print Server Properties
- Remove old printers via Print Management
- Delete old printers using the Registry Editor
- Delete driver packages from the driver store to free up disk space
- One small request: If you liked this post, please share this?
- About the author
- 2 thoughts on “How to Completely Remove Old Printers in Windows 10”
Get-Printer
Retrieves a list of printers installed on a computer.
Syntax
Description
The Get-Printer cmdlet retrieves a list of printers installed on a computer. You can also use Get-Printer to retrieve the properties of a single printer, and then use that information as input into other cmdlets.
You can use wildcard characters with Get-Printer. You can use a Get-Printer in a Windows PowerShell remoting session.
You do not need administrator credentials to run Get-Printer.
Examples
Example 1: Get a list of printers
This command retrieves a list of printers and printer connections on the local computer.
Example 2: Get the information for a specific printer
This command retrieves information for one specific printer named Microsoft XPS Document Writer.
Example 3: Get the detailed information for a specific printer
This command retrieves detailed information for one specific printer named Microsoft XPS Document Writer.
Example 4: Get a list of printers on a remote computer
This command retrieves a list of printers from the computer named PrintServer.
Example 5: Get a list of printer objects and then rename the printers
The first command gets the printer named Microsoft XPS Document Writer, and then stores it in the $Printer variable.
The second command renames the printer in $Printer by using the Rename-Printer cmdlet.
Parameters
Runs the cmdlet as a background job. Use this parameter to run commands that take a long time to complete.
| Type: | SwitchParameter |
| Position: | Named |
| Default value: | None |
| Accept pipeline input: | False |
| Accept wildcard characters: | False |
Runs the cmdlet in a remote session or on a remote computer. Enter a computer name or a session object, such as the output of a New-CimSession or Get-CimSession cmdlet. The default is the current session on the local computer.
| Type: | CimSession [ ] |
| Aliases: | Session |
| Position: | Named |
| Default value: | None |
| Accept pipeline input: | False |
| Accept wildcard characters: | False |
Specifies the name of the computer from which to retrieve the printer information.
| Type: | String |
| Aliases: | CN |
| Position: | Named |
| Default value: | None |
| Accept pipeline input: | False |
| Accept wildcard characters: | False |
Specifies all the printer parameters to retrieve including RenderingMode and PermissionSDDL.
| Type: | SwitchParameter |
| Position: | Named |
| Default value: | None |
| Accept pipeline input: | False |
| Accept wildcard characters: | False |
Specifies the name of the printer about which to retrieve information.
| Type: | String [ ] |
| Position: | 0 |
| Default value: | None |
| Accept pipeline input: | True |
| Accept wildcard characters: | False |
Specifies the maximum number of concurrent operations that can be established to run the cmdlet. If this parameter is omitted or a value of 0 is entered, then Windows PowerShellВ® calculates an optimum throttle limit for the cmdlet based on the number of CIM cmdlets that are running on the computer. The throttle limit applies only to the current cmdlet, not to the session or to the computer.
| Type: | Int32 |
| Position: | Named |
| Default value: | None |
| Accept pipeline input: | False |
| Accept wildcard characters: | False |
Inputs
None
This cmdlet accepts no input objects.
Outputs
This cmdlet outputs one or more printer objects.
How to list all the installed Printers on Windows 10 computer
You can install multiple printers on a Windows computer. Now when you have installed many Printer, you may want to list all the installed printers. Today we will show you how to carry out this task using different. methods.
List all the Printers installed on Windows 10
You can use the following four ways can be used to list all the installed Printers on Windows 10:
- Using Control Panel.
- Via Windows 10 Settings App.
- Using Windows PowerShell.
- Using Command Prompt.
Let us see these methods in details.
1] Using Control Panel
Open Control Panel. Select Devices and Printers.
Under the section of Printers, you will find all the printers installed on your computer.
2] Using Windows 10 Settings App
Open the Windows 10 Settings App. Select Devices.
Then click on Printers & scanners.
Under the section of Printers & scanners, you will find all the installed printers on your computer.
3] Using Windows PowerShell
Run Windows PowerShell and execute this command to list the names 0f the installed printers:
Execute this command to list all the details of the installed printers:
Run this command to save all the details of the installed printers to a text file on the Desktop:
4] Using Windows Command Prompt
To list the installed printers, execute this command:
To save the list of the installed printers, execute this command:
I hope you find this guide useful.
Now read: How to list Printers using the same printer driver, separately in Windows 10.
Date: August 7, 2019 Tags: Printer
Related Posts
Windows cannot connect to the printer, Operation failed, Error 0x0000052e
Unknown Printer driver error 0x80070705 on Windows 10
How to Turn On or Off File and Printer Sharing in Windows 10
[email protected]
Ayush has been a Windows enthusiast since the day he got his first PC with Windows 98SE. He is an active Windows Insider since Day 1 and is now a Windows Insider MVP. He has been testing pre-release services on his Windows 10 PC, Lumia, and Android devices.
How To List Installed Printers in Windows 10
In Windows 10, it is possible to create a list of all installed printers, and save it to a file. There are a number of methods you can use. Let’s review them.
In Windows 10, you can manage the printer queue using Devices and Printers in the classic Control Panel app or in Settings->Devices->Printers and Scanners. However, these tools do not allow creating a list of installed printers.
To create such a list, we can use the built-in tools, wmic and PowerShell.
WMIC stands for ‘WMI command-line’. This tool provides a command-line interface for WMI. WMI has been an important part of Microsoft’s systems management initiative since Microsoft Systems Management Server (SMS) 2.0 and has grown in popularity since the introduction of Windows 2000. WMIC extends WMI for operation from several command-line interfaces and through batch scripts. WMIC is compatible with existing shells and utility commands.
To List Installed Printers in Windows 10,
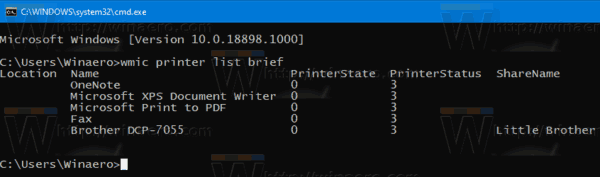
- Open a new command prompt
- Type the following command: wmic printer list brief . This will show the list of installed printers.

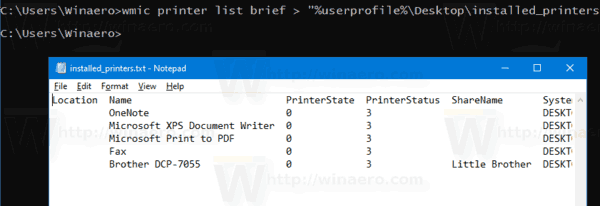
- To save the list to a file, issue the command wmic printer list brief > «%userprofile%\Desktop\installed_printers.txt» . This will create a new file, installed_printers.txt, on your Desktop. It will contain the list of all installed printers.
Alternatively, you can use PowerShell for the same purpose.
PowerShell is an advanced form of command prompt. It is extended with a huge set of ready-to-use cmdlets and comes with the ability to use .NET framework/C# in various scenarios. Windows includes a GUI tool, PowerShell ISE, which allows editing and debugging scripts in a useful way.
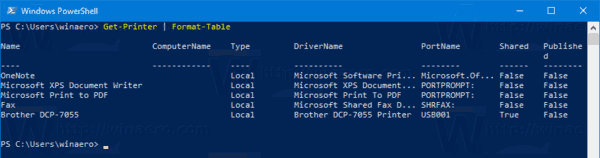
To List Installed Printers in Windows 10 with PowerShell,
- Open PowerShell. Tip: You can add «Open PowerShell As Administrator» context menu .
- Type or copy-paste the following command to list your installed printers:
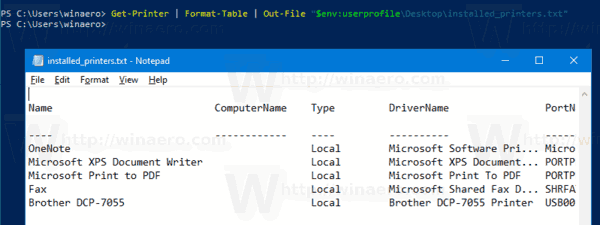
To save the list to a file, execute the command:
Finally, you can find the list of your installed printers in Settings > Devices -> Printers & scanners: 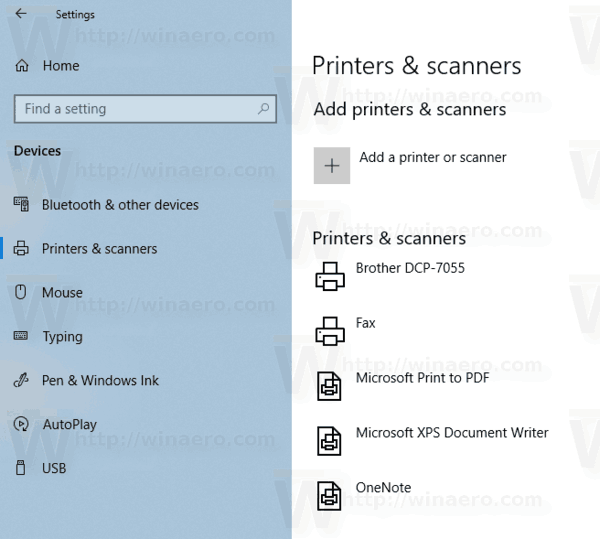
And also in the classic Control Panel under Control Panel\Hardware and Sound\Devices and Printers.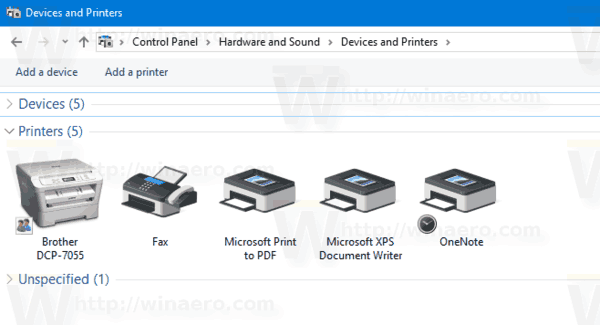
Winaero greatly relies on your support. You can help the site keep bringing you interesting and useful content and software by using these options:
Share this post
About Sergey Tkachenko
Sergey Tkachenko is a software developer from Russia who started Winaero back in 2011. On this blog, Sergey is writing about everything connected to Microsoft, Windows and popular software. Follow him on Telegram, Twitter, and YouTube.
3 thoughts on “ How To List Installed Printers in Windows 10 ”
There is another window to show all the installed printers (only with Windows Pro) :
%systemroot%\system32\printmanagement.msc
Within this window, you can see all the printers (even the printers who disappear in the traditional “Devices and printers” window. You can select them all or some of them and delete them in bulk. Export of the list is easy with the Action button at the left.
I have upgraded all my PC’s to Windows 10 Pro to have this option enabled, since so many of my printers disappeared from the classic window.
Thank you very much. Completely forgot about this snap-in.
Install a printer in Windows 10
When you connect a printer to your PC or add a new printer to your home network, you can usually start printing right away. Windows 10 supports most printers, so you probably won’t have to install special printer software. Additional printer drivers and support might be available if you update Windows 10.
Note: If your PC is running Windows 10 S, some printers might not work with it, or they might have limited functionality. For more info, see Device support on Windows 10 S.
If your printer is on and connected to the network, Windows should find it easily. Available printers can include all printers on a network, such as Bluetooth and wireless printers or printers that are plugged into another computer and shared on the network. You might need permission to install some printers.
Select the Start button, then select Settings > Devices > Printers & scanners.
Open Printers & scanners settings
Select Add a printer or scanner. Wait for it to find nearby printers, then choose the one you want to use, and select Add device.
If your printer isn’t in the list, select The printer that I want isn’t listed, and then follow the instructions to add it manually using one of the options.
If you use wireless access points, extenders or multiple wireless routers with separate SSIDs, you’ll need to ensure that you’re connected to the same network as the printer for your PC to find and install it.
If you have a new wireless printer that hasn’t been added to your home network, read the instructions that came with the printer, and check the printer manufacturer’s website to learn more and to get up-to-date software for your printer.
In most cases, all you have to do to set up a printer is to connect it to your PC. Simply plug the USB cable from your printer into an available USB port on your PC, and turn the printer on.
Select the Start button, then select Settings > Devices > Printers & scanners.
Open Printers & scanners settings
Select Add a printer or scanner. Wait for it to find nearby printers, then choose the one you want to use, and select Add device.
If your printer isn’t in the list, select The printer that I want isn’t listed, and then follow the instructions to add it manually using one of the options.
Need more help?
If you’re looking for help with a scanner, see Install and use a scanner in Windows 10.
If your printer appears «offline,» find out how you can Change a printer’s status to «online.»
If you’re having problems with your printer after updating to the latest version of Windows 10, see Fix printer problems after updating Windows 10. For driver issues, see the «Step 3: Update drivers» section of this page.
How to Completely Remove Old Printers in Windows 10
When you try to add a new printer by clicking the Add a printer or scanner in the Printer & Scanners page, old printers that you added earlier but no longer in use, may be listed.

This post tells you how to completely remove old, uninstalled or obsolete printers from the Add a Printer and Printers & Scanners pages. The leftover printer drivers, driver packages and registry entries need to be removed.
Contents
How to Remove Old Printers Completely from your Computer
The old or supposedly uninstalled printers may still show up in Printers & Scanners page. In some cases, the entries may show up on the Add Printer list and not in the Printers & Scanners or the Devices page. The following procedure helps you uninstall or complete remove your old printer along with its drivers and drive store package.
To remove the old printer entries from the Add a printer or scanner as well as Printers & Scanners page, follow this procedure:
Delete old Printer drivers via Print Server Properties
- Open Printers and Scanners page in Settings.
- Scroll down and click Print server properties link.Tip: Alternately, you can run rundll32.exe printui.dll,PrintUIEntryDPIAware /s or printui /s /t2 command elevated (as administrator) from the run dialog or elevated Command Prompt. The commands open Print Server properties page directly.
- Select the Drivers tab.
- Select the old printer entry from the list, and click Remove
- Select Remove driver and driver package, and click OK.
- Click Delete when you see the Remove Driver Package confirmation prompt.
Remove old printers via Print Management
The Print Server properties method should do the trick. As an alternative, you can use the Print Management console to remove old printers and their drivers. Print Management is a Microsoft console which lets you view and manage printers and print jobs on the computer.
- Open Print Management via Start Search. Or run the command printmanagement.msc to launch Print Management.
- Select All printers section.
- Right-click on the old printer if listed in the right-pane, and choose Delete.
- Select All drivers.
- Right-click on the old printer, and click on the option Remove driver package or click Delete.
Delete old printers using the Registry Editor
Even after you uninstall and delete the printers using the above methods, the Add a printer page may still show up your old printers. You need to edit the registry to remove the remnant entries.
- Create a System Restore point.
- Right-click Start, click Run. Type regedit.exe and press ENTER . This opens the Registry Editor.
- Go to the following registry key:
- In the right-pane, right-click the printer you want to remove, and choose Delete .
- Do this for every other printer you want to remove.
- Also, check the printer entries under the following key and delete the unwanted item(s):
- Go to the following key:
- Expand the key and select the old printer listed under the key.
- Right-click on the old printer and choose Delete.
- Additionally, one of the following subkeys may contain references to your old printers. You may want to clear that as well:
The registry had references to my old inkjet printer HP F4488 (F4400 series). I had to delete it and its driver store using earlier methods, as I’ve replaced the HP with a Canon G2012 series printer recently.
Delete driver packages from the driver store to free up disk space
Even after removing the driver packages using the methods above, some remnant drivers may exist in the driver store. The driver store is a trusted location of the inbox and third-party driver packages. Before a driver can be installed, it must first be stored in the driver store folder located under C:\Windows\System32\DriverStore\FileRepository
Each subfolder stores a driver package along with the respective .inf file. The driver store folders have cryptic names and it’s a tedious job to find the driver package you want to delete.
Thankfully, we have the excellent DriverStore Explorer tool that does the job for you.
DriverStore Explorer [RAPR] is a third-party program that makes it easier to deal with the Windows driver store. It supports operations including enumeration, adding a driver package (stage), adding & installing, deletion and force deletion from the driver store.
If you look at this image, you can see that there is till 9 MB of HP printer drivers leftover. This happened even after I removed the driver packages via Print Server Properties. Evidently, those two methods weren’t enough.
All I had to do was select the old HP printer driver from the list, click Remove. Click OK when you see the following warning:
Warning
About to delete prnhpcl1.inf (oem32.inf) from driver store.
This removed the old HP printer’s .inf file, its driver package thus saving 9 MB of space.
Hope the above methods helped you completely remove old printer entries, the drivers and driver packages from your Windows computer.
One small request: If you liked this post, please share this?
About the author
Ramesh Srinivasan founded Winhelponline.com back in 2005. He is passionate about Microsoft technologies and he has been a Microsoft Most Valuable Professional (MVP) for 10 consecutive years from 2003 to 2012.
Microsoft → Windows → Windows 10 → How to Completely Remove Old Printers in Windows 10
2 thoughts on “How to Completely Remove Old Printers in Windows 10”
Why do we always get “RPC Error” when using the PrintUI or “Print Server” methods of deletion?
Thanks. This was exactly what I was looking for.


