- List of user groups command line
- How to open Local Users and Groups on Windows 10
- Open Local Users and Groups on Windows 10
- 1] Using the Computer Management utility
- 2] Directly by using lusrmgr.msc
- Using the Run box
- Using Windows Search box
- Using Windows 10 Command Prompt
- Using Windows PowerShell command line
- Add or remove Users from Group
- Add a User to Group using Command Prompt
- Remove a User from a Group using Command Prompt
- Add a User to Group using PowerShell
- Remove a User from a Group using PowerShell
- How do I view all the users on a Windows computer? (5 ways)
- Quick Steps:
- 1. How to see users using the Windows command line (PowerShell & CMD list users)
- 2. How to use PowerShell to get all users on a computer
- 3. How to see the list of all user accounts in Computer Management
- 4. How to see the list of active user accounts using the Control Panel
- 5. How to see the list of active user accounts on the Windows sign-in screen
- Did you find many hidden user accounts on your Windows PC?
- 5 Ways to See All User Accounts Existing on Windows 10
- Way 1: See all user accounts from the login screen
- Way 2: See all user accounts using Control Panel
- Way 3: See all user accounts using Computer Management tool
- Way 4: See all user accounts using Command Prompt
- Way 5: See a list of all user accounts using Windows Password Refixer
List of user groups command line
On Windows OS we can find the list of local user groups created on a system from Contorl Panel -> User Accounts. This information can be obtained from command line also using net command. Syntax is shown below.
Example: Running this command shows the following local groups on my system.
How to list the users in a local group?
Use the below command to know the list of members of a group from command line.
For example to get the list of all remote desktop users on a system we can run the below command.
How to find the list of all groups a user is member of?
You can run the below command to list the groups a user is member of. This command prints the details of the given user account. You can find the group membership information in the last two line of this command output.
Useful references, however “net use username” should be changed to “net user username”
Thank you Kennedy. Corrected the command.
Please get me a command which will display all local users as: LOGIN, FULL NAME, DESCRIPTION, GROUP etc..
I’d just like to express my frustration with this API. As you can see in these examples, thet net API localgroups functionality will happily list all members of a group. However the net user code completely ignores system accounts, as does most of the rest of what Windows makes available. Internally they are organized as a subclass of Win32_Account but not Win32_UserAccount. So it’s possible to retrieve a bunch of useless information from the Windows API. This happens with LookupAccountSid as well. If you give it an SID like S-1-5-20, it will give you an answer. But the answer it gives you can’t be used as input for anything else, which is obnoxious.
You can query if users exist by doing
SET /P query_user=What user do i look for?
::Take out /domain if you want to look on the local computer
Net User %query_user% /domain
if NOT %errorlevel% == 0 goto s_error_1
if %errorlevel% == 0 goto s_success_1
“net user /domain username” lists only the groups to which the username is a direct member. It can’t show nested groups. I was doing a quick check to see if a username was a member of a group:
net user /domain username | find “Group Name”
That fails since the user is not directly a member of “Group Name”. In reality, they are a member, as they’re a member of a nested group.
Any idea of a command line that will expand groups to look for a particular member? I’ve used the “dsquery” and “dsget” commands, but they are only present if the AD tools are installed.
Very useful thanks, didn’t worked for me the first time.
The command is not case sensitive.
For example “NET USER /DOMAIN MYDOMAIN/MyUser” Didn’t worked.
But “NET USER /DOMAIN MyUser” works fine!
So not necessary to put explicitly the domain.
By the way it means also you can’t query another domain than the main one you are logged on to ?
Is there any option where we can get the multiple user’s output in excel for local computer and remote computer
net user userName
How to open Local Users and Groups on Windows 10
Apart from what is visible to you on the login screen, Windows 10 tends to create several users and groups in the background to carry out several tasks on a computer. However, they are not visible to a normal user and are logged in in the background and serve a great deal in permission structuring. Let us learn how to see and to manage Local Users and groups on a Windows 10/8/7 on the computer.
Open Local Users and Groups on Windows 10
The following methods will help you to open and view Local Users and Groups on Windows 10:
- Using the Computer Management utility
- Directly by using lusrmgr.msc.
Let us look at the procedure in detail. We will also take a look at how to add or remove Users from a Group.
1] Using the Computer Management utility
Open the WinX menu and select Computer Management.
From the left side navigation panel, select Local Users and Groups under the expanded list of Computer Management (Local).
You will see two folders here:
- Users and
- Groups.
Expanding each will give you the required details.
2] Directly by using lusrmgr.msc
To open Local Users and Groups window, you have to invoke its process, which is called lusrmgr.msc, and you can do this in the following four ways.
Using the Run box
Hit the Windows Key + R button combination on your keyboard.
Type in lusrmgr.msc and hit Enter.
It will open the Local Users and Groups window.
Using Windows Search box
Hit the Windows Key + S button combination on your keyboard. It will launch the Windows Search Box.
Search for lusrmgr.msc and hit Enter.
The Local Users and Group window will now be open.
Using Windows 10 Command Prompt
Open Windows Command Prompt and execute the following command:
You will arrive at your destination window.
Using Windows PowerShell command line
Open Windows PowerShell and execute the following command:
It will open at your destination window.
Add or remove Users from Group
To add or remove Users from a Group:
- Open the Groups folder
- Select the Group
- Double-click on the group
- Under the Members box, select the user you want to delete.
- Click on the Delete button.
To add a User, click the Add button and follow the process.
Add a User to Group using Command Prompt
You need to execute the following command:
Replace GROUP and USER with the actual names.
Remove a User from a Group using Command Prompt
You need to execute the following command:
Replace GROUP and USER with the actual names.
Add a User to Group using PowerShell
You need to execute the following command:
Replace GROUP and USER with the actual names.
Remove a User from a Group using PowerShell
You need to execute the following command:
Replace GROUP and USER with the actual names.
I hope this helps.
Windows 10 Home user? These links may interest you:
- Use freeware Lusrmgr tool to access Local User and Group Management in Windows 10 Home
- Open and Manage Local User and Group Management in Windows 10 Home using Command Prompt or PowerShell.
How do I view all the users on a Windows computer? (5 ways)
Sometimes, you may need to extract a list of all the user accounts on a Windows computer. Or you may want to know the hidden user accounts that exist alongside your user account. To help you out, we compiled a list of five methods that you can use to see all the users, including the hidden ones created by Windows or third-party apps that you installed. Here they are:
Quick Steps:
- Open CMD or PowerShell.
- Type net user, and press Enter.
- Net user lists the users that have accounts configured on a Windows PC, including hidden ones or disabled user accounts.
NOTE: This guide covers Windows 10, Windows 7, and Windows 8.1. If you don’t know the Windows version that you have, read How to tell what Windows I have (11 ways).
1. How to see users using the Windows command line (PowerShell & CMD list users)
This method works both in the Command Prompt and PowerShell. Open the command-line app that you prefer, type net user, and press Enter. Net user lists the users that have accounts configured on a Windows PC, including hidden ones or disabled user accounts. The user accounts are listed by their internal names that Windows uses behind the scenes, not by their full display name that you see when you sign in to Windows.
Run net user to make Windows CMD show users
You can also have the net user list stored in a text file that opens in Notepad or any other text editor. Type net user > filename.txt, and a file with the name you provided is created under “C:\Users\Your User Name.”
Save the net list of users to a file using net user > filename.txt
If you want to export the CMD list of users to a text file that’s saved in a location you choose, enter net user > “path\filename.txt” and press Enter.
Export the CMD list of users to a file at a specified location
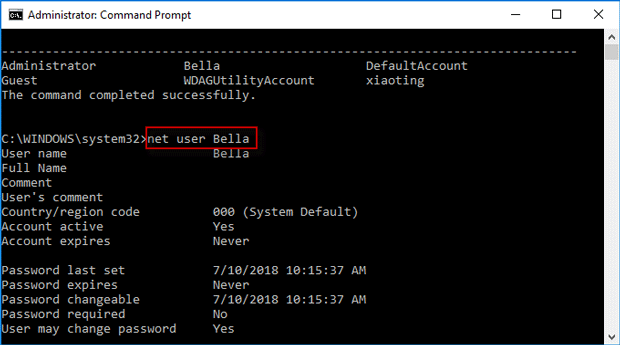
A neat trick is using this command to find information about a specific user account: type net user username and press Enter. Windows then displays helpful information about that user account, like when the password was set the last time, when it expires (if it’s set to expire), the groups it’s a part of, and more.
Getting details about a user account in CMD, using the net user command
If you want to know more about this command and all its parameters, go to this documentation page: Net user.
2. How to use PowerShell to get all users on a computer
Besides the net user command, here’s another command that you can use in PowerShell to view all users in Windows 10 or previous versions: Get-WmiObject Win32_UserAccount -filter “LocalAccount=True” | Select-Object Name,FullName,Disabled.
Get-WmiObject Win32_UserAccount -filter “LocalAccount=True” | Select-Object Name,FullName,Disabled
Alternatively, if you use Windows 10, you can also run the simpler get-localuser command, as pointed out by one of our readers.
Using PowerShell to get all users on a computer
3. How to see the list of all user accounts in Computer Management
Another method that displays all user accounts, including hidden users or disabled ones, involves using Computer Management. Open Computer Management, and go to “Local Users and Groups -> Users.” On the right side, you get to see all the user accounts, their names as used by Windows behind the scenes, their full names (or the display names), and, in some cases, also a description.
Windows list of users displayed in Computer Management
Double-click or double-tap on a user account to learn more about its properties and settings, including the user groups that it is part of.
4. How to see the list of active user accounts using the Control Panel
A method that is less geeky but which also displays less information involves opening the Control Panel. After you start it, go to “User accounts” or “User Accounts and Family Safety,” depending on the Windows version that you have.
The User Accounts entry from the Control Panel
Then, click or tap on User accounts.
Opening the User Accounts settings
Now you see your user account, information about it, and several links. Click or tap the link that says “Manage another account.”
Manage another account
Now you see the active, not-hidden user accounts in Windows, whether they are local accounts, administrators, etc.
Control Panel shows the list of users on a Windows computer
With this method, you cannot see hidden or disabled user accounts.
5. How to see the list of active user accounts on the Windows sign-in screen
The obvious and most straightforward method is to look at the sign-in screen just before you log into Windows. You should see all the active (not hidden) user accounts that exist in Windows on this screen. If you are using Windows 10, this list is shown in the bottom-left corner of the sign-in screen.
Windows 10 list of users shown on the sign-in screen
If you are using Windows 7, all active user accounts are displayed front and center.
Windows 7 list of users shown on the sign-in screen
The same is true when using the Windows 8.1 sign-in screen.
Windows 8.1 list of users shown on the sign-in screen
The downside of this method is that you cannot see hidden or disabled user accounts.
Did you find many hidden user accounts on your Windows PC?
We highly recommend trying the first three methods for identifying all the user accounts that exist on your Windows computer or device. You may be surprised to see that some of your apps created hidden user accounts that you had no idea existed. Before closing this tutorial, share in a comment whether you found hidden user accounts on your PC and how many of them were there. We are curious to know.
5 Ways to See All User Accounts Existing on Windows 10
Occasionally for some reason, you may want to view a full list of all user accounts that exist on Windows 10. Now, this page introduces five ways you can see all user accounts on Windows 10.
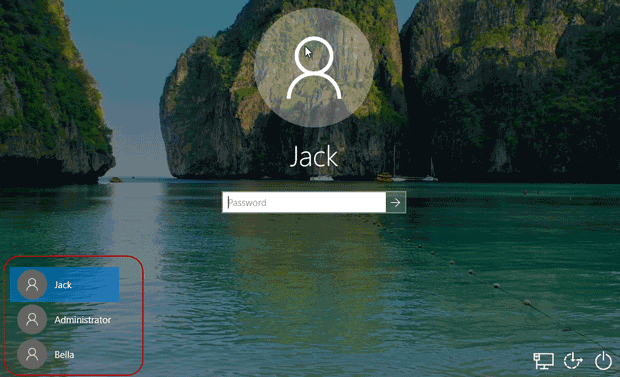
Way 1: See all user accounts from the login screen
All active user accounts on Windows 10 display in a list in the lower left corner of the login screen. You can see all of them when you are at the login screen. But the disabled or hidden user accounts won’t display here.
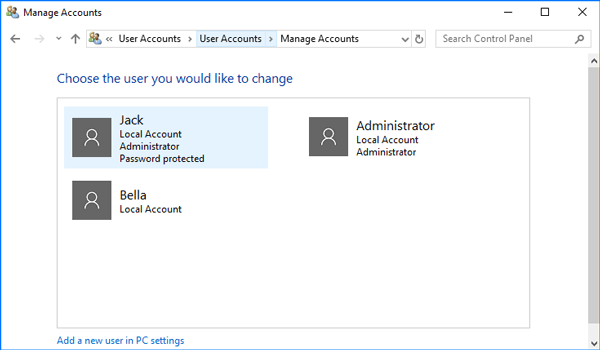
Way 2: See all user accounts using Control Panel
Open the Control Panel in Windows 10, and go to User Accounts > User Accounts > Manage Another Accounts.
Then from here, you can see all user accounts that exist on your Windows 10, except those disabled and hidden ones.
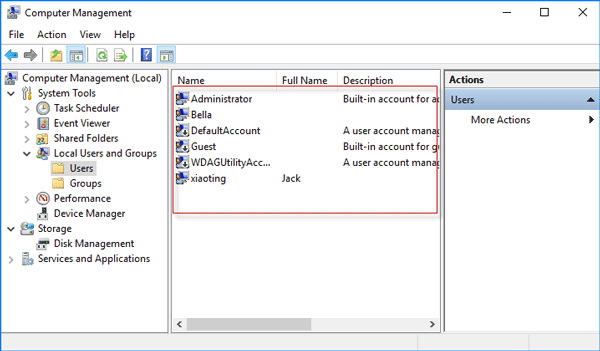
Way 3: See all user accounts using Computer Management tool
Step 1: Right-click on This PC and select Manage from the context menu to open Computer Management.
Step 2: Expand System Tools > Local Users and Groups, and then select the Users folder, so that it will list all user accounts existing on your Windows 10, including the disabled or hidden accounts. Furthermore, you can double-click on each user’s name to see its properties if you want.
Way 4: See all user accounts using Command Prompt
Step 2: Type in the command: net user, and then press Enter key so that it will display all user accounts existing on your Windows 10, including the disabled and hidden user accounts. They are arranged from left to right, top to down.
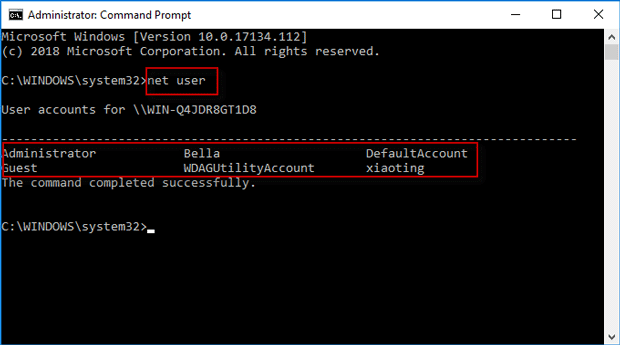
Step 3: If you want to view detailed information or properties about a specific user account, just type in the command: net user username, for example, net user Bella, and press Enter key. Then the window displays detailed information and properties about that user account, such as its full name, account active state, if the password is required or not, and so on.
Way 5: See a list of all user accounts using Windows Password Refixer
Beyond that, you can also see the list of all existing user accounts using the third-party Windows Password Refixer tool. It would be helpful especially when you can’t log on to Windows 10 or even can’t start Windows 10 normally.
Tips: Windows Password Refixer is a Windows password reset tool designed to primarily help users to reset Windows password. But it also has two other valuable features, allowing you to view all user accounts existing on Windows and create a new admin account for Windows.
Step 1: If you just want to use this tool to view a list of all user accounts that exist on your Windows 10, you can download the Windows Password Refixer tool free on any computer and install it on that computer.
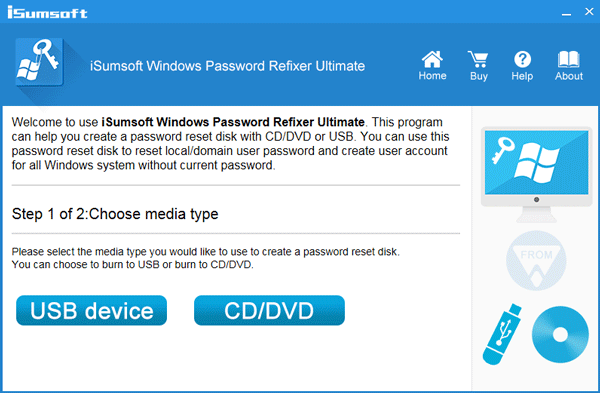
Step 2: Once you have it installed, launch it, and then follow the on-screen instructions to burn it to a USB device or CD/DVD flash drive to create a boot disk.
Step 3: Connect the boot disk to your Windows 10 computer and start/restart it from the boot disk (USB or CD flash drive). If you have no idea how to do that, refer to this page: How to boot a computer from a USB drive, or How to boot a computer from a CD/DVD flash drive.
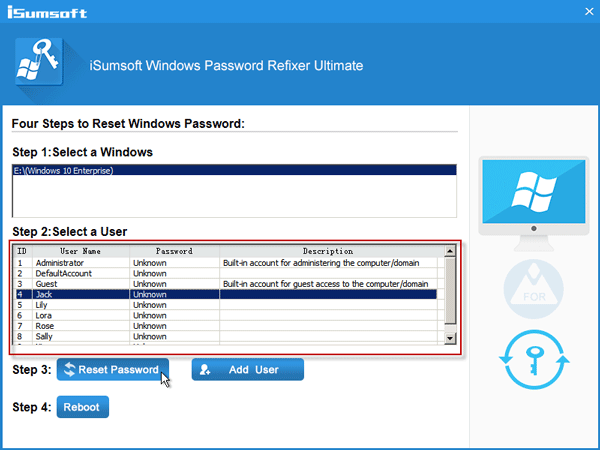
Step 4: If you boot your computer from that boot disk correctly, Windows Password Refixer should work and appear on your screen. It displays Windows 10 running on your computer and shows a full list of all user accounts existing on your Windows 10, including the disabled and hidden user accounts.
Conclusion: The first two methods allow you to view all active user accounts on Windows 10, while the last three methods allow you to view the full list of all user accounts that exist on Windows 10, including the disabled and hidden user accounts.


