- Linux Command To Find the System Configuration And Hardware Information
- Linux cpu/hardware information
- Linux show free and used memory in the system
- Find ram speed and max supported ram by the server
- Linux find out the current running kernel version
- Find out information about the Linux distribution and version
- List all PCI devices
- List all USB devices
- List all block devices (hard disks, cdrom, and others)
- Display installed hard disk and size
- Display information about hardware RAID
- Say hello to lshw
- Dump all hardware information
- List of Commands to get Linux system info using terminal
- Commands to View Linux System info using terminal
- 1. Check Linux system CPU info and Virtualization support
- 2. Know about Linux System RAM details
- 3. Find out BIOS Info on Linux using Dmidecode
- 4. Command to view hard disk and partition distribution
- 5. Check Network card information
- 6. View PCI Slots information on Linux system
- 6. USB controllers and attached devices
- 7. Command to get complete Linux OS information
- 8. Command to get Linux Kernel Information
- 9. View Real-time processes
- 9. Complete Linux System Hardware Information
- System configuration
- How do I get an out-of-the-box working Linux audio workstation?
- How do I build a real-time audio workstation on Linux?
- Preliminary
- QuickScan
- The kernel
- Note about kernels
- Status of your kernel
- Do I really need a real-time kernel?
- Using the threadirqs kernel option
- Disabling Spectre and Meltdown mitigations
- Installing a real-time kernel
- Build your own real-time kernel
- Disabling resource-intensive daemons, services and processes
- CPU frequency scaling
- DBus-controlled services
- Hardware support modules
- Example script to disable resource-intensive daemons, services and processes
- Solve IRQ conflicts by unbinding devices
- Filesystems
- Encryption
- tmpfs
- ext3/ext4 tuning options
- limits.conf/audio.conf
- sysctl.conf
- audio group
- Timers
- Hardware timers
- Software timers
- Priorities
- rtirq
- When to use rtirq
- PCI bus latency
- Screensavers
- PulseAudio
- External links
- Using FireWire
- Legacy FireWire stack
- JuJu FireWire stack
- Troubleshooting
- latencytop
- cyclictest
Linux Command To Find the System Configuration And Hardware Information
W hat is the command to find the system configuration on Linux operating system using command line (text) mode?

On Linux based system most of the hardware information can be extracted from /proc file system, for example display CPU and Memory information, enter:
| Tutorial details | |
|---|---|
| Difficulty level | Intermediate |
| Root privileges | Yes |
| Requirements | None |
| Est. reading time | 10 minutes |
cat /proc/meminfo
cat /proc/cpuinfo
The following list summarizes commands to get various hardware from the system:
Linux cpu/hardware information
Use any one of the following command:
# less /proc/cpuinfo
OR
# lscpu
Sample outputs:
Linux show free and used memory in the system
Use any one of the following command:
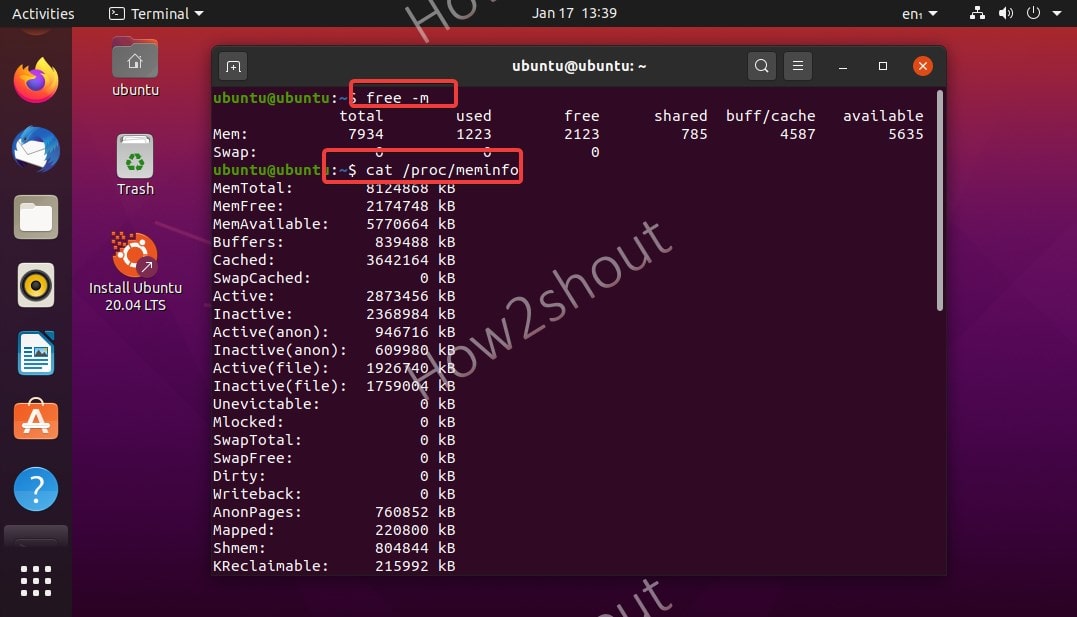
# cat /proc/meminfo
OR
# free
# free -m
# free -mt
# free -gt
Sample outputs:
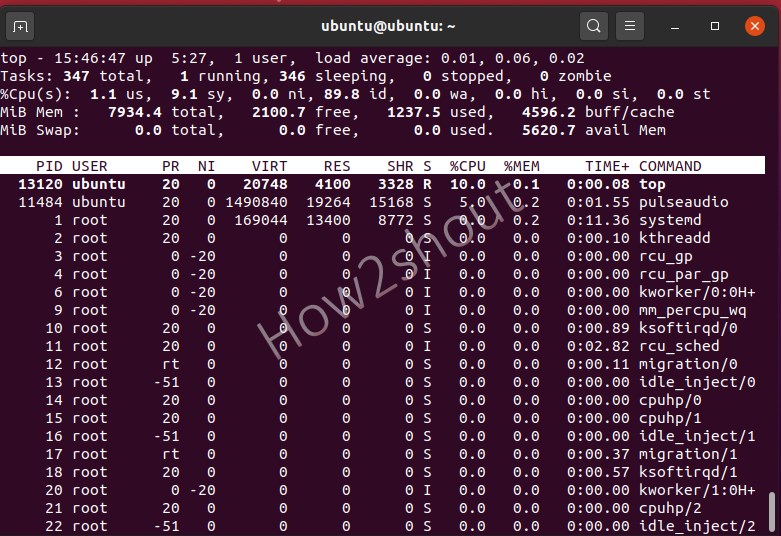
You can also run top/htop/atop commands to see used and free memory and cpu usage and more:
# top
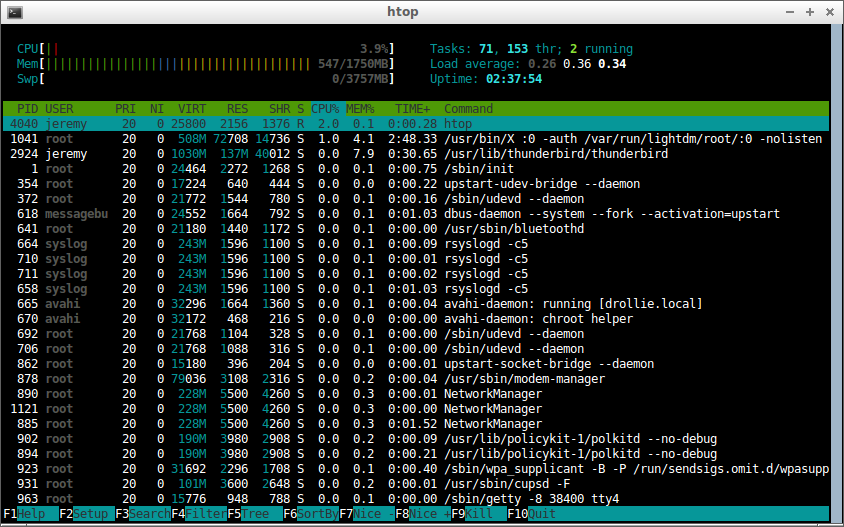
# htop
# atop
Find ram speed and max supported ram by the server
# dmidecode —type 17
# lshw -short -C memory
# perl memconf.v3.06.pl -v
Sample outputs:
Linux find out the current running kernel version
Type the following command:
# cat /proc/version
Sample outputs:
OR use the following command:
# uname -mrs
# uname -a
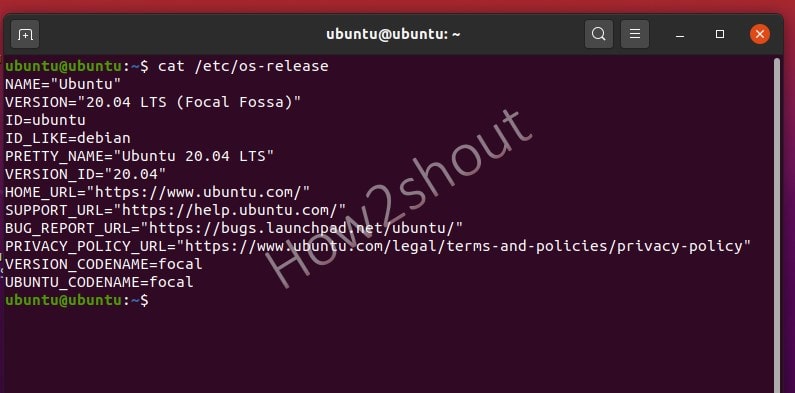
Find out information about the Linux distribution and version
# lsb_release -a
Sample outputs:
OR use the following command:
$ cat /etc/*release*
Sample outputs:
List all PCI devices
# lspci
Sample outputs:
List all USB devices
# lsusb
Sample outputs:
- No ads and tracking
- In-depth guides for developers and sysadmins at Opensourceflare✨
- Join my Patreon to support independent content creators and start reading latest guides:
- How to set up Redis sentinel cluster on Ubuntu or Debian Linux
- How To Set Up SSH Keys With YubiKey as two-factor authentication (U2F/FIDO2)
- How to set up Mariadb Galera cluster on Ubuntu or Debian Linux
- A podman tutorial for beginners – part I (run Linux containers without Docker and in daemonless mode)
- How to protect Linux against rogue USB devices using USBGuard
Join Patreon ➔
List all block devices (hard disks, cdrom, and others)
# lsblk
Sample outputs:
Display installed hard disk and size
# fdisk -l | grep ‘^Disk /dev/’
Sample outputs:
Display information about hardware RAID
See info about Adaptec hardware RAID:
# arcconf getconfig DEV
# /usr/StorMan/arcconf getconfig 1
See info about 3ware hardware RAID:
# tw_cli /dev show
# tw_cli /c0 show
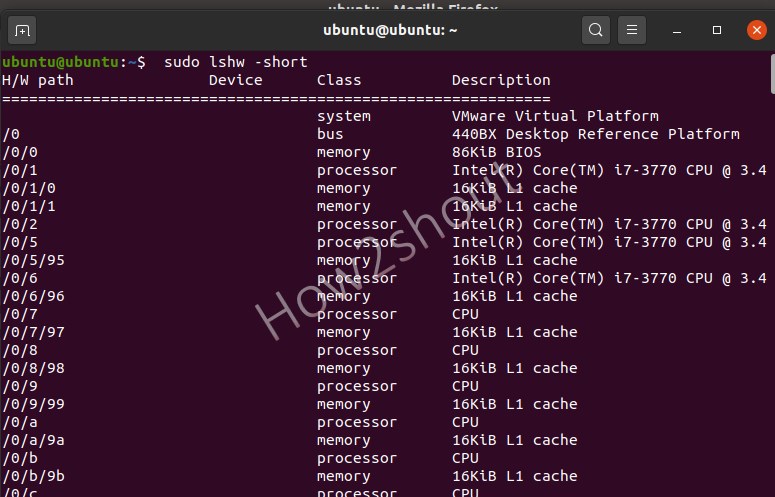
Say hello to lshw
The lshw is a small command line tool to extract detailed information on the hardware configuration of the machine. It can report exact memory configuration, firmware version, mainboard configuration, CPU version and speed, cache configuration, bus speed, etc. on DMI-capable x86 or IA-64 systems and on some PowerPC machines (PowerMac G4 is known to work):
# lshw | more
# lshw -html > output.htmlq
# lshw -short | less
Sample outputs:
Dump all hardware information
Type the following command to see your motherboard, cpu, vendor, serial-numbers, RAM, disks, and other information directly from the system BIOS:
# dmidecode | less
Sample outputs:
Источник
List of Commands to get Linux system info using terminal
In Linux, we can use the command terminal to check various system hardware configurations and information such as CPU, Memory, hard disk, etc., and here are those to use…
Although there are tools that can display Linux system info graphically, however, here we are going to use the inbuilt commands.
The question of how a system is equipped and how it performs in harsh everyday life is not only of theoretical interest. Lot’s of time to solve a problem we need to know hardware and its utilization to remove some bottleneck. Thus, if you are new to Linux systems or running any cloud server where you want to know about the system load, the network interface, and type of processor and chipset, or what hardware is actually in the system? Then here some top commands to follow…
Commands to View Linux System info using terminal
Here we are using Ubuntu 20.04 to display the results of the Linux system info commands, however, you can use them on older versions such as Ubuntu 18.04/16.04 including RPM-based distros like CentOS and RHEL. Apart from them, others are also supported such as Debian, Linux Mint, Kali, Elementary OS, Manjaro, and more.
1. Check Linux system CPU info and Virtualization support
To check out the full information of Linux system’s CPU such as Type of Architecture (i386, x86_64, etc.) (32-bit or 64-bit), Socket, Cores per socket, CPU speed, L cache, Virtualization type or support, etc. use the below given single command:
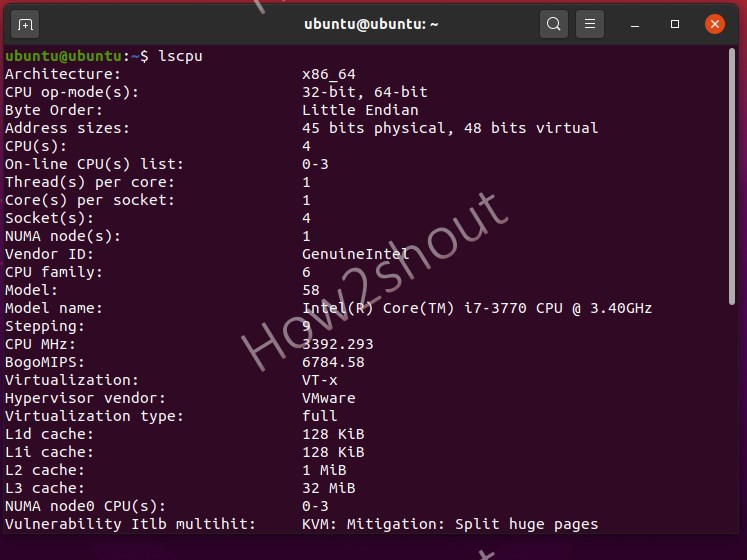
Furthermore, you can also check each CPU in detail (CPU model, frequency, etc.) of your computer, laptop, or server using:
Output:
2. Know about Linux System RAM details
Check out free Memory on your Linux system along with details of its size and hardware information.
To print free available RAM, type:
Those who are interested in full detail such as Total Memory, Free Memory, Buffers, Cache, Swap cached, Active, mapped, and more… can go for this one:
To identify each RAM used on each memory slot of your system’s motherboard, print the Memory Controller information using the dmidecode command:
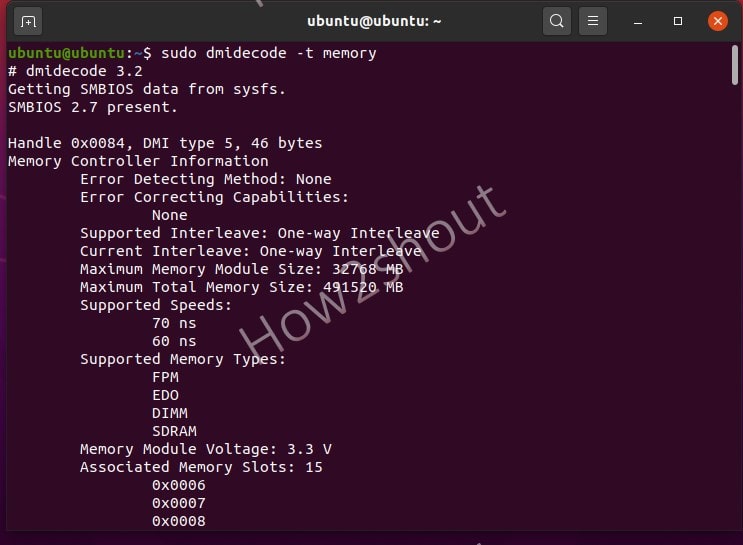
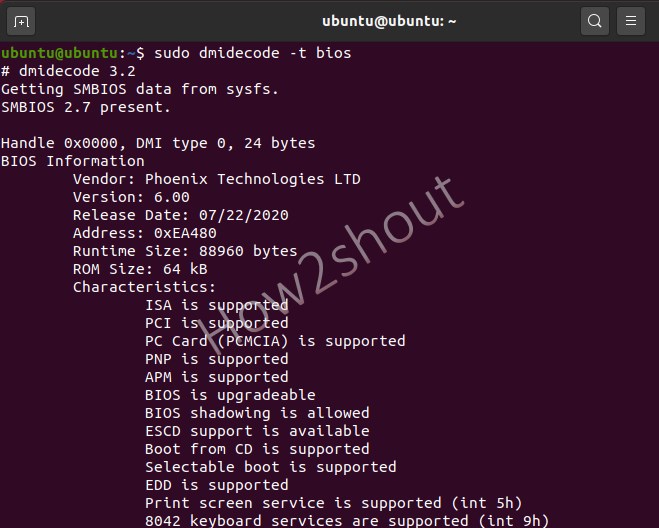
3. Find out BIOS Info on Linux using Dmidecode
Dmidecode dumps the DMI (Desktop Management Interface) information of the machine in a readable way. This information includes hardware and BIOS.
You can get the current configuration and the maximum configuration supported by the system, such as the maximum amount of memory supported that we already have shown above…
Therefore, here are some uses of the dmidecode command to know further details of the system as well such as BIOS version, motherboard, and processor.
If you want to view all Linux useful system information use this one. However, it will give a lot of information.
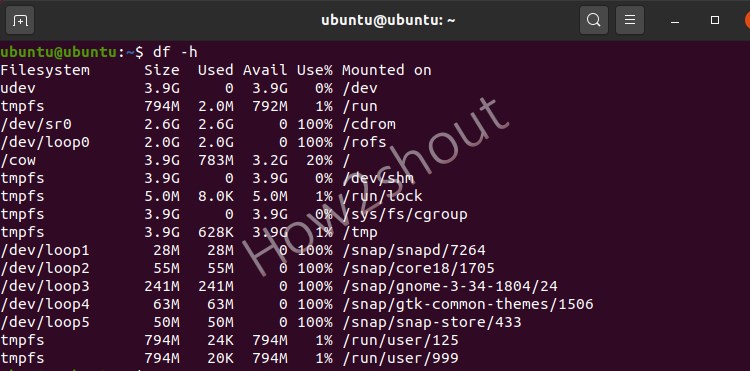
4. Command to view hard disk and partition distribution
Do you want to know about each size of Hard disk and partition available? Then use-
OutPut:
Furthermore, those who want to dig more on hard disk and partitions, then to have each detail of the installed drives run fdisk -l with sudo rights:
Output
To get a clear view and all information along with the type of file system and partitions mounted points, we can also use:
Mount points can be further elaborated with:
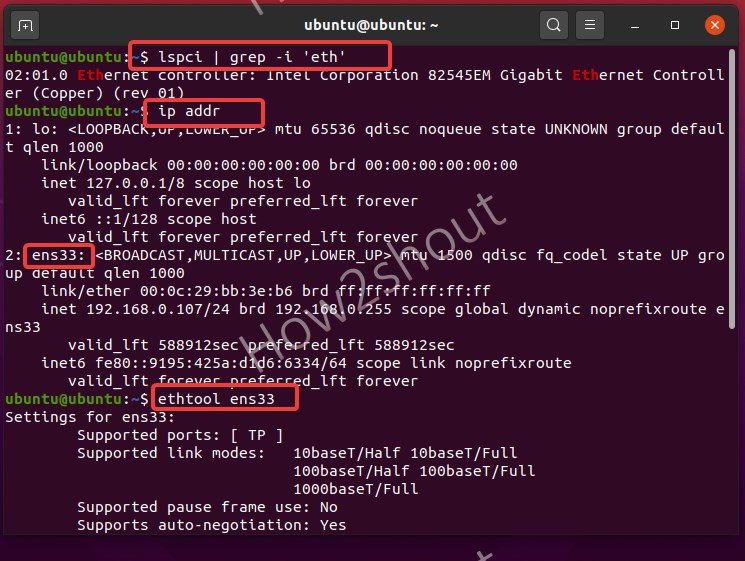
5. Check Network card information
The network card installed on our Linux system is one of the important components to connect the internet and other local networks. However, to know its model, manufacturer, and other information without operating the system’s case, use the below-given commands.
Find out the IP address and available active ethernet interfaces:
Now, after using the above command you get the IP address and active ethernet interface, just use that with the below command. For example, ens33 is our interface.
The ethtool will show all information about the network card bandwidth such as what is the max speed, supported link modes, ports, and more…
To get network information we can also use Net-tools, however, we need to install it because by default it would not available on the system.
For Debian/Ubuntu: sudo ap tinstall net-tools
For RHEL/CentOS/Fedora– sudo yum install net-tools or sudo dnf install net-tools
To know Ipaddress:
For getting details of active connections, protocols, domain sockets, and more…
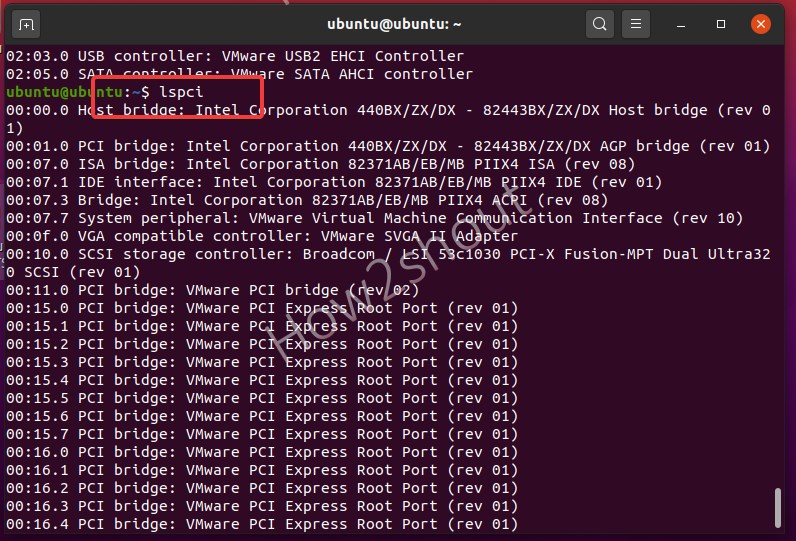
6. View PCI Slots information on Linux system
PCI slots, where we use graphic cards, network cards, and other third-party hardware directly on the Motherboard. To know about these PCI hardware slots run:
If you want more detailed information: lspci -v or lspci -vv
To see the device tree: lscpi -t
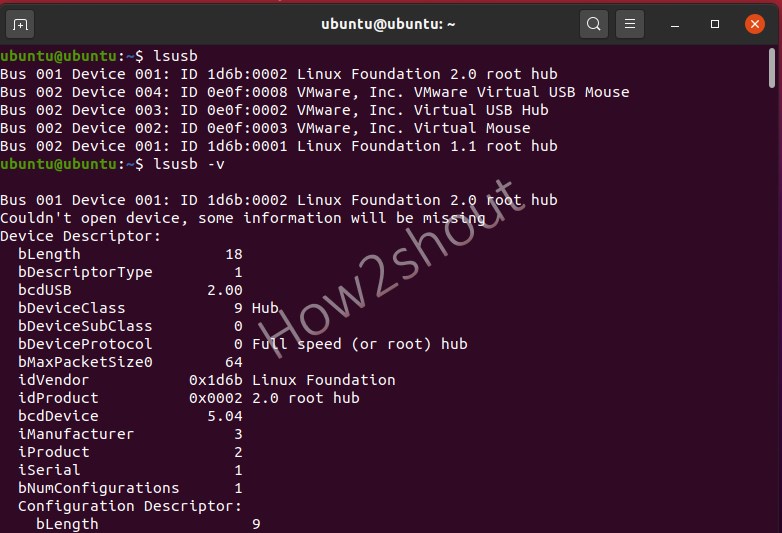
6. USB controllers and attached devices
View the details of USB slots and the devices plugged into them using lsusb command:
To have detailed info on USB slots and their active devices use :
7. Command to get complete Linux OS information
When we are running a Linux server and after upgrading or having installation, in case we want to know what version of Linux operating system we are using then, that is possible as well using the command terminal.
Get release info only:
8. Command to get Linux Kernel Information
A kernel, which is the core part of our Linux system, to check out which version we on before updating or after, run:
9. View Real-time processes
To go a bit further and know PID (Process ID, Unique number of the process) of the process executed on the system along with what is currently active we can use two commands:
To check out the PID (Process ID, Unique number of the process) of the process.
Real-time display of process status
A top is a text-based tool that gives complete information of currently active processes in real-time. To exit it, press Ctrl+C.
9. Complete Linux System Hardware Information
Here is the one final command that can give all the hardware information of your Linux system in a single shot. However, displaying all data in one place may feel clutter but if you don’t want to use multiple commands, then this one is for you.

Those who want to omit the slight unwanted information can use the same command with a short flag.
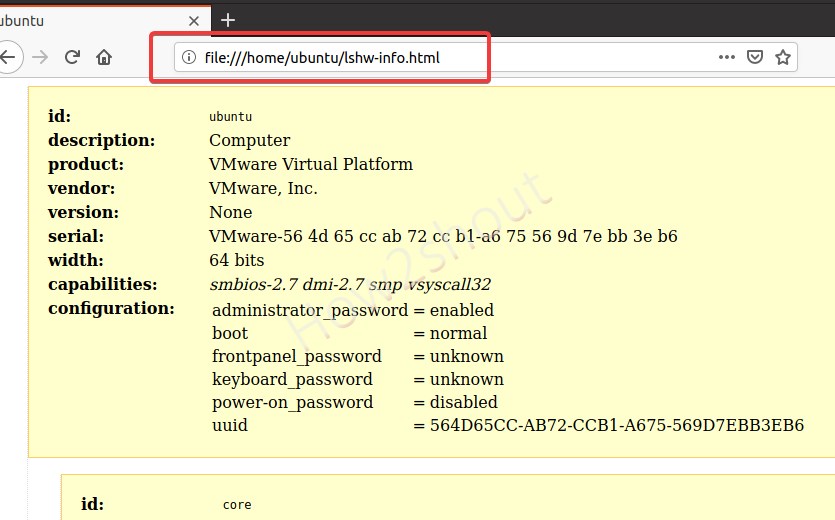
The good thing, if you want to print or save your Linux system hardware information in HTML format then that is also possible using lshw, simply run:
you will see the created file.
Now, open your browser and type or paste: file:///home/ubuntu/lshw-info.html
Closing thoughts:
So, these were some common commands we can use to find out Linux system info on CPU, Memory, OS, kernel, Network, and more. Although, these are not the only there are so many others, so keep searching this big world of Linux. If you know some commands to get a better view of the Linux system then the comment section is all yours…
Источник
System configuration
How do I get an out-of-the-box working Linux audio workstation?
How do I build a real-time audio workstation on Linux?
The Ardour manual has a interesting introduction about getting the right computer system for digital audio. Below that article there is also a (somewhat Windows oriented) video by Richard Ames, which could be helpful to get a idea which things are involved for this topic. Summary: lots of things are involved for a well performing real-time audio workstation. It’s not simply a matter of buying a computer with massive CPU and memory power, as the coming sections on this page shows.
A good starting point for optimizing your system for real-time audio on GNU/Linux, is the QuickScan script below (as a newbie you might want to ignore the hardware timers settings first).
After adjusting your system using the recommendations of the QuickScan and with JACK (QjackCtl) and a2jmidid installed, the basics should be there for a well performing real-time audio system (depending on your hardware too of course).
Preliminary
The modifications discussed in the following sections have been tested thoroughly and a number of these modifications have been implemented in specialized distros like KXStudio and AVLinux. This doesn’t guarantee though that these modifications work for all set-ups and these modifications shouldn’t be used as is but should be adapted if possible to match your own set-up. It is also advised to try the modifications step by step, so do not implement them all at once. This way you can verify if each modification does what it claims to do. By implementing the modifications a step at a time it is easier to track down which modification is causing any unwanted behavior.
A good habit is to always make backups of any files you’re about to modify. Take /etc/fstab for instance. Before adding the noatime mount parameter you might want to make a backup of your existing and working fstab file:
This way you can restore the original file in the case you made such a typo that the system has become unbootable. The procedure of recovering an unbootable system itself is beyond the scope of this Wiki but there are plenty of resources that explain this in detail.
QuickScan
The realTimeConfigQuickScan script automatically analyzes your current configuration. This script will make configuration suggestions based on your current setup and link to the relevant sections on this page for background information.
To get the script install Git first and then pull in the script:
Discuss this script at the LinuxMusicians Forum
The kernel
Note about kernels
Status of your kernel
Run uname -a to find out which kernel you’re running:
5.4.24-core2-rt15 is the version number of the currently running kernel. The configuration file with which this kernel was created can be found in /boot/config-5.4.24-core2-rt15 . Open it, and check if it has the following characteristics:
The “RT” is real-time, and the above reflects a real-time kernel. The “1000” reflects the 1000 Hz setting.
If you can’t find the config file for your kernel there is also the possibility to extract the config from /proc/config.gz if your kernel supports it (CONFIG_IKCONFIG_PROC=y):
The Quickscan is also good for checking if you have a RT kernel and if the kernel timer setting is adequate.
Do I really need a real-time kernel?
As of kernel 2.6.39 one the core parts of the real-time patchset, threaded IRQs, has been integrated into the main kernel. With the kernel boot option threadirqs standard kernels create threaded IRQs, a feature that was reserved to kernels here . The integration of this feature into the main kernel basically nullifies the need to use a real-time kernel in most of the cases. But a real-time kernel can still be very useful on a Linux audio platform. If you need the lowest latencies possible and tight timing (for live MIDI applications for instance) a real-time kernel might still be your best resort. But if you’re mainly recording, a standard kernel or an optimized kernel (like the low-latency kernel Ubuntu offers) will suffice probably.
Using the threadirqs kernel option
This is only needed for so-called generic kernels, ie. standard kernels that are not tweaked for lowlatency performance. You can check if your kernel already includes this option with the following command:
If it returns CONFIG_IRQ_FORCED_THREADING=y and CONFIG_PREEMPT_RT=y then your kernel is using IRQ threading and you don’t have to proceed with the following steps. If it only returns CONFIG_IRQ_FORCED_THREADING=y you can add the threadirqs boot option as described below. If the command returns nothing you have a kernel that cannot use threaded IRQs.
Open /etc/default/grub with your favorite editor as root. Look for the line that starts with GRUB_CMDLINE_LINUX_DEFAULT and add threadirqs to the list of options:
Save the file and update the grub configuration:
Now reboot and you should have threaded IRQs.
Disabling Spectre and Meltdown mitigations
Warning: disabling these mitigations will make your machine less secure! Use with caution!
To work around the Spectre and Meltdown vulnerabilities several mitigations were built into the kernel. These mitigations can have a negative impact on the performance of your machine. To disable those mitigations and get the most out of your CPU’s again you can add the following kernel parameter to your Grub configuration, add it to the value of either GRUB_CMDLINE_LINUX_DEFAULT or GRUB_CMDLINE_LINUX :
Installing a real-time kernel
This section describes installing a real-time kernel on an existing Linux distribution. Some distributions contain packages you can install to get a real-time kernel, for others you’ll need to compile it yourself. You can recognize real-time kernel versions by the added ‘-rt’ or ‘-realtime’ parts of the kernel version number.
Ubuntu
Ubuntu Studio 12.04 comes with a 1000 Hz non-real-time low-latency kernel. Unfortunately there are no packaged real-time kernels available but using the kernel build method described in this Wiki it should be fairly easy to build your own real-time kernel 1) .
Debian
Since Debian Wheezy an RT variant is also available in the stock repositories; unfortunately its system timer is set to 250 Hz instead of 1000 Hz, so you’ll probably want to recompile your own kernel anyway, especially if you use ALSA MIDI. These kernels incorporate Pengutronix patches (see DebianMultimedia Wiki).
Arch has rt kernels available in AUR.
Gentoo
Build your own real-time kernel
If your distribution isn’t any help, you can compile and install a real-time kernel manually. The examples assume building a RT kernel based on the 4.8 kernel version but they should generally apply for other kernel versions too provided that there is a RT patchset available for the used kernel.
Install the necessary packages, on Debian and Ubuntu this is:
Download the kernel sources and the RT patchset (this example uses the 4.8 branch, you’re free to use another kernel branch for which there is a RT patch set available):
Extract the kernel sources and patch them with the RT patchset:
Now you need to configure the kernel. The easiest way is to use an existing kernel config, those configs can be found in the /boot/ directory of your system. You can copy an appropriate kernel config to your current working directory and use that config as a starting point:
This will copy the config of the kernel you’re currently using. You might want to consider using a config of a kernel already optimized for audio work, like the Ubuntu -lowlatency kernel config. The next step is to create a new config with full preemption enabled from the copied config:
You will get a lot of prompts but you can leave everything at its default value except for the prompt which Preemption Model you’d like to use. Select option 5 there (Fully Preemptible Kernel):
You can use one of these commands to edit the configuration:
if you want a text interface, or
for a nice ncurses text interface (you need to install libncurses5-dev if you’re on Debian or Ubuntu), or
for another ncurses interface with better keybindings, or
Make sure to check the “ Timer Frequency: 1000 Hz ” options under the “ Processor type and features ” group.
When your configuration is done, you can build and install the kernel and its modules (distro-agnostic way):
On Debian or Ubuntu the building step can be done like this:
Or if you prefer make-kpkg:
You can also use `getconf _NPROCESSORS_ONLN` instead of `nproc` .
When building is complete and the packages have been created you can install them (this will also update the boot loader menu):
If you built and installed the kernel the distro-agnostic way you will have to update the bootloader yourself:
Optional bits
You may want to disable the debug features; this will save compile space. You can do it in the config interface, or from the shell with this command:
You may want to set the “ Local version ” (in the “ General setup ” group) to your name or -custom-rt or whatever: it will be appended to the kernel name so you’ll easily recognize it as a custom build, and you won’t risk overwriting some working kernel with the same name. You can achieve the same result by editing the file localversion-rt and append a local version name to the version number of the RT patch set.
You can do without an initrd if you build into the kernel (not as a module, i.e. checked in the config as “ * ” and not “ m ”) everything you need to boot (e.g. ext4, chipset drivers, keyboard drivers, etc.). If you need it, build it with:
or follow your distro guide.
If you need to know which drivers you need for your hardware, use the form at http://kmuto.jp/debian/hcl/ (it’s distro-agnostic, even if it says “Debian” everywhere).
Build your own real-time kernel on Debian Wheezy or later
Since Debian Wheezy, the linux-source-3.2 package already installs the RT patch (you don’t need to download it from upstream), but you’ll have to apply it manually.
Install the kernel source package:
This installs a linux tarball and a bzipped RT patch in /usr/src/ . Copy them to wherever you want to build (you’ll need some GB of free space), untar/bunzip them and cd into the linux source directory.
Apply the RT patch:
Make sure to install the needed tools for the build:
Now you must configure the kernel. (This step is distro-agnostic, you can follow the istructions in the previous paragraph ).
Then you can compile.
… and install the new kernel
Other relevant links
Disabling resource-intensive daemons, services and processes
You should check if the following daemons, services or processes are running, and if so, consider stopping them and/or resort to alternatives:
CPU frequency scaling
If your CPU supports frequency scaling and the CPU frequency scaling governor is set to ondemand (which is the default on a lot of distros) you could run into xruns. The ondemand governor scales the frequency according to the CPU load, the more the load, the higher the frequency. But this is happening independently from the DSP load on your system so it could happen that the DSP load suddenly rises for instance, demanding more CPU power, and that the scaling daemon kicks in too late, resulting in xruns because the DSP load maxes out. A solution would be to use a CPU frequency scaling daemon that scales the frequency according to the DSP load on your system like jackfreqd or to simply disable CPU frequency scaling altogether. The latter can be achieved by setting the scaling governor to performance.
To check which governor is active:
Setting the governor to performance:
You could also add a line to your /etc/rc.local file for instance to set the governor to performance at boot time:
Another option is to create a Systemd Unit that does this for you. Example of an audio-setup Unit file, create as /etc/systemd/system/audio-setup.service:
This will start /usr/local/bin/audio-setup at boot so you can add the aformentioned line regarding setting the CPU’s to the performance scaling governor there, make the file executable, enable the Systemd service and start it.
The audio-setup script could then also be used to set up other things.
Ubuntu
On Ubuntu systems the command in your /etc/rc.local or /usr/local/bin/audio-setup file only works if you disable the ondemand service:
Debian
On Debian you can control the scaling governor with the cpufreq-set utility which is part of the cpufrequtils package:
On installation the package also installs an init script in /etc/init.d/cpufrequtils and a configuration file in /etc/default/cpufrequtils . To have the governor always set to performance make sure the configuration file looks as follows:
Most BIOSes allow to disable CPU frequency scaling altogether and as a result your CPU will run at its maximum clock rate. For Intel CPUs you should look for a SpeedStep option. Its AMD equivalents are either Cool’n’Quiet or PowerNow!.
If you really need to prevent the CPU from running hot (to prevent shutdowns or overheating) or if you prefer your PC’s to consume less power then you can also adjust some BIOS settings (if your BIOS has them):
With these settings disabled the ondemand governor should work without causing any xruns.
DBus-controlled services
DBus is a solid standard used for a wide variety of services which need to be started automatically, but on demand only, in the background, not specifically at boot. One set of DBus services used extensively in Ubuntu is ‘gvfs’, the virtual filesystem for the Gnome desktop; if these are permitted to run, polling of hardware including the USB bus will occur, which is likely to interfere with USB MIDI interfaces, eat CPU power, and cause xruns in general. To disable gvfs, become root and run the following two commands:
Hardware support modules
These are modules in the Linux kernel which support various hardware. All of them will reserve resources. If, for instance, you have an HDMI audio port which you don’t need, you can blacklist it to disable it. However, you should check the IRQ usage first (see related section of this document), because this might be the more vital change to make, if you do in fact have a conflict.
Example script to disable resource-intensive daemons, services and processes
There are quite some processes and drivers running that you might not need when making music. Below an extremely simple example of a Bash script to disable all unneeded things. Note that it includes a solution for IRQ conflict, documented further down.
You could run this script once you’re logged in (it needs root privileges though), run it from /etc/rc.local or even as an init script. A suggestion would be to run it only when a real-time kernel is loaded for example:
The modules and processes differ of course on a per machine basis so first figure out which modules are loaded with lsmod for instance and then decide which ones you really need. Same for any processes running on your machine, ps -ef or even pstree -p could be helpful when looking for unneeded processes.
Solve IRQ conflicts by unbinding devices
The above script also contains a line to unbind a rogue device that sits on the same IRQ as the sound card. Unbinding a device is basically a last resort if a device is interfering in such a way that all other possibilities, like using rtirq, fail to improve the performance of the sound card. In this particular case the thread created for the USB port started consuming so much CPU that at a certain moment xruns were all over the place. In order to prevent this from happening unbinding the USB driver from the physical USB port worked out well.
This is the situation on the affected machine:
So usb2 shares IRQ 16 with the HDA Intel soundcard. In order to be able to unbind the USB driver from usb2 we need to find the bus ID of usb2:
So the ID of usb2 is 0000:00:13.0 . If we write that to the unbind file in the /sys/bus/pci/drivers/ohci_hcd/ directory usb2 should get unbound from the USB driver:
Finding the right unbind file might be a bit trial and error, but /sys/bus/pci/drivers/ohci_hcd/ contains the right unbind file for USB1.1 root hubs such as usb2. Now we can check with the first tree command (or with lsusb ) what the current status is:
As you can see, usb2 is gone, it doesn’t show up with lsusb anymore either:
usb2 used to correspond with Bus 002. That one seems to be gone. A final check:
Great, the sound card is now sitting on its own on IRQ 16 and runs in a way more stable manner than before when it still shared an IRQ with the USB port. Major drawback of this method of course is that you loose an USB port.
Filesystems
For audio use, it is desirable to use a filesystem that favours few big files over many small files and low-latency over long-term thoughput. It is said that ReiserFS and fuseblk are bad choices from this perspective, while ext3 and ext4 are good. ext4 has had some performance issues in the past but those were not directly related to processing audio and in the meanwhile most issues have been ironed out.
In any case, it is advisable to mount ext filesystems with the noatime option enabled. This step is verified by the QuickScan , but could use more information about which filesystems are suitable.
Most distributions currently do not auto-detect and optimize your filesystem settings for SSD drives. Here is a guide on how to optimize your SSD for use under Ubuntu-based distros. There is also a PDF document available on elinux.org on how to tune your filesystem for use with a SSD drive: http://elinux.org/images/b/b6/EMMC-SSD_File_System_Tuning_Methodology_v1.0.pdf
Encryption
It won’t affect the quality of the audio, but it will change how many tracks the disk can support and because encryption requires CPU, it will affect how much signal processing you can do all of which is a long-winded way of saying “don’t do it”
tmpfs
Both Jack1 and Jack2 now use /dev/shm/ so mounting /tmp/ to tmpfs is not necessary anymore.
ext3/ext4 tuning options
noatime
Setting the noatime parameter in your /etc/fstab file reduces the amount of disk I/O (the inode access times are not updated each time a file is read) which could improve the overall performance of your system.
/dev/sdax / ext4 noatime,errors=remount-ro 0 1
Most modern distributions use either atime or relatime . See the mount manpage for more information on these parameters.
The noatime parameter implies nodiratime so when using noatime there’s no need to set nodiratime . 2)
nobarrier
According to this thread High latency with ext4 / jbd2 kernel thread on the ext4 mailing list, the nobarrier parameter, with an ext4 filesystem, can reduce the amount of work made by the background kernel thread jbd2. However, it is said to be an unsafe parameter, making your filesystem less resistant to power failures. Use it with caution.
/dev/sdax / ext4 nobarrier,errors=remount-ro 0 1
Ext3 filesystem doesn’t enable barrier by default, ext4 does. See the mount manpage for more information on these parameters.
data=writeback
You can’t use this parameter in /etc/fstab for the root partition, you will have to set it as a kernel parameter. So when using Grub you can add the following parameter to the GRUB_CMDLINE_LINUX line in /etc/default/grub :
Use this parameter with caution.
limits.conf/audio.conf
It is advisable to set up your /etc/security/limits.conf or /etc/security/limits.d/audio.conf/ file properly, for example:
Setting memlock to unlimited shouldn’t be strictly necessary since most apps would work fine with lower values (such as 500000 ). However, certain applications have been reported to complain or even to crash with lower values than unlimited . On the other hand, giving unlimited capability of locking memory can cause buggy applications to temporarily freeze the whole system. See http://www.linuxmusicians.com/viewtopic.php?f=10&t=2193 for more details.
You could also allow the audio group to renice processes with the help of the limits.conf file, but since nice uses SCHED_OTHER it basically does nothing to increase the performance of a low-latency real-time audio environment that relies on SCHED_FIFO/SCHED_RR. Consult the sched_setscheduler manpage for more info on this subject.
If you do not use PAM (which is rare), you might want to use set_rlimits instead
sysctl.conf
Suggested settings for /etc/sysctl.conf :
This setting changes the so-called swappiness of your system, or in other words, the moment when your system starts to use its swap partition. You can check the current value with cat /proc/sys/vm/swappiness , in most cases it is set to 60. This is too high, it will make your system start using swap too fast which might influence the overall performance.
There are references on the net on adjusting the fs.inotify.max_user_watches value also for enhanced performance. The max_user_watches parameter sets the maximum number of files your system can monitor with inotify (which is part of the kernel) for changes. Setting this parameter too low results in inotify failing. Setting it too high can make inotify needlessly consume memory. The advise of increasing this value might originate from for example DAW’s or samplers that watch a lot of files and if the system runs out of watchers these DAW’s or samplers fall back to polling the file system which increases disk IO which could in turn cause jitter 4) . And since modern systems have mostly enough memory these days increasing this value should cause no issues.
audio group
It is generally good practice to have an ‘audio’ group, and add any users that should be allowed to perform audio tasks to this group. This prevents some interference from non-audio-processes with audio tasks. To verify you’re in the ‘audio’ group, run the groups command. Remember, after adding yourself to new groups, you need to log out and back in again. Be careful when adding an ‘audio’ group to your system: most systems come with a pre-configured ‘audio’ group, and do not warn you when you add another group with the same name, leading to much confusion.
This step is verified by the Quickscan .
Timers
The configuration of hardware or software timers only matters for ALSA MIDI performance. JACK MIDI, JACK’s MIDI backend drivers (like the alsarawmidi driver) and tools like a2jmidid do not care about the kernel clock frequency. When using applications that rely on ALSA MIDI (like Qtractor, SEQ24 or Rosegarden) a high resolution timer might reduce MIDI jitter and improve MIDI performance.
Hardware timers
Using hardware timers to achieve more accurate MIDI timing is questionable. Applications that use ALSA MIDI (via either the Sequencer or the Raw MIDI Interface) may be affected by using hardware timers but it might be better to rely on a high resolution software-based timer like the snd-hrtimer kernel module. The information below only serves archival purposes and should not be used anymore.
Some MIDI sequencers or DAWs that rely on ALSA MIDI might benefit from being able to use hardware timers like the real-time clock ( /dev/rtc ) or the High Precision Event Timer ( /dev/hpet ). When using a hardware timer make sure the ‘audio’ group has read permissions on it.
A simple chgrp might not be persistent across reboots — to make the change last, create a new 40-timer-permissions.rules file in /etc/udev/rules.d/ with the following lines:
It is also advisable to enable users of the audio group to use these timers at higher frequencies since the defaults are too low:
Unfortunately there’s no consensus on what values to use. Most sources mention a minimal value of at least 1024 or even 2048 and a maximal setting of 8192. It might be wisest to use the values mentioned in the Rosegarden Wiki as Rosegarden is an application that relies on accurate max user freq settings. The max user freq setting for hpet can be set in /etc/sysctl.conf as it lives in /proc/ and the setting for rtc0 can be set with an echo command at boot-time with either a start-up script or adding a line to /etc/rc.local .
/etc/sysctl.conf (or something like /etc/sysctl.d/60-max-user-freq.conf ):
Start-up script or /etc/rc.local :
And reboot. To activate these settings immediately:
This step is verified by the QuickScan .
Software timers
WIP
Priorities
For rtprio, higher values mean higher priority. You can list threads and their priorities with one of the following commands
Or if you have rtirq installed:
Most applications take care of running some threads with higher rtprio when possible themselves, like JACK with the real-time option set. Jack1’s watchdog has a higher prio than jackd itself (+10) so choose a sensible priority value for Jack1 (70 for example, this will assign prio 80 to Jack1’s watchdog thread), bearing in mind also that sound devices might get a priority in the 80-90 range if you use rtirq. Jack2 doesn’t have a watchdog thread (neither does the current git version of Jack1) so you can give Jack2 an even higher prio.
You can also set rtprio and scheduling settings manually using the chrt command-line tool, which should come with most distributions nowadays, or use the rtirq init script.
rtirq
rtirq is a script written by Rui Nuno Capela, the author of QjackCtl and Qtractor amongst others. This script allows to make use of the threaded IRQs as used by real-time kernels or kernels >= 2.6.39 with the threadirqs kernel option enabled. The term threaded IRQ is quite an abstract one but what it boils down to is that every peripheral gets an IRQ and the Linux kernel splits this IRQ in different parts of which the so-called bottom-halve is of concern in the context of the rtirq script. Bottom-halves are also known in some cases as softirqs which might make this matter a bit less abstract, ‘hardirqs’ (the top-halves) are the IRQs assigned by the system which can’t be managed from within the OS as opposed to ‘softirqs’ (the bottom-halves) which can be managed.
The rtirq tarball as available on the site of the author consists of two files, the script itself ( rtirq.sh ) and a configuration file ( rtirq.conf ). In most cases the rtirq.sh file is used as an init script (and hence stripped from the .sh extension) and rtirq.conf mostly ends up in /etc/default/ or /etc/sysconfig/ , also stripped from its extension. Let’s look at the contents of the configuration file:
The RTIRQ_NAME_LIST variable contains a list of space separated service names of which the first entry gets the highest priority. The term service seems to refer to module names and sound device designations (so the output of lsmod and aplay -l respectively) and doesn’t have to correspond to the full output, part of the output may suffice as the rtirq script does the matching itself.
The RTIRQ_PRIO_HIGH variable sets the highest priority a service can get assigned.
The RTIRQ_PRIO_DECR speaks for itself, here you set the number with which the priorities for each consequent service mentioned in the RTIRQ_NAME_LIST variable should be decreased.
The RTIRQ_RESET_ALL is a legacy variable and can best be left to default.
The RTIRQ_NON_THREADED variable is another legacy option, your kernel configuration has to support it and in almost all cases it doesn’t because the specific option, which was part of the CONFIG_PREEMPT_VOLUNTARY kernel config option and that allowed for setting non-threaded IRQs, simply doesn’t exist anymore. So basically this variable doesn’t do anything.
The RTIRQ_HIGH_LIST variable contains a list of space separated service names that get priorities in the 99-91 range, so above the value as set in the RTIRQ_PRIO_HIGH variable. Use this variable only for services of which you want to be 100% sure they don’t get interrupted by anything else. You will mostly want to put timers in there like rtc or the ALSA high resolution timer (snd-hrtimer).
When to use rtirq
A common use case for rtirq is when a FireWire controller shares its IRQ with one or even more devices. With rtirq you can then give a higher priority to the FireWire bottom-halve which should lower the chance of running into xruns drastically or even enable the device to initialize properly. The grep firewire /proc/interrupts command outputs the IRQ that is in use by your FireWire controller (when using the current JuJu stack):
As you can see IRQ 16 is really crowded in this case and a FireWire device connected to this controller simply won’t initialize. By adding the firewire_ohci module to the list of separated values of the RTIRQ_NAME_LIST variable you can assign a higher priority to the softirq or bottom-halve of the FireWire controller:
If RTIRQ_PRIO_HIGH is set to 90 and RTIRQ_PRIO_DECR to 5 then the real-time clock (rtc) will get prio 90 and the FireWire controller prio 85. All other bottom-halves of IRQ 16 will get a default prio of 50 so the FireWire controller will always take precedence. In this particular case (a HP DV7-1040) using rtirq this way enables the FireWire device (a Focusrite Saffire Pro 10 IO) to initialize properly and run in a stable manner at lower latencies (128 frames/48Khz samplerate * 3 periods = 8ms). And given the fact that the controller (an onboard JMicron chipset) sits on a very crowded IRQ shared by a NIC, a cardreader, an USB port and a GPU rtirq definitely shows off its strength here.
PCI bus latency
Conventional PCI has a shared bus topology and also suffers from only being able to address a limited number of IRQ’s. So besides PCI devices sharing interrupts they could also get into each other’s way because of
Question remains in how far adjusting the PCI latency timer affects performance for PCI-X devices. PCIe doesn’t suffer from PCI bus latency because of its different topology. Besides, PCIe devices have their PCI latency timer set to 0 and the setpci command simply doesn’t change anything, setting latency_timer=ff on PCIe devices still yields a setting of 0.
Screensavers
When doing audio work screensavers tend to get in the way. So you might want to consider uninstalling them. You will find then that X is still trying to blank your screen after a while. To completely disable this you could add the following lines to your .profile file:
This should completely disable any unwanted screensavers or screen blanking.
PulseAudio
Basically all modern distros come with PulseAudio installed. PulseAudio (PA) is a sound server (like JACK) that takes care of mixing the output of all applications that can output sound. Since PulseAudio is designed to work in as much situations and with as much hardware as possible it is not the best choice for a real-time, low-latency Linux audio set-up. In other words PulseAudio is more suited for consumer audio and JACK is more suited for pro audio.
There are distros that offer scripts or configurations to allow using both sound servers at once. But when setting up a Linux audio workstation you could ask yourself if you really need two sound daemons when the software you’re going to use is probably all JACK aware. Also, think about the extra overhead and possible issues you could run into when using two sound servers. Hence it’s not uncommon that people disable or uninstall PulseAudio on their Linux audio machines. On a Linux audio workstation that is used for nothing else you could uninstall PulseAudio, on a workstation that is also used for other tasks it might be a better option to disable PulseAudio for the specific session in which you want to do your audio and music production. Since PulseAudio is the default sound server on a lot of distros it is not part of the startup applications and it is also not called through init systems. So it will always run or start to run as soon as an application wants to output sound. Add to this that on most distros PA is set to respawn automatically after being killed or when it crashes and you’ll understand that PA doesn’t allow to be disabled easily.
There is a relatively easy way to disable PulseAudio though for a specific user session. First, modify or create the file
/.pulse/client.conf and make sure it contains the following line:
Now you can kill the pulseaudio daemon:
And it shouldn’t come up again, providing a PA free user session.
External links
Using FireWire
When using FireWire audio interfaces it is generally advised to use a real-time kernel. Of course this is not necessary, there are also users reporting success with generic kernels, but when you have trouble getting your system stable regarding xruns one of the first things besides installing rtirq you might want to try is to install or compile a real-time kernel .
Legacy FireWire stack
Make sure the raw1394 module is loaded. You can have this module loaded automatically by adding it to your /etc/modules file. Just add the following line to this file:
Loading this module will create the /dev/raw1394 node. Normal users do not have permissions to use this node but with an udev rule in /etc/udev/rules.d/ you can control these permissions. Most recent distributions also install the corresponding udev rules when installing FFADO packages but if your distro doesn’t do so you can create a new file 50-raw-firewire.rules with the following line to allow the audio group to use this node:
You will also need the FFADO drivers (most distros have packages for these drivers) and set the driver for JACK to ‘firewire’ in either QjackCtl or on the commandline with the -dfirewire argument.
JuJu FireWire stack
As of kernel 2.6.37 the legacy FireWire stack has been removed from the kernel sources in favor of the JuJu stack. If you have FFADO installed it should take care of properly setting up your device(s). Instead of creating a /dev/raw1394 node, the JuJu stack creates nodes per device in /dev/ , first device is always /dev/fw0 . Take note that the first device is always your controller, not your soundcard.
To use JACK with your FireWire device(s), set the driver to ‘firewire’ in QjackCtl or use the -dfirewire option on the commandline.
Troubleshooting
After setting up, configuring and tweaking your system it is still possible that it doesn’t perform the way you want it to. To help analyzing why the overal performance is not as expected there are some helpful tools that might reveal the source of the bottlenecks on your system.
top is probably the most used tool to display system information like CPU or memory usage. It is installed by default on most distros.
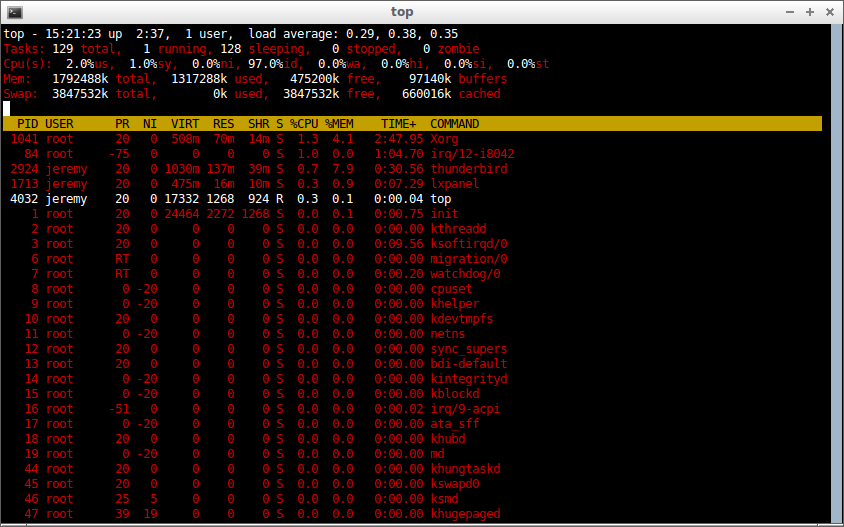
With the help of top you can find out which process is using up all your CPU or memory. By pressing h you get a help screen. To sort on memory usage instead of CPU usage you can press F + n + Enter .
htop is the somewhat more sophisticated big brother of top .
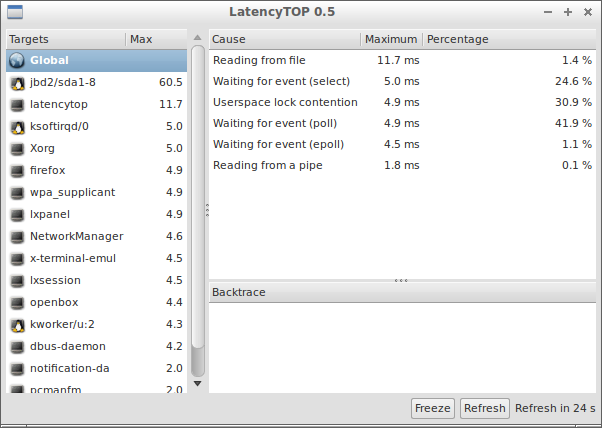
latencytop
latencytop is a very useful tool to find out what process is causing system latency to happen.
cyclictest
Just as latencytop measures system latencies, cyclictest measures kernel latencies. cyclictest has quite some options but one of the most used ways to run the command is:
One single thread ( -t1 ), priority of 80 ( -p 80 ), use clock_nanosleep ( -n ), use 10000 us base interval of thread ( -i 1000 ), use 1000 loops and then exit ( -l 10000 ), lock current and future memory allocations ( -m ). More on clock_nanosleep can be found in its manpage ( man clock_nanosleep ).
Other examples of the usage of cyclictest :
Источник


