- Question: Q: What is the terminal command to list USB devices?
- All replies
- Identify the ports on your Mac
- Thunderbolt / USB 4
- Thunderbolt 3
- USB 3
- Thunderbolt
- Mini DisplayPort
- Ethernet
- FireWire
- SD card
- Audio
- Power
- Learn more
- List all devices connected, lsblk for Mac OS X
- 5 Answers 5
- How to create a bootable installer for macOS
- What you need to create a bootable installer
- Download macOS
- Use the ‘createinstallmedia’ command in Terminal
Question: Q: What is the terminal command to list USB devices?
In Ubuntu Linux the command lsusb lists all devices connected to the usb ports. What is the equivalent command in OS-X? Thanks.
Mac mini, OS X Mountain Lion (10.8.2)
Posted on Mar 20, 2013 3:43 PM
Posted on Mar 20, 2013 5:31 PM
All replies
Loading page content
Page content loaded
Mar 20, 2013 5:31 PM
I do not know the Terminal command for that. but are you aware that you can go to System Information and see all USB devices connected to the mini?
Click on the Apple in the upper menu > About this Mac > More Info. > System Report > Hardware > USB.
Mar 20, 2013 5:33 PM
Thank you very much for the info. Now, my next step (I will create a new post) is to find out the terminal command that allows me to unmout or unattach any device that is connected to any of the USB busses that is shown on the list (obviously without physically disconnecting the device). Thanks again.
Mar 20, 2013 6:16 PM
Is there a similar command to list PCI devices? Thanks.
Mar 21, 2013 11:29 AM
Yes there is, but I think you’re on the wrong track. I suggest you start a new thread describing what it is you actually want to do.
Mar 21, 2013 1:23 PM
Thanks. The new thread, if you want to comment on it is:
If I am able to deactivate or unattach or disable the driver that is responsible for controlling the usb web cam that I have in my Mac mini, the virtualization program (VBox) would be able to capture it (already configured with the appropriate filter) for my guest OS. Now, I only get a message saying that the camera is busy from a previous request.
When I run your command, I get no response.
Mar 21, 2013 8:12 PM
Question: Q: What is the terminal command to list USB devices? More Less
Источник
Identify the ports on your Mac
If you’re not sure which port to use with your external display, hard drive, camera, printer, iPhone, iPad, or other device, the port shapes and symbols in this guide should help.
Information about these and other types of Mac ports is in the specifications for your Mac: Choose Apple menu > About This Mac, click Support, then click Specifications. Or check your Mac user guide.
Thunderbolt / USB 4
These Mac models have Thunderbolt / USB 4 ports:
You can connect a single external display and other devices that connect using either a Thunderbolt 3 cable or USB-C cable. You can also connect a USB-C charge cable to charge your notebook, or a USB-C to Lightning cable to charge your iPhone or iPad. If you have a device that doesn’t connect to this port, you might be able to use an adapter to connect it.
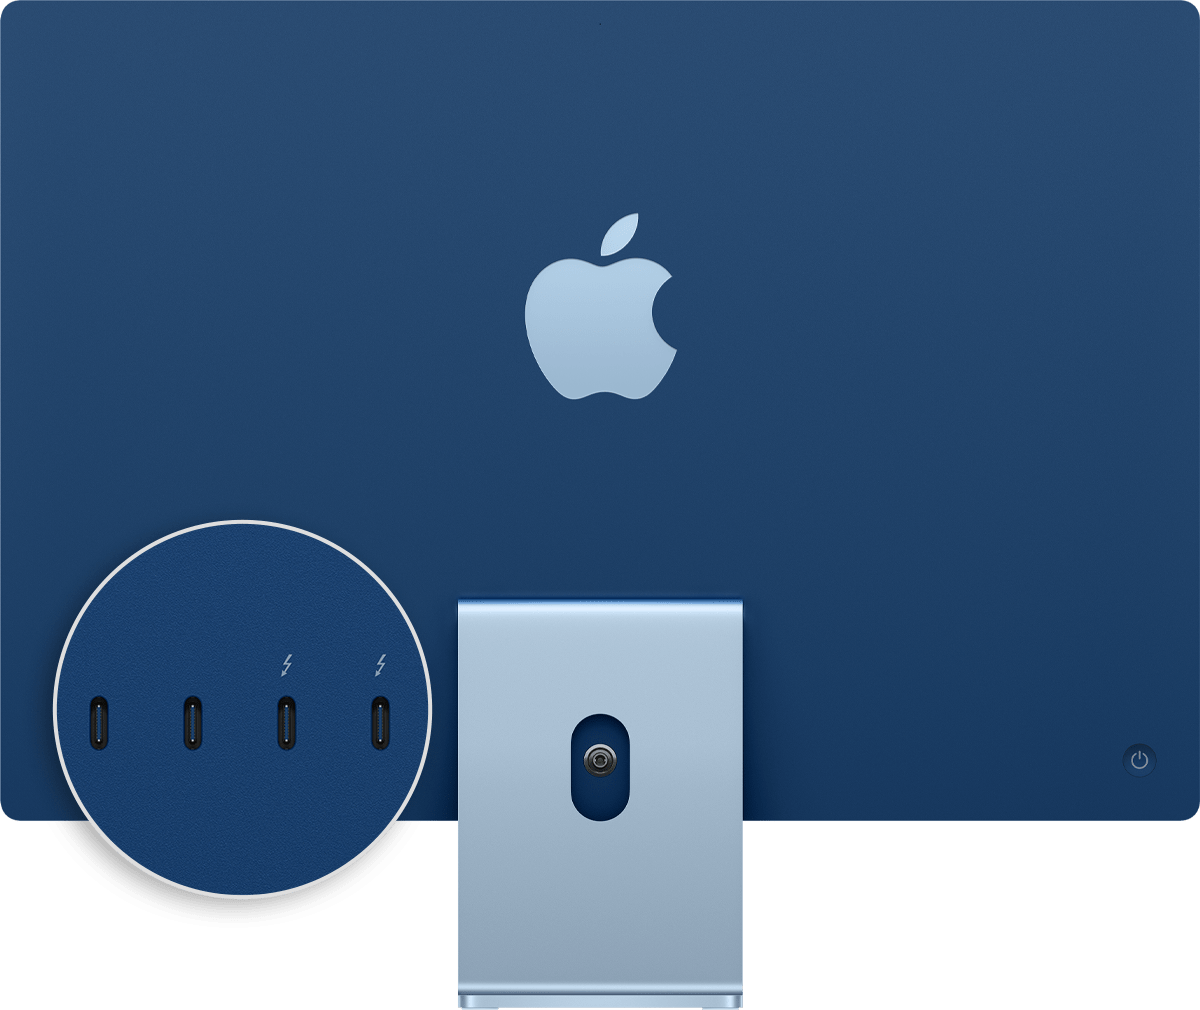
On iMac (24-inch, M1, 2021), the symbol appears above each Thunderbolt / USB 4 port. To connect a display, use either of the ports with the Thunderbolt symbol .

Thunderbolt 3
These Mac models have Thunderbolt 3 ports:
- iMac (Retina 5K, 27-inch, 2020)
- iMac (Retina 5K, 27-inch, 2019)
- iMac (Retina 4K, 21.5-inch, 2019)
- iMac (Retina 5K, 27-inch, 2017)
- iMac (Retina 4K, 21.5-inch, 2017)
- iMac (21.5-inch, 2017)
- iMac Pro
- Mac Pro (2019)
- Mac Pro (Rack, 2019)
- Mac mini (2018)
- MacBook Air (Retina, 13-inch, 2020)
- MacBook Air (Retina, 13-inch, 2019)
- MacBook Air (Retina, 13-inch, 2018)
- MacBook Pro (13-inch, 2020, Two Thunderbolt 3 ports)
- MacBook Pro (13-inch, 2020, Four Thunderbolt 3 ports)
- MacBook Pro (16-inch, 2019)
- MacBook Pro (13-inch, 2019, Two Thunderbolt 3 ports)
- MacBook Pro (15-inch, 2019)
- MacBook Pro (13-inch, 2019, Four Thunderbolt 3 ports)
- MacBook Pro (15-inch, 2018)
- MacBook Pro (13-inch, 2018, Four Thunderbolt 3 ports)
- MacBook Pro (15-inch, 2017)
- MacBook Pro (13-inch, 2017, Four Thunderbolt 3 ports)
- MacBook Pro (13-inch, 2017, Two Thunderbolt 3 ports)
- MacBook Pro (15-inch, 2016)
- MacBook Pro (13-inch, 2016, Four Thunderbolt 3 ports)
- MacBook Pro (13-inch, 2016, Two Thunderbolt 3 ports)
Use these ports with displays and other devices that connect using either a Thunderbolt 3 cable or USB-C cable. You can also connect a USB-C power adapter and cable to charge your notebook computer. If you have a device that doesn’t connect to this port, you might be able to use an adapter to connect it.

If your Mac notebook or desktop computer has more than one port like this, each port supports Thunderbolt 3 and USB-C.
USB 3
These Mac models have USB 3 ports:
- iMac (24-inch, M1, 2021) with four ports
- MacBook (Retina, 12-inch, 2017)
- MacBook (Retina, 12-inch, Early 2016)
- MacBook (Retina, 12-inch, Early 2015)
On MacBook, use this port with displays and other devices that connect using a USB-C cable. You can also connect a USB-C power adapter and cable to charge your notebook computer. If you have a device that doesn’t connect to this port, you might be able to use an adapter to connect it.
On iMac (four-port model only), use the USB 3 ports with external devices that connect using a USB-C cable. To connect an external display, use either of the ports with the Thunderbolt symbol .
Thunderbolt
These Mac models have Thunderbolt or Thunderbolt 2 ports:
- MacBook Pro introduced in 2011 through 2015
- MacBook Air introduced in 2011 through 2017
- Mac mini introduced in 2011 through 2014
- iMac introduced in 2011 through 2015
- Mac Pro introduced in 2013
Use these ports with displays and other devices that connect using a Thunderbolt cable.
Thunderbolt and Thunderbolt 2 are not the same as Mini DisplayPort . They have the same shape, but use different symbols on the cable and port. However, this port does support Mini DisplayPort for video output, so you can use a Mini DisplayPort cable to connect a Mini DisplayPort display.
Mini DisplayPort
These Mac models have Mini DisplayPort:
- MacBook Pro introduced in late 2008 through 2010
- MacBook Air introduced in late 2008 through 2010
- Mac mini introduced in 2009 and 2010
- iMac introduced in 2009 and 2010
- Mac Pro introduced in 2009 through 2012
Use this port with displays that connect using a Mini DisplayPort cable.
Mini DisplayPort is not the same as Thunderbolt or Thunderbolt 2 . They have the same shape, but use different symbols on the cable and port.
Use these ports with devices that connect using a USB-A cable. USB ports are sometimes known by the USB specification of the port, such as USB 2 or USB 3.

Use HDMI with displays and TVs that connect using an HDMI cable.
Ethernet
Use Ethernet with networks and devices that connect using an Ethernet (RJ45) cable.
On some iMac models, the Ethernet port is located on the computer’s power adapter. If your power adapter doesn’t have an Ethernet port, you can use an Ethernet adapter.
FireWire
| FireWire 400 | FireWire 800 |
Use FireWire with devices that connect using a FireWire 400 or FireWire 800 cable.
SD card
Use the SD card slot with SD, SDHC, SDXC, MMC, and UHS-II media cards, such as those used by digital cameras.
Audio
Use Audio-Out — or — with headphones, speakers, and other audio-output devices that connect using an audio cable that has a 3.5 mm (1/8 inch) audio jack.
Use Audio-In with a microphone or other audio-input device that connects using an audio cable that has a 3.5 mm (1/8 inch) audio jack.
Power
Use the power port , if available, to connect your computer to AC power using a MagSafe cable or adapter. This port isn’t available on newer Mac notebook computers, which use Thunderbolt 3 or USB-C for power and charging. Learn more about power adapters and cables for Mac notebook computers.
Learn more
Information about products not manufactured by Apple, or independent websites not controlled or tested by Apple, is provided without recommendation or endorsement. Apple assumes no responsibility with regard to the selection, performance, or use of third-party websites or products. Apple makes no representations regarding third-party website accuracy or reliability. Contact the vendor for additional information.
Источник
List all devices connected, lsblk for Mac OS X
In Linux if I want to see all the devices currently connected to my computer in the command-line, I run:
What’s the equivalent command under Mac OS X?
NOTE
The goal here is to be able to obtain information about a device based on its label or other uniquely identifying attributes, even if it hasn’t been mounted, thus df is not a viable option.
Examples of the kind of info I’m looking for are:
NOTE
I need to be able to see network-attached drives as well!

5 Answers 5
diskutil list will list all disks with their identifiers, even if unmounted.
For mounted disks only…
To find the raw device name (i.e. /dev/disk0s1 ) you can run df .
You can limit the results to locally-mounted filesystems, use df -Hl .
This results in a list of partitions and their raw device names, as shown below:
Mac OS X offers the system_profiler utility that can be run from Terminal. You can pipe it through grep to find specific strings that you want.

Adding this answer to complement @aglasser’s answer.
If you want to list all the USB Devices connected to your mac, run this in the Terminal app
List all PCI devices

From at least High Sierra 10.13.6 you can use the system profiler (About This Mac > System Report > SATA/SATA Express) to give you a list of all mounted SATA devices and get the UUID of each mounted Disk by name. If you have unmounted drives use Disk Utility to mount them.
The goal here is to be able to obtain information about a device based on its label or other uniquely identifying attributes, even if it hasn’t been mounted, thus df is not a viable option.
If that is your goal, then you can obtain all of that info from a specified disk using diskutil info /dev/diskX where diskX is the disk that you want to obtain information about.
NOTE: In your goal, you did not say that you wanted to obtain all information about all disks all at once in one command. So I am not answering that question, as your originaly question seems different than your stated goal. You may want to make some edits to specify what you are trying to accomplish and how.
Источник
How to create a bootable installer for macOS
You can use an external drive or secondary volume as a startup disk from which to install the Mac operating system.
These advanced steps are primarily for system administrators and others who are familiar with the command line. You don’t need a bootable installer to upgrade macOS or reinstall macOS, but it can be useful when you want to install on multiple computers without downloading the installer each time.
What you need to create a bootable installer
- A USB flash drive or other secondary volume formatted as Mac OS Extended, with at least 14GB of available storage
- A downloaded installer for macOS Big Sur, Catalina, Mojave, High Sierra, or El Capitan
Download macOS
- Download: macOS Big Sur, macOS Catalina, macOS Mojave, or macOS High Sierra
These download to your Applications folder as an app named Install macOS [ version name ]. If the installer opens after downloading, quit it without continuing installation. To get the correct installer, download from a Mac that is using macOS Sierra 10.12.5 or later, or El Capitan 10.11.6. Enterprise administrators, please download from Apple, not a locally hosted software-update server. - Download: OS X El Capitan
This downloads as a disk image named InstallMacOSX.dmg. On a Mac that is compatible with El Capitan, open the disk image and run the installer within, named InstallMacOSX.pkg. It installs an app named Install OS X El Capitan into your Applications folder. You will create the bootable installer from this app, not from the disk image or .pkg installer.
Use the ‘createinstallmedia’ command in Terminal
- Connect the USB flash drive or other volume that you’re using for the bootable installer.
- Open Terminal, which is in the Utilities folder of your Applications folder.
- Type or paste one of the following commands in Terminal. These assume that the installer is in your Applications folder, and MyVolume is the name of the USB flash drive or other volume you’re using. If it has a different name, replace MyVolume in these commands with the name of your volume.
Big Sur:*
Catalina:*
Mojave:*
High Sierra:*
El Capitan:
* If your Mac is using macOS Sierra or earlier, include the —applicationpath argument and installer path, similar to the way this is done in the command for El Capitan.
After typing the command:
- Press Return to enter the command.
- When prompted, type your administrator password and press Return again. Terminal doesn’t show any characters as you type your password.
- When prompted, type Y to confirm that you want to erase the volume, then press Return. Terminal shows the progress as the volume is erased.
- After the volume is erased, you may see an alert that Terminal would like to access files on a removable volume. Click OK to allow the copy to proceed.
- When Terminal says that it’s done, the volume will have the same name as the installer you downloaded, such as Install macOS Big Sur. You can now quit Terminal and eject the volume.


Источник


