- Установка драйверов в Linux
- Как драйвера устройств работают в Windows
- Как работают драйвера Linux
- Установка проприетарных драйверов Linux
- Установка прошивок в Linux
- Как установить драйверы для принтера в Linux
- Как заставить работать другое программное обеспечение
- Выводы
- Lite on linux drivers
- Operating System
- Preferred Computer Requirements:
- Keyboard Shortcuts
- Included Software
- Post Installation
- How do I know if my computer has UEFI?
- Secure Boot
- Disable Secure Boot in Windows
- Disabling Secure Boot — Tips
- Keyboard Function
- Lite System Report
- Lite info
- Support
- Forums
- General Software Support
- Social Networks
- Menus
- System Menu
- Office Menu
- Multimedia Menu
- Internet Menu
- Graphics Menu
- Accessories Menu
- My Computer Menu
- Application Finder
- Install Updates
Установка драйверов в Linux
В Windows мы привыкли, что перед тем, как новое оборудование будет работать, для него необходимо установить драйвера. Не важно будет ли это USB устройство, веб-камера или видеокарта. Драйвера в Windows выпускаются производителями и распространяются через интернет или на диске в комплекте с оборудованием.
В Linux, драйвера тоже необходимы, но ситуация состоит с ними немного по-другому. Здесь все свободные драйвера Linux встроены в ядро и если ваше оборудование будет работать с этой операционной системой, то, скорее всего, оно будет работать из коробки. Свободные драйвера разрабатываются производителями оборудования или же независимыми разработчиками. Также производители могут не открывать код своих драйверов, тогда они считаются проприетарными и не включаются в ядро, а доустанавливаются вручную.
Давайте рассмотрим подробнее работу с драйверами linux и Windows.
Как драйвера устройств работают в Windows
После установки Windows вам необходимо установить драйвера устройств, предоставляемые производителями — драйверы материнской платы, набора микросхем, драйверы видеокарты, звука, сети, wifi и многое другое.
Windows может немного в этом помочь и установить большинство драйверов от производителей через центр обновления Windows. При подключении устройства к компьютеру Windows вы увидите сообщение «Установка драйвера». Windows определяет производителя, ищет драйвер на серверах Microsoft и загружает его на ваш компьютер. Microsoft не пишут драйвера самостоятельно, они получают их от производителей и предоставляют вам, как только они понадобятся.
Если оборудование не работает в WIndows, то обычно вы можете найти драйвер чтобы заставить его работать. Обычно достаточно подыскать подходящий драйвер на просторах сети.
Как работают драйвера Linux
В Linux ситуация с драйверами очень сильно отличается. Большинство драйверов для вашего оборудования распространяются в виде открытого программного обеспечения и интегрированы в дистрибутив Linux. Эти драйверы linux, как правило, являются частью ядра Linux, но здесь есть исключение — драйверы видеокарты являются частью программного обеспечения Xorg, а драйверы принтера включены в набор CUPS (система печати).
Это значит, что большинство доступных для linux драйверов уже установлены на вашем компьютере, включены вместе с ядром, в виде модулей ядра или вместе с графическим сервером или сервером печати. Установка драйверов Linux почти не нужна. Драйвера в Linux разработаны, в основном, энтузиастами, но иногда их выпускают сами производители оборудования, которые вносят свой вклад в развитие ядра Linux и других проектов, например, это Intel, AMD, а также другие, более мелкие производители.
Все драйвера установлены из коробки, а значит вам не придется искать драйвера для каждого устройства в вашей системе и вручную их устанавливать. Система автоматически определит ваше оборудование и сама загрузит нужные драйвера в linux. Но здесь есть одно исключение — это проприетарные драйвера ядра linux и прошивки.
Установка проприетарных драйверов Linux
Некоторые производители не хотят открывать исходный код своих драйверов, поэтому для поддержки оборудования выпускают проприетарные драйвера в Linux с закрытым исходным кодом. Большинство дистрибутивов Linux не включают такие драйвера в свой состав, а значит они не смогут их автоматически определить и загрузить.
Чаще всего нам приходится сталкиваться с проприетарными драйверами для видеокарт, например, для NVIDIA, которые обеспечивают лучшую производительность в играх на Linux. Конечно, есть драйверы ядра Linux с открытым исходным кодом, которые заставят вашу видеокарту работать, но они не могут обеспечить достаточный уровень производительности в 3D играх. Некоторые драйвера wifi по прежнему закрыты, поэтому ваше оборудование не будет работать пока вы их не установите.
Установка драйверов в Linux зависит от вашего дистрибутива. В Ubuntu и основанных на ней дистрибутивах есть специальный инструмент — Дополнительные драйверы.

Программа определит, какие проприетраные драйверы устройств Linux можно установить и предложит скачать и установить их. В Linux Mint тоже есть инструмент менеджер драйверов, он работает аналогично инструменту в Ubuntu. Fedora — против проприетарных драйверов Linux и здесь нет никакого способа их установить. Во многих дистрибутивах проприетарные драйверы устройств linux можно найти в неофициальных репозиториях. Каждый дистрибутив решает эту проблему по-разному.
Установка прошивок в Linux
Не все могут делать драйвера с открытым кодом или проприетарные драйвера. Некоторым драйверам необходимы прошивки, чтобы правильно работать с устройствами. Например, прошивки нужны для работы некоторых модулей wifi или сетевых интерфейсов.
Чтобы установить прошивки в Linux необходимо скачать и установить пакет linux-firmware, это можно сделать с помощью следующей команды в Ubuntu:
sudo apt install linux-firmware
А в RPM дистрибутивах:
sudo yum install linux-firmware
Также возможно придется установить другие прошивки. Чтобы посмотреть подробнее, что нужно, и как установить, посмотрите лог ядра dmesg.
Как установить драйверы для принтера в Linux
Возможно, вам понадобится поставить драйвера linux для принтера. Однако при использовании инструмента для конфигурации принтеров — CUPS вы можете выбрать нужный драйвер из баз данных. Как правило, программа определяет производителя вашего принтера, а в списке вы можете выбрать точную модель принтера.
Вы также можете попытаться определить принтер по описанию PostScript или PPD файла. Эти файлы часто входят в состав драйвера принтера для Windows и вы можете найти PPD файл, который сделает работу вашего принтера лучше. Файл PPD можно выбрать в процессе работы CUPS.
Принтер может стать головной болью в Linux и многие из них могут не работать должным образом или даже вообще не работать. Так что при выборе принтера лучше сразу смотреть только те, которые точно будут работать с Linux.
Как заставить работать другое программное обеспечение
Иногда вам может понадобиться поставить драйвера linux для другого оборудования, которые не предоставляются автоматически. Например, NVIDIA предоставляет собственный инсталлятор для своего драйвера. Но тем не менее лучше использовать драйвера упакованные для вашего дистрибутива, они будут работать лучше.
В общем, если в Linux что-то не работает из коробки, и если оно все еще не работает после установки драйвера или прошивки, то, скорее всего, оно уже не будет работать вообще. Если вы используете старую версию Linux, может помочь обновление до самой новой версии. Это обеспечит лучшую аппаратную поддержку и обновления. Но если что-то все еще не работает, то , скорее всего, оно уже работать не будет.
Найти подробную информацию, как настроить работу того или иного оборудования в вашем дистрибутиве можно на различных форумах. Обычно, если у вас не очень новое устройство, другие пользователи уже сталкивались с этими проблемами, но они их уже решили, и вы можете найти эти ответы.
Выводы
Вы не должны возиться с драйверами слишком много. Драйвера в Linux с открытым исходным кодом и они интегрированы в ядро. В большинстве случаев вам не нужно устанавливать их или изменять, система автоматически определит оборудование и загрузит автоматические драйверы. Когда вы установили Linux, ваше оборудование должно работать либо сразу, либо после установки нескольких проприетарных драйверов.
Вы можете устанавливать и драйвера linux, размещенные на официальных сайтах производителей, но проприетарные драйвера могут работать не настолько хорошо, как подготовленные для вашей системы.
Источник
Lite on linux drivers
Thank you for choosing the Linux Lite Operating System.
Version: 5.6 | Date published: 1st September, 2021
What’s New: Updated information for 5.6 release.
Authors: Jerry Bezencon, Ralphy, Bill Hahnen, Ralphy, Milos Pavlovic, Adam Grubbs, John Jenkins
Operating System
- Current Release Name: Linux Lite 5.6
- Architecture: 64bit
- Supported BIOS: Legacy, UEFI & Secure Boot
- Software Base: Ubuntu 20.04.3 LTS
- Desktop Environment: XFCE 4.14.3
- Media Type: DVD, 2gb or larger USB device
Preferred Computer Requirements:
- 1.5 Ghz processor+
- 1Gb ram+
- 20Gb HDD/SSD+
- VGA, DVI or HDMI screen capable of 1366×768 resolution+
- DVD drive or USB port for the ISO image
Keyboard Shortcuts
- Ctrl+Alt+T — opens a terminal.
- Ctrl+Alt+Del — opens the logout dialogue.
- Ctrl+Shift+Esc — opens the Task Manager.
- Windows key — opens the Menu.
- Windows key+H — opens your home folder.
- Windows key+L — locks the screen.
- Alt+F2 — opens the Application Finder dialogue box.
- Printscreen key — opens the screenshot program.
Included Software
Firefox Web Browser, Thunderbird Email, LibreOffice Writer (Word), LibreOffice Calc (Excel), LibreOffice Impress (Powerpoint), VLC Media Player, Gimp Image Editor, Text Editor, PDF Viewer, CD/DVD Burner, Image Scanner, Image Viewer, Firewall, Backups, Bluetooth Manager, Partition Drives, Resource Usage, Task Manager, Install Drivers, Timeshift, Whisker Menu, Lite Auto Login, Lite Desktop, Lite Info, Lite Network Shares, Lite Software, Lite Sounds, Lite Sources, Lite System Report, Lite Tweaks, Lite Updates Notify, Lite Upgrade, Lite User Manager, Lite Welcome, Lite Widget, Help Manual.
Post Installation
The first thing you should do after a new install is click on Menu, Favorites, Install Updates. Next if you have any wireless, wired, graphics card devices or other hardware devices, click on Menu, Settings, Install Drivers. Please read the information provided very carefully before choosing a suitable driver. It is usually best to choose the recommended driver. You can look through how to connect to the internet by clicking here. More information on drivers can be found here.
According to How-To-Geek, «The BIOS will soon be dead: Intel has announced plans to completely replace it with UEFI on all their chipsets by 2020. The traditional BIOS still has serious limitations. It can only boot from drives of 2.1 TB or less. 3 TB drives are now common, and a computer with a BIOS can’t boot from them. That limitation is due to the way the BIOS’s Master Boot Record system works. UEFI replaces the traditional BIOS on PCs. There’s no way to switch from BIOS to UEFI on an existing PC.»
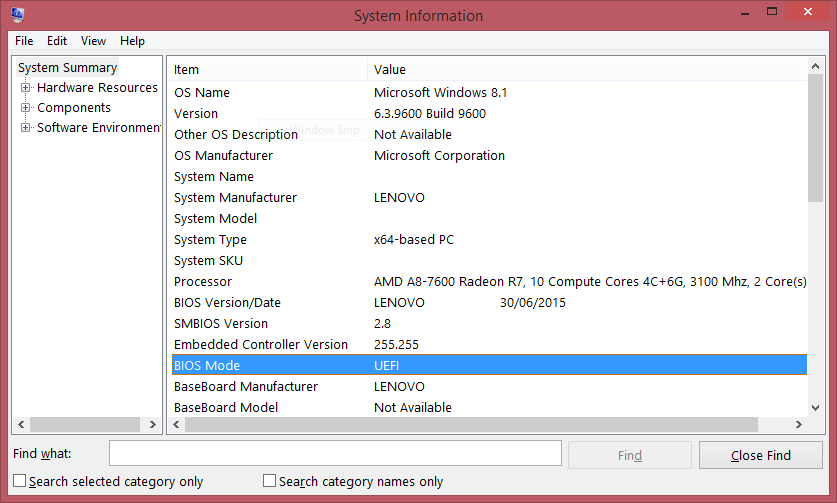
How do I know if my computer has UEFI?
In Windows Search, type msinfo or msinfo32 and launch the desktop app named System Information. Look for the BIOS Mode item, and if the value for it is UEFI, then you have the UEFI firmware. If it says BIOS Mode Legacy, then that’s the firmware you’re running. Also, in general, UEFI-enabled machines have faster startup and shutdown times as compared to BIOS-Legacy machines. If you bought the computer/motherboard after 2010, chances are you have a UEFI system. If you are still unsure, download the UEFI version as it will also detect and run on a BIOS-Legacy computer. If you have an older, legacy type BIOS computer don’t worry, Linux Lite will still detect this and install on your computer.
Secure Boot
Linux Lite recommends that you disable Secure Boot in your BIOS. This will save you potentially a lot of headaches during the use of your system. Linux Lite will run with Secure Boot enabled, but we highly recommend that you don’t. You should be aware that Secure Boot is considered a security feature and was implemented to make it harder for things like ransomware to take hold of your pc.
Disable Secure Boot in Windows
See the following link for generic instructions on how to disable Secure Boot in Windows (configuration will differ slightly depending on the manufacturer)
(Internet connection required to view video)
Disabling Secure Boot — Tips
There are many ways to do this. One of these should work for your system:
— In Windows — Hold down Shift, Click on the Power icon in your Menu, click Restart, keep holding down Shift the whole time. Release Shift key once you reach the Recovery options. Go to Troubleshoot, Advanced Options, UEFI Firmware Settings, Restart. You’ll then be in your BIOS, Look for Security, or Advanced or Boot Options and find Secure Boot, disable it. Exit your BIOS by saving settings.
— Turn on your PC and access your BIOS menu. You can do this by pressing a key during the bootup sequence, eg. F1, F2, F12, or Esc. Look for the Secure Boot setting, set it to Disabled. Secure Boot is usually in either the Security tab, the Boot tab, or the Authentication tab. Save changes and exit your BIOS.
— In Windows — Clicking the gear icon on the Start menu will take you to Settings. In Settings, choose Update & Security. Select Recovery from the left menu and you can see Advanced startup at the right side. Click Restart Now under the Advanced startup option. The comptuer will reboot to the Recovery menu. Select Troubleshoot, Advanced options, UEFI Firmware Settings. Restart.
Keyboard Function
On some laptops you may have to enable Numlock as it is disabled by default. You could also try FN + Numlock to use your keys, or FN + one of the F keys across the top of your keyboard. This varies from computer to computer. Some examples follow:
Fn + F11 (Acer, Toshiba, Samsung)
Shift + Num Lock
Fn + Num Lock (Sony, Gateway)
Fn + F11 + Scroll lock
Fn + F8 (HP)
Ctrl + F11
Fn + Shift + Num Lock
Fn + F4 (Dell)
Fn + Nmlk (Lenovo, ASUS)
Lite System Report
Linux Lite comes with the Lite System Report tool found under Menu, Settings. This tool helps our Support team more accurately identify any problems you may be having, thus providing you with better service. Click here to learn more about this.
Lite info
The purpose of the Linux Lite Hardware Database, is to give people an idea of different computer configurations from within a Linux Lite Series. The Linux Lite Hardware Database displays Make and Model, CPU, Graphics, Audio, Network and Storage technical specifications. This provides a snapshot of the kind of computers people are able to use with Linux Lite. No personal or security related information is gathered or displayed. Click on Menu, Settings, Lite Info to share your hardware and help others. Click here to go to the Linux Lite Hardware Database.
Support
If you cannot find the answer to your question in this Manual, please choose from the following:
Forums
Click here to get support for Linux Lite on the Linux Lite Forums. Please search the Forums before posting your question, chances are the question you have, has previously been answered. When posting for support, make your title descriptive as possible. Within the post, specify details of the problem, describe the procedure you followed that led to it, steps you tried in order to resolve the issue, and any error messages you may have encountered at various stages in the process. Also include information on your computer — model number, approximate age, CPU, RAM, etc. (The Lite System Report tool is good for that.) The more info you provide the easier it will be for people to evaluate the situation and offer appropriate guidance.
NOTE: Please read the Forum Posting Guidelines before creating your first post.
General Software Support
If you are using a program for example Firefox, the first port of call should always be the developer and or creator/s directly. Most programs have a Help menu somewhere on their program. The Help menu will then have a link to their support area. This is where the experts are and you should receive excellent support. If after trying this you are still getting nowhere, feel free to use one of our above services. Because Linux Lite is based on the popular Ubuntu Operating System, many questions can also be answered by simply entering the issue you are having into your favorite search engine.
Social Networks
Here, we will give you a brief introduction to the Linux Lite Desktop. Let’s start the Tour.
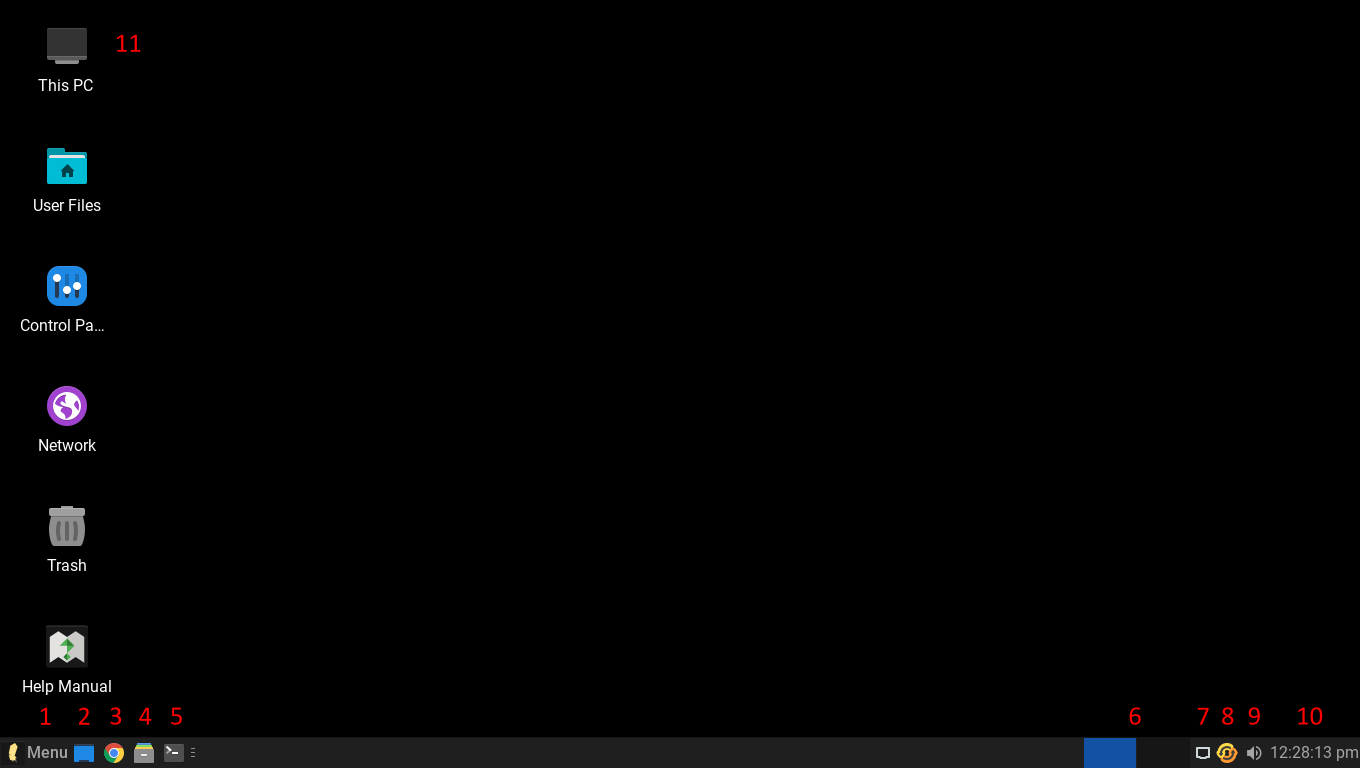
The Desktop layout
1 — 9 — Taskbar. This area consists of the Menu, quick launch application icons, workspaces and the system tray.
1 — Menu. This is where all of your applications are accessed. In Linux Lite, Menu items are categorized. See here for more information.
2 — Show Desktop. Clicking on this icon minimizes all currently open windows to the taskbar.
3 — Web Browser. Here is where you can launch the web browser Firefox from to allow you to browse your favorite websites on the Internet.
4 — Home Folder. This is where all your Documents, Downloads, Music, Pictures and Videos will be stored.
5 — XFCE Terminal. Otherwise known as the ‘command line’. Here, you can run commands just lke you can in Windows (Command Prompt).
6 — Workspaces. These are like virtual desktops. They allow you to run your applications on 2 or more Desktops, increasing your workspace.
7 — Network Icon (system tray). Configure and connect to wired, wireless and VPN networks here.
8 — Volume Icon (system tray). You can adjust the main volume level, or if you have several applications running sound, you can adjust each level individually.
9 — Date, Time & Calendar (system tray). Here you can view the date and time, and also view the current months calendar by clicking on the time.
10 — Desktop Icons. Quick and easy access to frequently visited places in your computer (English installations only).
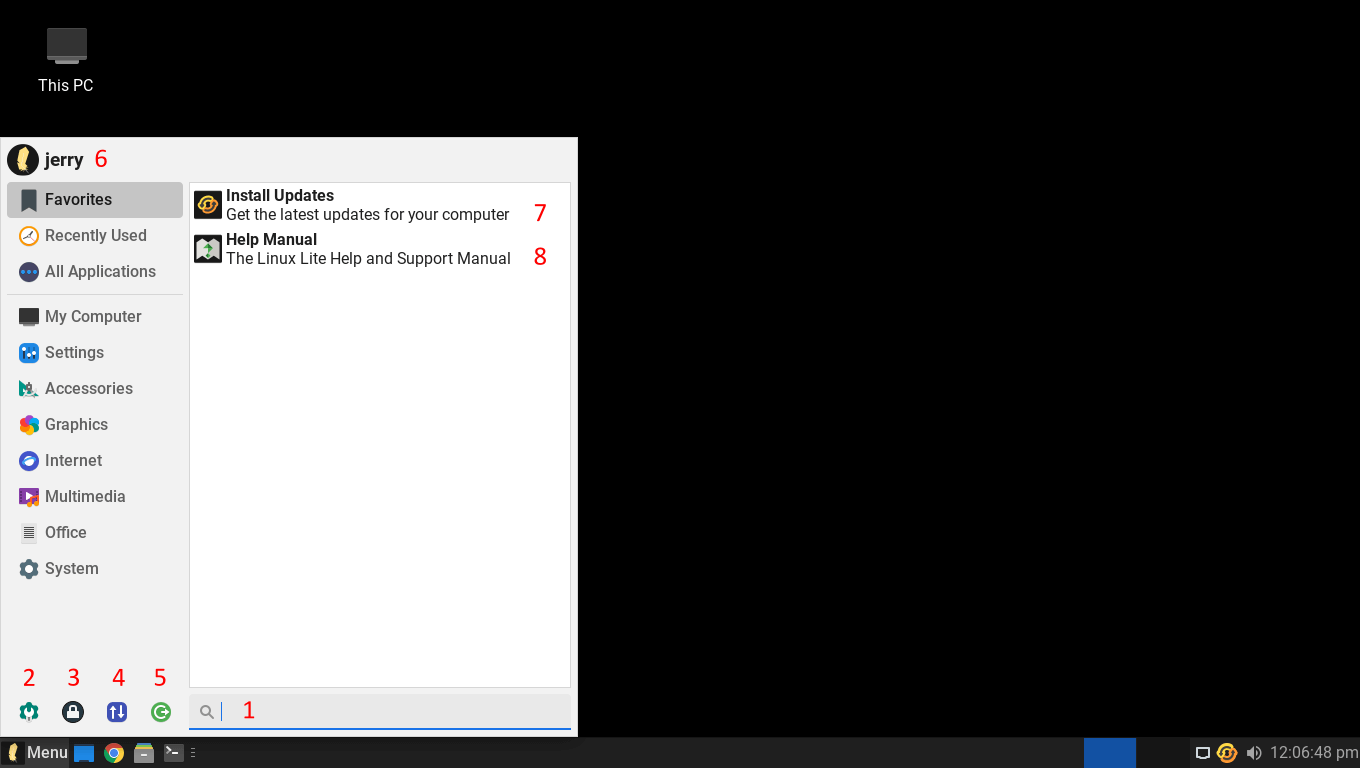
1 — Search Bar. Here you can start typing the name of an application and the Menu will show that application to you in the list.
2 — All Settings. This is the Settings Manager, similar to the Control Panel in Windows. This is where you can adjust things like your Display resolution and Power settings.
3 — Lock Screen. Clicking on this icon will lock your screen. A handy feature to have when you are away from your computer for a short time and want it secured. Enter your password to unlock your screen when you return.
4 — Switch Users. Just like in Windows, if you have more than one user set up and you are both working on the same computer, here you can switch users without needing to login and logout each time.
5 — Logout. Clicking on this icon will bring up a new dialogue window giving you the option to, Log Out, Restart, Shut Down, Suspend or Hibernate your computer.
6 — Login Name. The name of the currently logged in user.
7 — Install Updates. Click here to install the latest updates that help keep your computer safe and secure. See here for more information.
8 — Help Manual. A shortcut to the Linux Lite Help Manual, an excellent resource for learning how to use and configure Linux Lite.
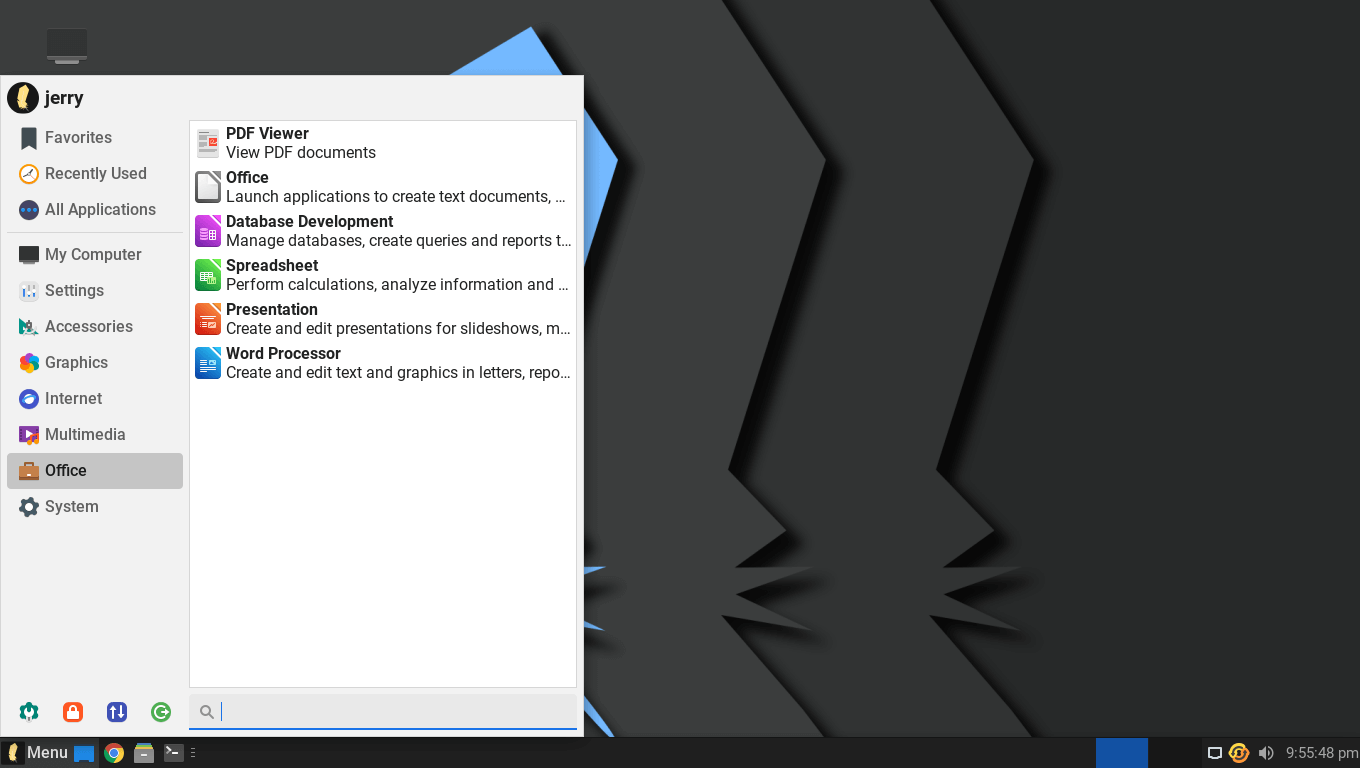
In Linux Lite, when you click on the Menu button, applications are stored in the Menu by category. For example, when you navigate to the Office category, you will see all of the Office like applications.
Desktop Settings — Changing the Wallpaper
When you right click on a clear space on the Desktop, you will get a menu of utilities to select from. To change the Wallpaper, select Desktop Settings from the menu.
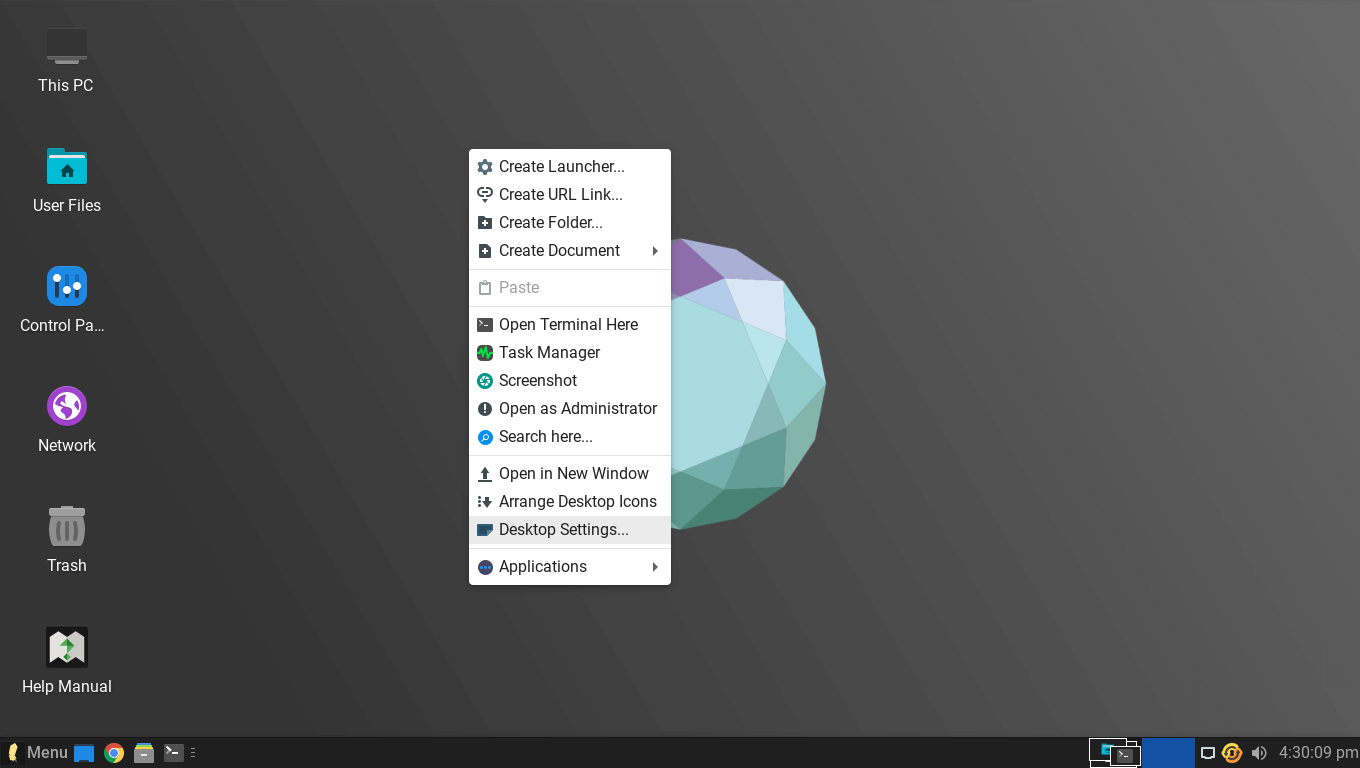
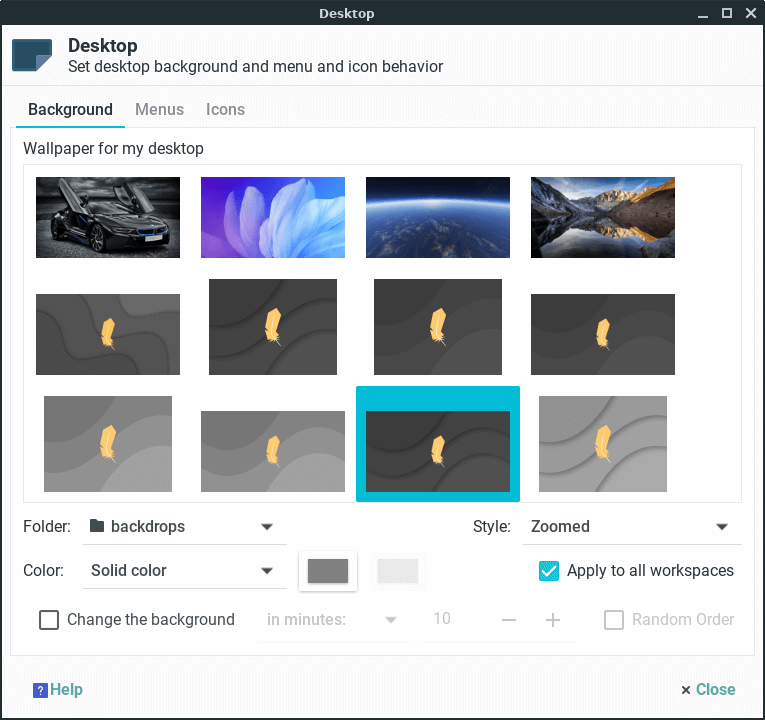
In the window that appears, left click on any of the wallpapers to set a new Desktop wallpaper. More information on this can be found here.
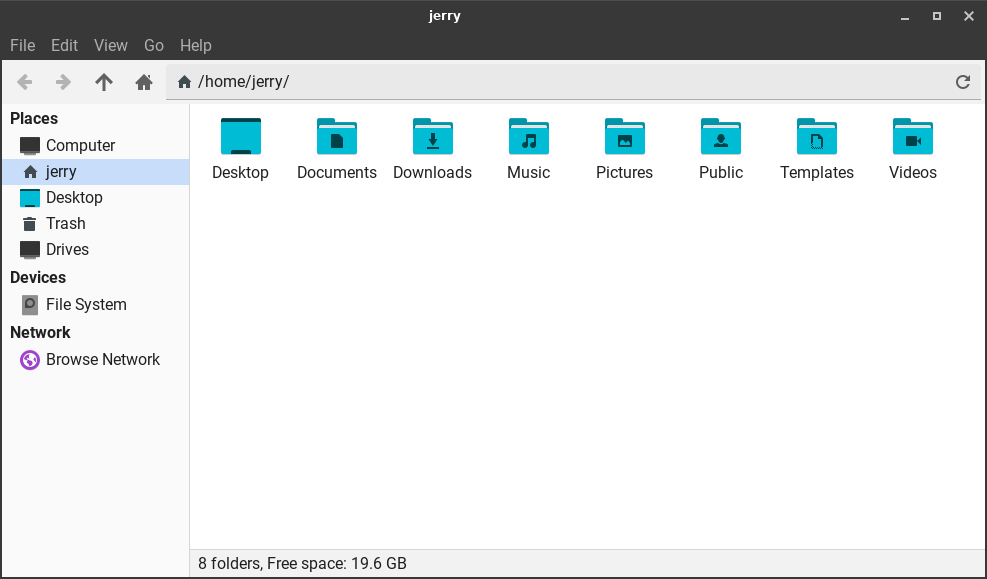
The equivalent of Explorer in Windows, is called the Home folder in Linux Lite. This is where all your files get stored. For example, when you download a file from the Internet, that file gets stored in the Downloads folder. The rest of the folders are set up for your convenience in which you can organize your files according to their category. Your music would go into the Music folder, your photos would go into the Pictures folder, and so on. You can store your files directly into your Home folder if you choose to, but keeping files stored in separate folders sure does keep things tidy and easier to find.
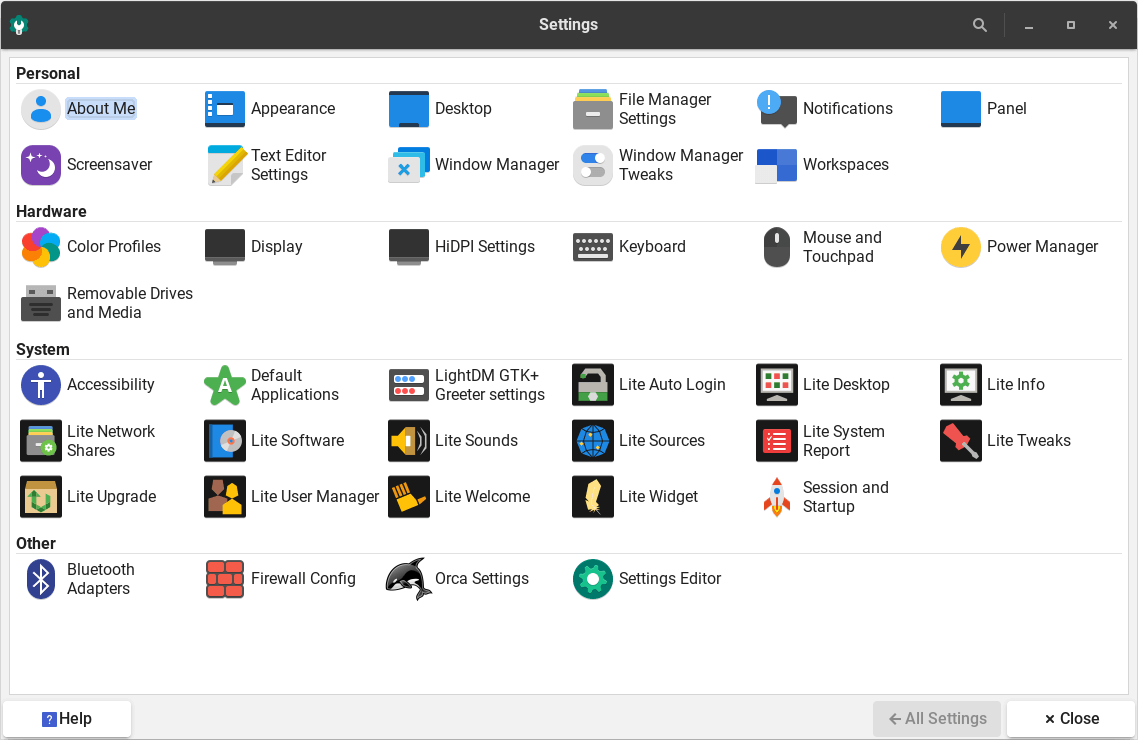
In Linux Lite, the Settings Manager is like the Control Panel in Windows. This is a central place where you can configure all of your Linux Lite settings. You can access the Settings Manager by going to Menu, Settings, Settings Manager.
Menus
The menu system on Linux Lite has been greatly simplified to make navigation intuitive.
System Menu
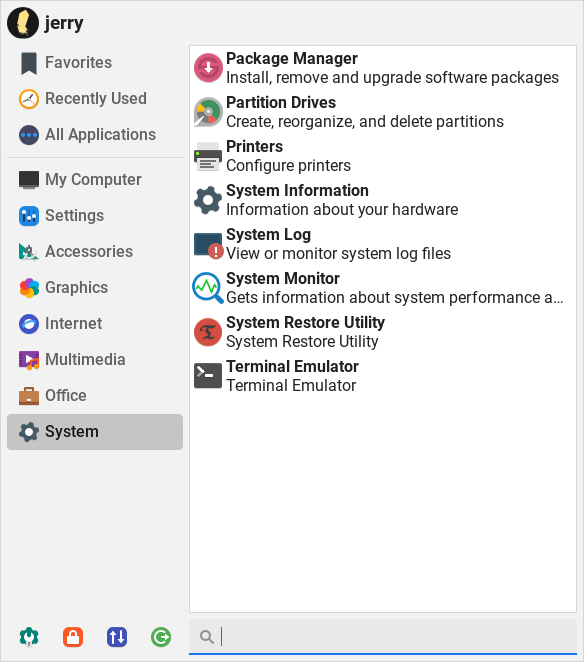
Package Manager — Install and Remove software with the Synaptic Package Manager.
Partition Drives — View and edit your hard drive partitions with GParted program.
Printers — Install and set up printers.
Process Viewer — Shows you how much cpu and memory your computer is using. Also displays system processes.
System Information — View hardware like your cpu, memory, graphics card etc in detailed information.
System Log — View system your logs, helps with troubleshooting.
System Restore Utility — System restore tool for Linux. Supports scheduled snapshots, multiple backup levels, and exclude filters. (like System Restore in Windows)
Task Manager — An overview of currently running computer processes. You can kill unresponsive applications here to.
Terminal Emulator — A command line utility like the command prompt in Windows.
Office Menu
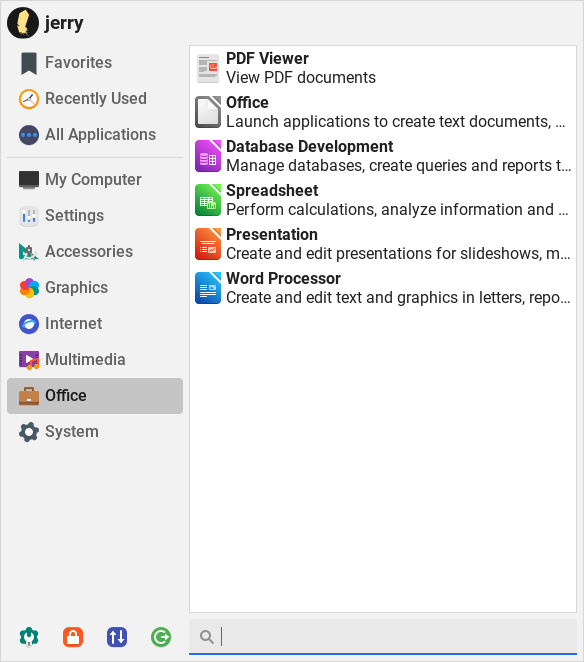
Word Processor — Opens LibreOffice Writer, an application similar to Microsoft Word.
Presentation — Opens LibreOffice Impress, an application similar to Microsoft PowerPoint.
Spreadsheet — Opens LibreOffice Calc, an application similar to Microsoft Excel.
PDF Viewer — View PDF documents with this application.
Multimedia Menu
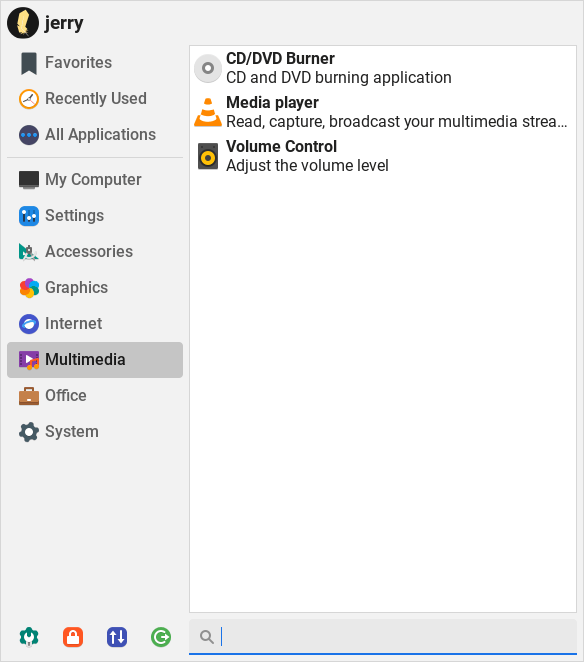
CD/DVD Burner — A fully featured CD & DVD burning program — XFBurn.
Media Player — VLC, a fantastic all around media player, play mp3’s, avi’s, mkv’s etc. Plays all your media files.
Volume Control — Individually set volume levels for each program that is running and configure your sound devices.
Internet Menu
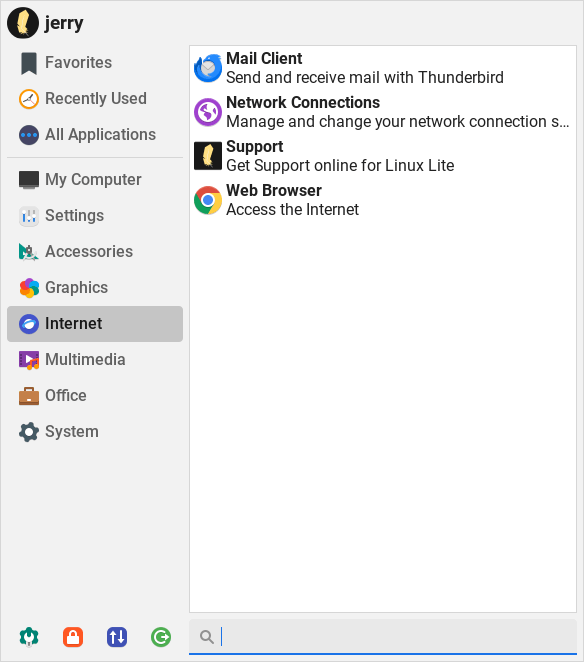
Mail Client — The Thunderbird email program, send and receive email.
Network Connections — Manage and connect to wired, wireless, 3g and VPN networks.
Support — Get Support at the Linux Lite Forums.
Web Browser — Browse the internet with Firefox.
Graphics Menu
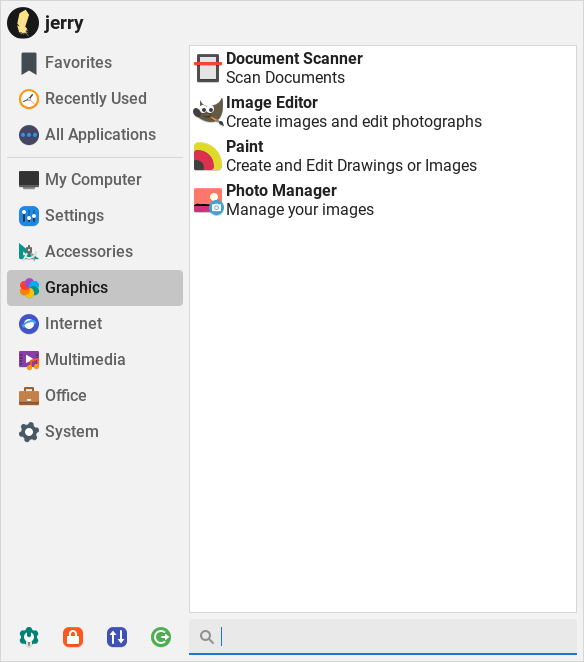
Document Scanner — Scan your documents and pictures.
Image Editor — GIMP is a powerful, and fully featured image manipulation program with features similar to Photoshop.
Paint — Gnome Paint is a simple to use Paint application.
Photo Manager — Preview your pictures and apply basic editing changes to them with the Shotwell image viewer.
Accessories Menu
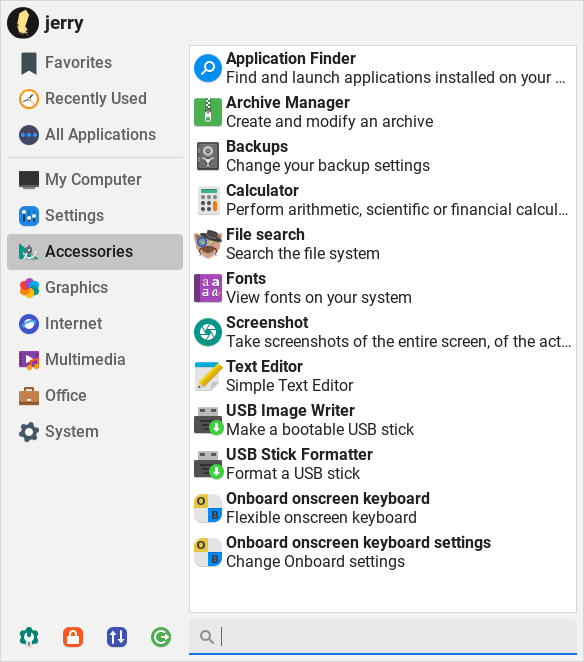
Application Finder — A handy pop up menu to all your programs, by category and in alphabetical order.
Archive Manager — A utility to compress and uncompress zip files etc.
Backups — A simple to use backup solution for your computer.
Calculator — A basic calculator also capable of scientific functions.
File Search — Locate files and folders on your computer.
Fonts — A simple font viewer and installer.
Screenshot — Take a screenshot of a window, and selected area, or the entire desktop.
Text Editor — A basic text editor, a program to type text into. Can also be used to create and/or edit configuration files.
My Computer Menu
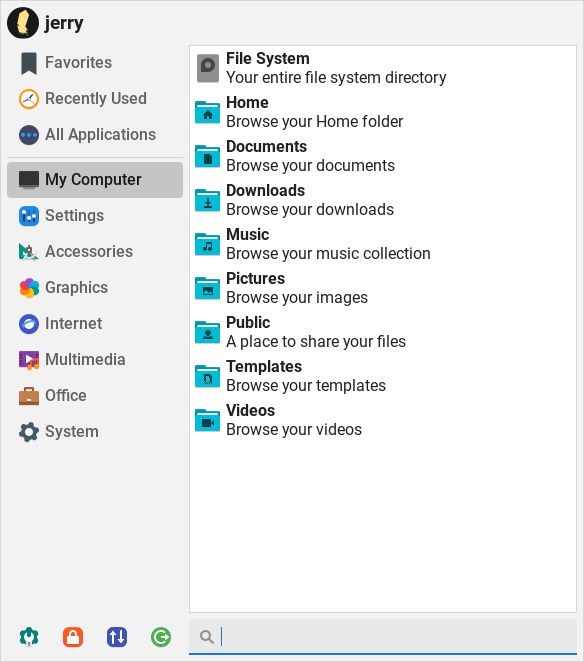
Conveniently placed shortcuts to your file system and all the folders within your home directory (English installations only).
Application Finder
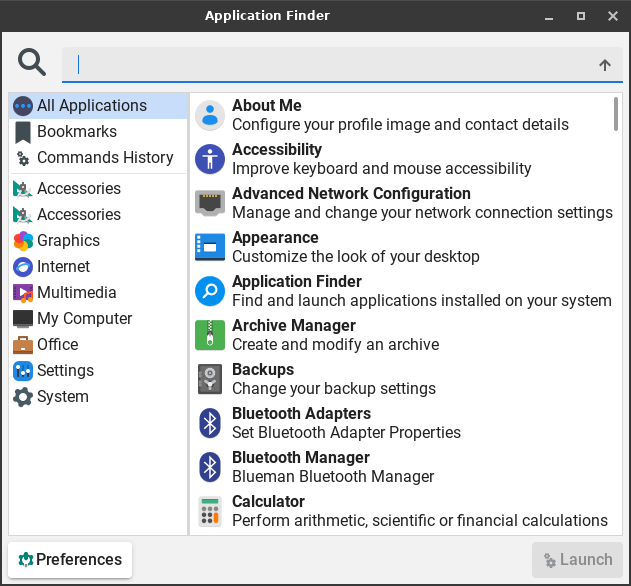
Clicking on this, you can run any program that is installed on the computer by its name.
Install Updates
Checks for updates for Linux Lite. Click here to learn more about installing updates.
Источник


