- как разблокировать диск ssd с помощью hdparm?
- 2 ответа
- Unlock HDD that are locked after Secure Erase
- Unlock HDD that are locked after Secure Erase
- 4 Responses
- How to unlock an SSD disk with hdparm?
- 2 Answers 2
- Live linux cd usb if drive is locked unlock disable security
- Войти
- Восстановление (разблокировка) SSD диска OCZ Vertex
- # Kernel Issues
- # Stuck on [EB|#LOG:EXITBS:START]
- # Booter Issues
- # Kernel Patch Issues
- # AMD Users
- # Intel Users
- # Legacy Intel users
- # UEFI Issues
- # Stuck on EndRandomSeed
- # Stuck after selecting macOS partition in OpenCore
- # Kernel Panic on Invalid frame pointer
- # Stuck on [EB|LD:OFS] Err(0xE) when booting preboot volume
- # Stuck on OCB: LoadImage failed — Security Violation
- # Stuck on OCABC: Memory pool allocation failure — Not Found
- # Stuck on Buffer Too Small
- # Stuck on Plist only kext has CFBundleExecutable key
- # Stuck on This version of Mac OS X is not supported: Reason Mac.
- # Couldn’t allocate runtime area errors
- # Stuck on RTC. , PCI Configuration Begins , Previous Shutdown. , HPET , HID: Legacy.
- # Stuck at ACPI table loading on B550
- # «Waiting for Root Device» or Prohibited Sign error
- # USB Issues
- # SATA Issues
- # Kernel panic with IOPCIFamily on X99
- # Stuck on or near IOConsoleUsers: gIOScreenLock. / gIOLockState (3.
- # Scrambled Screen on laptops
- # Black screen after IOConsoleUsers: gIOScreenLock. on Navi
- # Kernel Panic Cannot perform kext summary
- # Kernel Panic AppleIntelMCEReporter
- # Kernel Panic AppleIntelCPUPowerManagement
- # Kernel Panic AppleACPIPlatform in 10.13
- # macOS frozen right before login
- # Keyboard works but trackpad does not
- # kextd stall[0]: AppleACPICPU
- # Kernel Panic on AppleIntelI210Ethernet
- # Kernel panic on «Wrong CD Clock Frequency» with Icelake laptop
- # Kernel panic on «cckprng_int_gen»
- # Stuck at Forcing CS_RUNTIME for entitlement in Big Sur
- # Stuck on ramrod (^^^^^^^^^^^^^)
- # Virtual Machine Issues
- # Reboot on «AppleUSBHostPort::createDevice: failed to create device» on macOS 11.3+
как разблокировать диск ssd с помощью hdparm?
У меня есть SSD-диск с защитой паролем, но пароль давно потерялся . поэтому я попытался получить защиту ATA с помощью команды «hdparm».
с «hdparm -I», информация о диске выглядит интересной, как показано ниже:
Как вы можете видеть, диск находится в состоянии безопасности, и он не поддерживает функцию режима безопасности hdparm.
Когда используется команда разблокировки безопасности на этом диске, распечатайте, как показано ниже:
Мне интересно, есть ли другой способ разблокировать этот ssd-диск и удалить пароль?
2 ответа
Я смог заставить это работать на моем Western Digital WD20EURS. После сбора советов со всего Google, я смог получить мастер-пароль, изучить команды hdparm и использовать ваш пример в исходном вопросе для решения моей проблемы. Возможно, это поможет и вам.
Во-первых, я нашел список основных паролей для различных марок дисков.
Вот два расположения (заменены версиями веб-архива, чтобы избежать гниения ссылок)
- Используется ESCAPE для отмены запроса пароля Bios HD.
- Загружается в CLI CentOS7 (ранее установленный yum install hdparm )
- Command hdparm -I /dev/sda , чтобы проверить, был ли диск заблокирован ( -I является капиталом i )
- Команда hdparm —user-master m —security-unlock PASS /dev/sda
- m = с использованием мастер-пароля
- PASS = для меня, набрав «WDC» десять раз, с завершением «W»
- нашел это в ссылках, перечисленных выше
- Команда hdparm -I /dev/sda снова ( -I — это капитал i ). На этот раз диск показал «не заблокирован» (, на котором я нерешительно радовался )
- Команда hdparm —user-master m —security-disable PASS /dev/sda
- -Это должно отключить пароль на жестком диске и позволить вам загружаться без необходимости использования пароля в следующий раз.
- Затем я вернул диск в свою машину для Windows, и мне удалось увидеть все разделы на диске, удалить их и использовать этот новый диск!
Попробуйте использовать главный пароль для безопасного удаления диска. Выполнение безопасного удаления приведет к сбросу пароля пользователя. Вы можете найти списки стандартных паролей по умолчанию для поставщиков через поисковые запросы Google. Например, этот веб-сайт может быть полезен:
Источник
Unlock HDD that are locked after Secure Erase
Unlock HDD that are locked after Secure Erase
I normally rely on Synology to do secure erase procedure on any HDD before storing or selling them. I now wish I didn’t as the drive may get locked, so I’ve wasted alot of time to test a bulk of HDD I have done in the past to ensure that they are not locked. Synology should provide a visual aid if the HDD is still locked, and provide a means to prevent the security lock still in place.
Symptoms
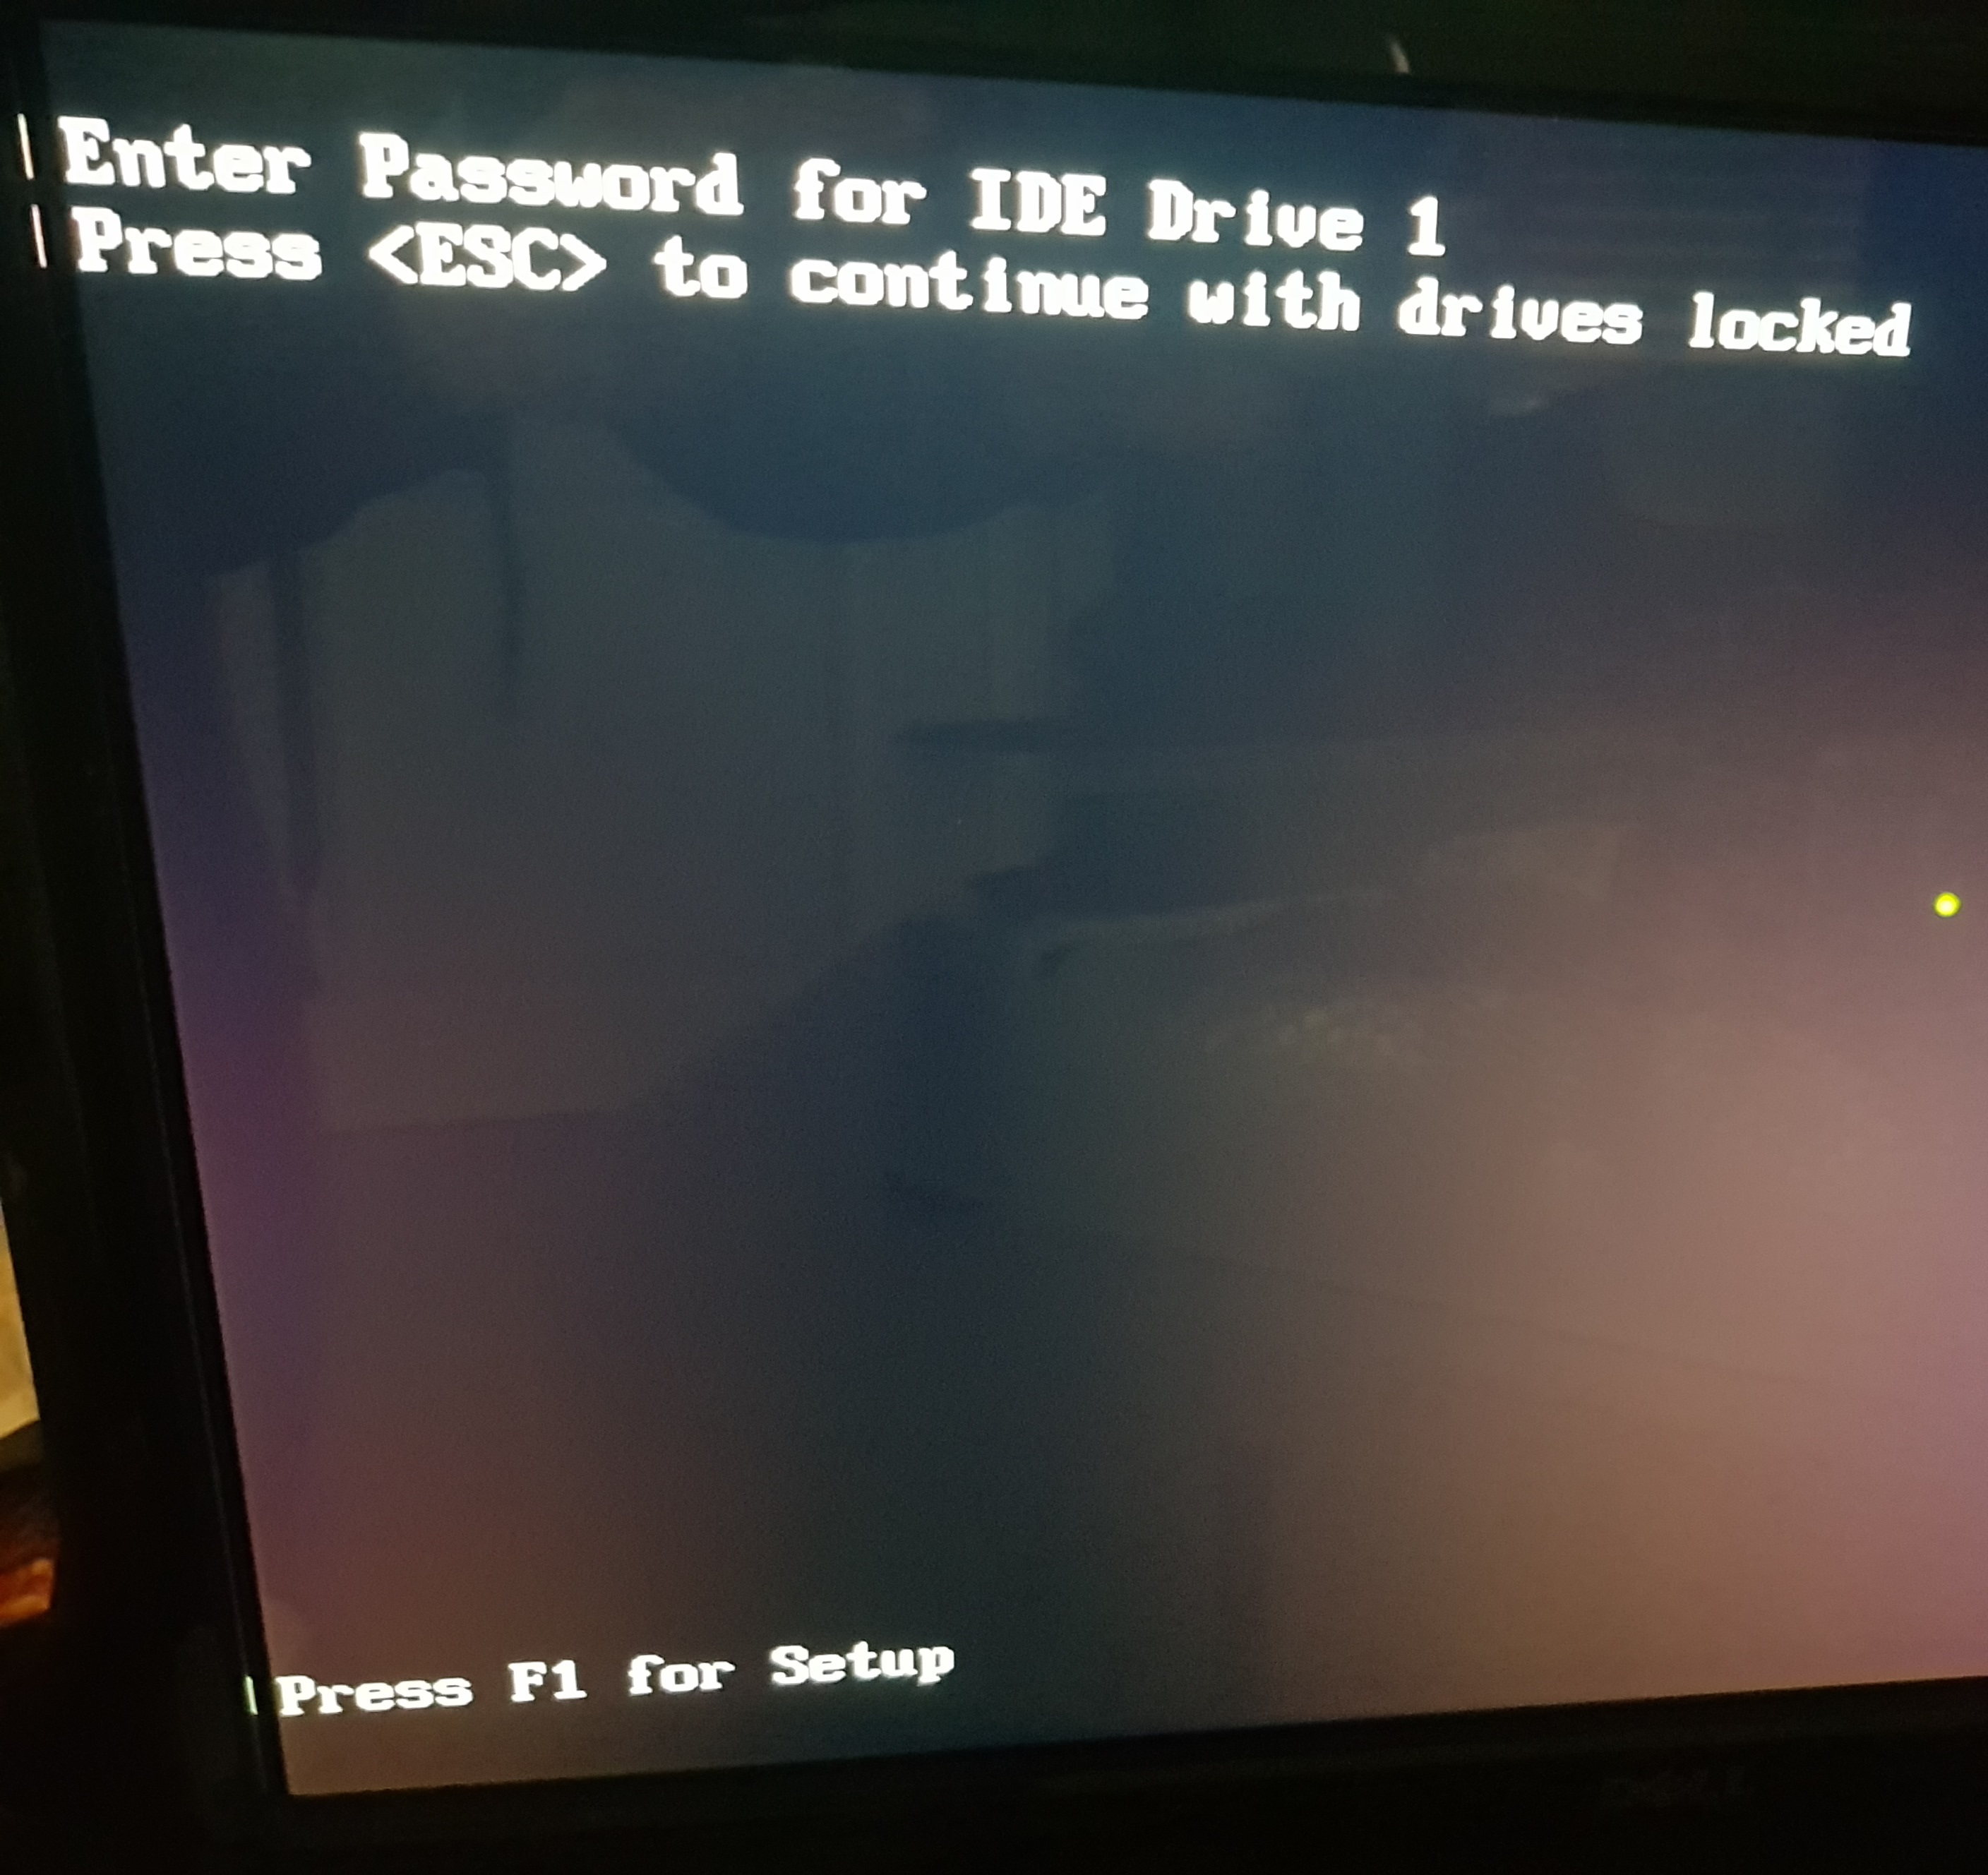
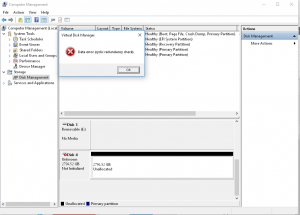
In Windows you get the ‘Data error (cyclic redundancy check).’ error, while the Mint Linux would ask for the password for that particular drive.
Manufacture Master Password
These are the commands you needs, but first you need the master password on which ever HDD manufacture you are using. There is a list of passwords from Forensics Wiki
- Western Digital: WDCWDCWDCWDCWDCWDCWDCWDCWDCWDCW
- Maxtor: Maxtor*INIT SECURITY TEST STEP*F (* means 00h)
- Seagate: Seagate
- Fujitsu, Hitachi, Toshiba: 32 spaces
- Samsung: tttttttttttttttttttttttttttttttt
- IBM:
- CED79IJUFNATIT
- VON89IJUFSUNAJ
- RAM00IJUFOTSELET
Command
Switching ‘Locked’ into ‘Not Locked’
Switching ‘Enabled’ into ‘Not Enabled’ security lock
Synology
If you still got your Synology, you can telnet into the system.
Use your admin account to login to the system.
List all drives
Find the drive that you wish to poll, then use this command to find which drive letters available could be ‘sda’, ‘sdb’ and so on.
For DSM 6 onwards, to become root do this first.
You want to gather the drive information, you only need to look at the security section (near bottom), if it’s says the following ‘enabled’, ‘locked’ and ‘Security level high’ which mean it’s locked.
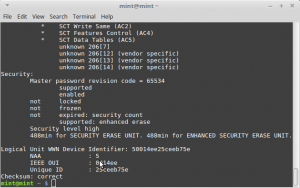
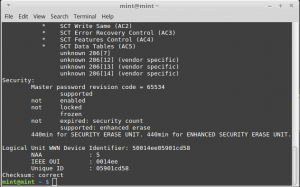
Now run the disable and unlock command


Check the drive information again, you should see ‘not enabled’ and ‘not locked’ and the security level high message disappeared.

Linux Mint Distribution
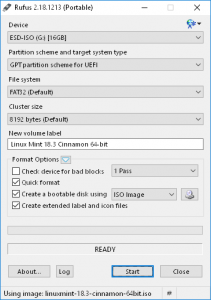
If you don’t have an Synology you can use a bootable Linux Operating System, I recommend Linux Mint download their popular edition “Cinnamon 64-bit edition” on their download page.
Please note that you connect the drive directly using SATA not via USB as I could not send the command correctly.
Get Rufus which is the best software to make bootable USB, it’s very tiny and very simple to use. I just download the portable version, and just loaded the ISO Image using the CD disk image icon next to “Create a bootable disk using”. Remember that all data will be deleted ensure you select the correct USB device to start with.
Boot that USB, and open terminal once Mint loaded.
Display drive information and check out the security section. For this example it was the only drive so I know it’s ‘sda’
You can see that the security is ‘enable’, ‘locked’ and ‘Security level high’.
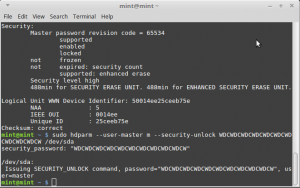

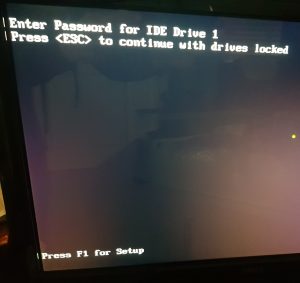
Eventually you get this
To avoid using secure erase you can just send command to write the whole drive with zeros or random bit.
Zeros
4 Responses
fantastic post, however, note that the commands to remove the password and the security need “sudo” in front of them. in your post, the first time the commands appear, the sudo is missing and I typed as is and it didn’t work, said wrong password. so i scrolled down and then i copy/pasted the second iteration under the mint instructions and it worked fine.
Hi Tim, just updated the post to include ‘sudo’ on all commands, I believe you only need to state sudo once on Synology then provide a password and you become root from then onward. Though being root has changed from Synology DSM 6 onwards, I’ve also updated the forensicswiki link to their new domain https://forensicswiki.xyz/. Glad that it works for you, this post is quite old.
This saved my week-end, crazy. Why does secure erase lock a drive ?
One point, in the forensics you put one character too much at the end …
Cheers
Mike
Glad that it helps you Mike, oddly forensics has been wrong all this time. I think I’ve corrected the code when I was experimenting with unlocking my Western Digital. I believe the secure lock was just a half bake process that was a great idea at the time, but as you can tell it’s useless.
Источник
How to unlock an SSD disk with hdparm?
I have an SSD disk with password protection, but the password was lost long time ago. so I tried to erase the ATA security with the hdparm command.
With «hdparm -I», the disk information looks interesting as below:
As you can see, the disk is in the security locked state, and it doesn’t support hdparm security mode feature.
When use the security unlock command on this disk, the results are as below:
I’m wondering if there is any other way to unlock this SSD disk and remove the password?
2 Answers 2
I was able to get this to work on my Western Digital WD20EURS. After piecing together tips from all over Google, I was able to get a master password, research the commands of hdparm , and use your example in your original question to resolve my issue. Maybe this will help you too.
First off, I found a list of master passwords for various brands of drives.
Here are two locations, (replaced with Web Archive versions to avoid link rot)
- Used ESCAPE to cancel Bios HD password request.
- Booted into CentOS7 CLI (previously installed yum install hdparm )
- Command hdparm -I /dev/sda to check if drive was «locked» ( -I is capital i )
- Command hdparm —user-master m —security-unlock PASS /dev/sda
- m = using master password
- PASS = for me, typing ‘WDC’ ten times, with a finishing ‘W’
- found this password in the links listed above
- Command hdparm -I /dev/sda again ( -I is capital i ). This time the drive showed «not locked» (at which I hesitantly rejoiced)
- Command hdparm —user-master m —security-disable PASS /dev/sda
- This should disable the password on the hard drive and allow you to boot without needing a password next time.
- Then I put the drive back into my Windows machine. I was able to see all the partitions in the drive, erase them, and use this new drive!
Источник
Live linux cd usb if drive is locked unlock disable security
Войти
Авторизуясь в LiveJournal с помощью стороннего сервиса вы принимаете условия Пользовательского соглашения LiveJournal
Восстановление (разблокировка) SSD диска OCZ Vertex
Впервые я это опубликовал тут, а в ЖЖ делаю репост:
У дисков OCZ серии Vertex есть неприятная особенность (возможно, присущая дискам и других производителей), с которой пришлось мне столкнуться.
Иногда при отключении питания (например, кончился заряд батарей ноутбука, или комп завис и пришлось его перезагрузить) эти диски блокируются ATA паролем (ATA password). И чтобы получить снова доступ к SSD, требуется его как-то разблокировать. Это баг в прошивке, потому все SSD диски настоятельно рекомедуется сразу после покупки перепрошить на последнюю версию firmware!
Я свой диск не перепрошил, и у меня с диском Vertex 450 произошло именно это — зависание, перезагрузка компа и блокировка диска. В результате с диском ничего нельзя сделать, даже провести форматирование. Гугление по инету не дало толковой информации, все сводилось к тому, что можно попробовать использовать OCZ Toolbox, и он типа может быть поможет. Не помог. Даже попытка запуска secure erase в этом тулбоксе совершенно не помогла — диск не дает с собой ничего делать. Единственной альтернативой является сдать диск по гарантии, случай это гарантийный, и на подобные жалобы на форуме OCZ советуют просто нести в гарантию, и все будет ОК. Но мне было во-первых влом тащить куда-то диск, а во-вторых интересно самому решить эту проблему (и сегодня, а не когда-то там когда по гарантии сделают).
Спасло гугление информации по утилите hdparm для Linux. Совсем другая история, как я на эту утилиту вышел, но это не важно.
1. Скачиваем CD с Ubuntu 12.04 LTS вот тут: http://www.ubuntu.com/download/desktop
2. Записываем образ на CD/DVD диск.
3. Перезагружаем комп, отключаем в БИОС все жесткие диски, если их больше чем один SSD, но оставляем CD/DVD привод, разумеется.
3. Грузимся с диска Ubuntu, выбираем режим Live CD («Try Ubuntu»).
4. Жмем в левом верхнем углу кнопку с логотипом Убунты, вводим там terminal, в найденных программах запускаем Terminal.
5. Вводим команду
sudo hdparm -I /dev/sda
6. Читаем вывод команды, там будет что-то такое:
Model Number: OCZ-VERTEX450
Нам надо убедиться, что это тот самый диск, и это он. Ок, идем дальше.
7. В самом конце вывода команды ищем такое:
Security:
Master password revision code = 24519
supported
enabled
locked
not frozen
not expired: security count
not supported: enhanced erase
Security level high
Нас интересует «locked» — в нем и проблема, должно быть «not locked»! Значит диск реально блокирован.
sudo hdparm —security-unlock «» /dev/sda
Тут «» — это две двойные скобки, внутри них — ничего, это типа пустой пароль. Не знаю, как на других дисках, а на Vertex 450 проканал пустой пароль.
9. Снова sudo hdparm -I /dev/sda
Видим:
Security:
Master password revision code = 24519
supported
enabled
not locked
not frozen
not expired: security count
not supported: enhanced erase
Security level high
Все ок, «not locked»!
10. Теперь отключаем безопасность (пока мы только типа ввели пароль чтобы получить доступ), чтобы и после перезагрузки все было хорошо:
sudo hdparm —security-disable «» /dev/sda
11. Теперь скачайте утилиту OCZ Toolbox и с ее помощью обновите прошивку SSD: http://ocz.com/consumer/download/firmware
Под Ubuntu это легко сделать, скачав архив для Linux по ссылке выше, распаковав его на рабочий стол и введя команду:
Обновление прошивки должно пройти успешно, а затем так же успешно должна будет пройти и загрузка компа с этим диском, и все должно без проблем работать. Работы — на 10-20 минут!
Источник
# Kernel Issues
Issues surrounding from initial booting the macOS installer to right before the install GUI pops up.
# Stuck on [EB|#LOG:EXITBS:START]
This section will be split into 3 parts, so pay close attention:
# Booter Issues
The main culprits to watch for in the Booter section are:
DevirtualiseMmio
- Certain MMIO spaces are still required to function correctly, so you’ll need to either exclude these regions in Booter -> MmioWhitelist or disable this quirk outright. More info here: Using DevirtualiseMmio
- For TRx40 users, enable this quirk
- For X99 users, disable this quirk as it breaks with some firmwares
SetupVirtualMap
- This quirk is required for the majority of firmwares and without it it’s very common to kernel panic here, so enable it if not already
- Mainly Z390 and older require this quirk enabled
- However, certain firmwares(mainly 2020+) do not work with this quirk and so may actually cause this kernel panic:
- Intel’s Ice Lake series
- Intel’s Comet Lake series(B460, H470, Z490, etc)
- AMD’s B550 and A520(Latest BIOS on X570 are also included now)
- Many B450 and X470 boards with late 2020 BIOS updates are also included
- AMD’s TRx40
- VMs like QEMU
- X299 2020+ BIOS updates(This applies to other X299 boards on the latest BIOS that released either in late 2019 or 2020+)
EnableWriteUnprotector
- Another issue may be that macOS is conflicting with the write protection from CR0 register, to resolve this we have 2 options:
- If your firmware supports MATs(2018+ firmwares):
- EnableWriteUnprotector -> False
- RebuildAppleMemoryMap -> True
- SyncRuntimePermissions -> True
- For older firmwares:
- EnableWriteUnprotector -> True
- RebuildAppleMemoryMap -> False
- SyncRuntimePermissions -> False
- Note: Some laptops(ex. Dell Inspiron 5370) even with MATs support will halt on boot up, in these cases you’ll have two options:
- Boot with the old firmware quirk combo(ie. With EnableWriteUnprotector and disable RebuildAppleMemoryMap + SyncRuntimePermissions )
- Enable DevirtualiseMmio and follow MmioWhitelist guide
Regarding MATs support, firmwares built against EDK 2018 will support this and many OEMs have even added support all the way back to Skylake laptops. Issue is it’s not always obvious if an OEM has updated the firmware, you can check the OpenCore logs whether yours supports it(See here how to get a log):
- Note: 1 means it supports MATs, while 0 means it does not.
# Kernel Patch Issues
This section will be split between Intel and AMD users:
# AMD Users
(opens new window) (only applies for AMD CPUs, make sure they’re OpenCore patches and not Clover. Clover uses MatchOS while OpenCore has MinKernel and Maxkernel )
- Note outdated kernel patches will also have the same effect please ensure you’re using the latest patches from AMD OS X
# Intel Users
- AppleXcpmCfgLock and AppleCpuPmCfgLock
- Missing CFG or XCPM patches, please enable AppleXcpmCfgLock and AppleCpuPmCfgLock
- Haswell and newer only need AppleXcpmCfgLock
- Ivy Bridge and older only need AppleCpuPmCfgLock
- Broadwell and older need AppleCpuPmCfgLock if running 10.10 or older
- Alternatively you can properly disable CFG-Lock: Fixing CFG Lock
(opens new window)
- Missing CFG or XCPM patches, please enable AppleXcpmCfgLock and AppleCpuPmCfgLock
- AppleXcpmExtraMsrs
- May also be required, this is generally meant for Pentiums, HEDT and other odd systems not natively supported in macOS.
# Legacy Intel users
For macOS Big Sur, many firmwares have issues determining the CPU core count and thus will kernel panic too early for screen printing. Via serial, you can see the following panic:
- Enable AvoidRuntimeDefrag under Booter -> Quirks
- This should work for most firmwares
However on certain machines like the HP Compaq DC 7900, the firmware will still panic so we need to force a CPU core count value. Only use the below patch if AvoidRuntimeDefrag didn’t work:
Legacy CPU Core patch
To do this, Add the following patch(replacing the 04 from B8 04 00 00 00 C3 with the amount of CPU threads your hardware supports):
Key Type Value Base String _acpi_count_enabled_logical_processors Count Integer 1 Enabled Boolean True Find Data Identifier String Kernel Limit Integer 0 Mask Data MaxKernel String MinKernel String 20.0.0 Replace Data B804000000C3 ReplaceMask Data Skip Integer 0 # UEFI Issues
- ProvideConsoleGop
- Needed for transitioning to the next screen, this was originally part of AptioMemoryFix but is now within OpenCore as this quirk. Can be found under UEFI -> Output
- Note as of 0.5.6, this quirk is enabled by default in the sample.plist
- IgnoreInvalidFlexRatio
- This is needed for Broadwell and older. Not for AMD and Skylake or newer
# Stuck on EndRandomSeed
Same issues above, see here for more details: Stuck on [EB|#LOG:EXITBS:START]
# Stuck after selecting macOS partition in OpenCore
Same issues above, see here for more details: Stuck on [EB|#LOG:EXITBS:START]
- Note: Enabling DEBUG OpenCore can help shed some light as well
# Kernel Panic on Invalid frame pointer
So this is due to some issue around the Booter -> Quirks you set, main things to check for:
- Certain MMIO spaces are still required to function correctly, so you’ll need to either exclude these regions in Booter -> MmioWhitelist or disable this quirk outright
- More info here: Using DevirtualiseMmio
- This quirk is required for the majority of firmwares and without it it’s very common to kernel panic here, so enable it if not already
- However, certain firmwares do not work with this quirk and so may actually cause this kernel panic:
- Intel’s Ice Lake series
- Intel’s Comet Lake series
- AMD’s B550
- AMD’s A520
- AMD’s TRx40
- VMs like QEMU
- However, certain firmwares do not work with this quirk and so may actually cause this kernel panic:
Another issue may be that macOS is conflicting with the write protection from CR0 register, to resolve this we have 2 options:
- If your firmware supports MATs(2018+ firmwares):
- EnableWriteUnprotector -> False
- RebuildAppleMemoryMap -> True
- SyncRuntimePermissions -> True
- For older firmwares:
- EnableWriteUnprotector -> True
- RebuildAppleMemoryMap -> False
- SyncRuntimePermissions -> False
Regarding MATs support, firmwares built against EDK 2018 will support this and many OEMs have even added support all the way back to Skylake laptops. Issue is it’s not always obvious if an OEM has updated the firmware, you can check the OpenCore logs whether yours supports it:
Note: 1 means it supports MATs, while 0 means it does not.
# Stuck on [EB|LD:OFS] Err(0xE) when booting preboot volume
This can happen when the preboot volume isn’t properly updated, to fix this you’ll need to boot into recovery and repair it:
- Enable JumpstartHotplug under UEFI -> APFS(Recovery may not boot on macOS Big Sur without this option)
- Boot into recovery
- Open the terminal, and run the following:
Then finally reboot
# Stuck on OCB: LoadImage failed — Security Violation
This is due to missing outdated Apple Secure Boot manifests present on your preboot volume resulting is a failure to load if you have SecureBootModel set, reason for these files being missing is actually a bug in macOS.
To resolve this you can do one of the following:
- Disable SecureBootModel
- ie. set Misc -> Security -> SecureBootModel -> Disabled
- Reinstall macOS with the latest version
- Or copy over the Secure Boot manifests from /usr/standalone/i386 to /Volumes/Preboot/ /System/Library/CoreServices
- Note you will most likely need to do this via terminal as the Preboot volume isn’t easily editable via the Finder
To do this via terminal:
# Stuck on OCABC: Memory pool allocation failure — Not Found
This is due to incorrect BIOS settings:
- Above4GDecoding is Enabled
- CSM is Disabled(Enabling Windows8.1/10 WHQL Mode can do the same on some boards)
- Note on some laptops, CSM must be enabled
- BIOS is up-to-date(Z390 and HEDT are known for having poorly written firmwares)
# Stuck on Buffer Too Small
- Enable Above4GDecoding in the BIOS
# Stuck on Plist only kext has CFBundleExecutable key
Missing or incorrect Executable path in your config.plist, this should be resolved by re-running ProperTree’s snapshot tool(Cmd/Ctrl+R).
# Stuck on This version of Mac OS X is not supported: Reason Mac.
This error happens when SMBIOS is one no longer supported by that version of macOS, make sure values are set in PlatformInfo->Generic with Automatic enabled. For a full list of supported SMBIOS and their OSes, see here: Choosing the right SMBIOS
Supported SMBIOS in macOS 10.15, Catalina
- iMac13,x+
- iMacPro1,1
- MacPro6,1+
- Macmini6,x+
- MacBook8,1+
- MacBookAir5,x+
- MacBookPro9,x+
Supported SMBIOS in macOS 11, Big Sur
- iMac14,4+
- iMacPro1,1
- MacPro6,1+
- Macmini7,1+
- MacBook8,1+
- MacBookAir6,x+
- MacBookPro11,x+
# Couldn’t allocate runtime area errors
# Stuck on RTC. , PCI Configuration Begins , Previous Shutdown. , HPET , HID: Legacy.
Well this general area is where a lot of PCI devices are first setup and configured, and is where most booting issues will happen. Other names include:
- apfs_module_start. ,
- Waiting for Root device ,
- Waiting on. IOResources. ,
- previous shutdown cause.
The main places to check:
Missing EC patch:
- Make sure you have your EC SSDT both in EFI/OC/ACPI and ACPI -> Add, double check it’s enabled.
- If you don’t have one, grab it here: Getting started with ACPI
IRQ conflict:
- Most common on older laptops and pre-builts, run SSDTTime’s FixHPET option and add the resulting SSDT-HPET.aml and ACPI patches to your config( the SSDT will not work without the ACPI patches)
PCI allocation issue:
- UPDATE YOUR BIOS, make sure it’s on the latest. Most OEMs have very broken PCI allocation on older firmwares, especially AMD
- Make sure either Above4G is enabled in the BIOS, if no option available then add npci=0x2000 to boot args.
- Some X99 and X299 boards(ie. GA-X299-UD4) may require both npci boot-arg and Above4G enabled
- AMD CPU Note: Do not have both the Above4G setting enabled and npci in boot args, they will conflict
- 2020+ BIOS Notes: When enabling Above4G, Resizable BAR Support may become an available. Please ensure this is Disabled instead of set to Auto.
- Other BIOS settings that are important: CSM disabled, Windows 8.1/10 UEFI Mode enabled
NVMe or SATA issue:
- Sometimes if either a bad SATA controller or an unsupported NVMe drive are used, you can commonly get stuck here. Things you can check:
- Not using either a Samsung PM981 or Micron 2200S NVMe SSD
- Samsung 970 EVO Plus running the latest firmware(older firmwares were known for instability and stalls, see here for more info
(opens new window) )
- SATA Hot-Plug is disabled in the BIOS(more commonly to cause issues on AMD CPU based systems)
- Ensure NVMe drives are set as NVMe mode in BIOS(some BIOS have a bug where you can set NVMe drives as SATA)
- If your firmware supports MATs(2018+ firmwares):
NVRAM Failing:
- Common issue HEDT and 300 series motherboards, you have a couple paths to go down:
- 300 Series Consumer Intel: See Getting started with ACPI
(opens new window) on making SSDT-PMC.aml
HEDT(ie. X99): See Emulating NVRAM
(opens new window) on how to stop NVRAM write, note that for install you do not need to run the script. Just setup the config.plist
RTC Missing:
- Commonly found on Intel’s 300+ series(ie. Z370, Z490), caused by the RTC clock being disabled by default. See Getting started with ACPI
(opens new window) on creating an SSDT-AWAC.aml
X99 and X299 have broken RTC devices, so will need to be fixed with SSDT-RTC0-RANGE. See Getting started with ACPI
(opens new window) on creating said file
- Known affected models: HP 15-DA0014dx , HP 250 G6
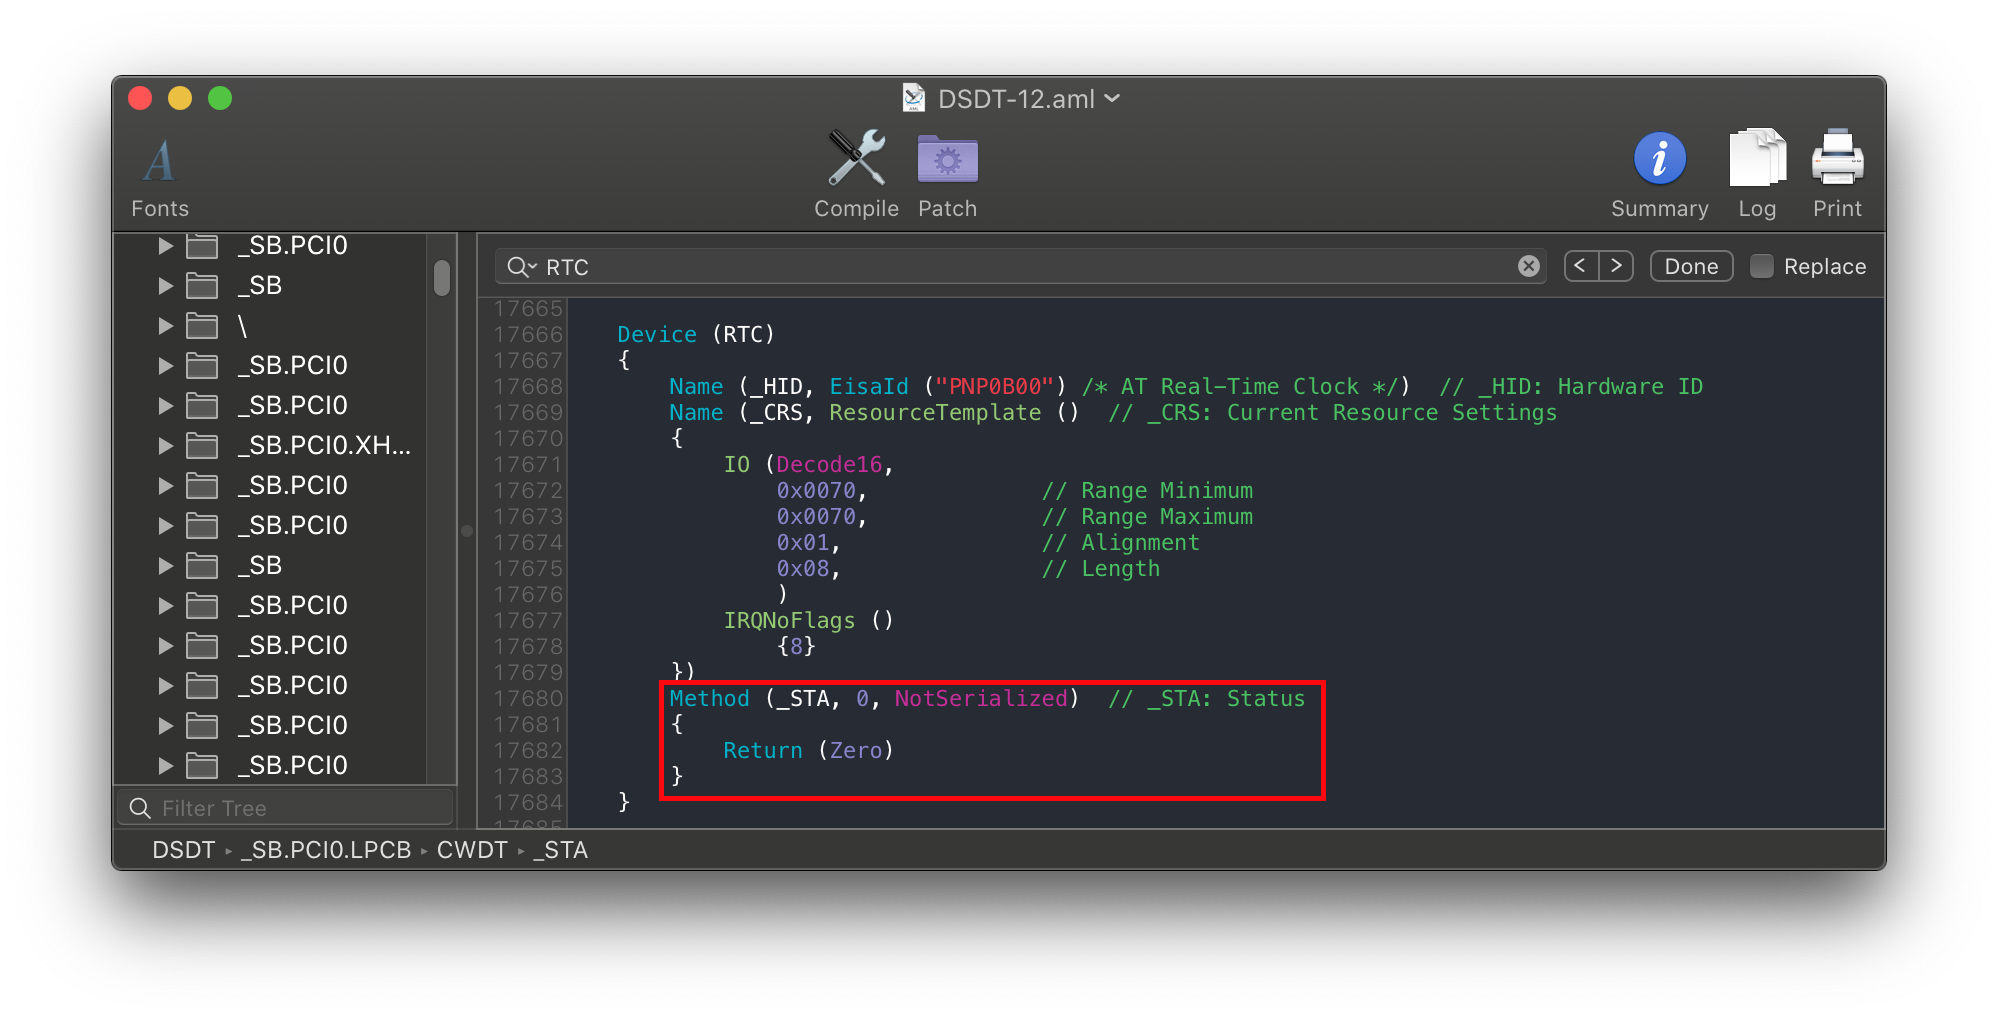
- For users cursed with such hardware you’ll need to create a fake RTC clock for macOS to play with. See getting started with ACPI for more details, as well as below image example:
Example of what a disabled RTC with no way to enable looks like(note that there is no value to re-enable it like STAS ):
# Stuck at ACPI table loading on B550

If you’re getting stuck at or near ACPI table loading with an AMD B550 or A520 motherboard, add the following SSDT:
And please remember to add this SSDT to both EFI/OC/ACPI and your config.plist under ACPI -> Add(ProperTree’s snapshot function can do this for you)
# «Waiting for Root Device» or Prohibited Sign error
- Other names: Stop Sign, Scrambled
This is generally seen as a USB or SATA error, couple ways to fix:
# USB Issues
This assumes you’re only booting the installer USB and not macOS itself.
If you’re hitting the 15 port limit, you can temporarily get around this with XhciPortLimit but for long term use, we recommend making a USBmap
- Kernel -> Quirks -> XhciPortLimit -> True
Another issue can be that certain firmware won’t pass USB ownership to macOS
- UEFI -> Quirks -> ReleaseUsbOwnership -> True
- Enabling XHCI Handoff in the BIOS can fix this as well
Sometimes, if the USB is plugged into a 3.x port, plugging it into a 2.0 port can fix this error.
For AMD’s 15h and 16h CPUs, you may need to add the following:
If XLNCUSBFix still doesn’t work, then try the following:
X299 Users: Enable Above4G Decoding
- Odd firmware bug on X299 where USB breaks otherwise
Missing USB ports in ACPI:
- For Intel’s Coffee Lake and older, we recommend using USBInjectAll
(opens new window)
For Intel’s Ice Lake and Comet Lake, we recommend SSDT-RHUB
(opens new window)
- SSDTTime’s 7. USB Reset option can do the same
# SATA Issues
On rare occasions(mainly laptops), the SATA controller isn’t officially supported by macOS. To resolve this, we’ll want to do a few things:
- Set SATA to AHCI mode in the BIOS
- macOS doesn’t support hardware RAID or IDE mode properly.
- Note drives already using Intel Rapid Storage Technology(RST, soft RAID for Windows and Linux) will not be accessible in macOS.
- SATA-unsupported.kext
(opens new window)
- Adds support to obscure SATA controllers, commonly being laptops.
- For very legacy SATA controllers, AHCIPortInjector.kext
(opens new window)
- For users running macOS 11, Big Sur and having issues. This backports the known working Catalina kext, SATA-unsupported is not needed with this kext
Note that you will only experience this issue after installing macOS onto the drive, booting the macOS installer will not error out due to SATA issues.
# Kernel panic with IOPCIFamily on X99
For those running the X99 platform from Intel, please go over the following:
- The following kernel patches are enabled:
- AppleCpuPmCfgLock
- AppleXcpmCfgLock
- AppleXcpmExtraMsrs
- You have the following SSDTs:
- SSDT-UNC(if not, see Getting started with ACPI
# Stuck on or near IOConsoleUsers: gIOScreenLock. / gIOLockState (3.
This is right before the GPU is properly initialized, verify the following:
- GPU is UEFI capable(GTX 7XX/2013+)
- CSM is off in the BIOS
- May need to be enabled on laptops
- Forcing PCIe 3.0 link speed
- Double check that ig-platform-id and device-id are valid if running an iGPU.
- Desktop UHD 630’s may need to use 00009B3E instead
- Trying various WhateverGreen Fixes
(opens new window)
- -igfxmlr boot argument. This can also manifest as a «Divide by Zero» error.
- Coffee Lake iGPU users may also need igfxonln=1 in 10.15.4 and newer
# Scrambled Screen on laptops
Enable CSM in your UEFI settings. This may appear as «Boot legacy ROMs» or other legacy setting.
# Black screen after IOConsoleUsers: gIOScreenLock. on Navi
- Add agdpmod=pikera to boot args
- Switch between different display outputs
- Try running MacPro7,1 SMBIOS with the boot-arg agdpmod=ignore
For MSI Navi users, you’ll need to apply the patch mentioned here: Installer not working with 5700XT #901
Specifically, add the following entry under Kernel -> Patch :
Note: macOS 11, Big Sur no longer requires this patch for MSI Navi.
# Kernel Panic Cannot perform kext summary
Generally seen as an issue surrounding the prelinked kernel, specifically that macOS is having a hard time interpreting the ones we injected. Verify that:
- Your kexts are in the correct order(master then plugins, Lilu always before the plugins)
- Kexts with executables have them and plist only kexts don’t(ie. USBmap.kext, XHCI-unspported.kext, etc does not contain an executable)
- Don’t include multiple of the same kexts in your config.plist(ie. including multiple copies of VoodooInput from multiple kexts, we recommend choosing the first kext in your config’s array and disable the rest)
Note: this error may also look very similar to Kernel Panic on Invalid frame pointer
# Kernel Panic AppleIntelMCEReporter
With macOS Catalina, dual socket support is broken, and a fun fact about AMD firmware is that some boards will actually report multiple socketed CPUs. To fix this, add AppleMCEReporterDisabler
(opens new window) to both EFI/OC/Kexts and config.plist -> Kernel -> Add
# Kernel Panic AppleIntelCPUPowerManagement
This is likely due to faulty or outright missing NullCPUPowerManagement. To fix the issue, remove NullCPUPowerManagement from Kernel -> Add and EFI/OC/Kexts then enable DummyPowerManagement under Kernel -> Emulate
- Note: On older Intel CPUs(ie. Penryn and older), it may be due to IRQ conflicts or the HPET device being disabled. To resolve, you have 2 options:
- SSDTTime’s FixHPET Option
(opens new window)
- Forcing the HPET Device on
- SSDT-UNC(if not, see Getting started with ACPI
Forcing the HPET Device on
Under ACPI -> Patch:
| Comment | String | Force HPET Online |
|---|---|---|
| Enabled | Boolean | YES |
| Count | Number | 0 |
| Limit | Number | 0 |
| Find | Data | A010934F53464C00 |
| Replace | Data | A40A0FA3A3A3A3A3 |
# Kernel Panic AppleACPIPlatform in 10.13
On macOS 10.13, High Sierra the OS is much stricter with ACPI tables, specifically a bug with how headers were handled
(opens new window) . To resolve, enable NormalizeHeaders under ACPI -> Quirks in your config.plist
# macOS frozen right before login
This is a common example of screwed up TSC, for most system add CpuTscSync
The most common way to see the TSC issue:
| Case 1 | Case 2 |
|---|---|
 |  |
# Keyboard works but trackpad does not
Make sure that VoodooInput is listed before VoodooPS2 and VoodooI2C kexts in your config.plist.
Check the order that your kexts load — make they match what is shown under Gathering Files:
- VoodooGPIO, VoodooInput, and VoodooI2CServices in any order (Found under VoodooI2C.kext/Contents/PlugIns)
- VoodooI2C
- Satellite/Plugin Kext
Make sure you have SSDT-GPIO in EFI/OC/ACPI and in your config.plist under ACPI -> Add in your config.plist. If you are still having issues, reference the Getting Started With ACPI GPIO page
# kextd stall[0]: AppleACPICPU
This is due to either a missing SMC emulator or broken one, make sure of the following:
- Lilu and VirtualSMC are both in EFI/OC/kexts and in your config.plist
- Lilu is before VirtualSMC in the kext list
- Last resort is to try FakeSMC instead, do not have both VirtualSMC and FakeSMC enabled
# Kernel Panic on AppleIntelI210Ethernet
For those running Comet lake motherboards with the I225-V NIC, you may experience a kernel panic on boot due to the I210 kext. To resolve this, make sure you have the correct PciRoot for your Ethernet. This commonly being either:
- PciRoot(0x0)/Pci(0x1C,0x1)/Pci(0x0, 0x0)
- By default, this is what Asus and Gigabyte motherboards use
- PciRoot(0x0)/Pci(0x1C,0x4)/Pci(0x0,0x0)
- Some OEMs may use this instead
For those who can to your PciRoot manually, you’ll want to install macOS fully and run the following with gfxutil
This should spit out something like this:
The ending PciRoot(0x0)/Pci(0x1F,0x6) is what you want to add in your config.plist with device-id of F2150000
# Kernel panic on «Wrong CD Clock Frequency» with Icelake laptop
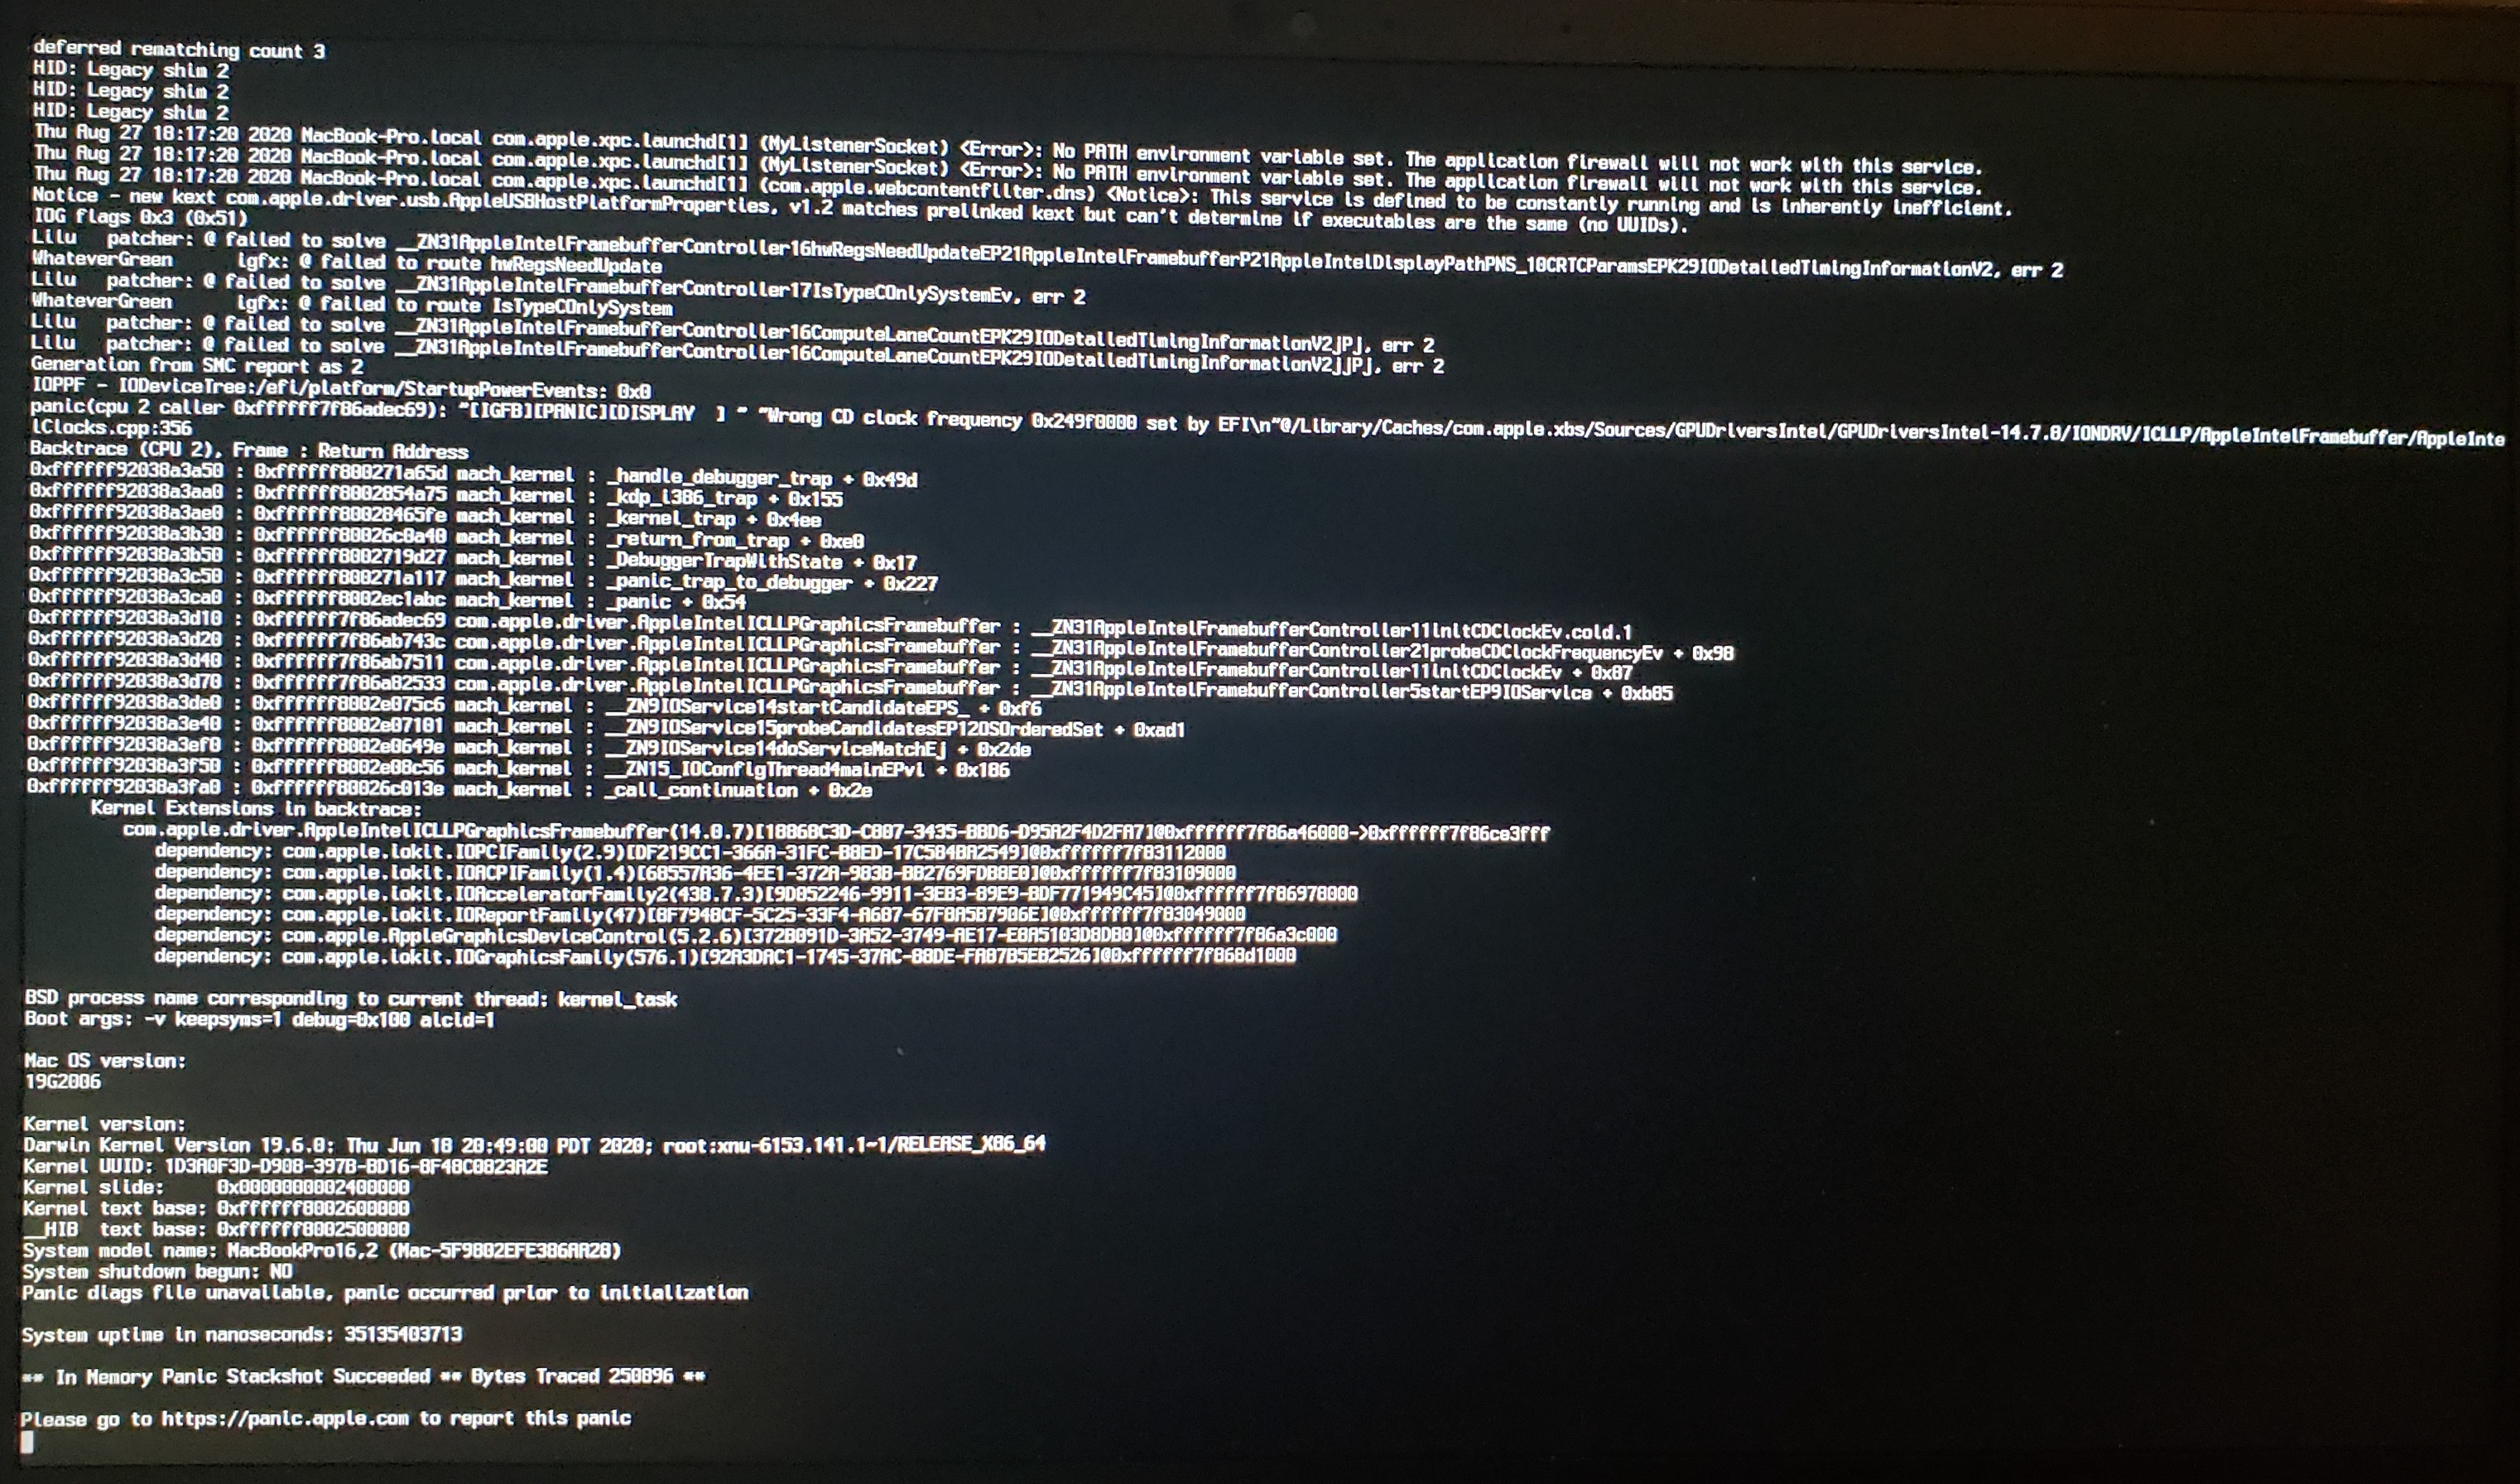
To resolve this kernel panic, ensure you have -igfxcdc in your boot-args.
# Kernel panic on «cckprng_int_gen»
This is likely to be 1 of 2 things:
- Missing SMC Emulator(ie. no VirtualSMC in your config.plist or EFI)
- Add VirtualSMC.kext
(opens new window) to your config.plist and EFI
For the latter, ensure you’re only using SSDT-CPUR with B550 and A520. Do not use on X570 or older hardware(ie. B450 or A320)
# Stuck at Forcing CS_RUNTIME for entitlement in Big Sur
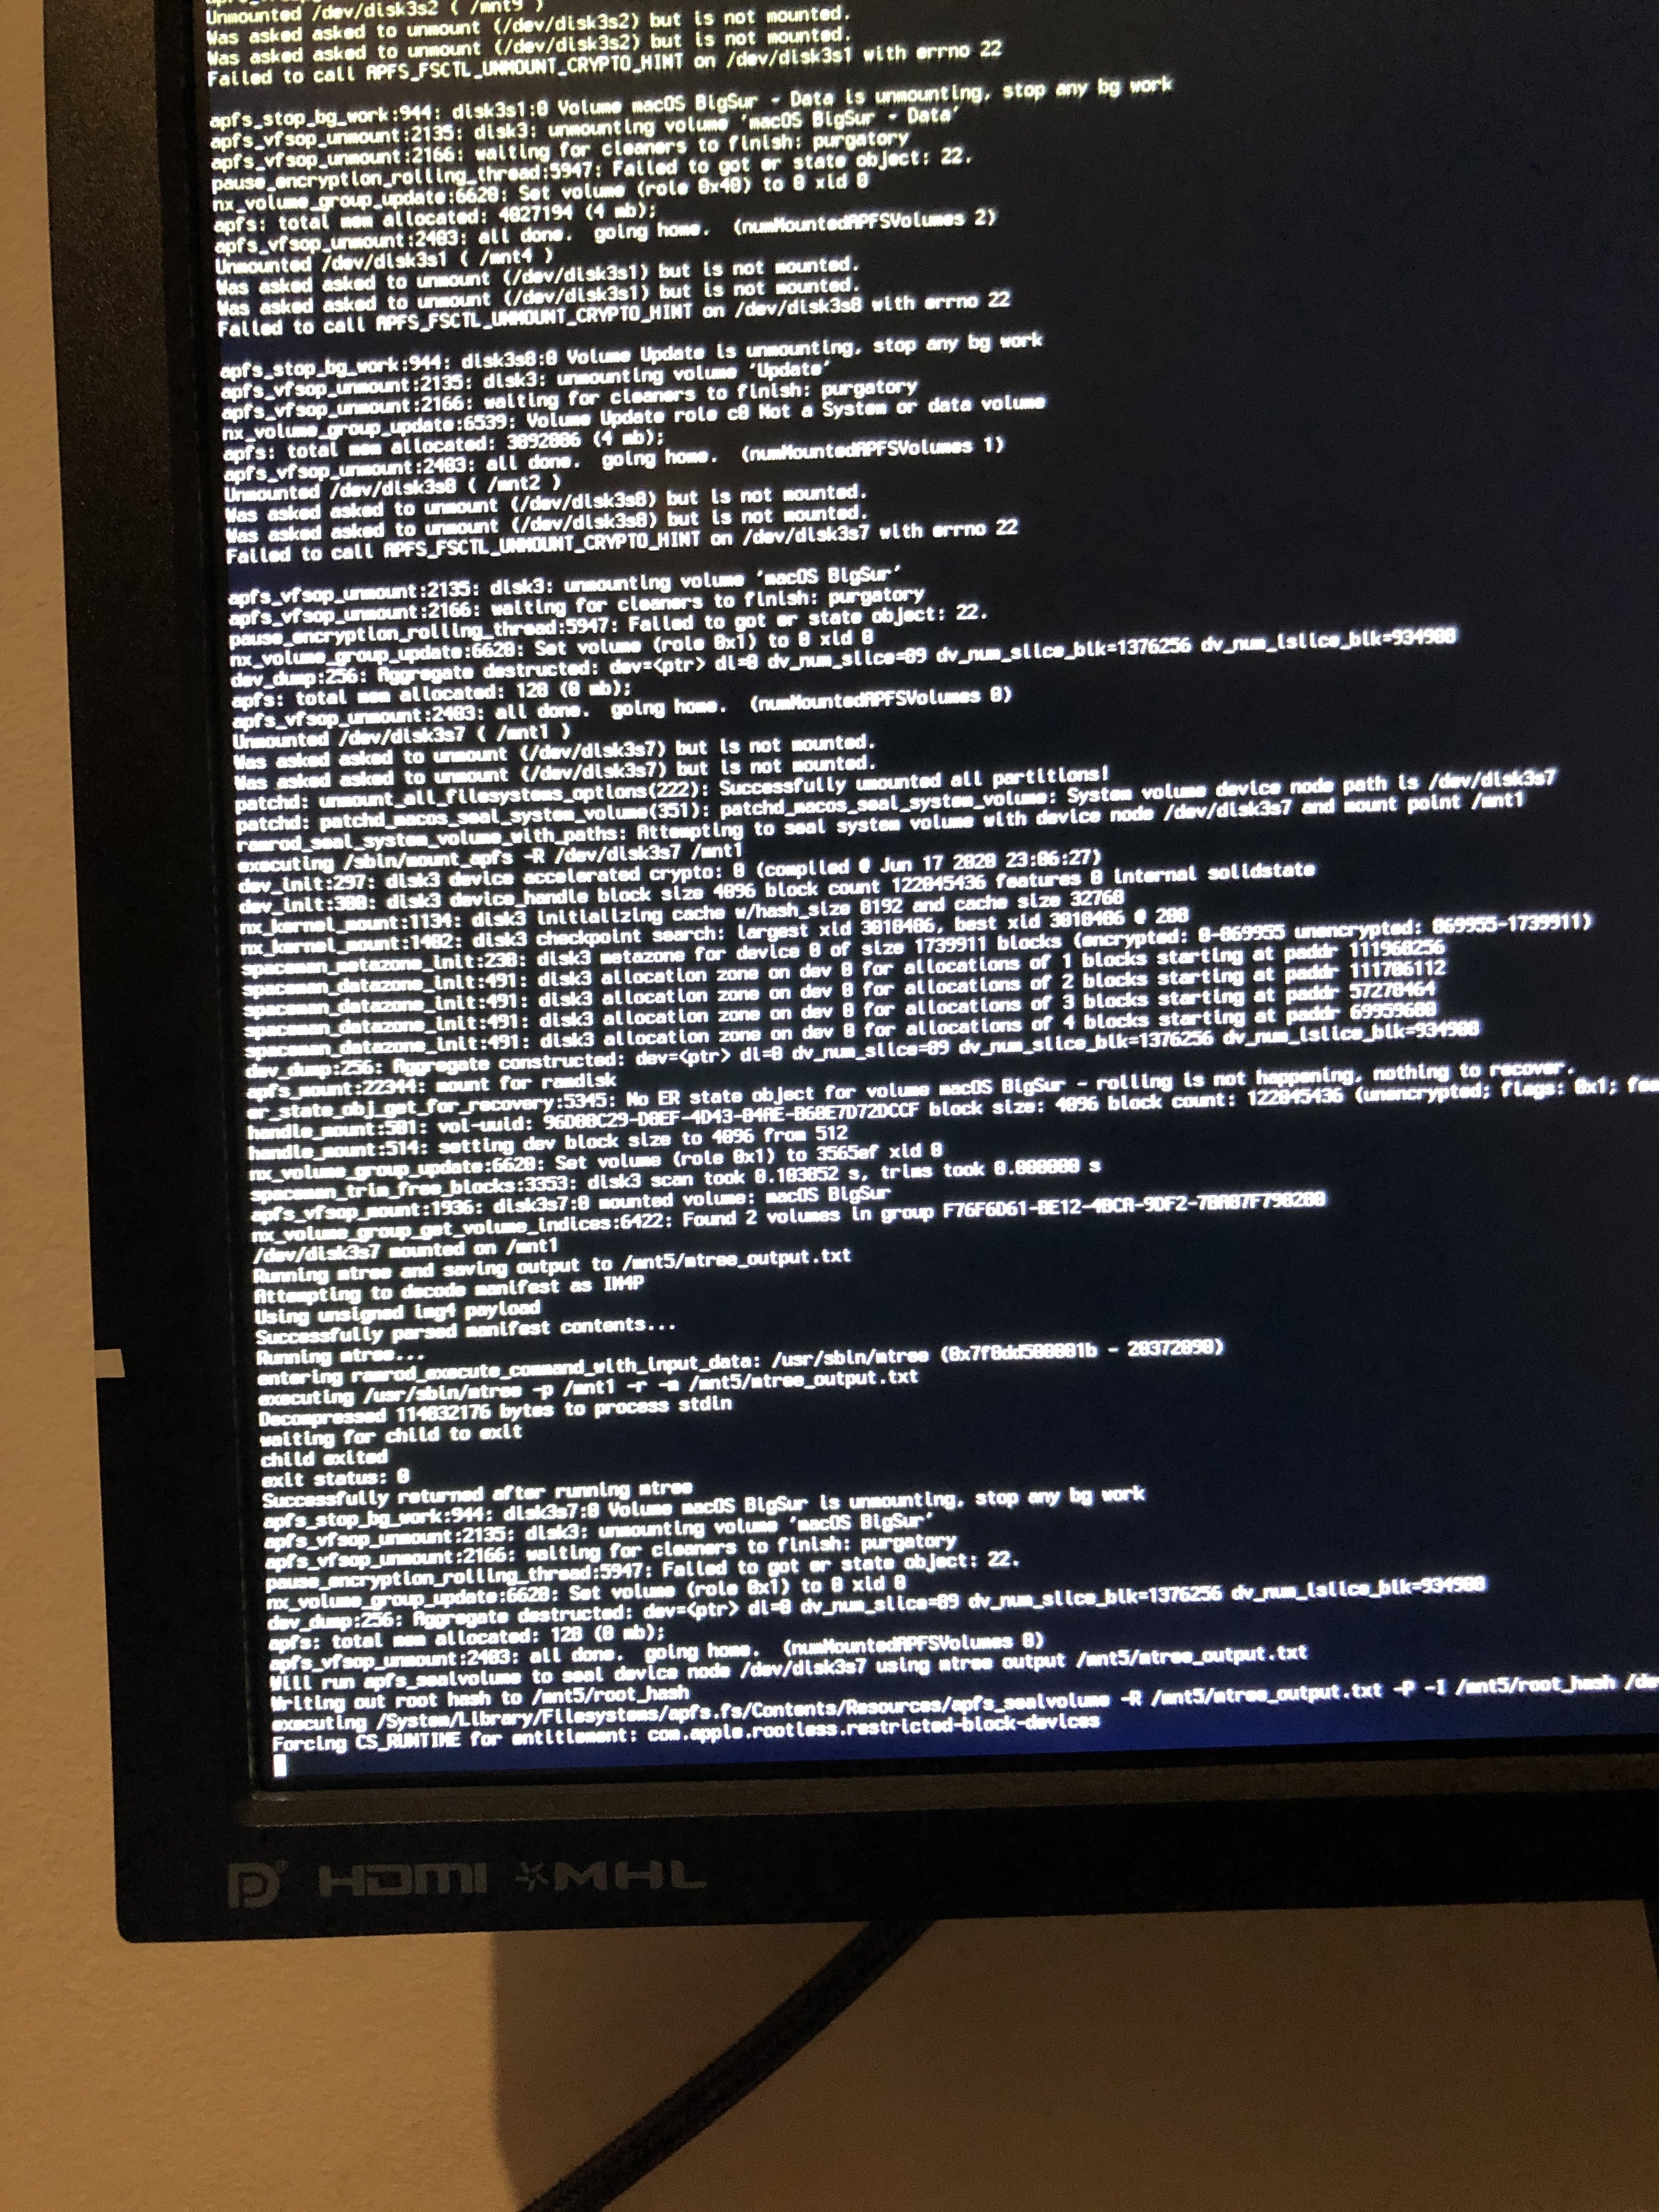
This is actually the part at where macOS will seal the system volume, and where it may seem that macOS has gotten stuck. DO NOT RESTART thinking you’re stuck, this will take quite some time to complete.
# Stuck on ramrod (^^^^^^^^^^^^^)
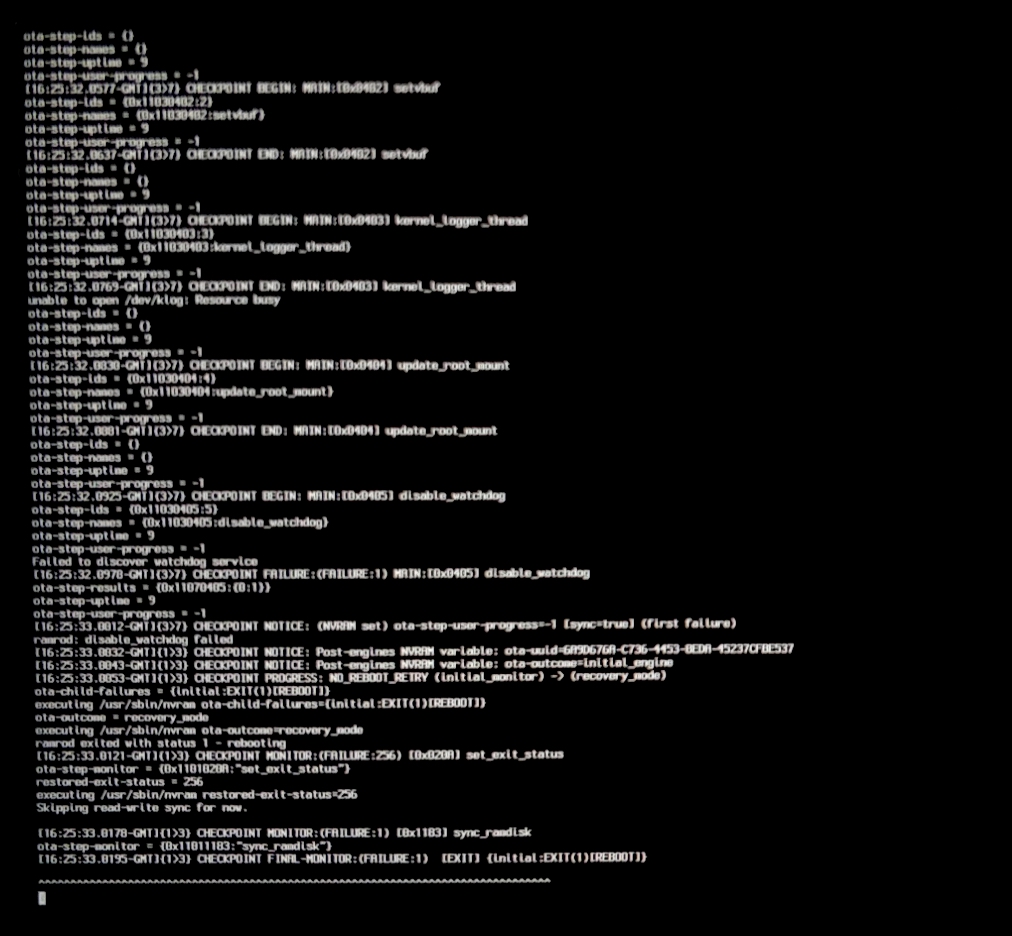
If you get stuck around the ramrod section (specifically, it boots, hits this error, and reboots again back into this, causing a loop), this hints that your SMC emulator is broken. To fix this, you have 2 options:
- Ensure you’re using the latest builds of VirtualSMC and Lilu, with the vsmcgen=1 boot-arg
- Switch over to Rehabman’s FakeSMC
(opens new window) (you can use the MinKernel / MaxKernel trick mentioned above to restrict FakeSMC to Big Sur and up
And when switching kexts, ensure you don’t have both FakeSMC and VirtualSMC enabled in your config.plist, as this will cause a conflict.
# Virtual Machine Issues
- VMWare 15 is known to get stuck on [EB|#LOG:EXITBS:START] . VMWare 16 resolves the problem.
# Reboot on «AppleUSBHostPort::createDevice: failed to create device» on macOS 11.3+
(opens new window) , to resolve you must disable XhciPortLimit under Kernel -> Quirks. Please ensure you’ve mapped your USB ports correctly
- Alternatively, you can boot macOS 11.2.3 or older to resolve
- For educational purposes, we’ve provided some images:
- macOS 11.2.3 InstallAssistant(macOS)
Источник


