- How to Fix ‘Failed to Load the JNI Shared Library’
- What Causes the ‘Failed to Load the JNI Shared Library’ Error?
- Solution 1: Edit the ‘eclipse.ini’ File
- Solution 2: Make Sure Eclipse and Java Versions Match
- Uninstalling Java on Windows 10
- Uninstalling Java on Previous Versions of Windows
- Installing Java
- Solution 3: Remove the Path Variable for Java
- Building a shared library using gcc on Linux and MinGW on Windows
- 1 Answer 1
- Load multiple copies of a shared library
- 4 Answers 4
- Shared Libraries: Windows vs Linux method
- 3 Answers 3
How to Fix ‘Failed to Load the JNI Shared Library’
Eclipse is an open source project which uses a Java plugin system to allow programmers programming in different languages to work together easily. It’s available for many platforms as well. The error mentioned in the title of the article is an error which appears after users try to open Eclipse on their Windows PC.
 Failed to Load the JNI Shared Library
Eclipse usually just closes afterward. The problem often appears as soon as users install and run Eclipse. There have been many different methods used to resolve this problem and that is why we have gathered them in a single article for you to check out!
What Causes the ‘Failed to Load the JNI Shared Library’ Error?
The problem is often caused by one or two common issues which are shared among many users who have reported the problem online. Still, there are several ways to deal with the same problem. Check out the list below:
- Mismatching versions of Eclipse and Java Runtime – Both programs must be either 64-bit or 32-bit or this error is bound to appear. Resolve the problem by switching both programs to the same format.
- Both the 32-bit and 64-bit versions of Java installed – Eclipse might try to access the wrong one and you should guide it to the proper version by manipulating the Path variable.
- Eclipse is unaware of the installation folder of Java – You should clarify the confusion by including it in the eclipse.ini file.
Solution 1: Edit the ‘eclipse.ini’ File
This specific problem can occur of the installation of Eclipse fails to understand just what the correct path to the executable might be. That can be resolved easily simply by adding a line inside the Eclipse configuration file available in the installation directory. Make sure you follow the instructions below in order to resolve the problem.
- Navigate to the folder’s location in the File Explorer simply by opening a folder and clicking This PC or My Computer from the left navigation pane or by searching for this entry in the Start menu.
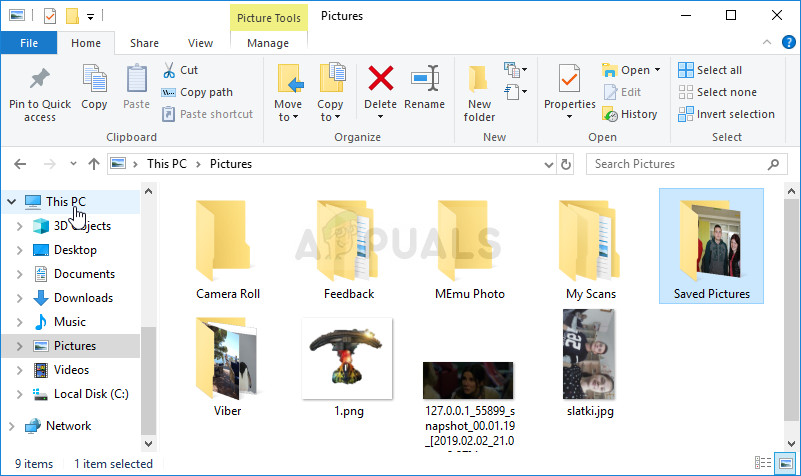 Opening This PC in Libraries
- In This PC or My Computer, double-click to open your Local Disk and navigate to the installation directory of Java Development Kit. After locating the Java folder, navigate to jrex.x.xx > bin and locate the ‘jawaw.exe’ file. Click the address bar and copy the full address to Clipboard. The ‘x.x.xx‘ placeholder represents the version of Java you have installed.
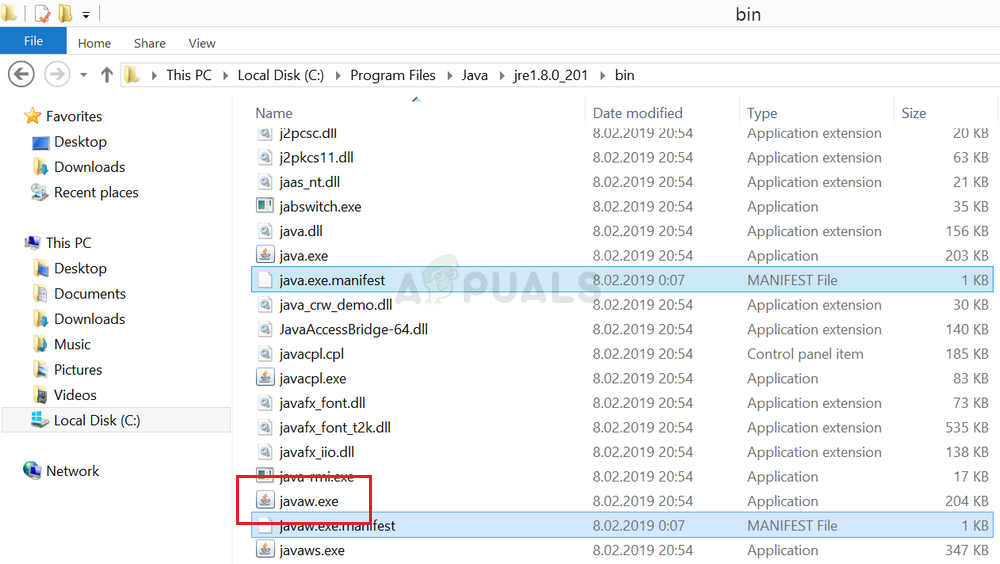 Location of jawaw.exe
- Navigate to the Eclipse’s installation folder. The correct location can also be found after right-clicking the Eclipse shortcut and choosing the Open file location option from the context menu.
- Right-click the file called named ‘eclipse.ini’ and choose to open it with Notepad. Make sure you navigate to the top of the file and paste the lines below in order to resolve the problem. Make sure you also replace our placeholder address with the address you found out in the first part of the solution:
- Try running the program again and check to see if the ‘failed to load the JNI shared library’ error comes up.
Solution 2: Make Sure Eclipse and Java Versions Match
If you are using a 64-bit version of Eclipse, you should also make sure you install the 64-bit version of Java Runtime. The same goes for the 32-bit version. Make sure you follow the instructions below in order to uninstall the one and install the second option.
Uninstalling Java on Windows 10
- Click on the Start menu button located at the bottom left part of your screen. Select Settings by clicking on the gear icon above the Power button in Start menu.
- Select Apps section in the Settings app. Select Java from the list of installed apps and then click its Uninstall
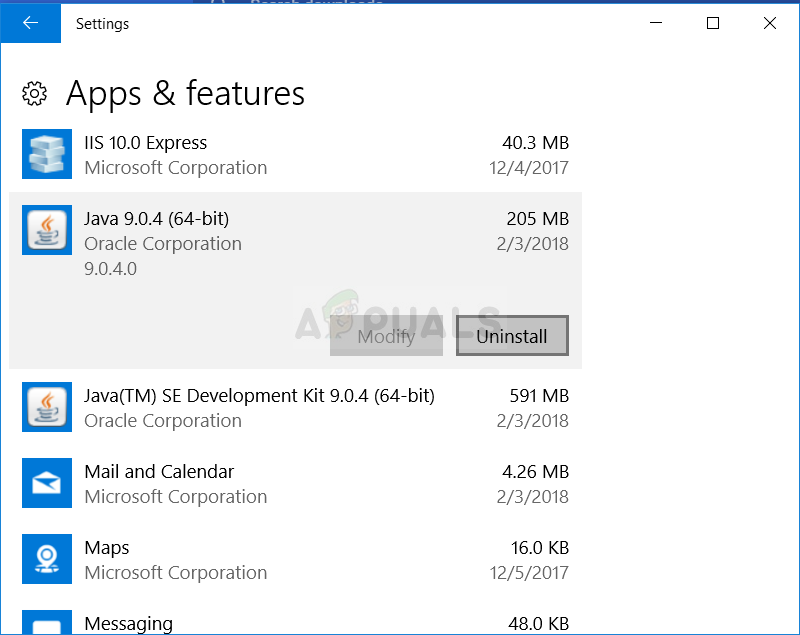 Uninstalling Java on Windows 10
- Respond to the instructions displayed on screen to complete the uninstall process.
Uninstalling Java on Previous Versions of Windows
- Click on the Start menu button located at the bottom left part of your screen.
- Select Control Panel from Start menu and switch the View by option to Category. Select Uninstall a Program under the Programs section.
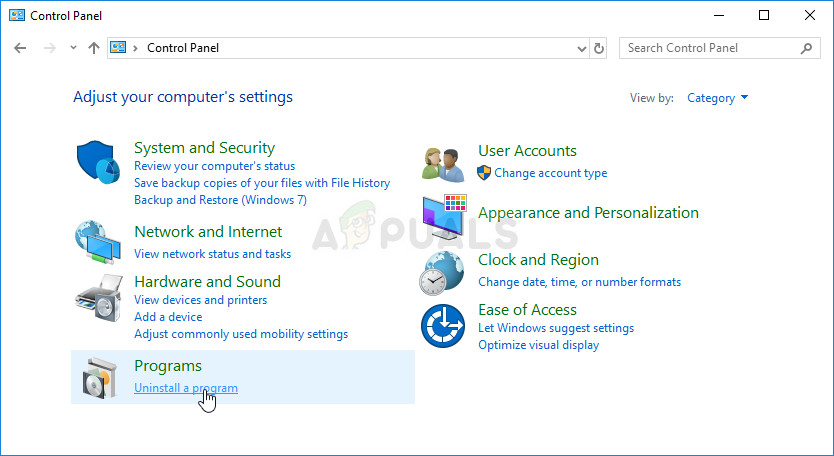 Uninstalling a program in Control Panel
- Select Java from the list of installed programs by clicking on it, and then click the Uninstall Follow the instructions on the screen to complete the wizard.
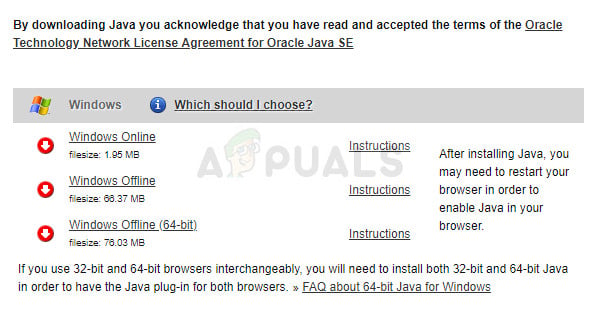
Installing Java
There are two ways of installing Java. You can either use the online installer which only downloads a small file which is used to download the entire program or you can download the entire package and install it without an active Internet connection. Here is how to install it offline:
- Go to the Manual download page and click on Windows Offline. Make sure you differentiate between Windows Offline which is the 32-bit version and Windows Offline (64-bit) which is obviously the 64-bit version.
 Downloading Java
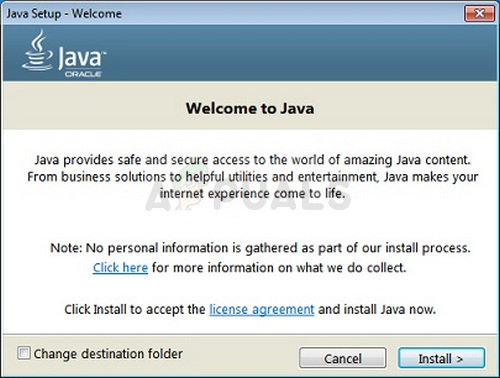
- The File Download dialog box appears prompting you to run or save the download file Click Save to download the file to your local system.
- Close all applications including your browser and double-click on the saved file to start the installation process. Click the Install button to accept the license terms and to continue with the installation.
 Installing Java
- Oracle has partnered with companies that offer various products. The installer may present you with an option to install these programs when you install Java. After ensuring that the desired programs are selected, click the Next button to continue the installation.
- A few brief dialogs confirm the last steps of the installation process; click Close on the last dialog. This will complete the Java installation process. Check to see if the problem still appears after you match the versions of Eclipse and Java Runtime.
Solution 3: Remove the Path Variable for Java
If you have both the 32-bit and the 64-bit version of Java installed on your computer, Eclipse may get confused trying to figure out which one to use. For example, if a 64-bit version of Eclipse tries to use the 32-bit version of Java, a problem will appear. This can be resolved without uninstalling one version of Java simply by deleting its Path variable. Make sure you follow the instructions below carefully.
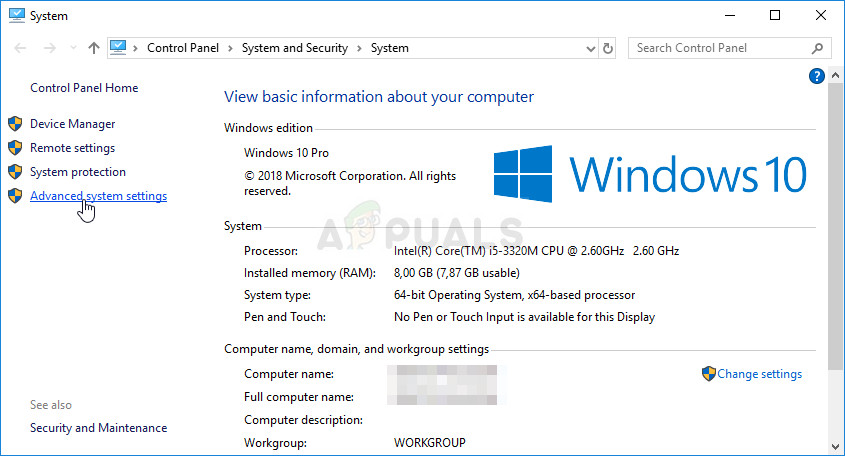
- Right-click either on My Computer/This PC depending on the version of Windows you have installed on your computer and choose the Properties After that, locate the Advanced system settings button at the right side of the Properties window, click on it, and navigate to the Advanced tab.
 Advanced System Settings in This PC Properties
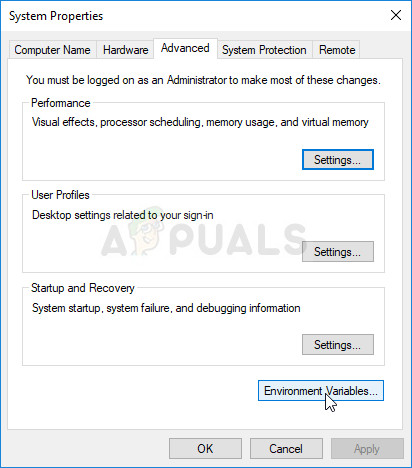
- At the bottom right section of the Advanced tab, you will be able to see the Environment Variables option so click on it and you will be able to see a list of all user variables under the User variables section.
 Environment Variables in System Properties >> Advanced
- Click the Path variable under System variables or the User variables section and click the Edit button below. Try to locate a path for the Java folder, select it and choose Delete from the left-side menu. This refers to the Java folder which doesn’t match the version of Eclipse.
- Try reopening the program and check to see if it will run properly now.
Building a shared library using gcc on Linux and MinGW on Windows
I’m having trouble with generating a build setup that allows shared libraries to be built in both Linux and Windows using gcc and MinGW, respectively. In Linux, a shared library doesn’t have to resolve all dependencies at compile time; whereas, this appears to the case in Windows. Here is the problem setup:
Now, in Linux, this compiles and runs just fine:
In Windows, we need to change so to dll, which is minor and fine:
However, when we try to build, we get the following error:
Now, we can fix the error by simply including the objects from foo.o into libbar.dll:
However, I don’t like this approach since libbar.dll now contains symbols for both foo and bar. In Linux, it only contains symbols for bar. This separation is important for situations where a library depends on some standard numerical library like BLAS. I’d like to be able to deploy the shared library and have it depend on the optimized version of the numerical library on the user’s machine and not my own.
In any case, what’s the proper procedure to create a shared library where not all of the symbols are present at compile time?
In case it matters, I compiled these examples with gcc 4.6.3 on Linux and mingw-get-inst-20120426.exe with gcc 4.7.2 on Windows.
1 Answer 1
On Windows, you need to create an import library for the DLL. An import library looks like a static library, in that it defines all of the needed symbols, but it doesn’t have the actual function implementations, it just has stubs. The import library will resolve the «undefined reference» errors while avoiding static linking.
To create an import library with MinGW, follow the instructions here. The key is that when building the DLL, you must pass the option -Wl,—out-implib,libexample_dll.a to the linker to generate the import library libexample_dll.a .
Then, when you compile your main executable, you use the -lexample_dll option (along with -L. ) to link against the import library. So with your code, I think this should work:
Also, note that on Windows, the calling convention for exported functions in DLL is almost always __stdcall , not the default __cdecl , so if you want your DLLs to be usable by other software, I’d recommend making them __cdecl . But that’s not strictly requires, as long as both the code in the DLL and the header files agree on what the calling convention is.
Load multiple copies of a shared library
I am running Linux, and I would like to be able to make parallel function calls into a shared library (.so) which is unfortunately not threadsafe (I am guessing it has global datastructures).
For performance reasons, I do not want to simply wrap the function calls in a mutex.
What I would like to do is to spawn, say 4 threads, and also load 4 copies of the same library into the process memory. Each thread then makes the function calls into its own copy of the library.
Unfortunately, dlopen does not allow me to load more one instance of any library.
Does anyone know of any method which will allow me to load the library more than once? (Other than making 4 copies of the .so file, each with a different name)
4 Answers 4
You can load multiple independent copies of the library like this:

Instead of using threads, you can use multiple processes, each doing some of the work. This is very common on *nix, and is usually easier to code.
Looks like a bad idea. That is no more possible with shared libraries as it would be with static ones.
You could probably use dlopen() with RTLD_LOCAL flag so that subsequent calls to dlopen won’t see it’s allready loaded and make it work as you want. but it still looks like a bad design idea. If you have performance issues it would be better avoiding to clutter memory with several copies of the same library.
I would suggest either using several processes or going the mutex way, it’s probably more efficient.
As you work on Linux there also may exists other approaches if you can access the source code of the library, like renaming it’s symbols to have as many separate instances as needed. Well, once you get the source there may be other ways, like making the library thread safe.
Shared Libraries: Windows vs Linux method
I have a quick question about Windows shared libraries (DLLs) vs Linux shared libraries (SOs).
Why is it that when you create a Windows DLL it requires the client program to also link against a static library (.lib file), but applications created in Linux does not require any linking against such static library.
Does it have anything to do with code relocation and the like? Thanks.
3 Answers 3
Not actually with code relocation, that’s a totally different issue. It is about a difference in architecture:
In Windows, a DLL is just like a executables (EXE). The main difference between an EXE and a DLL is that the EXE has an entry point (main/WinMain function) and so it can be used to start a process, while DLLs can only be loaded into a pre-existing process. But see (1)
In Linux, a .so work similar to a static library (.a). The main difference is that the .so file can be linked with a running program, while the .a file can only be linked when compiling the program.
A consequence of this approach is that in linux the same file can be used to build and run the program. But in Windows you need a proper library (LIB) to link the program. Actually the lib that corresponds to a DLL usually have nothing more than the names of the functions, to satisfy the linker, and the stubs to do the relocation. But see (2)
(1) Well, DLLs have entry point too, but it is not used as the main function, just as some sort of initialization/finalization hook.
(2) Some linkers are smart enough to be able, in some simple cases, to link to a DLL by using the DLL itself, without the need of an additional LIB file. I think that at least the MinGW linker can do that.

Why is it that when you create a Windows DLL it requires the client program to also link against a static library (.lib file), but applications created in Linux does not require any linking against such static library.
This is a historic design decision made by Microsoft so that the linker could add DLL references into an executable without having a particular version of the DLL being present at link time. The reason for this was, that there always have been different versions of Windows around, with different versions of DLLs. Also at that time Microsoft was cooperating with IBM on OS/2 and the plan was, that Windows programs could be executed on OS/2 as well. Well, Microsoft decided to «backstab» OS/2, by rolling their own professional grade OS, based on the NT kernel. But this meant, that for development you wanted developers to be able to link against system DLLs, without having all the different variants of the DLL available. Instead a dynamic linkage «template» would have been used for creating both the DLL and the executables (both being in the PE format), which are these particular .lib files, which are not libraries at all, but merely symbol and ordinal tables (this is a little known fact, but PE binary symbols can be loaded not only by a string identifier, but also by a integer number, the so called ordinal).
A side effect of ordinals is, that they allow to hide the human readable symbols, so that you could make use of the DLL only if you knew the ordinal ←→ function relationship.
In Unix the tradition was, «you build it on the system you’re going to run it on», or «you have all the target system files in place». So there was never an incentive so separate library and linkage information. Technically the same would work for DLLs, too. PEs can export a symbol and relocation table, which DLLs do, and a linker could grab all the information it requires from that, just fine.
If you were to hide symbols with Unix shared objects, you’d normally do this by using a single struct with all the function pointers in it, and only exporting a global constant instance of this struct by name, which contains a lot of not explicitly named pointers. You could do exactly the same with Windows DLLs, though.
TL;DR: The reason for this is not a technical one, but a marketing and distribution decision one.


