- How To Create A Localhost Web Site In Linux Using Apache Web Server
- Apache Server Installation
- Site Creation
- Файл hosts в Linux
- Разрешение доменных имён в Linux
- Настройка файла hosts в Linux
- Выводы
- Apache2 change localhost directory on Ubuntu 14.04
- 4 Answers 4
- How do I change the root directory of an Apache server? [closed]
- 15 Answers 15
- To change the port and run from multiple directories on different ports:
- Как отредактировать файл Hosts в Linux, Windows и macOS
- Формат файла Hosts
- Изменить файл Hosts в Linux
- Изменить файл Hosts в Windows
- Изменить файл Hosts в macOS
- Выводы
How To Create A Localhost Web Site In Linux Using Apache Web Server
Localhost is a hosting place in your own computer. There are a vast number of Localhost servers you can use. The most used and popular of them is Apache. Localhost enables you to test your work on your computer itself, instead of testing on a live server on the web. If you are creating a project, Localhost is the best place to test that project. In this tutorial I will show you how to create a localhost site running on Apache Server in any Linux Distribution.
This tutorial is for Ubuntu versions 10.10 and below. The latest versions from 11.04 should see this tutorial.
Apache Server Installation
We need to install Apache server first. To install Apache Web Server open Terminal and do the following command :
The Apache Server will be downloaded and installed automatically. After installation continue to the next part of this tutorial.
Site Creation
Now edit the new file to configure :
- You will need to change the codes ‘username’ shown below to your home folder name.
- You will need to change the names ‘mysite’ shown below to your desired site name.
- You can also change the web address of your site by renaming «mysite.com» to the site address you want.
Content that should be added to the file :
Once you’ve saved these changes, you’ll need to enable the site. ( You will need to change the name ‘mysite’ shown below to the name of the file you create at «/etc/apache2/sites-available/ « ).
We specified a separate directory for storing log files, so we’ll need to create that log directory.( You have to change the name ‘mysite’ shown below to the name you given in the configuration file on «/etc/apache2/sites-available/ « ).
Finally, we need to point the site address to localhost in your hosts file. For that, Edit /etc/hosts :
and add the following at the end of the file. ( You need to change the web address «mysite.com» shown below to your address given on the file in sites-available folder ).
Now we restart Apache Server using Terminal to apply all the changes we made.
You can now store all your work in /home/ you home name / site name and navigate to it by pointing your browser to the address you gave.
Источник
Файл hosts в Linux
Система доменных имен DNS используется для определения, какой IP принадлежит к нужному домену в сети интернет. Когда какой-либо программе понадобится обратиться к сайту по его доменному имени, операционная система отправляет к DNS-серверу запрос, чтобы узнать, по какому IP ей дальше передавать пакеты. Но так происходит не всегда. Например, когда мы обращаемся к домену localhost, то всегда запрос отправляется нашему локальному компьютеру.
Всему причиной файл hosts. Если вы раньше пользовались Windows, то, наверное, уже слышали о таком файле. Там чаще всего он использовался для того, чтобы быстро заблокировать доступ к какому-либо ресурсу. Но применение его гораздо шире. В этой статье мы рассмотрим, как настроить файл hosts в Linux, а также какие возможности он нам предоставляет.
Разрешение доменных имён в Linux
Прежде чем мы перейдём к самому файлу hosts, нужно разобраться, как происходит поиск IP-адреса для доменного имени в Linux. Я говорил, что операционная система сразу же отправляет запрос DNS-серверу, но это не совсем так. Существует определённый порядок поиска, согласно которому он выполняется. Этот порядок установлен в конфигурационном файле /etc/nsswitch.conf
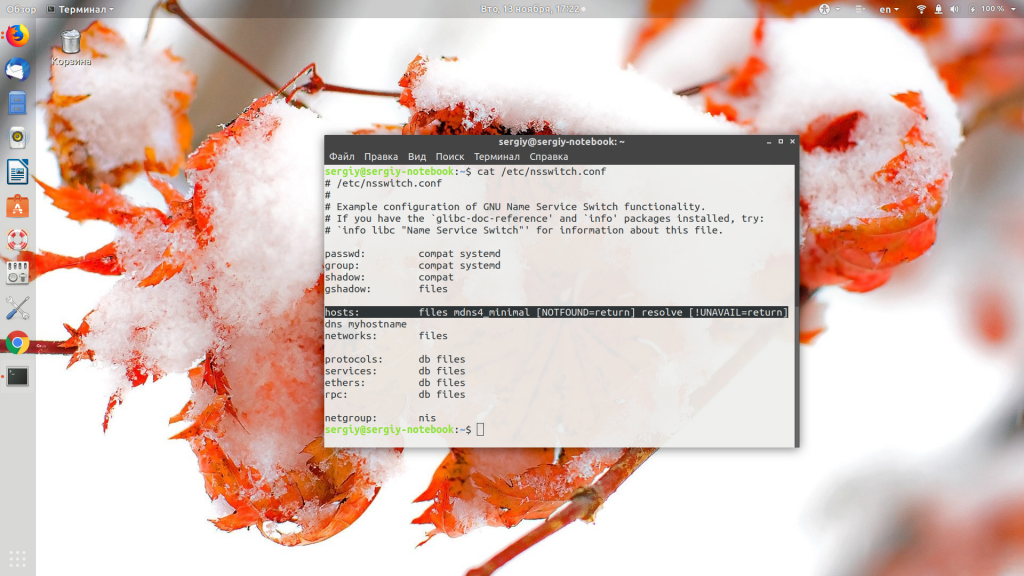
Здесь нас интересует строчка hosts. В ней в порядке очередности записаны службы, которые используются для поиска IP-адреса для доменного имени. Пункт files означает использование файла /etc/hosts, а dns — сервиса доменных имён интернета. Если files расположена перед hosts, это означает, что сначала система попытается найти домен в /etc/hosts, а уже потом по DNS. По умолчанию дело обстоит именно так.
Настройка файла hosts в Linux
Нужный нам файл находится в директории /etc/. Для его открытия можно использовать любой текстовый редактор как в командной строке, так и в графическом интерфейсе, только открывать его нужно с правами суперпользователя. Например, с помощью vim:
sudo vi /etc/hosts
sudo gedit /etc/hosts
Синтаксис файла довольно простой. В нём находится несколько строчек с доменными именами и IP-адресами, которые нужно для них использовать. Каждая из них выглядит вот так:
ip_адрес домен алиас
Обычно первая же строчка создаёт правило для перенаправления всех запросов к домену localhost на локальный IP-адрес — 127.0.0.1:
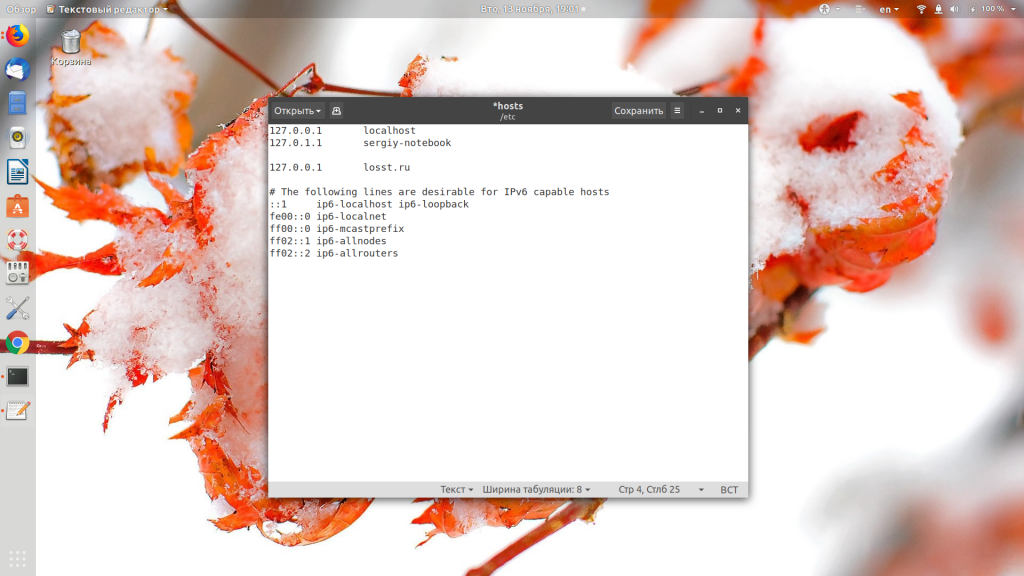
Также в этом файле по умолчанию размещаются перенаправления для имени вашего компьютера и для IPv6-адресов. Вы можете создать свои настройки для любого нужного домена. Для этого нужно добавить строчку в конец файла. Например, направим все запросы к домену losst.ru на ip 127.0.0.1:
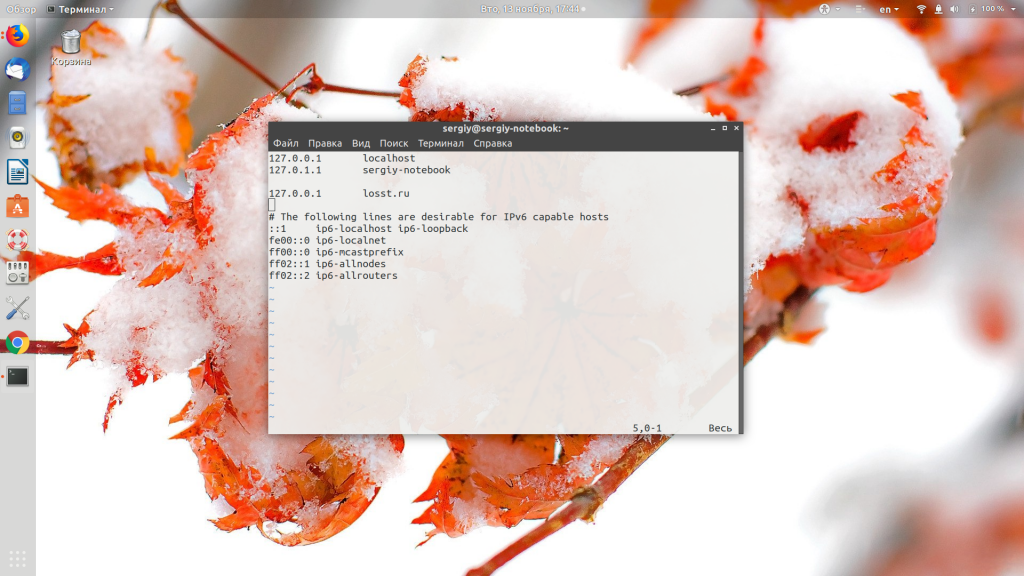
Обратите внимание, что здесь указывается только домен, без протокола. Префикс http или https указывать не нужно, иначе ничего работать не будет. А вот для поддомена www нужно создавать отдельную запись или записывать его в виде алиаса. Например:
127.0.0.1 losst.ru www.losst.ru

Теперь при запросе домена losst.ru будет открываться наш локальный IP. Чтобы вернуть доступ к оригинальному ресурсу, достаточно убрать добавленную строчку. Но вы можете использовать не только локальный адрес, но и любой другой. Это очень удобно, если вы только зарегистрировали домен и доменная зона ещё не успела обновиться, а вы уже хотите работать с новым сайтом. Просто добавьте данные в /etc/hosts и работайте как обычно.
Выводы
В этой небольшой статье мы разобрали, как выполняется настройка DNS через файл hosts Linux. Как видите, с его помощью вы можете блокировать доступ к нежелательным ресурсам, например, к которым программы не должны получить доступ, а также использовать его в работе веб-мастера.
Источник
Apache2 change localhost directory on Ubuntu 14.04
After a fresh install of Ubuntu, I am trying to change the localhost directory of Apache2 (2.4.7). As always, it’s not simple at all and it doesn’t work right now.
Here’s what I have done so far:
Then in /etc/apache2/apache2.conf:
When I try to access localhost throught the browser, I get:
And the log gives:

4 Answers 4
Here’s what solved the problem:
Try to change apache2.conf to:
remove .htaccess if exist and create index.txt file then try to access http://localhost/index.txt

You are missing one essential step. After modifying the default DocumentRoot in 000-default.conf . To take effect you should enable 000-default.conf and restart apache2.
First, I gave permission to the directory root. In my case this directory was:
I run the following command:
After, I edited the file apache2.conf with the following command:
In the apache.conf I changed the following lines:
And I edited the file 000-default.conf in /etc/apache2/sites-available/000-default.conf and /etc/apache2/sites-enabled/000-default.conf. I changed the following lines:
Finally, I restarted the apache with the following command:
Источник
How do I change the root directory of an Apache server? [closed]
Want to improve this question? Update the question so it’s on-topic for Stack Overflow.
Closed 3 years ago .
How can I change the document root of the Apache server? I basically want localhost to come from /users/spencer/projects directory instead of /var/www .
I ended up figuring it out. Some suggested I change the httpd.conf file, but I ended up finding a file in /etc/apache2/sites-available/default and changed the root directory from /var/www to /home/myusername/projects_folder and that worked.

15 Answers 15
Please note, that this only applies for Ubuntu 14.04 LTS (Trusty Tahr) and newer releases.
In my Ubuntu 14.04 LTS, the document root was set to /var/www/html . It was configured in the following file:
and change the following line to what you want:
And change /var/www/html to your preferred directory and save it.
After you saved your changes, just restart the Apache 2 web server and you’ll be done 🙂
If you prefer a graphical text editor, you can just replace the sudo nano with a gksu gedit .
You need to change the DocumentRoot setting in your httpd.conf file. Chances are it will be under something like /etc/apache2/conf/httpd.conf .
Use your favourite editor (I recommend Vim) and look for the DocumentRoot and change it to /users/spencer/projects . Also look a little further down for a setting that looks like this:
You will also want to change what is in the quotes to your new directory. This gives Apache access to read from that directory when a user makes a request that call on it.
Now restart your Apache service ( httpd -k restart ) and you should be good to go.
Apache 2 site configuration files are now typically kept in /etc/apache2/sites-available/ (Debian, Ubuntu, etc.).
I had to edit /etc/apache2/sites-available/default . The lines are the same as mentioned by RDL.
This is for Ubuntu 14.04 (Trusty Tahr):
In file /etc/apache2/apache2.conf it should be as below without the directory name:
And in file /etc/apache2/sites-available/000-default.conf you should include the custom directory name, i.e., www:
If it is not as above, it will give you an error when loading the server:
Forbidden You don’t have permission to access / on this server

The right way to change directory or run from multiple directories under different port for Apache 2 is as follows:
For Apache 2, the configuration files are located under /etc/apache2 and doesn’t use a single configuration file as in older versions but is split into smaller configuration files, with /etc/apache2/apache2.conf being the main configuration file. To serve files from a different directory we need a new virtualhost conf file. The virtualhost configuration files are located in /etc/apache2/sites-available (do not edit files within sites-enabled). The default Apache installation uses virtualhost conf file 000-default.conf .
Start by creating a new virtualhost file by copying the default virtualhost file used by the default installation of Apache (the one that runs at localhost on port 80). Change into directory /etc/apache2/sites-available and then make copy by sudo cp 000-default.conf example.com.conf , now edit the file by sudo gedit example.com.conf to:
I have deleted the nonimportant lines from the above file for brevity. Here DocumentRoot is the path to the directory from which the website files are to be served such as index.html .
Create the directory from which you want to serve the files, for example, mkdir example.com and change owner and default group of the directory, for example, if your logged in user name is ubuntu change permissions as sudo chown ubuntu:www-data example.com . This grants full access to the user ubuntu and allows read and execute access to the group www-data .
Now edit the Apache configuration file /etc/apache2/apache2.conf by issuing command sudo gedit apache2.conf and find the line and below the closing tag , add the following below:
Now there are two commands to enable or disable the virtualhost configuration files, which are a2ensite and a2dissite respectively. Now since our example.com.conf file uses the same port( 80 ) as used by the default configuration file( 000-default.conf ), we have to disable the default configuration file by issuing the command sudo a2dissite 000-default.conf and enable our virtualhost configuration file by sudo a2ensite example.com.conf
Now restart or reload the server with command sudo service apache2 restart . Now Apache serves files from directory example.com at localhost on default port of 80 .
The a2ensite command basically creates a symbolic link to the configuration file under the site-enabled directory.
Do not edit files within sites-enabled (or *-enabled) directory, as pointed out in this answer.
To change the port and run from multiple directories on different ports:
Now if you need to run the directory on a different port, change the port number from 80 to 8080 by editing the virtualhost file as:
and editing /etc/apache2/ports.conf and adding Listen 8080 just below the line Listen 80
Now we can enable the default virtualhost configuration file that runs on port 80 since example.com directory uses port 8080, as sudo a2ensite 000-default.conf .
Now restart or reload the server with command sudo service apache2 restart . Now both the directories can be accessed from localhost and localhost:8080 .
Источник
Как отредактировать файл Hosts в Linux, Windows и macOS
Файл hosts используется для сопоставления доменных имен (имен хостов) с IP-адресами. Это простой текстовый файл, используемый всеми операционными системами, включая Linux, Windows и macOS.
Файл hosts имеет приоритет над DNS. Когда вы вводите доменное имя веб-сайта, который хотите посетить, это доменное имя должно быть преобразовано в соответствующий IP-адрес. Операционная система сначала проверяет свой файл hosts для соответствующего домена, и, если для этого домена нет записи, она запрашивает настроенные DNS-серверы для разрешения указанного имени домена. Это влияет только на компьютер, на котором внесено изменение, а не на то, как домен разрешается во всем мире.
Использование файла hosts для сопоставления домена с IP-адресом особенно полезно, если вы хотите протестировать свой веб-сайт без изменения настроек DNS домена. Например, вы переносите свой веб-сайт на новый сервер и хотите проверить, полностью ли он работает, прежде чем указывать домен на новый сервер. Файл hosts также можно использовать для блокировки веб-сайтов на вашем компьютере.
В этой статье мы дадим инструкции о том, как изменить файл hosts в Linux, macOS и Windows.
Формат файла Hosts
Записи в файле hosts имеют следующий формат:
IP-адрес и доменные имена должны быть разделены хотя бы одним пробелом или табуляцией. Строки, начинающиеся с # являются комментариями и игнорируются.
Чтобы добавить запись в файл hosts, просто откройте файл в текстовом редакторе. Ниже приведен пример файла hosts:
Изменения файла hosts вступают в силу немедленно, за исключением случаев, когда записи DNS кэшируются приложениями.
Чтобы отменить изменения, просто откройте файл и удалите добавленные строки.
Изменить файл Hosts в Linux
В Linux полный путь к файлу — /etc/hosts .
Приведенные ниже инструкции действительны для всех дистрибутивов Linux, включая Ubuntu, CentOS, RHEL, Debian и Linux Mint:
В окне терминала откройте файл hosts с помощью вашего любимого текстового редактора :
При появлении запроса введите свой пароль sudo.
Прокрутите вниз до конца файла и добавьте новые записи:

Изменить файл Hosts в Windows
В Windows полный путь к файлу — c:WindowsSystem32Driversetchosts . Приведенные ниже инструкции действительны для Windows 10 и Windows 8.
Нажмите клавишу Windows и введите «Блокнот» в поле поиска.
Щелкните правой кнопкой мыши значок «Блокнот» и выберите «Запуск от имени администратора».
В Блокноте щелкните Файл, затем Открыть. В поле Имя файла вставьте c:WindowsSystem32driversetchosts .
Прокрутите вниз до конца файла и добавьте новые записи:

Сохраните изменения, щелкнув File > Save .
Изменить файл Hosts в macOS
В macOS полный путь к файлу — /etc/hosts . Приведенные ниже инструкции действительны для всех версий macOS.
В окне терминала откройте файл hosts с помощью вашего любимого текстового редактора:
При появлении запроса введите пароль администратора.
Прокрутите вниз до конца файла и добавьте новые записи:

Сохраните изменения и очистите кеш DNS:
Выводы
Файл hosts позволяет вам установить IP-адрес данного доменного имени.
Не стесняйтесь оставлять комментарии, если у вас есть вопросы.
Источник


