- How to Lock Specific Apps in Windows 10
- Lock Specific Apps in Windows 10
- Lock Apps on Windows 10 with My Lockbox
- Other App Locker Software for Windows 10
- 1. Folder Guard
- 2. GiliSoft EXE Lock
- 3. Smart-X AppLocker
- Use Windows 10 Parental Controls
- Use Group Policy to Disable Apps on Windows 10
- Lock your private apps on Windows 10!
- Use AppLocker to create a Windows 10 kiosk that runs multiple apps
- Install apps
- Use AppLocker to set rules for apps
- Other settings to lock down
- Customize Start screen layout for the device (recommended)
How to Lock Specific Apps in Windows 10
Windows has always had a number of important apps that we adore. And with the advent of Windows 10 and its Universal apps platform, the number of Windows 10 apps is growing exponentially. Even the popular chat and social media apps like Facebook, Twitter, WhatsApp, etc., have arrived. That means you need to be more protective of your data as a laptop or computer tends to be shared among family members. While Windows 10 offers a built-in App Locker service, it’s limited to Windows Enterprise and Education versions. If you are using any other Windows version, don’t worry – here’s how you can lock apps on Windows 10.
Lock Specific Apps in Windows 10
In this article, we have mentioned 4 different methods that you can use to lock apps in Windows 10. And all these methods work on both Windows 10 Home and Pro editions. You can use the table of content below to skip to any specific section you want.
Lock Apps on Windows 10 with My Lockbox
1. You can use the My Lockbox software to lock apps on Windows 10. So, firstly you will have to download and install the software on your PC.
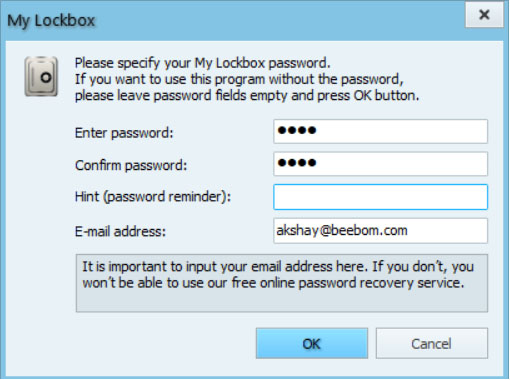
2. When you first open My Lockbox, the software will ask you to set up a password that will be used to lock the apps on your PC. You can also add a password hint and an email id, that will help you recover passwords in case you forget.
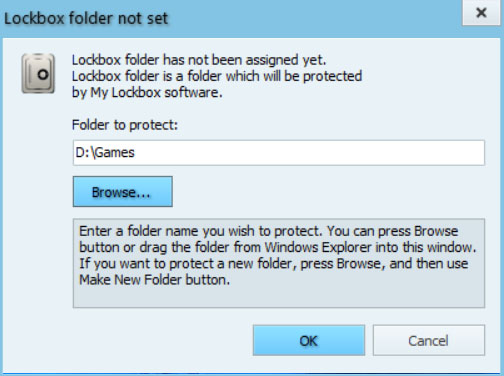
3. Then, you can choose the folder to protect and click “Ok”. Here, you can select the folder where the app or software you want to lock is installed. The Windows software are generally installed in C:/Program Files or Program Files (x86), so you can just head over and locate the software you want to lock. You can even select the Program Files folder to lock all the apps inside it.
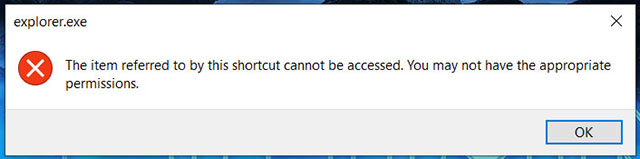
4. The folder and the software will then be locked. So, when you try and access the app from anywhere on Windows, you will get a message saying you don’t have appropriate permissions.
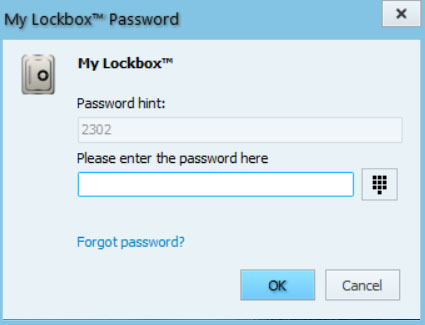
5. To unlock an app, you can head over to My Lockbox control panel and hit the “Unlock button”. You will need to enter the password to open the My Lockbox app, so not every one will be able to access it. Moreover, the software requires the password even when you are trying to uninstall it, which is pretty handy.
My Lockbox is available in a free version but sadly, it’s fairly limited, as you can only lock one folder. To get the ability to lock unlimited folders, you will have to buy the full version ($29.95). While My Lockbox works pretty well, you can try other cool app locker software too. Here are some of the best ones out there other than My Lockbox:
Other App Locker Software for Windows 10
1. Folder Guard
We have already talked about Folder Guard in detail while listing ways to password protect folders in Windows 10 but it deserves a mention here as well. That’s because the software lets you lock apps too. Like My Lockbox, you can lock the folders, where a software is installed to block access to it from any shortcut. Also, it too requires a password when you try to uninstall it, making things more secure. Some people might even like Folder Guard more due to its ability to set different passwords for different folders/apps.
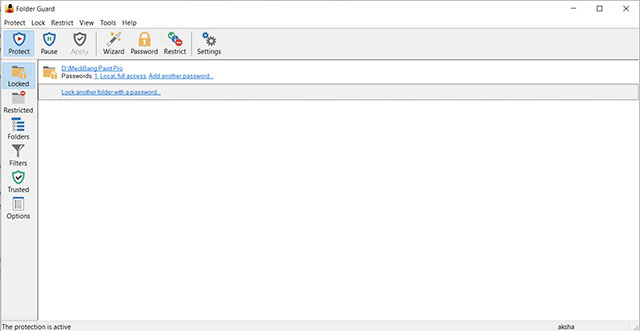
Folder Guard is available for a free 30 days trial, after which you will have to buy the full version ($39.95).
2. GiliSoft EXE Lock
As the name suggests, GiliSoft lets you lock executable EXE program files aka software and apps. The software works pretty well because unlike other software, it lets users unlock an app with the password as soon as you open the app, rather than going to the locker app and unlocking apps there. Along with password protection to software, GiliSoft also protects users from viruses that try and modify the system.
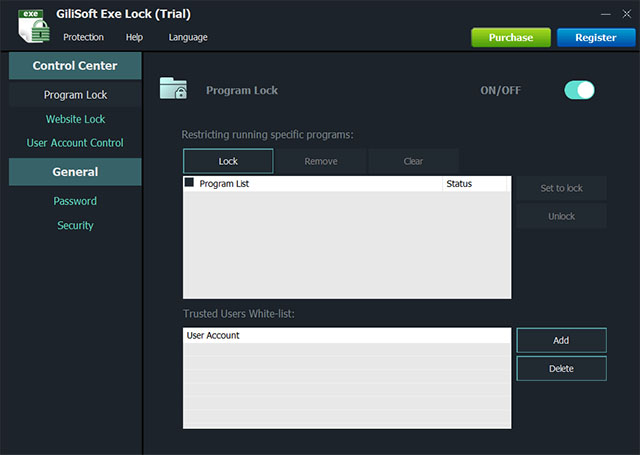
While GiliSoft EXE Lock is available in a free trial, it’s essentially useless because it has a fixed password, which anyone can easily view. So, if you want to use GiliSoft’s app locker software, you will have to buy the full version ($19.95).
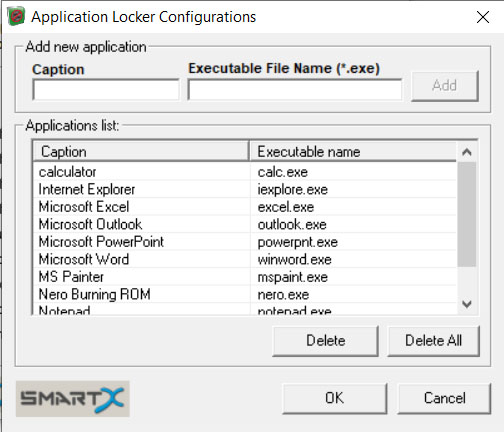
3. Smart-X AppLocker
If you are looking for a simple app locker to block access of few apps from children, then the Smart-X AppLocker software should be good enough. The software is pretty easy to use and you can lock apps with ease, It features a list of apps that you can lock but you can add more by just entering the name of their EXE files. While it locks apps with ease, it’s not really secure, as virtually anyone can uninstall it or access it to unlock the locked apps. Overall, we recommend the app only if your locking needs are simple.
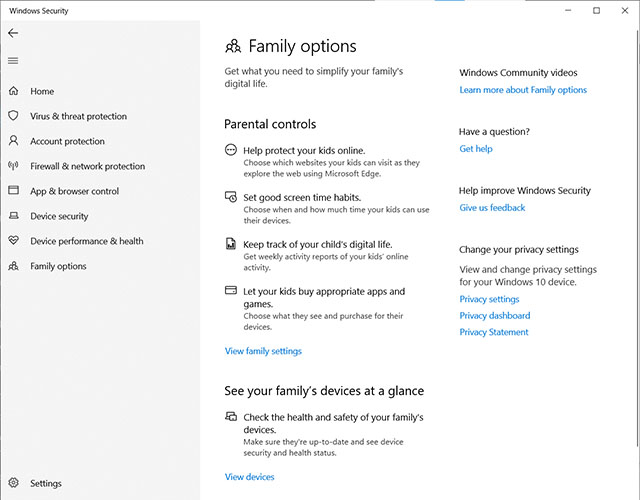
Use Windows 10 Parental Controls
If you are looking to lock apps (or websites) for one of your family member’s user account, you can use Windows 10’s parental control feature to do that. However, there’s a catch, as you cannot lock specific apps on the account until the user has been using them already. Basically, if you have a child user account and you keep track of your children’s activities, you can see the apps & games they use and then, block the apps you don’t want them to use. If you are okay with that, check out our post on how to set up and configure Windows 10 parental controls for all the details.
Use Group Policy to Disable Apps on Windows 10
If you’re using Windows 10 Pro or Enterprise, you can also use Group Policy to lock apps on Windows 10. Here’s how:
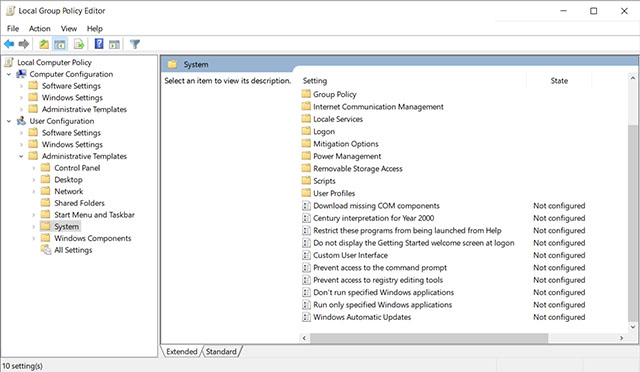
- Press windows+R and type ‘gpedit.msc’ and hit enter. This will open up the Group Policy Editor.
- Go to ‘User Configuration -> Administrative Templates -> System’.
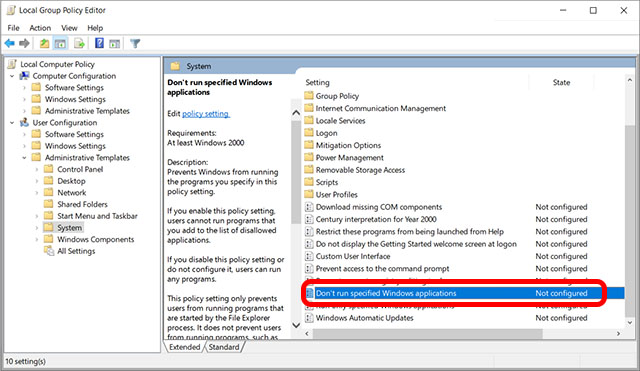
- Double click ‘Don’t run specified Windows applications’.
- Select ‘Enabled’ and click on ‘Show’.
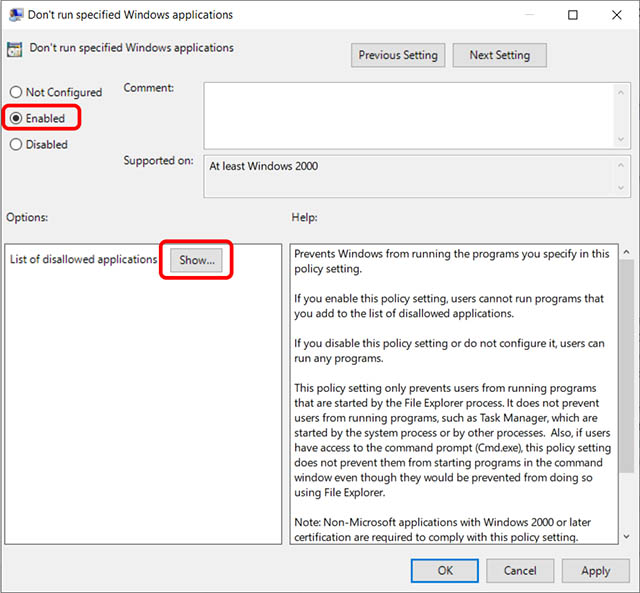
- Add the names of applications you want to block. You have to enter the names of the exe files.
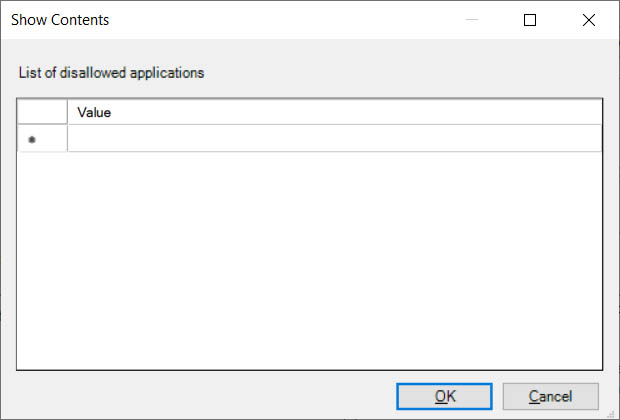
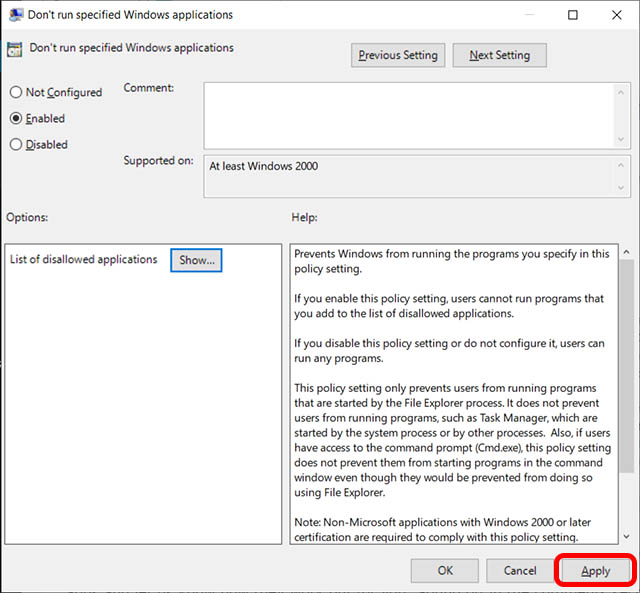
- Click ‘Ok’.
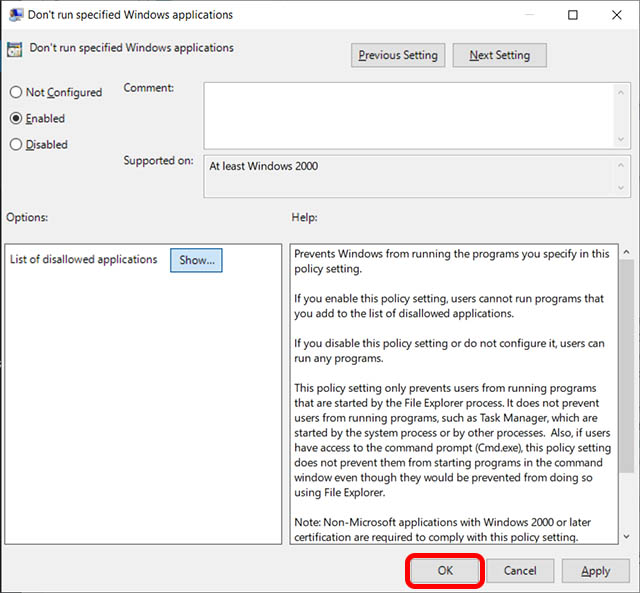
The apps you’ve specified will now be disabled on your computer and won’t be launched. This isn’t exactly locking apps, but it’s a built in method that you can use on your Windows 10 PC. Also, if you’re using Windows 10 Home, it doesn’t have gpedit installed. However, you can easily enable Group Policy Editor on Windows 10.
Lock your private apps on Windows 10!
The aforementioned software should do well enough for your app locking needs and they should make sure that no one is able to access your private information or work in different apps and software. As an alternative, you can even use Windows 10 parental control but if you are looking to lock apps on your own user account, it’s useless. So, install one of these apps and let us know how they work out for you. Sound off in the comments section below.
Use AppLocker to create a Windows 10 kiosk that runs multiple apps
Applies to
Learn how to configure a device running WindowsВ 10 Enterprise or WindowsВ 10 Education, version 1703 and earlier, so that users can only run a few specific apps. The result is similar to a kiosk device, but with multiple apps available. For example, you might set up a library computer so that users can search the catalog and browse the Internet, but can’t run any other apps or change computer settings.
For devices running Windows 10, version 1709, we recommend the multi-app kiosk method.
You can restrict users to a specific set of apps on a device running WindowsВ 10 Enterprise or WindowsВ 10 Education by using AppLocker. AppLocker rules specify which apps are allowed to run on the device.
AppLocker rules are organized into collections based on file format. If no AppLocker rules for a specific rule collection exist, all files with that file format are allowed to run. However, when an AppLocker rule for a specific rule collection is created, only the files explicitly allowed in a rule are permitted to run. For more information, see How AppLocker works.
This topic describes how to lock down apps on a local device. You can also use AppLocker to set rules for applications in a domain by using Group Policy.

Install apps
First, install the desired apps on the device for the target user account(s). This works for both Unified Windows Platform (UWP) apps and Windows desktop apps. For UWP apps, you must log on as that user for the app to install. For desktop apps, you can install an app for all users without logging on to the particular account.
Use AppLocker to set rules for apps
After you install the desired apps, set up AppLocker rules to only allow specific apps, and block everything else.
Run Local Security Policy (secpol.msc) as an administrator.
Go to Security Settings > Application Control Policies > AppLocker, and select Configure rule enforcement.
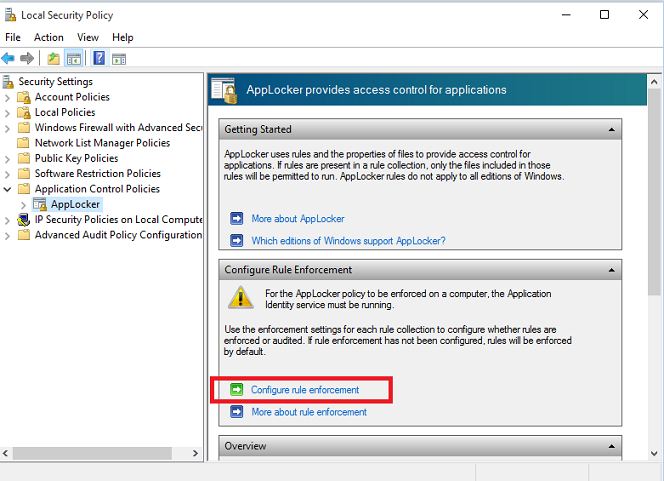
Check Configured under Executable rules, and then click OK.
Right-click Executable Rules and then click Automatically generate rules.

Select the folder that contains the apps that you want to permit, or select C:\ to analyze all apps.
Type a name to identify this set of rules, and then click Next.
On the Rule Preferences page, click Next. Be patient, it might take awhile to generate the rules.
On the Review Rules page, click Create. The wizard will now create a set of rules allowing the installed set of apps.
Read the message and click Yes.

(optional) If you want a rule to apply to a specific set of users, right-click on the rule and select Properties. Then use the dialog to choose a different user or group of users.
(optional) If rules were generated for apps that should not be run, you can delete them by right-clicking on the rule and selecting Delete.
Before AppLocker will enforce rules, the Application Identity service must be turned on. To force the Application Identity service to automatically start on reset, open a command prompt and run:
Restart the device.
Other settings to lock down
In addition to specifying the apps that users can run, you should also restrict some settings and functions on the device. For a more secure experience, we recommend that you make the following configuration changes to the device:
Remove All apps.
Go to Group Policy Editor > User Configuration > Administrative Templates\Start Menu and Taskbar\Remove All Programs list from the Start menu.
Hide Ease of access feature on the logon screen.
Go to Control Panel > Ease of Access > Ease of Access Center, and turn off all accessibility tools.
Disable the hardware power button.
Go to Power Options > Choose what the power button does, change the setting to Do nothing, and then Save changes.
Disable the camera.
Go to Settings > Privacy > Camera, and turn off Let apps use my camera.
Turn off app notifications on the lock screen.
Go to Group Policy Editor > Computer Configuration > Administrative Templates\System\Logon\Turn off app notifications on the lock screen.
Disable removable media.
Go to Group Policy Editor > Computer Configuration > Administrative Templates\System\Device Installation\Device Installation Restrictions. Review the policy settings available in Device Installation Restrictions for the settings applicable to your situation.
NoteВ В To prevent this policy from affecting a member of the Administrators group, in Device Installation Restrictions, enable Allow administrators to override Device Installation Restriction policies.
To learn more about locking down features, see Customizations for Windows 10 Enterprise.
Customize Start screen layout for the device (recommended)
Configure the Start menu on the device to only show tiles for the permitted apps. You will make the changes manually, export the layout to an .xml file, and then apply that file to devices to prevent users from making changes. For instructions, see Manage Windows 10 Start layout options.


