Локальный blynk сервер windows
Что такое Blynk и зачем он нужен? Официально на английском.

На картинке видно что сервер стоит между исполняемым устройством или сенсором и вашим телефоном (где устанавливается клиент) в общем он позволяет обеспечить управление удаленными, распределенными управляющими устройствами и сенсорами, предоставляя библиотеки, сервер и клиента. Сам сервер может использоваться в облаке, тогда вам нужен интернет, или локально (тогда интернет не нужен) но потребуется устройство на котором можно запустить сервер в моем случае это oprange Pi о ней я рассказывал
Установка локального сервера BLYNK на banana pi, orange pi или любой другой одноплатник с OC Armbian
sudo add-apt-repository ppa:webupd8team/java sudo apt-get update
sudo apt-get install oracle-java8-installer -y
sudo apt install oracle-java8-set-default
Скачиваем сервер BLYNK:
Устанавливаем при необходимости серфификат проверки подленности
openssl req -x509 -nodes -days 1825 -newkey rsa:2048 -keyout server.key -out server.crt
Устанавливаем ключ серфтификата
openssl pkcs8 -topk8 -inform PEM -outform PEM -in server.key -out server.pem
Прописываем настройки сервера БЛИНК: https://raw.githubusercontent.com/bly.
Если устанавливали сертификат:
Настраиваем автозапуск локального сервера BLYNK
Blynk сервер

D_Jackas
Всем привет. Имею у себя Home-сервер и на нем висит сервер не мало известного Blynk’a. Т.к. присутствует возможность, могу поделиться с сообществом. Ибо для пары девайсов жирновато будет, да и наличие халявной энергии не помешает.
Что такое Blynk:
Blynk — это платформа с приложениями для iOS и Android для управления Arduino, Raspberry Pi, ESP8266 и другими вашими подопытными через Интернет. Это цифровая панель, где вы можете создать графический интерфейс для своего проекта, просто перетаскивая виджеты.
Инструкция по подключению:
- Скачиваем само приложение с маркета: IOS & Android
- Запускаем.
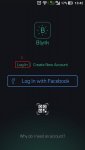
- На экране приветствия кликаем [Login In].
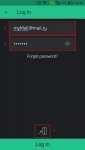
- Далее над кнопкой входа нажимаем на подобие светофора.
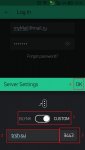
- Переключаем ползунок с BLYNK на CUSTOM и вводим адрес: trsh.su, порт оставляем 9443. Жмем Ок.
- Можем входить
Если у вас нет учетной записи на сервере, то на стартовом экране жмем [Create new Account] и продолжаем аналогично пунктам 4-5. После проходим пункты с 3-6
Можно пользоваться. По сути делюсь из-за того, что опять-же жирно для нескольких девайсов и могу поделиться т.к. не жадный, да и вам не придется арендовать белый IP у провайдера.
Немного информации о сервере:
| Адрес сервера | trsh.su |
| Порт сервера | 9443 |
| Порт для подключения (в скетче) | 8080 |
| Кол-во энергии по умолчанию | 1 |
| Почта сервера | trshfiles@gmail.com |
| Возможность генерации QR | + |
| Текущая версия сервера | 0.41.15 |
| Статус сервера | Online |
Q: Зачем тебе оно?
A: Просто. Нечего делать
Q: Можно пополнять энергию? И сколько будет стоить?
A: Да можно. Бесплатно. Просто напиши мне.
Q: Обновляешь ли сервер?
A: По мере выхода обновлений
Q: Будешь ли смотреть за моим проектами?
A: Оно мне надо? За своими стараюсь не забывать смотреть.
Q: А если отключишь сервер?
A: Отключится только если по тех. причинам и то буду стараться оповещать заранее.
Q: Забьешь на проект?
A: Только если не будет актуальным. А мне он нужен постоянно.
P.S. Если есть вопросы или пожелания, пишите. Данный «сервер» отдам полностью под комьюнити если будет интересно.
. ВНИМАНИЕ.
На данный момент по умолчанию выдаётся 1 единица энергии! Сделано это для фильтрации от ботов (такие имеются ). Чтобы получить энергию (БЕСПЛАТНО), пишите мне в ЛС.
Локальный blynk сервер windows
Blynk is a platform with iOS and Android apps to control Arduino, ESP8266, Raspberry Pi and the likes over the Internet.
You can easily build graphic interfaces for all your projects by simply dragging and dropping widgets. If you need more information, please follow these links:


Blynk Server is an Open-Source Netty based Java server, responsible for forwarding messages between Blynk mobile application and various microcontroller boards and SBCs (i.e. Arduino, Raspberry Pi. etc).
Download latest server build here.


- Java 8/11 required (OpenJDK, Oracle)
- Any OS that can run java
- At least 30 MB of RAM (could be less with tuning)
- Open ports 9443 (for app and hardware with ssl), 8080 (for hardware without ssl)
For Windows download Java here and install.
Quick local server setup
Make sure you are using Java 11
Run the server on default ‘hardware port 8080’ and default ‘application port 9443’ (SSL port)
NOTE: /path should be real existing path to folder where you want to store all your data.
As an output you should see something like that:
Enabling mail on Local server
To enable mail notifications on Local server you need to provide your own mail credentials. Create file mail.properties within same folder where server.jar is. Mail properties:
WARNING : only gmail accounts are allowed.
NOTE : you’ll need to setup Gmail to allow less secured applications. Go here and then click «Allow less secure apps».
Quick local server setup on Raspberry PI
Login to Raspberry Pi via ssh;
Make sure you are using Java 8
Download Blynk server jar file (or manually copy it to Raspberry Pi via ssh and scp command):
Run the server on default ‘hardware port 8080’ and default ‘application port 9443’ (SSL port)
As output you will see something like that:
Docker container setup
Run Docker container
Quick Launch on Raspberry Pi
Run Docker container
Enabling server auto restart on unix-like systems
To enable server auto restart find /etc/rc.local file and add:
Or if the approach above doesn’t work, execute
add the following line
Enabling server auto restart on Windows
Create bat file:
Put in it one line:
Put bat file to windows startup folder
You can also use this script to run server.
Update instruction for unix-like systems
IMPORTANT Server should be always updated before you update Blynk App. To update your server to a newer version you would need to kill old process and start a new one.
Find process id of Blynk server
You should see something like that
Kill the old process
10539 — blynk server process id from command output above.
After this steps you can update Blynk app. Server version downgrade is not supported.
WARNING! Please do not revert your server to lower versions. You may loose all of your data.
Update instruction for Windows
Open Task Manager;
Find Java process;
Start new server as usual
App and sketch changes
- Specify custom server path in your application


Change your ethernet sketch from
Change your WIFI sketch from
Change your rasp PI javascript from
or in case of USB when running blynk-ser.sh provide ‘-s’ option with address of your local server
IMPORTANT Blynk is being constantly developed. Mobile apps and server are updated often. To avoid problems during updates either turn off auto-update for Blynk app, or update both local server and blynk app at same time to avoid possible migration issues.
IMPORTANT Blynk local server is different from Blynk Cloud server. They are not related at all. You have to create new account when using Blynk local server.
Advanced local server setup
For more flexibility you can extend server with more options by creating server.properties file in same folder as server.jar . Example could be found here. You could also specify any path to server.properties file via command line argument -serverConfig . You can do the same with mail.properties via -mailConfig and sms.properties via -smsConfig .
Available server options:
Blynk app, https, web sockets, admin port
Http, hardware and web sockets port
For simplicity Blynk already provides server jar with built in SSL certificates, so you have working server out of the box via SSL/TLS sockets. But as certificate and it’s private key are in public this is totally not secure. So in order to fix that you need to provide your own certificates. And change below properties with path to your cert. and private key and it’s password. See how to generate self-signed certificates here
Note: if you use Let’s Encrypt certificates you’ll have to add #define BLYNK_SSL_USE_LETSENCRYPT before #include in the Arduino Sketch for your hardware.
User profiles folder. Folder in which all users profiles will be stored. By default System.getProperty(«java.io.tmpdir»)/blynk used. Will be created if not exists
Folder for all application logs. Will be created if it doesn’t exist. «.» is dir from which you are running script.
Log debug level. Possible values: trace|debug|info|error. Defines how precise logging will be. From left to right -> maximum logging to minimum
Maximum allowed number of user dashboards.
100 Req/sec rate limit per user. You also may want to extend this limit on hardware side.
this setting defines how often you can send mail/tweet/push or any other notification. Specified in seconds
Maximum allowed user profile size. In Kb’s.
Number of strings to store in terminal widget (terminal history data)
Maximum allowed number of notification queue. Queue responsible for processing email, pushes, twits sending. Because of performance issue — those queue is processed in separate thread, this is required due to blocking nature of all above operations. Usually limit shouldn’t be reached
Number of threads for performing blocking operations — push, twits, emails, db queries. Recommended to hold this value low unless you have to perform a lot of blocking operations.
Period for flushing all user DB to disk. In millis
Specifies maximum period of time when hardware socket could be idle. After which socket will be closed due to non activity. In seconds. Leave it empty for infinity timeout
Mostly required for local servers setup in case user want to log raw data in CSV format. See [raw data] (#raw-data-storage) section for more info.
Url for opening admin page. Must start from «/». For «/admin» url path will look like that «https://127.0.0.1:9443/admin».
Comma separated list of administrator IPs. Allow access to admin UI only for those IPs. You may set it for 0.0.0.0/0 to allow access for all. You may use CIDR notation. For instance, 192.168.0.53/24.
Default admin name and password. Will be created on initial server start
Host for reset password redirect and certificate generation. By default current server IP is taken from «eth» network interface. Could be replaced with more friendly hostname. It is recommended to override this property with your server IP to avoid possible problems of host resolving.
Email used for certificate registration, could be omitted in case you already specified it in mail.properties.
Blynk server provides administration panel where you can monitor your server. It is accessible at this URL:

WARNING Please change default admin password and name right after login to admin page. THIS IS SECURITY MEASURE.
WARNING Default allowed.administrator.ips setting allows access for everyone. In other words, administration page available from any other computer. Please restrict access to it via property allowed.administrator.ips .
Turn off chrome https warning on localhost
Paste in chrome
You should see highlighted text saying: «Allow invalid certificates for resources loaded from localhost». Click enable.
Blynk HTTP/S RESTful API allows to easily read and write values to/from Pins in Blynk apps and Hardware. Http API description could be found here.
Enabling sms on local server
To enable SMS notifications on Local Server you need to provide credentials for SMS gateway (currently Blynk server supports only 1 provider — Nexmo. You need to create file sms.properties within same folder where server.jar is.
And fill in the above properties with the credentials you’ll get from Nexmo. (Account -> Settings -> API settings). You can also send SMS over email if your cell provider supports that. See discussion for more details.
Enabling raw data storage
By default raw data storage is disabled (as it consumes disk space a lot). When you enable it, every Blynk.virtualWrite command will be saved to DB. You will need to install PostgreSQL Database (minimum required version is 9.5) to enable this functionality:
1. Enabling raw data on server
Enable raw data in server.properties :
2. Install PostgreSQL. Option A
2. Install PostgreSQL. Option B
3. Download Blynk DB script
4. Move create_schema.sql and reporting_schema.sql to temp folder (to avoid permission problems)
Copy it to clipboard from your console.
5. Connect to PostgreSQL
6. Create Blynk DB and Reporting DB, test user and tables
/tmp/create_schema.sql — is path from step 4.
You should see next output:
Now start your server and you should see next text in postgres.log file :
WARNING: Raw data may consume your disk space very quickly!
CSV data format
Where 10 — value of pin. 1438022081332 — the difference, measured in milliseconds, between the current time and midnight, January 1, 1970 UTC. To display the date/time in excel you may use formula:
Automatic Let’s Encrypt certificates generation
Latest Blynk server has super cool feature — automatic Let’s Encrypt certificates generation. However, it has few requirements:
Add server.host property in server.properties file. For example :
IP is not supported, this is the limitation of Let’s Encrypt. Also have in mind that myhost.com should be resolved by public DNS severs.
Add contact.email property in server.properties . For example :
You need to start server on port 80 (requires root or admin rights) or make port forwarding to default Blynk HTTP port — 8080.
That’s it! Run server as regular and certificates will be generated automatically.

Manual Let’s Encrypt SSL/TLS Certificates
First install certbot on your server (machine where you going to run Blynk Server)
Generate and verify certificates (your server should be connected to internet and have open 80/443 ports)
Then add to your server.properties file (in folder with server.jar)
Generate own SSL certificates
Generate self-signed certificate and key
Convert server.key to PKCS#8 private key file in PEM format
If you connect hardware with USB script you have to provide an option ‘-s’ pointing to «common name» (hostname) you did specified during certificate generation.
As an output you’ll retrieve server.crt and server.pem files that you need to provide for server.ssl properties.
Install java for Ubuntu
or if above doesn’t work:
Port forwarding for HTTP/S API
Enabling QR generation on server
Behind wifi router
If you want to run Blynk server behind WiFi-router and want it to be accessible from the Internet, you have to add port-forwarding rule on your router. This is required in order to forward all of the requests that come to the router within the local network to Blynk server.
Blynk has a bunch of integration tests that require DB, so you have to skip tests during build.
How Blynk Works?
When hardware connects to Blynk cloud it opens either keep-alive ssl/tls connection on port 443 (9443 for local servers) or keep-alive plain tcp/ip connection on port 8080. Blynk app opens mutual ssl/tls connection to Blynk Cloud on port 443 (9443 for local servers). Blynk Cloud is responsible for forwarding messages between hardware and app. In both (app and hardware) connections Blynk uses own binary protocol described below.
Hardware side protocol
Blynk transfers binary messages between the server and the hardware with the following structure:
| Command | Message Id | Length/Status | Body |
|---|---|---|---|
| 1 byte | 2 bytes | 2 bytes | Variable |
Command and Status definitions: BlynkProtocolDefs.h
Mobile app side protocol
Blynk transfers binary messages between the server and mobile app with the following structure:
| Command | Message Id | Length/Status | Body |
|---|---|---|---|
| 1 byte | 2 bytes | 4 bytes | Variable |
Websockets web side protocol
Blynk transfers binary messages between the server and websockets (for web) with the following structure:
| Websocket header | Command | Message Id | Body |
|---|---|---|---|
| 1 byte | 2 bytes | Variable |
When command code == 0, than message structure is next:
| Websocket header | Command | Message Id | Response code |
|---|---|---|---|
| 1 byte | 2 bytes | 4 bytes |
Message Id and Length are big endian. Body has a command-specific format.
About
Blynk is an Internet of Things Platform aimed to simplify building mobile and web applications for the Internet of Things. Easily connect 400+ hardware models like Arduino, ESP8266, ESP32, Raspberry Pi and similar MCUs and drag-n-drop IOT mobile apps for iOS and Android in 5 minutes


