- Lotus notes client для linux
- Ubuntu Documentation
- Lotus Notes 8.5 Installation
- Lotus Notes 8.0.1 on Jaunty Jackalope
- Pre-Requisites
- Graphical Installation Steps
- Console Installation Steps
- Uninstalling
- Troubleshooting and SNAFU’s
- Post-installation (when running Notes)
- References, Links, Resources
- IBM Documentation on Lotus Notes installations
- Lotus Notes 6.5.2 on Breezy Badger using Wine
- Requirements
- Installation
- Installing wine
- Installing Lotus Notes Client in ubuntu
Lotus notes client для linux
NOTE: If you’re going to print this out, it would be wise to print Landscape instead of Portrait.
These are some screenshots outlining my install of the Lotus Notes 7.0.1 Linux Client. For the most part you just need to read the readme.pdf file that comes with the installation files and follow the instructions, but I know that screenshots are nice sometimes too (click on any of the screenshots below to get 800×600 images).
One general caveat: the current client install (at the time of this writing, August 2006) is only supported on Red Hat Enterprise Linux v4 update 3 (RHEL4), so there may be other things you have to do if you are on another distro (or if you have a non-standard RHEL setup). I used CentOS-4, which is built from the RHEL sources and aims to be 100% binary compatible with Red Hat, and I had no problems.
If you want to install on another distro, you might want to take a look at this wiki page that talks about installing the client on Debian for some pointers.
Also, the Linux client install files are currently only available to Passport customers, so you won’t be able to find a trial version for download on the public Lotus site. If you want to use an older version of the Notes client on Linux, you can always try running it with Wine.
If you have problems, a good place to start looking for answers is the IBM Knowledge Collection Technote: IBM Lotus Notes client for Linux. There’s also a Technote with known limitations of the Linux client. And read the readme.pdf file that gets extracted when you unzip the install files — there are a lot of known issues (and a few workarounds) in there.
| Step 0 This is probably obvious, but the first thing you have to do is download the Notes client install package and set up your Linux workstation. For my testing, I installed CentOS-4 on a VMWare virtual machine with 384 MB of RAM. It worked, but a larger RAM allotment would have been much more comfortable. You’ll also need about 2 GB of free space to handle the install files, the temp files, and all the new program files. My CentOS install was the default workstation install, with no customizations. I ran up2date before starting the Notes client install process. Also note that I was logged in as a non-root user during the install. | |
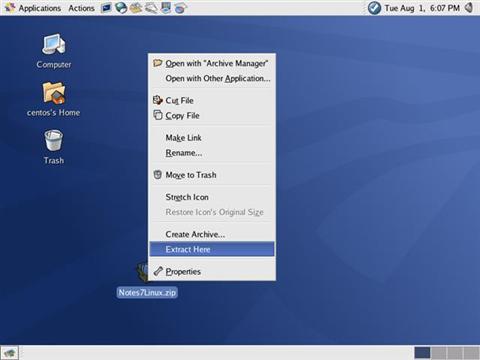 | Step 1 You’ll start with a ZIP file that contains all the installation files for the client. I think it was originally C93D1NA.zip or something. I renamed it to Notes7Linux.zip so I’d know what it was later. Anyway, just right-click the ZIP file and choose «Extract Here». |
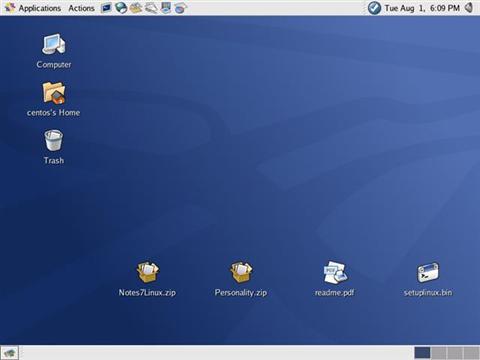 | Step 2 This will extract 3 files: Personality.zip, readme.pdf, and setuplinux.bin. |
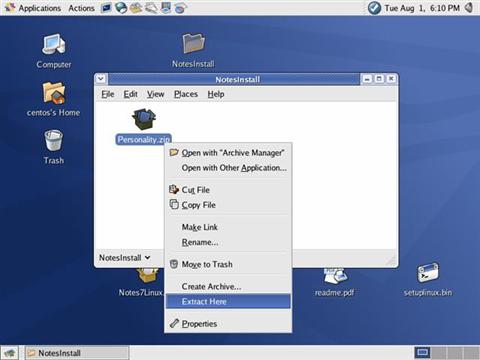 | Step 3 Create a temporary folder to extract the install files, which are all in the Personality.zip file. I just created a «NotesInstall» folder on my Desktop. Move the Personality.zip file inside this folder, right-click it, and choose «Extract Here». |
 | Step 4 The setup_wct_platform.bin file is the actual install file we’ll be running. However, it’s not executable by default. We’ll need to make it executable by right-clicking it and choosing «Properties». |
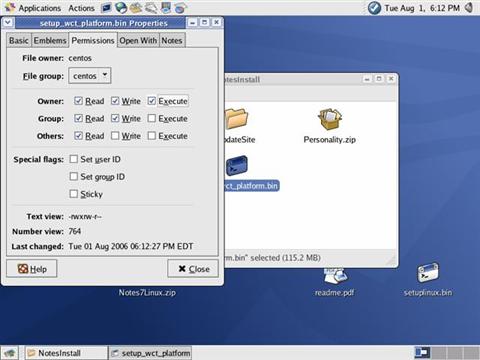 | Step 5 . and then putting a check mark next to the «Execute» permission for Owner, on the Permissions tab. Click the «Close» button after you’ve done this. |
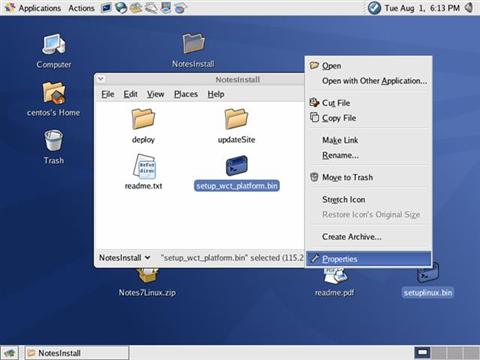 | Step 6 We’ll need to do the same thing with the setuplinux.bin file, which was one of the original 3 files that got unzipped in Step 2. So again, right-click it and choose «Properties». |
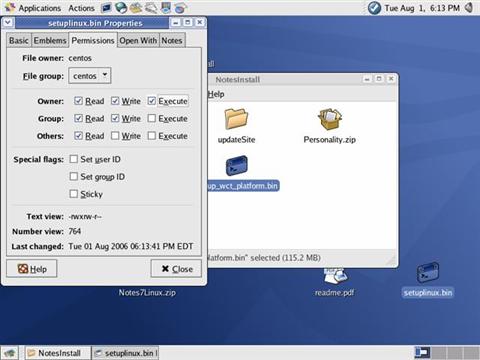 | Step 7 . and put a check mark next to the «Execute» permission for Owner, on the Permissions tab. |
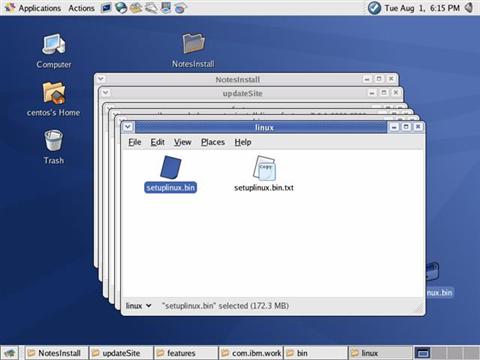 | Step 8 The setuplinux.bin file actually belongs in a subfolder of one of the folders that came out of the Personality.zip file. So go to the place where you extracted Personality.zip in Step 3 (that was NotesInstall for me) and navigate down to: /updateSite Wow! Okay, now copy the setuplinux.bin file from the previous step (right-click it and choose «Copy File») and Paste it into the «linux» folder you should now have open. |
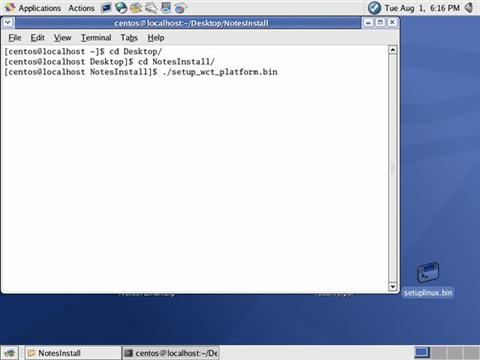 | Step 9 Open a Terminal window (Applications — System Tools — Terminal) and change directories to the place where setup_wct_platform.bin is. One nice thing about Linux Terminal windows is that they normally have auto-complete, so you can start typing the name of the file or directory you want and it will fill in the rest for you. For example, I wanted to navigate from my home directory to /Desktop/NotesInstall. So I typed «cd De» and pressed the TAB key, which changed the line to «cd Desktop/». Then I pressed ENTER and typed «cd No» and pressed TAB, and the line became «cd NotesInstall». However you do it, once you’re in the proper directory, type: «./setup_wct_platform.bin» (or «./set[TAB]» to auto-complete) to run the setup_wct_platform.bin file. Don’t forget the «./» at the beginning of the command — it’s important. |
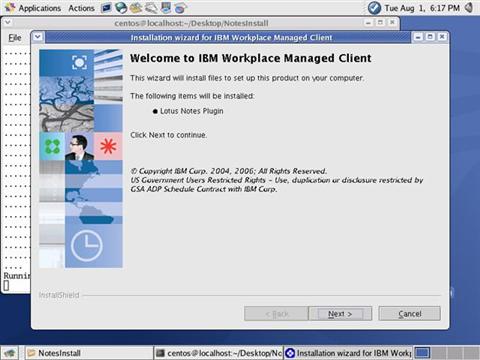 | Step 10 Some messages about starting Java and running InstallShield will go by, and then hey, look at that! There’s an IBM Workplace Managed Client install screen! Click the «Next» button. |
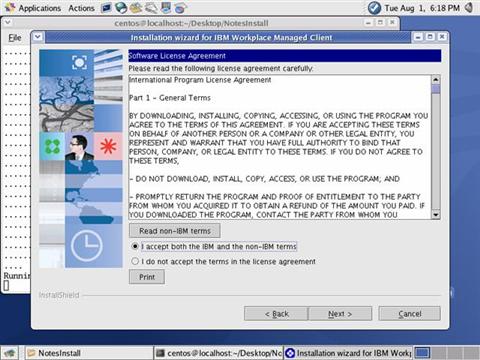 | Step 11 Agree to the license terms and click «Next» (or don’t agree and you’re all done with the install, I suppose). |
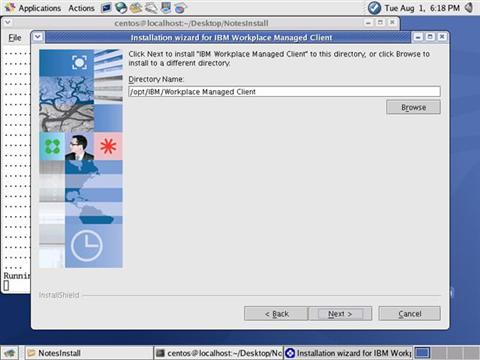 | Step 12 You will be prompted for a location to install the IBM Workplace Managed Client. By default, this directory is: /opt/IBM/Workplace Managed Client However, I wasn’t sure if I had rights to the /opt directory and I wasn’t planning on sharing this installation with anyone else, so. |
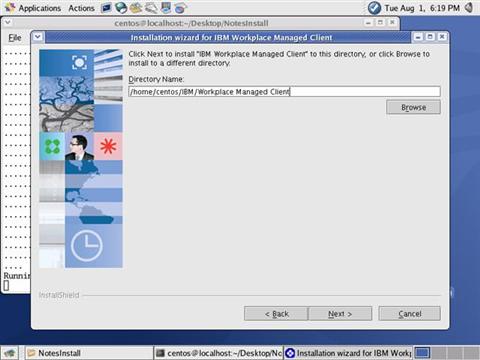 | Step 13 . I changed the install directory to: /home/centos/IBM/Workplace Managed Client Which was in my /home directory (my user name was «centos») and I knew I had rights to that. It also makes it easier to back everything up if it’s in my /home directory. |
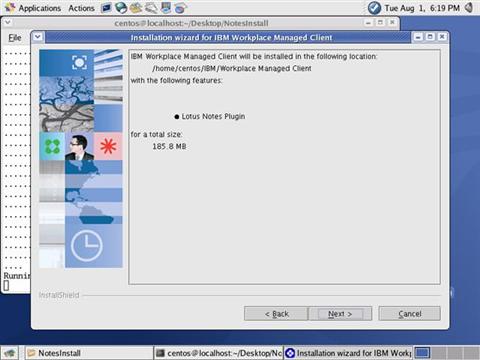 | Step 14 Now you’ll be told where the client will be installed (should be the location from the previous step), and it’ll also tell you that the Lotus Notes Plugin will be installed with it. As expected. Just click «Next». |
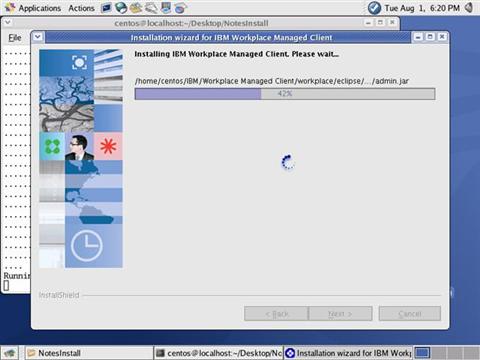 | Step 15 Files will install. Watch the progress bar and wait (it only took a minute or so for me). |
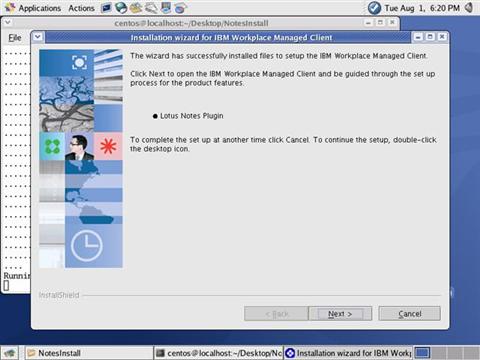 | Step 16 Now you’ll be told that the Lotus Notes Plugin is about to be installed. You want this, so click «Next». |
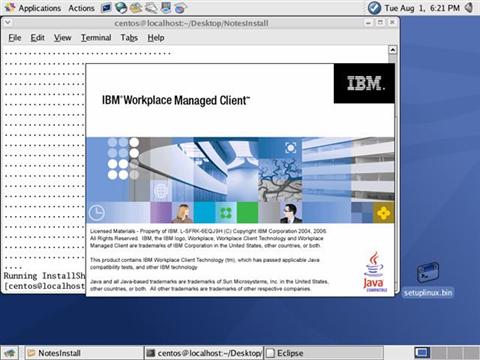 | Step 17 IBM Workplace Managed Client splash screen. Oooh. Ahhh. |
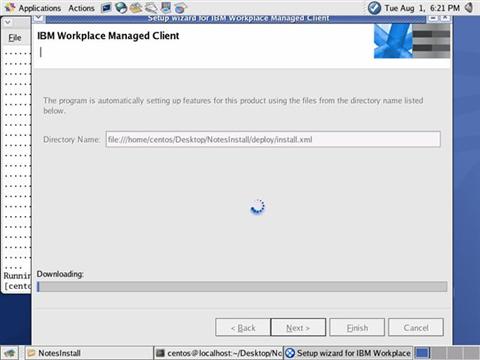 | Step 18 More files will unpack and install. More progress bars. More waiting (about 3 minutes or so for me). |
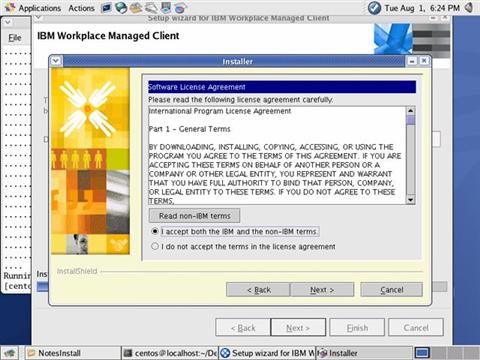 | Step 19 Now you’ll get some additional licensing and lawyer talk. Just accept it and click «Next» — you’ve gone this far, no sense in turning back. |
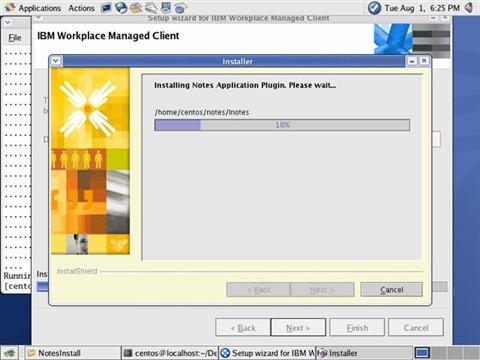 | Step 20 Another progress bar. Don’t panic, it’ll only be another minute or so. |
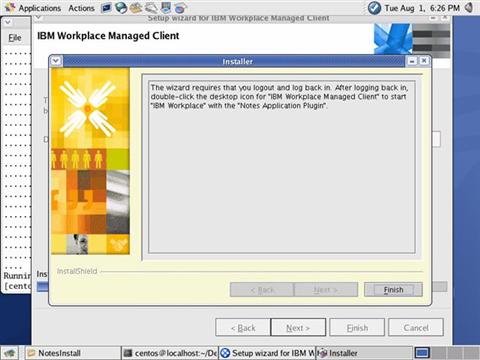 | Step 21 Now it’ll tell you to log out and log back in, presumably because it added things to your bash profile. But don’t worry, it’s not a full reboot like you’re used to on Windows machines, just a simple log out and log in. Click the «Finish» button to close the dialog. DO NOT log out yet. |
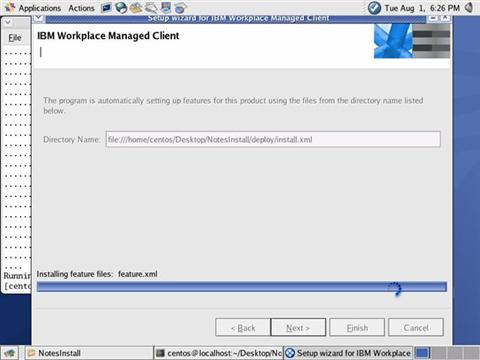 | Step 22 HA! Thought you were finished, didn’t you? Sucker. There are still a few more files to install. Aren’t you glad I told you not to log out yet? |
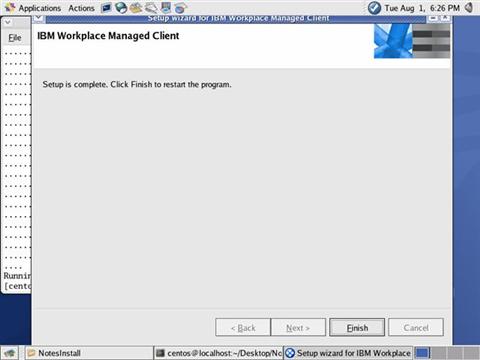 | Step 23 Finally done with the install. For some reason it says «Click Finish to restart the program» here, but I don’t know what program it’s going to restart. When you click «Finish» (go ahead, click it) the Setup Wizard dialog closes, but nothing restarts. It’s probably just messing with your head. |
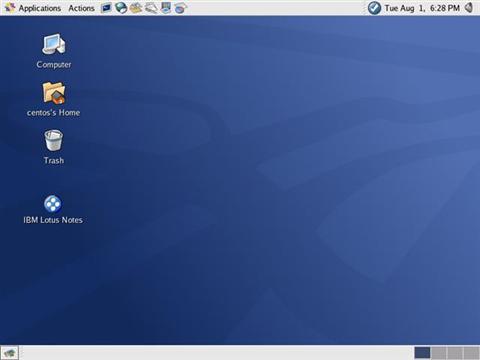 | Step 24 Go ahead and close all the open windows, and delete all the install files and folders you had laying around junking up the place. You will also see a nifty new «IBM Lotus Notes» icon on your Desktop. NOW you can log out. |
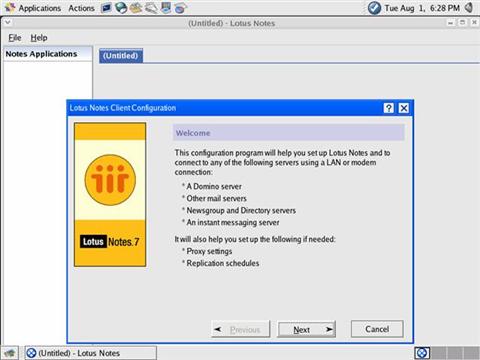 | Step 25 After you’ve logged back in, double-click the «IBM Lotus Notes» icon on the desktop. You’ll get the Lotus Notes Client Configuration screen. Configure away. |
Overall, the whole install process took about 20 minutes, so not too bad. And a lot of what you’re doing is waiting on files to unzip or copy or configure themselves. Not a lot of options at all, but there are a few tricks.
It’s not as easy as an RPM or DEB packaged app, but it’s a lot better than building from source. Just remember to READ THE INSTRUCTIONS.
Источник
Ubuntu Documentation
Lotus Notes 8.5 Installation
This is a place-holder section. In the mean time, the best installation/configuration/removal instructions is through IBM’s Notes Client Installation and Upgrade document. It provides instructions for all the OS’s IBM supports for Notes. Evaluation downloads including all supported platforms are available here: Evaluate: Lotus Notes and Domino Administrator clients. Note that the Administration Client and Domino Designer client are only available for Windows. The client, Lotus Notes, and the server, Lotus Domino, are available. Note that while the client is supported for Ubuntu, the server installation requires a little googling/tweaking to succeed. So Linux users can use the Domino server and Notes clients for mail and applications, but server administration and application design needs to be done using Windows. Note that a lot of server administration can be done using a web administration interface included with the Domino server. Please see the Administration help included for more information.
The basic steps are as follows:
- Get the 8.5.x release package. It comes in either RPM or DEB formats. Once you have the tarball, (usually something like lotus_notes851_linux.tar), extract it into a new folder:
- You’ll now have a set of RPM or DEB files. If you’ve got DEB files, you’re set. Continue to the next step. If all you have are RPM files, you’ll have to convert them to DEB using alien:
If you’re doing a fresh install, just run the installation:
If you’re upgrading from 8.0.1, you can probably still perform the fresh install steps above, but there’s a caveat! It seems that if you had Sametime installed in 8.0.1 and you run the install you’ll have an endless number of «ActivityMonitor» or «ScheduleAutoLogin» messages. This has something to do with how Instant Messaging is configured in Sametime. There’s an acknowledged issue, and comments about this. The better solution is to just go for a fresh install, by renaming your 8.0.1 install folder and doing a fresh install: This is, of course, assuming that you’re initial install was to the /opt/ibm folder.
That’s it — you’ll now have 8.5.1 installed.
Lotus Notes 8.0.1 on Jaunty Jackalope
This section defines the installation steps for Lotus Notes 8.0.1 on Jaunty Jackalope (9.04).
Pre-Requisites
Notes 8 for Linux requires the following:
- libstdc++ version 5
- Eclipse. It’s probably not absolutely necessary, but the notes client is built on Eclipse and your life will probably be a bit easier if you have it.
Graphical Installation Steps
- Create a new folder that you can work from
- Download Lotus Notes for Linux into this folder. This is usually available from your Notes administrator, or as part of the Notes/Domino package. The file’s called C19U2EN.tar.
- Untar the file:
- Run the installer as sudo’er:
This should launch the graphical InstallShield wizard. You’ll be asked to accept the license and specify an installation folder (/opt/ibm/lotus/notes). You can accept these defaults if you wish, or change them to your preference.
After installation is completed Notes should appear in Application -> Office -> Lotus Notes 8. But when you try to launch it as a regular user, you’ll end up with a «Permission Denied» error!
- This is necessary to allow your id file and individual configurations to be saved properly, and the initial error if you don’t do this will be related to the pernames.ntf file (/etc/lotus/notes/data/shared/pernames.ntf).
You should now be able to launch Notes (Application -> Office -> Lotus Notes 8), but you’ll end up with another error:
- Continue for now. We’ll fix this in a later step
Console Installation Steps
InstallShield wizard will install Lotus Notes 8.0.1 on your computer. Select 1 to continue.
Uninstalling
Removed Notes takes the following steps:
- Go to the install folder. By default this is /opt/ibm/lotus/notes/_uninst/
- Run uninstaller.bin. Uninstallation may take quite a while, so be patient!
Troubleshooting and SNAFU’s
=== During Installation ===
- «The installer is unable to run in graphical mode. Try running the installer with the -console or -silent flag.»
- Caused by absence of libstdc++5. See the pre-requisites section above. You MUST have libstdc++5 for the installer to run.
Post-installation (when running Notes)
Trying to run Notes as a regular user results in «Could not launch ‘Lotus Notes 8’. Failed to execute child process . «. This is thanks to the fact that we Notes was installed as sudo (which is the only way you *can* install). Here are some things to try out to fix this problem.
- Your home directory should have a lotus folder (
/lotus) which is owned by root. Change this and the notes install folder to be owned by you:
References, Links, Resources
IBM Documentation on Lotus Notes installations
Instructions in the links below are for Notes 8.5, but are useful when dealing with Notes 8 as well.
Lotus Notes 6.5.2 on Breezy Badger using Wine
This section documents the procedure to install Lotus Notes Client (version 6.5.2) on Breezy Badger (this may work on earlier releases but has not been tested).
If you find any errors/changes to this document please feel free to write to
Requirements
You will need to add the following lines to /etc/apt/sources.list
Installation
Installing wine
To install wine you’ll need to perform the following:
Installing Lotus Notes Client in ubuntu
- Install Lotus Notes Client 6.5.2 under Windows. Unfortunately wine still does not have support for windows installers. Make sure that you install this on a partition that is writable under ubuntu (a vfat partition is preferable)
- Execute wine once, without any command line arguments as
This would setup wine and place the correct configuration files.
- Create symlinks to windows partitions for use with wine.
- Almost done! Now use the following command to run Lotus Notes Client 6.5.2. Note the use of double slashes.
I’ve created a shell script
/bin/lotus-client that executes this long command for me.
Use an editor like gedit to create a file lotus-notes as:
LotusNotes (последним исправлял пользователь lars-planet 2010-12-16 16:12:32)
The material on this wiki is available under a free license, see Copyright / License for details
You can contribute to this wiki, see Wiki Guide for details
Источник


