- Free Mac Security Tools
- download
- download
- download
- download
- download
- download
- download
- download
- download
- download
- download
- download
- download
- download
- Защита macOS с помощью файрвола LuLu и Do Not Disturb
- Защита macOS с помощью LuLu и Do Not Disturb
- Установка и настройка LuLu и Do Not Disturb
- Загрузка LuLu
- Установка и настройка LuLu
- Настройка правил для сетевых подключений
- Загрузка Do Not Disturb
- Установка и привязка к iOS устройству
- Просмотр логов
- Итого
- Lulu mac os как пользоваться
- download
Free Mac Security Tools
 download
 download
In today’s connected world, it is rare to find an application or piece of malware that doesn’t talk to a remote server. LuLu is the free, open firewall for Macs, that can protect your network connections and detect malicious activity.
download
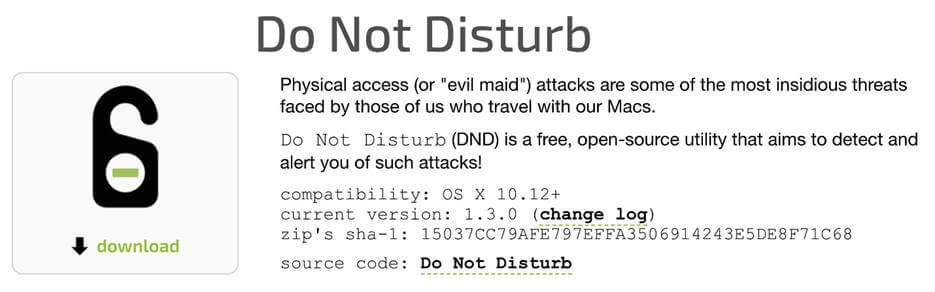
Physical access (or «evil maid») attacks are extremely insidious yet highly efficient.
Do Not Disturb detects and alerts you of such attacks!
download
«KnockKnock. Who’s There?» See what’s persistently installed on your Mac. KnockKnock uncovers persistently installed software in order to generically reveal malware.
download
TaskExplorer allows one to visually explore all running tasks (processes). Quickly see a task’s signature status, loaded dylibs, open files, network connection, and much more.
download
Malware and other applications may install persistent keyboard «event taps» to intercept your keystrokes. ReiKey can scan, detect, and monitor for such taps.
download
Netiquette, a network monitor, allows one to explore all network sockets and connections, either via an interactive UI, or from the commandline.
download
BlockBlock provides continual protection by monitoring persistence locations. Any new persistent component will trigger a BlockBlock alert, allowing malicious items be blocked.
download
By continually monitoring the file-system for the creation of encrypted files by suspicious processes, RansomWhere? aims to protect your personal files, generically stopping ransomware in its tracks.
download
Mac malware often spies on users by recording audio and video sessions. sometimes in an undetected manner. OverSight monitors a mac’s mic and webcam, alerting the user when the internal mic is activated, or whenever a process accesses the webcam.
download
Lockdown is an open-source tool for El Capitan that audits and remediates security configuration settings.
download
KextViewr displays all loaded kexts, along with their signing status, full path, VirusTotal detection ratios, and more.
download
Ostiarius is tool for El Capitan that blocks unsigned internet binaries from executing. Though OS X’s Gatekeeper attempts provide this functionality, it’s trivial to bypass.
download
Dylib Hijack Scanner
Dylib hijack scanner or DHS, will scan your computer for applications that are either susceptible to dylib hijacking or have been hijacked.
download
What’s Your Sign
What’s Your Sign adds a ^-click menu item to Finder.app . Click it to display the code-signing information about any file.
learn more
Commandline Utilities
Various CLI utilities to facilitate system monitoring and malware analysis.
Looking for an «all-in-one» enterprise endpoint protection solution?
Источник
Защита macOS с помощью файрвола LuLu и Do Not Disturb

В сегодняшней статье я расскажу как защитить macOS, в случае если посторонний человек получит доступ к вашему компьютеру, оставленному без присмотра, например, в гостинице. Для защиты mac будем использовать два инструмента: файрвол LuLu, который будет в случае заражения компьютера трояном блокировать все неизвестные подключения и утилита Do Not Disturb, которая будет оповещать о несанкционированном использовании компьютера.
Защита macOS с помощью LuLu и Do Not Disturb
Оба инструмента созданы Патриком Уордлом, бывшим экспертом и хакером NSA.
- Do Not Disturb будет делать фотографии с веб-камеры в момент когда устройство будет использоваться. Утилита также сохраняет в журнале все попытки доступа к компьютеру и может следить за действиями злоумышленника при использовании компьютера.
- LuLu — фаервол, который будет использоватся для отслеживания подключений к удаленному управляющему серверу. Прога генерирует оповещения для всех исходящих сетевых соединений и позволяет решить, кому разрешено выходить в сеть. Таким образом будет заблокирована любая попытка подключения и передачи украденных файлов.
Установка и настройка LuLu и Do Not Disturb
Для установки LuLu и Do Not Disturb необходимо устройство с macOS со всеми последними обновлениями и подключение к сети. Скачать LuLu и Do Not Disturb можно с официального сайта.
Следует отметить, что LuLu и Do Not Disturb могут генерировать большое количество предупреждений. В случае с LuLu нужно указать, каким программам и утилитам разрешены исходящие соединения, а каким – запрещены. То есть пока не настроен белый список, процесс настройки может маленько раздражать. Еще хуже, если вы решите игнорировать предупреждения. Тогда утилита будет бесполезной. Соответственно, стоит убедиться, что соблюден правильный баланс между прозрачностью и надоедливостью сигналов, исходящих от данных программ.
Загрузка LuLu
Вначале идем на страницу загрузки LuLu, кликаем на ссылку под иконкой в левом верхнем углу и скачиваем инсталлятор.
 Страница загрузки LuLu
После того как установщик оказался в папке «Downloads», запускаем файл «LuLu Installer.app». После чего откроется меню установки, где необходимо ввесте пароль для выдачи прав на установку.
Установка и настройка LuLu
В установщике кликните на кнопку «Install» и дождитесь завершения установки.
 Установка файрвола LuLu
После завершения установки вы увидите нажмите на кнопку «Next» для перезагрузки системы.
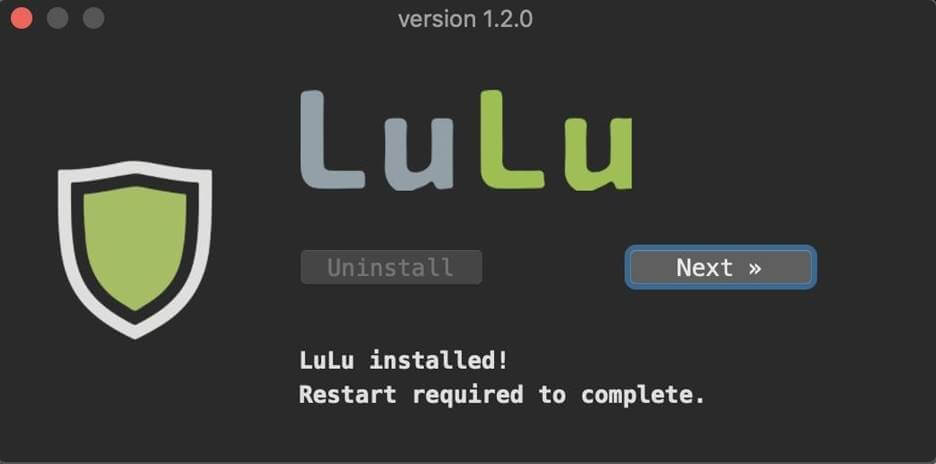 Установка файрвола LuLu завершена
Настройка правил для сетевых подключений
После рестарта macOS откройте LuLu для просмотра списка сетевых правил. Все программы отсортированы на разные категорий: приложения Apple, сторонние или установленные пользователем. В этом окне вы можете разрешить или запретить приложению выходить в сеть.
 Окно правил для приложений
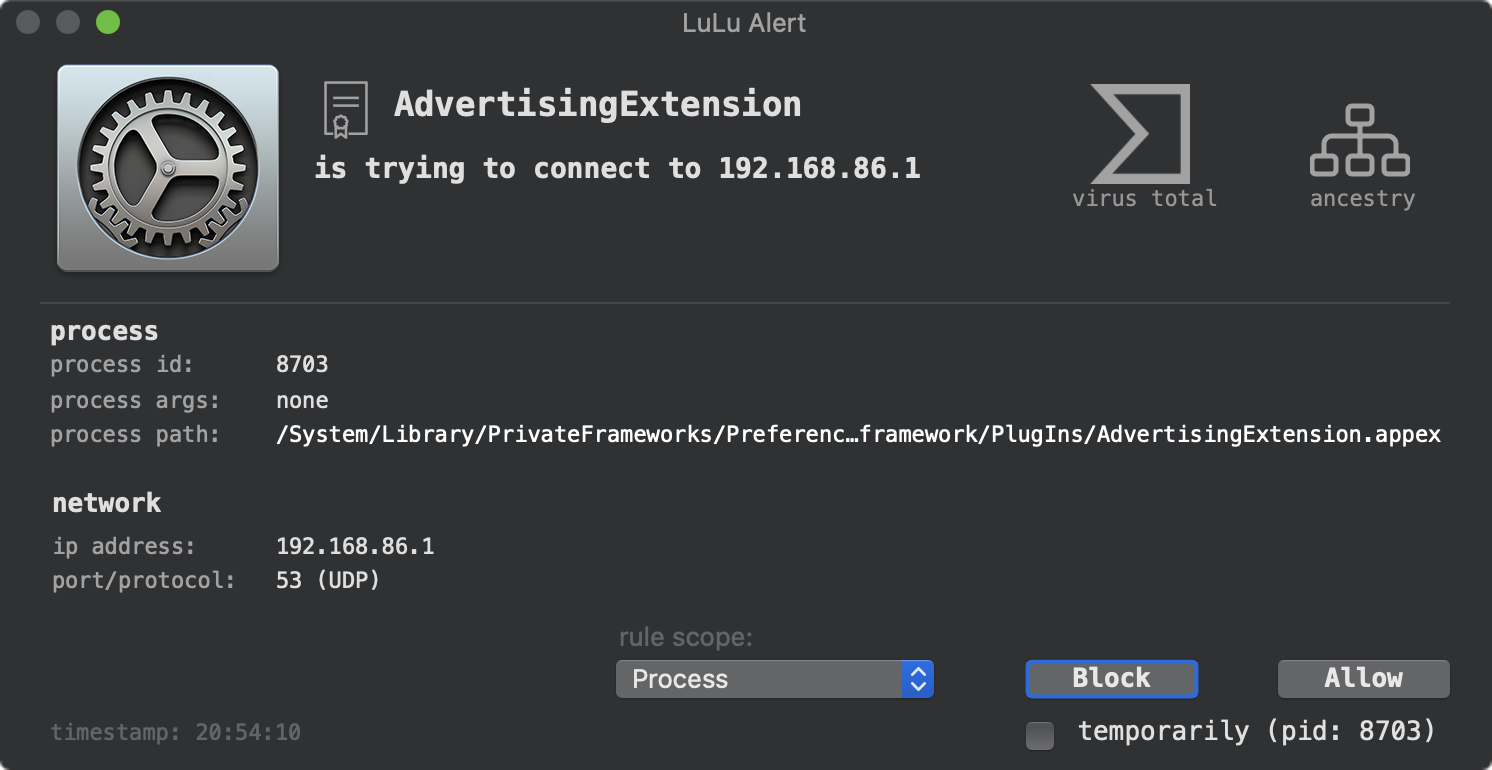
Как только приложение попытается установить внешнее подключение, файрвол LuLu будет искать по списку правил. Если правило не найдено в белом списке, появится окно для создания нового правила (см. скрин ниже). Для просмотра дерева запросов, можно кликнуть на иконку «ancestry».
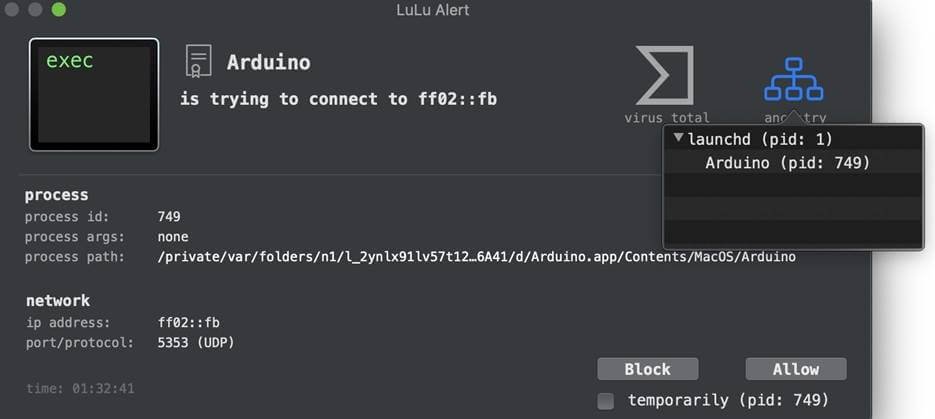 Оповещение о новом исходящим сетевом подключении
Если запрос выглядит подозрительно, тогда 0братие внимание на количество баллов в сервисе онлайн проверки файлов VirusTotal. Нажмите на иконку VirusTotal и проверьте, помечен ли процесс как подозрительный.
 Оценка процесса в VirusTotal
Нажав на ссылке «details», вы увидите подробный отчет по указанному файлу.
После настройки всех правил LuLu приступит к мониторингу сетевых подключений и будет оповещать при подозрительных запросах.
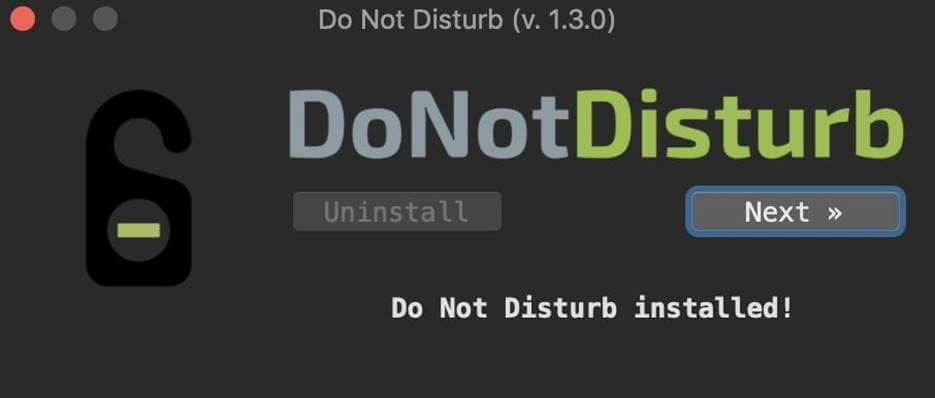
Загрузка Do Not Disturb
Приступаем к блокировке MacBook, iMac, Mac Pro и других устройств, где используется macOS. Заходим на страницу загрузки Do Not Disturb и в левом верхнем углу нажимаем по ссылке «download».
 Страница загрузки утилиты Do Not Disturb
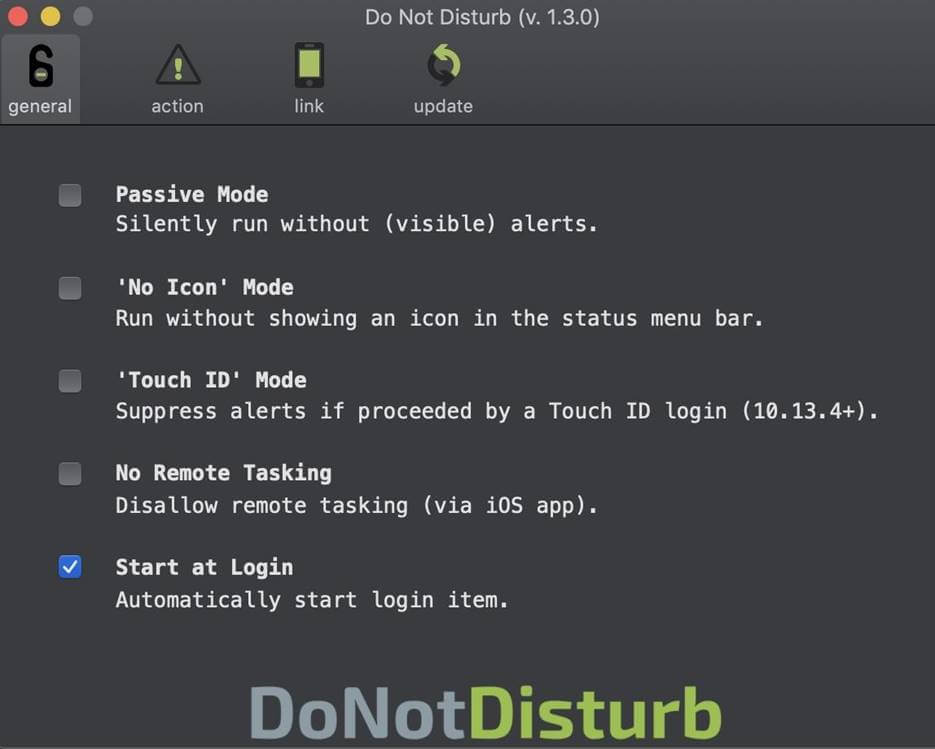
Установка и привязка к iOS устройству
После скачивания запустите установщик «DoNotDisturb.app», после чего начнется установка. Теперь введите пароль и нажмите на «Install» и после окончания процесса установки нажмите на кнопку «Next», чтобы закрыть установщик.
 Установка Do Not Disturb
Теперь в меню вашего устройства должна появится иконка Do Not Disturb. Нажмите на нее и зайдите в раздел «Preferences», чтобы открыть меню с настройками, где вы сможете настроить оповещения, скрыть иконку в меню или отключить оповещения в тот момент, когда вы залогились по отпечатку. Вы также можете запретить удаленное подключение в случае, если у вас нет iOS устройства.
 Настройка Do Not Disturb
В следующем разделе вы можете определить действие, которое будет выполняться во время открытия устройства. Если хотите сделать нечто вроде запроса Canary Token или Grabify URL, то можете передавать IP адрес каждый раз, когда устройство открывается. Также можно настроить мониторинг подозрительных операций, как, например, вставка USB флешки в первые три минуты после загрузки компьютера.
 Настройка действий при открытии компьютера
Наконец, вы можете привязаться к мобильному приложению Do Not Disturb Companion, разработанному компанией Digita Security, позволяющее получать оповещения на iPhone или iPad каждый раз во время загрузки компьютера. Даже можно настроить принудительное выключение для активации шифрования диска. Приложение подключается в разделе «Link» после нажатия на кнопку «Generate QR Code», после чего сгенерируется QR код, доступный для сканирования.
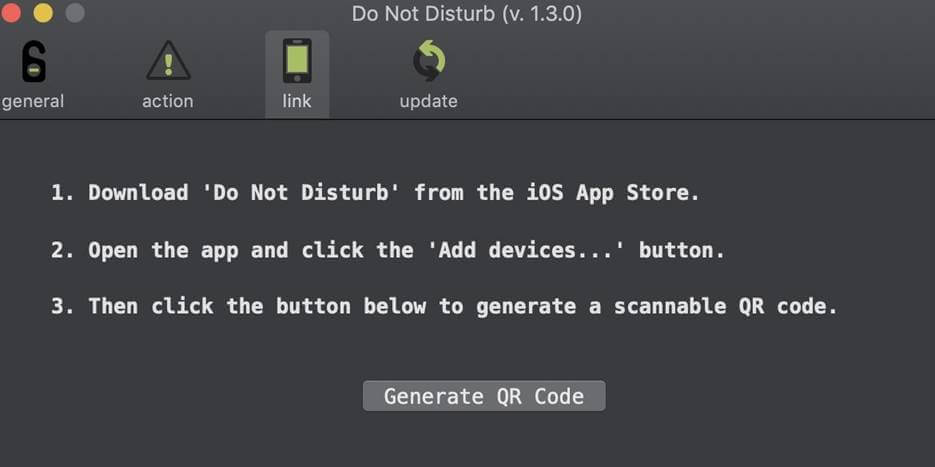 Привязка устройства
Привязка завершается после сканирования QR кода в приложении Do Not Disturb Companion. Мобильное приложение бесплатно одну неделю, а далее нужно оформить подписку (ежемесячно 1 доллар или ежегодно 10 долларов). Если вы не хотите оформлять подписку, или у вас нет iOS устройства, то можете отслеживать логи. Привязка к устройству вовсе не обязательна.
Просмотр логов
Если вы предпочитаете просматривать логи локально, в меню кликните на иконку «View Log». Появится консольное окно, содержащее полный список всех операций с вашим устройством. Вы можете увидеть все авторизации и события навроде подключения USB флешки.
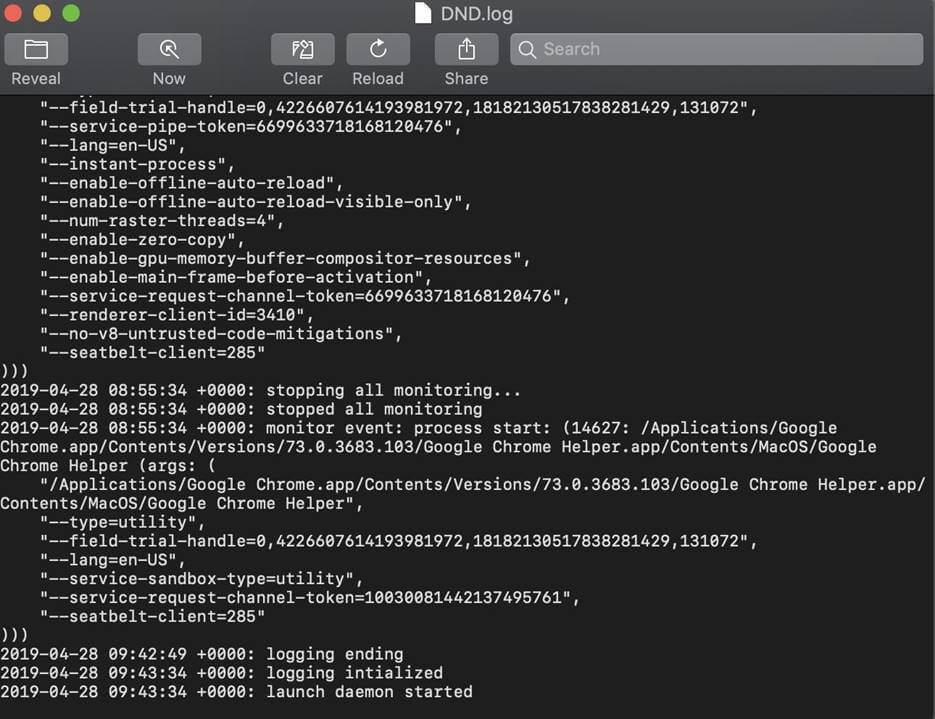 Логи, созданные утилитой Do Not Disturb
Теперь вы всегда будете в курсе, работал ли кто-то с устройством, пока вас не было.
Итого
Благодаря удобному iOS приложению и простому интерфейсу, при помощи Do Not Disturb легко следить за системой macOS даже, когда вас нет рядом. LuLu организует второй рубеж обороны против вредоносов, отслеживая все внешние подключения.
Эти утилиты не защитят вас от всех вредоносов, поскольку довольно просто выключаются, если злоумышленник задастся такой целью. Однако все же безопасность вашего устройства будет выше, и вы станете более осведомленным относительно того, что происходит с вашим устройством. В общем, крайне рекомендую обратить внимание на эти приложения.
Источник
Lulu mac os как пользоваться
download
LuLu leverages Apple’s new Network Extension framework.
As Apple continues to improve the stability of this framework, it is recommended you upgrade to the latest version of macOS 11 (Big Sur), before installing LuLu.
Looking for an older version (compatible with older versions of macOS)?
To install LuLu, first download the disk archive containing the application. Then double-click LuLu.dmg and drag LuLu.app into the Applications folder: 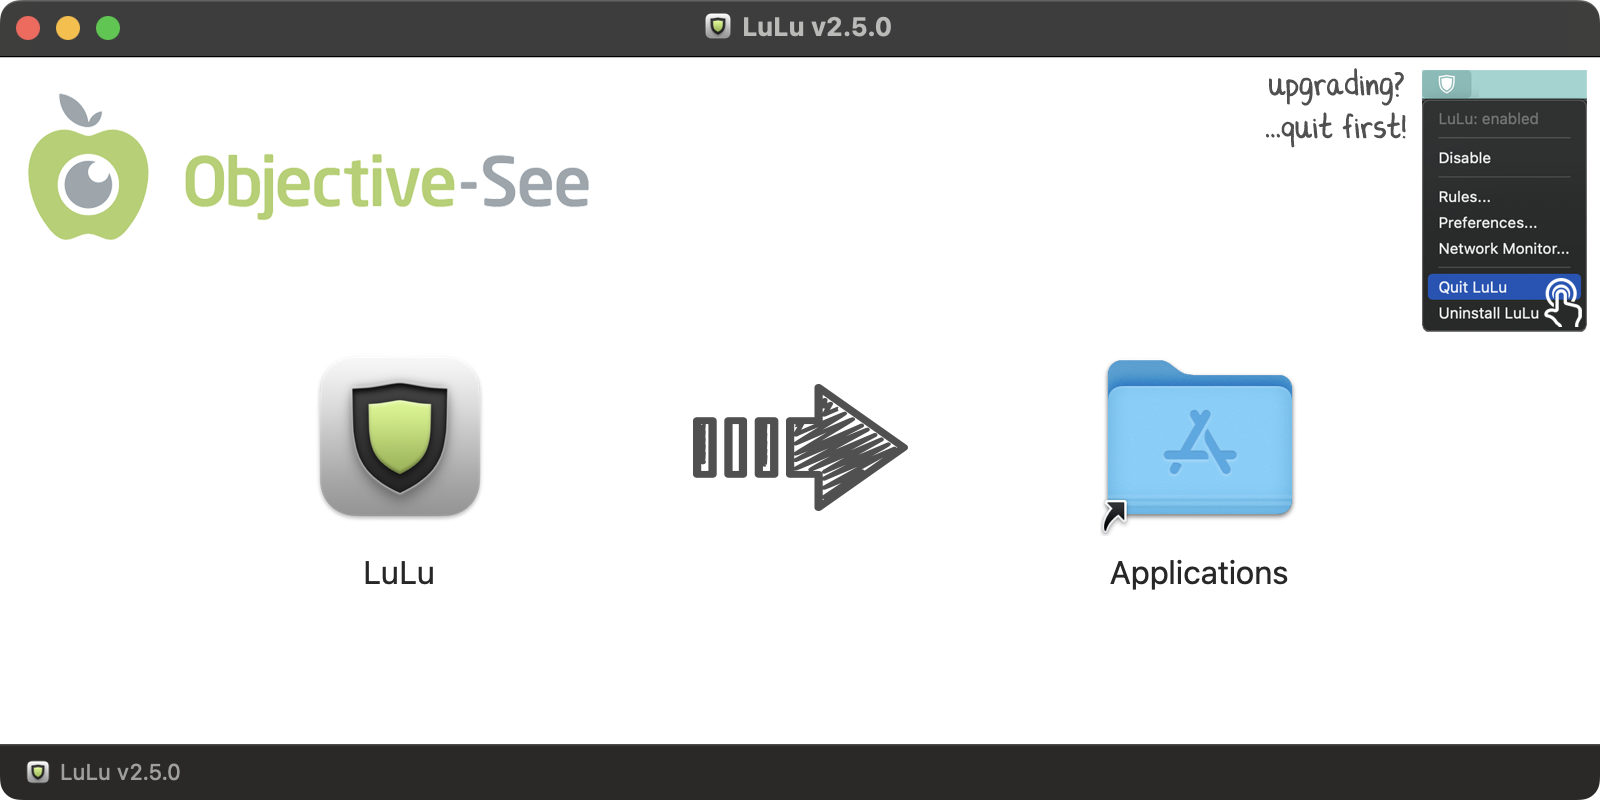
Once LuLu is installed, it aims to alert you anytime a new or unauthorized outgoing network connection is created.
Here’s a LuLu alert, displayed when LuLu checks for an update (by requesting the remote products.json file): 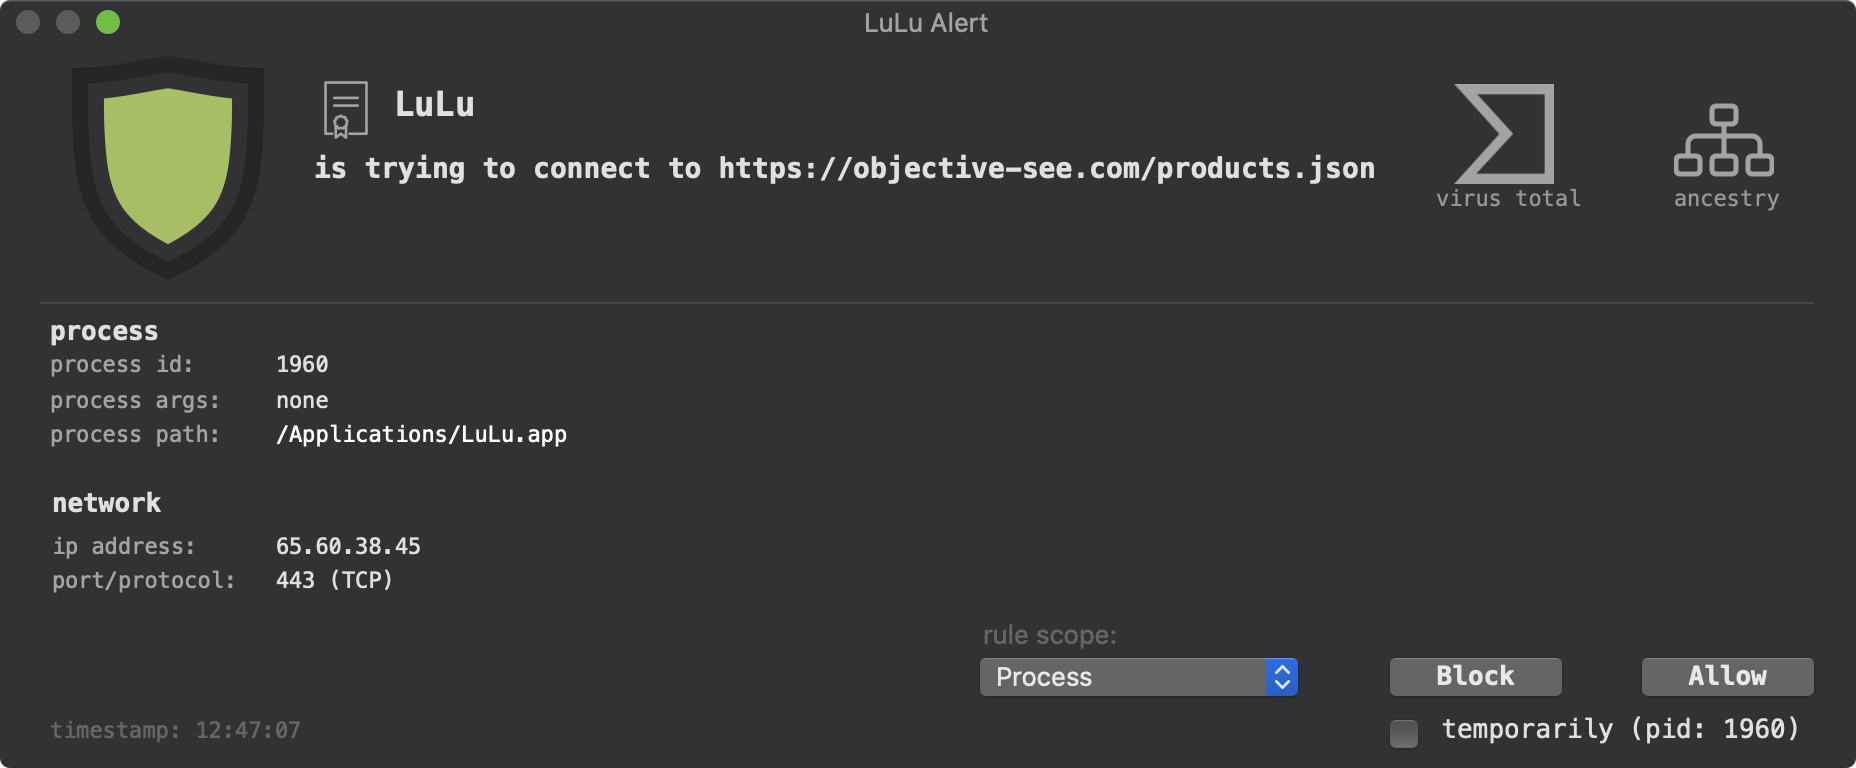 The alert contains information about the process attempting the connection, as well as information about the connection’s destination.
Various elements of the alert are click-able, such as a button to display the process’s code signing information: 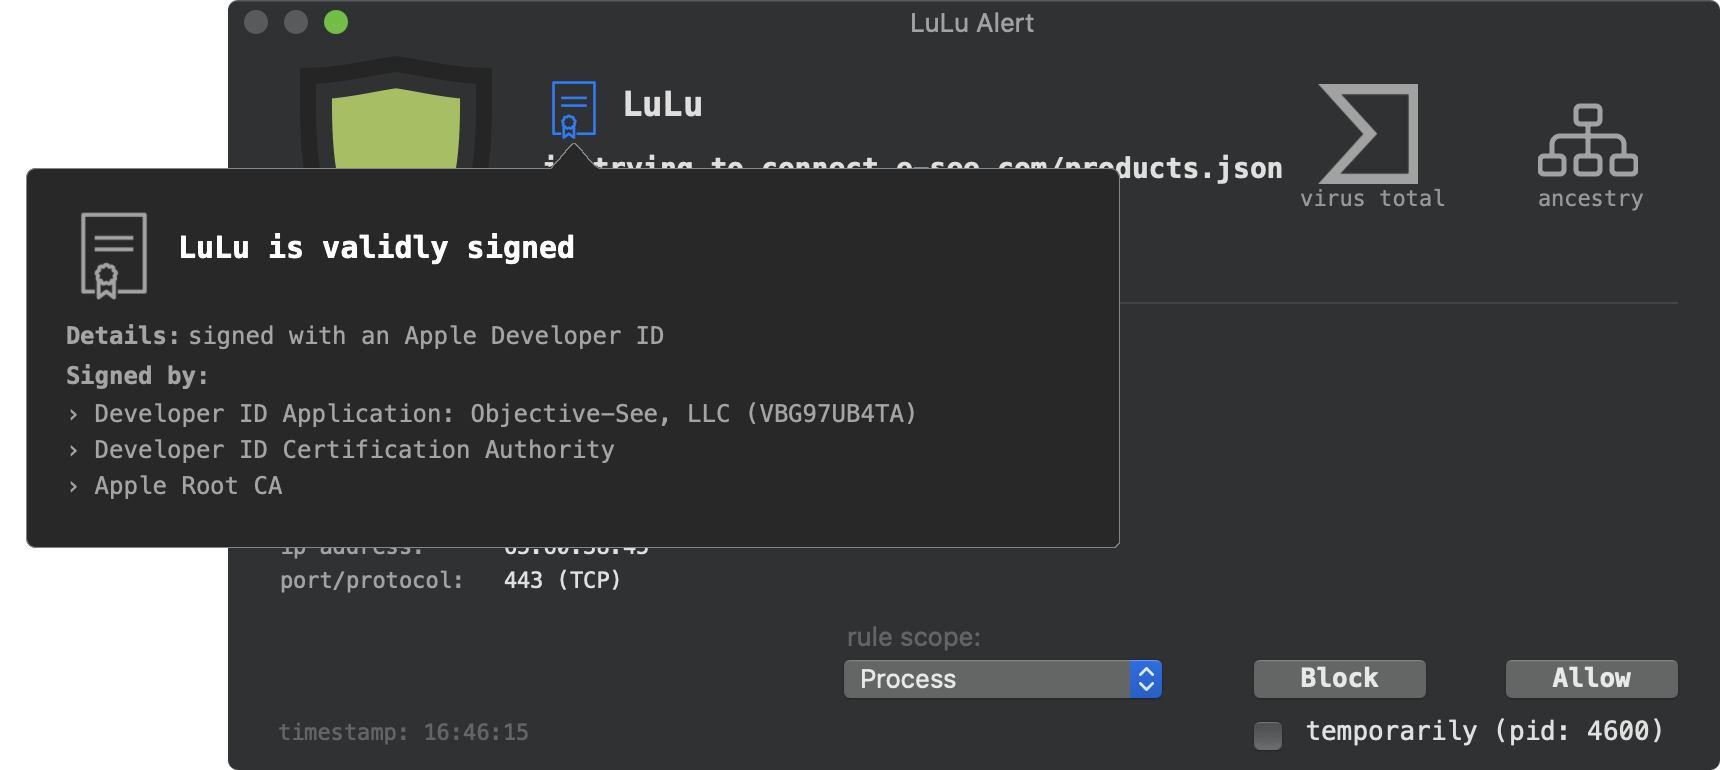 Other elements include of the alert, that onces clicked provide more information, include:
- Virus Total Information:
Contains an anti-virus detection ratio for process that is attempting to create the outgoing connection. - Process Hierarchy:
Display the hierarchy (ancestry) for the process that is attempting to create the outgoing connection.
To approve the outgoing connection, simply click «Allow» . or click «Block» to prevent it.
Unless you click the «temporarily» button, a persistent rule will be created to remember your decision.
By default, your decision (block or allow) applies to the entire process. That is to say, your decision will be applied to subsequent connections (regardless of their destination) for this process, and any other instances. However, if you select the «Remote Endpoint» option, your decision will be scoped, and only will be applied subsequent connections that match the same (remote) destination: 
Process or connections are either allowed to access the network, or blocked, based on LuLu’s rules. The ‘Rules’ window displays these rules: 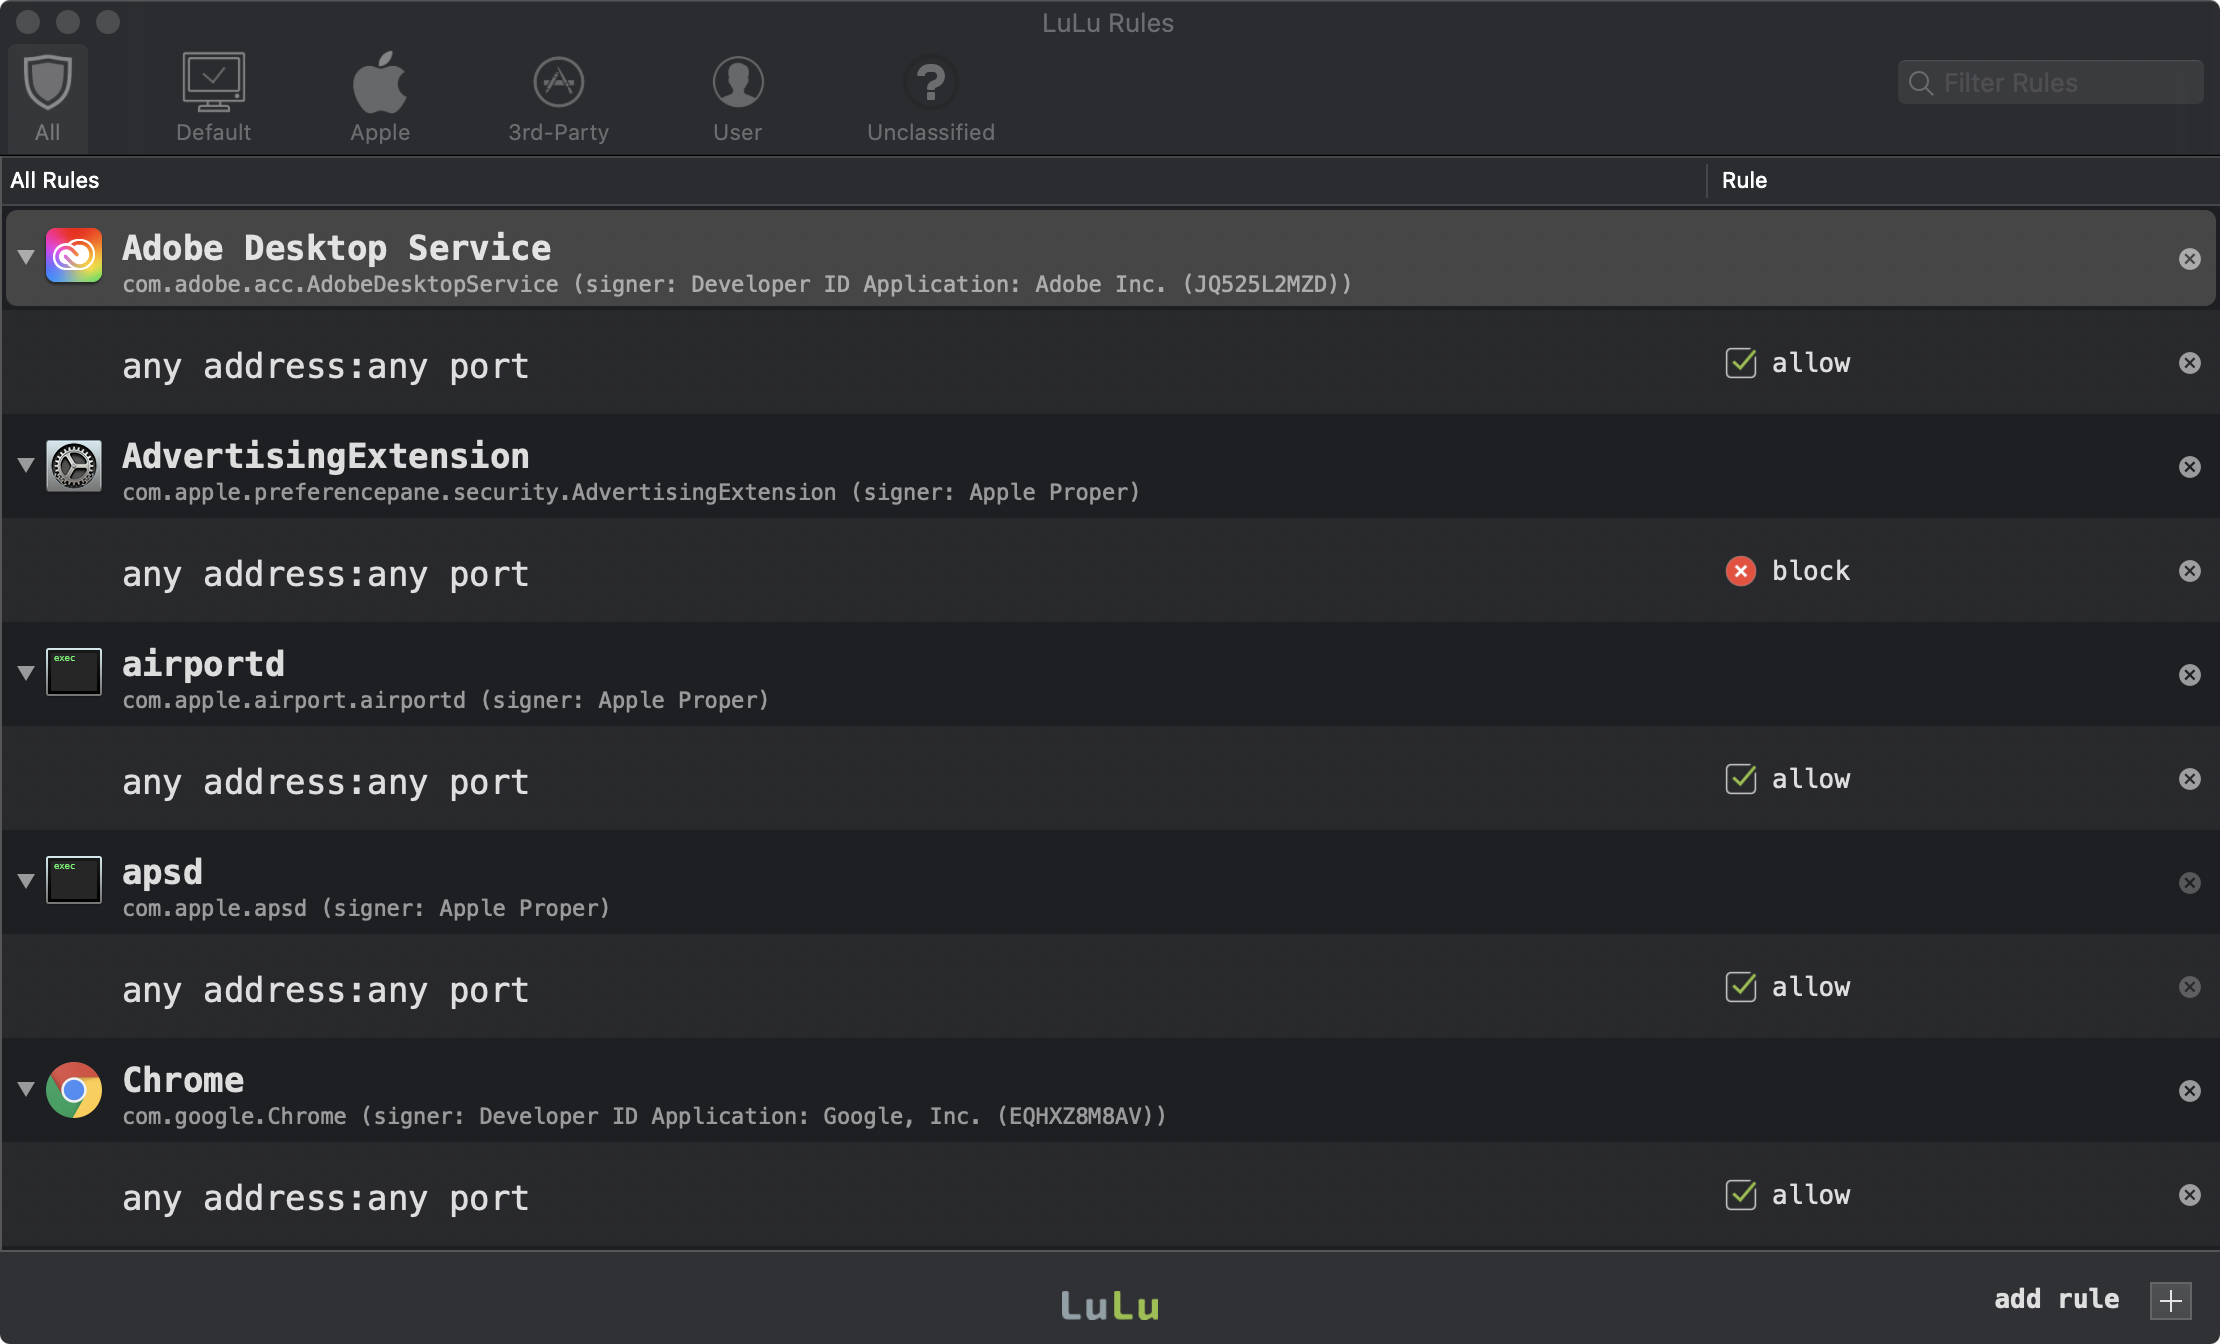
If signed, a program is identified in the Rules window by name and its code signing (bundle) identifier (e.g. com.objective-see.lulu ).
Using a code signing identifier (vs. a path), allows the rule to be applied even if the program is moved, or updated.
Want to view a program’s path(s)? Simply double click (or ^+click and select «в†’ Show Path(s)») on any program in the Rules window: 
The Rules Window
The Rules window can be accessed either by launching LuLu’s application ( /Applications/LuLu.app ), or by clicking on ‘Rules. ‘ in LuLu’s status bar menu:  There are several tabs in the rules window, aimed at organizing the rules:
- All Rules:
The first tab shows all of LuLu’s rules. In other words, it is a combination of the default, apple, baseline, user, and unclassified rules. - Default Rules:
The second tab shows LuLu’s default or system rules. These rules (which cannot be deleted via the UI), are for Apple/macOS processes that must be allowed to access to the network in order to preserve system functionality. - Apple Rules:
When the ‘Allow Apple Programs’ option has been selected (either during installation, or via LuLu’s preferences), any process that is signed by Apple proper will be automatically allowed to connect to the network. Also, an ‘Allow’ rule will be created, and will show up under this tab. - 3rd-Party Program Rules:
When the ‘Allow Installed Programs’ option has been selected (either during installation, or via LuLu’s preferences), any applications or program that was (pre)installed will be automatically allowed to connect to the network. Also, an ‘Allow’ rule will be created, and will show up under under this tab. - User Rules:
This tab shows rules the user has created, either manually via the ‘add rule’ button, or by clicking ‘Block’ or ‘Allow’ in a LuLu alert window. - Unclassified Rules:
If you are not logged in, and a process attempts to access the network will be automatically allowed. Also, an ‘Allow’ rule will be created, and will show up under under this tab.
Adding Rules
Generally rules are created in response to an alert (unless the user has selected the «temporarily» button).
To manually add a rule, click on the ‘add rule’ button at the bottom of the rules window. This will bring up an ‘Add Rule’ dialog box:
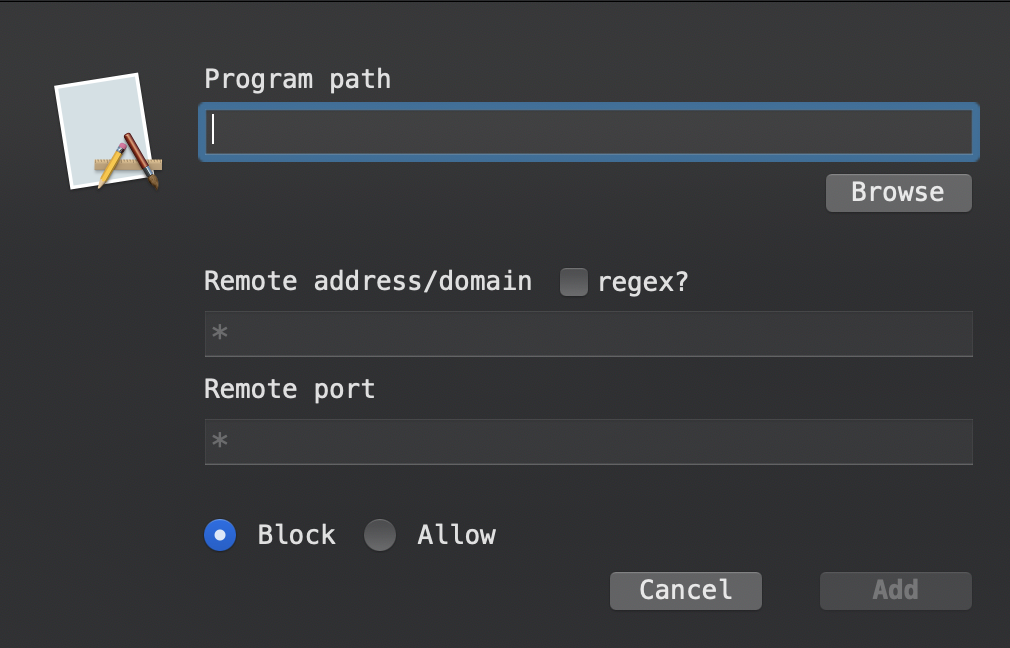
In this dialog box, enter the path to the program (or click ‘Browse’ to open a file chooser window). Then, enter the remote address or domain, remote port, and finally select ‘Block’ or ‘Allow’. Click ‘Add’ to add the rule, which will be persistently saved, and show up as a ‘User’ rule.
Enter * for «any» (e.g. a program path of * will globally match all programs).
The rule’s remote address/domain can also be a regular expression (though make sure to select the «regex» checkbox if this is the case).
Editing (Updating) Rules
To change a rule, either double click on a rule, or ^ +click and select » в†’ Edit Rule»: 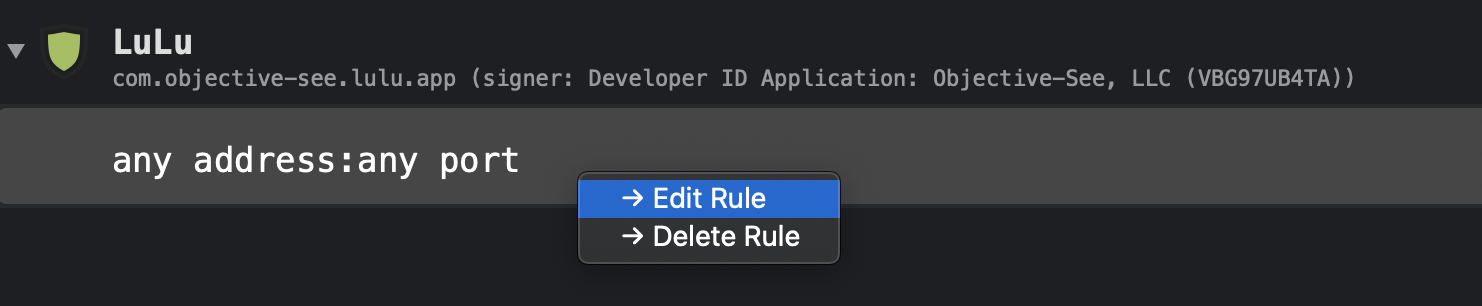 This will bring up the «Edit Rule» window. Here you can edit any aspect of the rule:
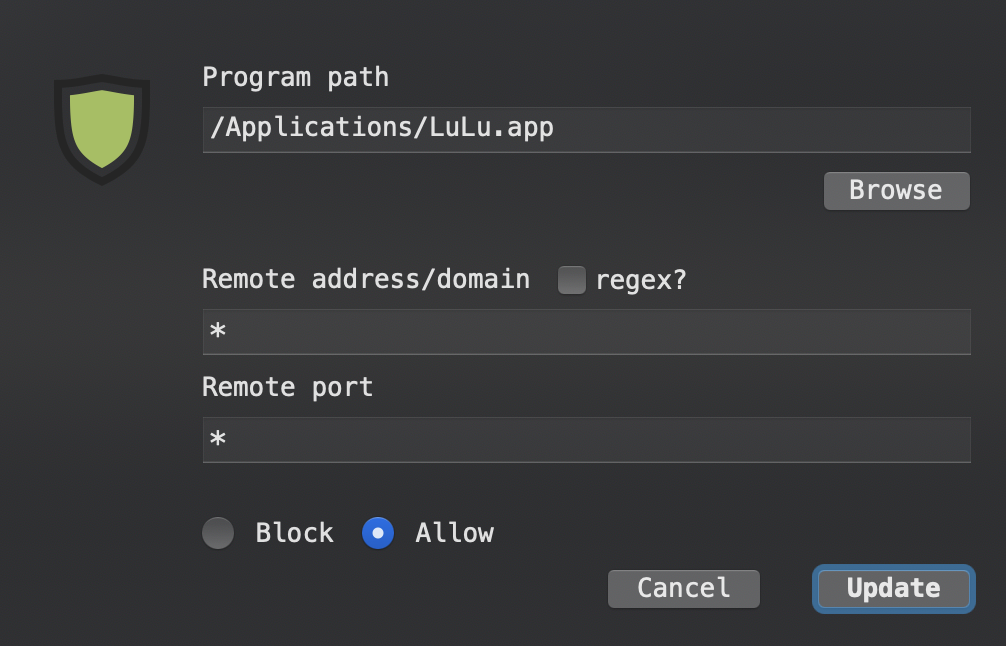
Deleting Rules
There are several ways to delete a rule. With the rule selected, simply press the «delete» on your keyboard or, ^ +click and select » в†’ Delete Rule»:  . or simply click the ‘x’ button on the right hand side of the rule.
Deleting a row that contains program information, will, as expected also remove all its rules.
Also note that default (system) rules cannot be deleted (via the Rules window).
LuLu can be configured via its preferences pane. To open this pane, either in the main LuLu application ( /Applications/LuLu.app ), or via LuLu’s status bar menu, click on ‘Preferences. ‘  The preference pane has three tabs: rules, mode, and update.
The rules tab, allows one to configure how LuLu will (automatically) generate rules, as well as how to specify a global block list: 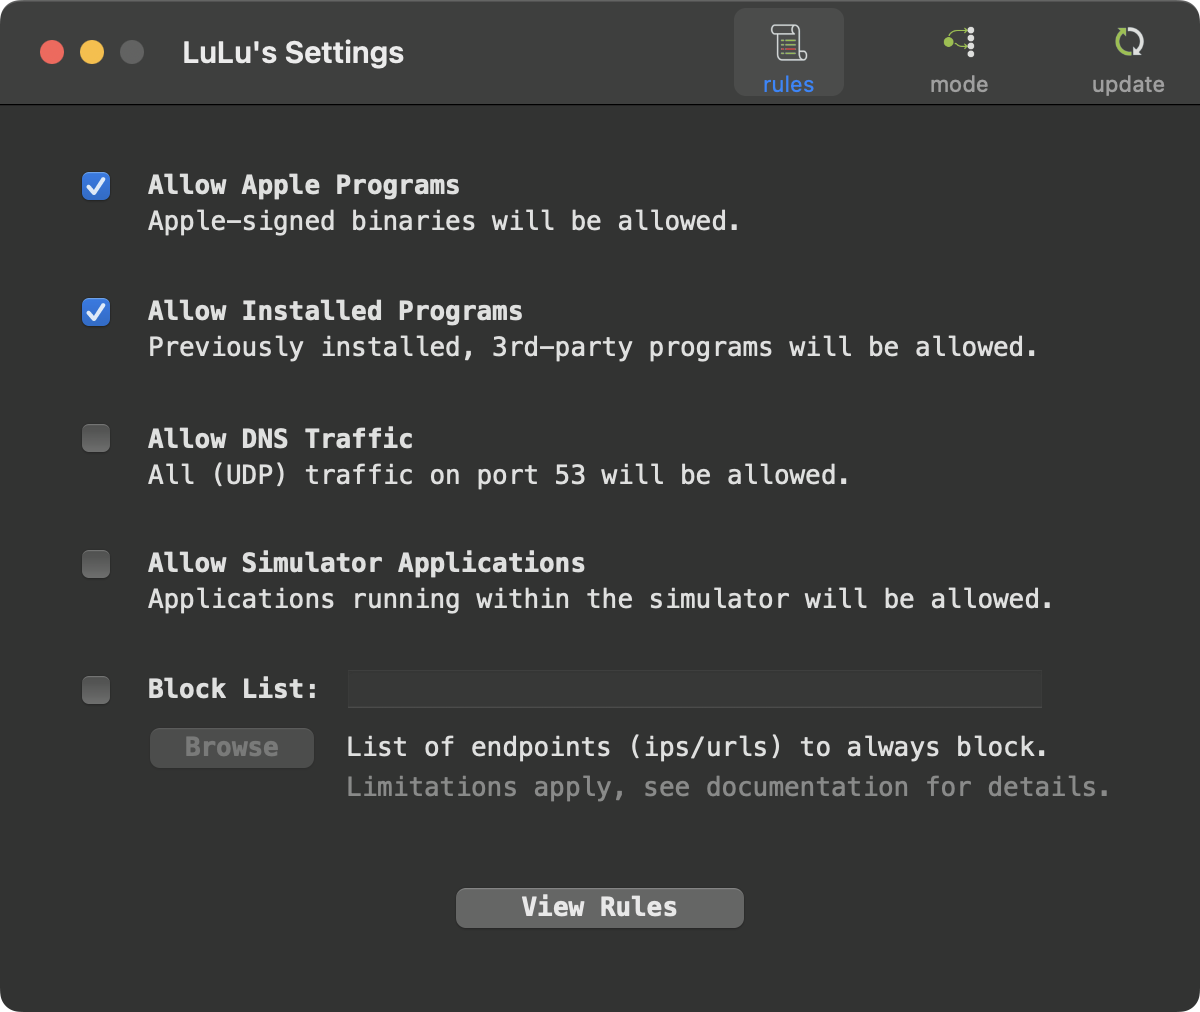
- ‘Allow Apple Programs’
When this option is selected any process that is signed by Apple proper will be automatically allowed to connect to the network. Also, an ‘allow’ rule will be created, and will show up in the Rules window, under ‘Apple Rules’. - ‘Allow Installed Applications’
When this option is selected any applications (and their components) that were (pre)installed will be automatically allowed to connect to the network. Also, an ‘allow’ rule will be created, and will show up in the Rules window, under ‘Baseline Rules’. - ‘Block List’
When this option is selected, LuLu will automatically block any connection that matches any items in specified block list. The block list can be a local file, or remote url (e.g. https://ceadd.ca/blockyouxlist.txt )
The block list file should contain a (newline-separated) list of url hosts and/or ip addresses to block.
Items in the block listed are matched and applied regardless of the process creating the connection, or any other rules.
For a free (privacy focused) block list, see: blockyouxlist.
Due to limitations of macOS, blocking via host name is only applicable to (as Apple notes) » Network.framework or NSURLSession connections«.
As such, for browsers (such as Chrome), that do not leverage these frameworks, only ip address based blocking is supported.
. as Safari and Firefox leverage such frameworks, they are not subject to this limitation.
The mode tab, allows one to configure LuLu to run in various modes: 
- ‘Passive Mode’
When this option is selected, LuLu will run silently without alerts. Existing rules will be applied, and new connections will be automatically allowed. - ‘Block Mode’
When this option is selected, all traffic (that is routed thru LuLu) will be blocked. - ‘No Icon Mode’
When this option is selected, LuLu will run without an icon in the status bar.
You can always manually run /Applications/LuLu.app to disable this preference if you’d like the status bar icon back!
The update tab, allows one to check for new versions, as well as disable the automatic check for new versions of LuLu: 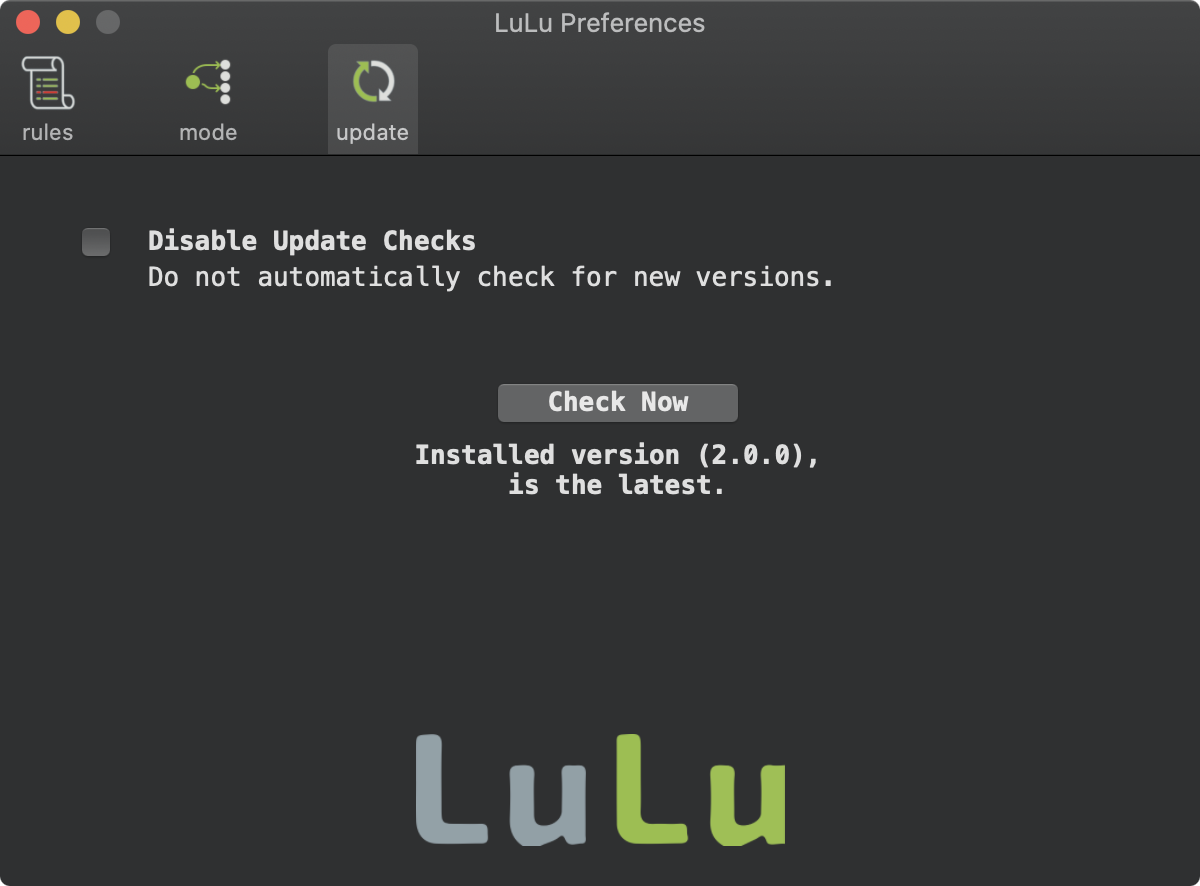
Q: Why is LuLu called LuLu?
A: In Hawaiian, the word ‘LuLu’ means protection, shield, or peace. As this tool aims to instill peace, by providing a protective shield, it seemed the fitting name. And as LuLu, (along with all of Objective-See’s tools) are coded with aloha on the lovely island of Maui, it’s the perfect name!
Q: Do I need LuLu if I’ve turned on the built-in macOS firewall?
A: Yes! Apple’s built-in firewall only blocks incoming connections. LuLu is designed to detect and block outgoing connections, such as those generated by malware when the malware attempts to connect to it’s command & control server for tasking, or exfiltrates data.
Q: Does LuLu conflict with other (paid) macOS firewalls or security products?
A: Although at this point testing has been limited, LuLu appears to play nice with other tools 🙂
Q: I found a bug (or issue) with LuLu. Can you fix it?
A: For sure! If you encounter any issues, create an bug report via GitHub.
Источник


