- Как сделать красивую консоль в Mac и Linux
- 50+ Terminal Commands for Beginners on Linux/OS X
- 50+ Terminal Commands – Linux/OS X Users.
- 1. Terminal Commands To Check System Memory.
- 1.1. The free command.
- 1.2. The
- 1.3. The command.
- 1.4. The top command.
- 1.5. The command.
- 1.6. Additional Linux commands to isolate memory issues.
- 2. Terminal Commands To Check Disk/File Usage.
- 2.1. The du command.
- 2.2. The df command.
- 2.3. Additional Terminal Commands for File Management.
- 3. Terminal Commands To Check on Running Processes.
- 3.1. The ps command.
- 3.2. The kill command.
- 3.2. The killall command.
- 3.3. The STRACE command.
- 3.4. The watch command.
- 4. Terminal Commands To Monitor & Manage Network.
- 4.1. The IFCONFIG and related commands.
- 4.2. Some nice ping command examples.
- 4.3. The TRACEROUTE command.
- 4.4. The NETSTAT command.
- 4.5. The dig command.
- 4.6. Miscellaneous network Linux commands.
- 5. Linux Commands To Configure Terminal & Screen.
- 5.1. The screen command.
- 5.2. Some Useful Terminal Command Shortcuts.
- 6. Some Important Terminal Commands for Quick Reference.
Как сделать красивую консоль в Mac и Linux

Если у вас OS X, поставьте iTerm2, он лучше стандартного Terminal.app. Если у вас Linux, то у вас наверняка уже есть неплохой терминал, или вы можете самостоятельно поставить любой, который вам нравится. Я вот люблю Sakura. Ещё я обычно меняю цветовую схему. Стандартные чёрные мне не очень нравятся, есть крутая схема Solarized. Как её устанавливать тоже зависит от вашего терминала.
Теперь настроим непосредственно шелл. Шелл — это оболочка, в которой выполняются команды. Он показывает вам так называемое приглашение, оно обычно состоит из имени пользователя, имени компьютера и пути к тому месту, где вы сейчас находитесь. И выполняет команды, которые вы в него вводите. Стандартный шелл выглядит так:
 Стандартное приглашение в шелле
Скучновато, правда? Первое, что мы сделаем — сменим оболочку с bash на zsh. Bash — это стандартная оболочка, которая поставляется в комплекте большинства систем. Zsh — это более современная оболочка со множеством плюшек. По сравнению с bash улучшены автодополнение, алиасы, хоткеи. Всё, что может bash, zsh может тоже, так что не вижу причин не переходить. У пользователей OS X zsh уже есть на компьютере, а пользователям Linux, скорее всего, нужно его установить. В Ubuntu и Debian это делается просто:
 Установка zsh в Ubuntu и Debian
Пользователи остальных систем наверняка справятся с установкой. Теперь нужно сделать, чтобы zsh был вашей оболочкой по умолчанию, то есть использовался каждый раз, когда вы открываете терминал. Для этого есть команда chsh (change shell):
 Ввод пароля при смене шелла
У вас спросят пароль администратора. По мере ввода на экране ничего изменяться не будет, просто напечатайте ваш пароль и нажмите Enter . Появится сообщение о том, что ваш шелл изменён:
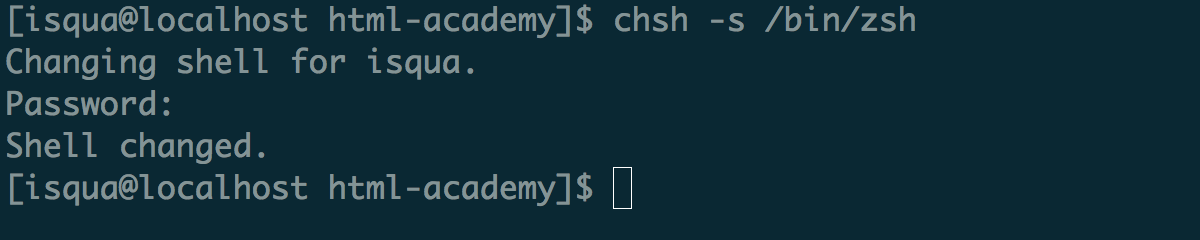 Смена оболочки по умолчанию
Теперь нужно выйти из системы и снова зайти. Когда вы откроете терминал, увидите приветственное сообщение zsh. Он предлагает вам ничего не делать, записать в свои настройки только комментарии, чтобы это сообщение не появлялось в следующий раз или пойти в меню настройки:
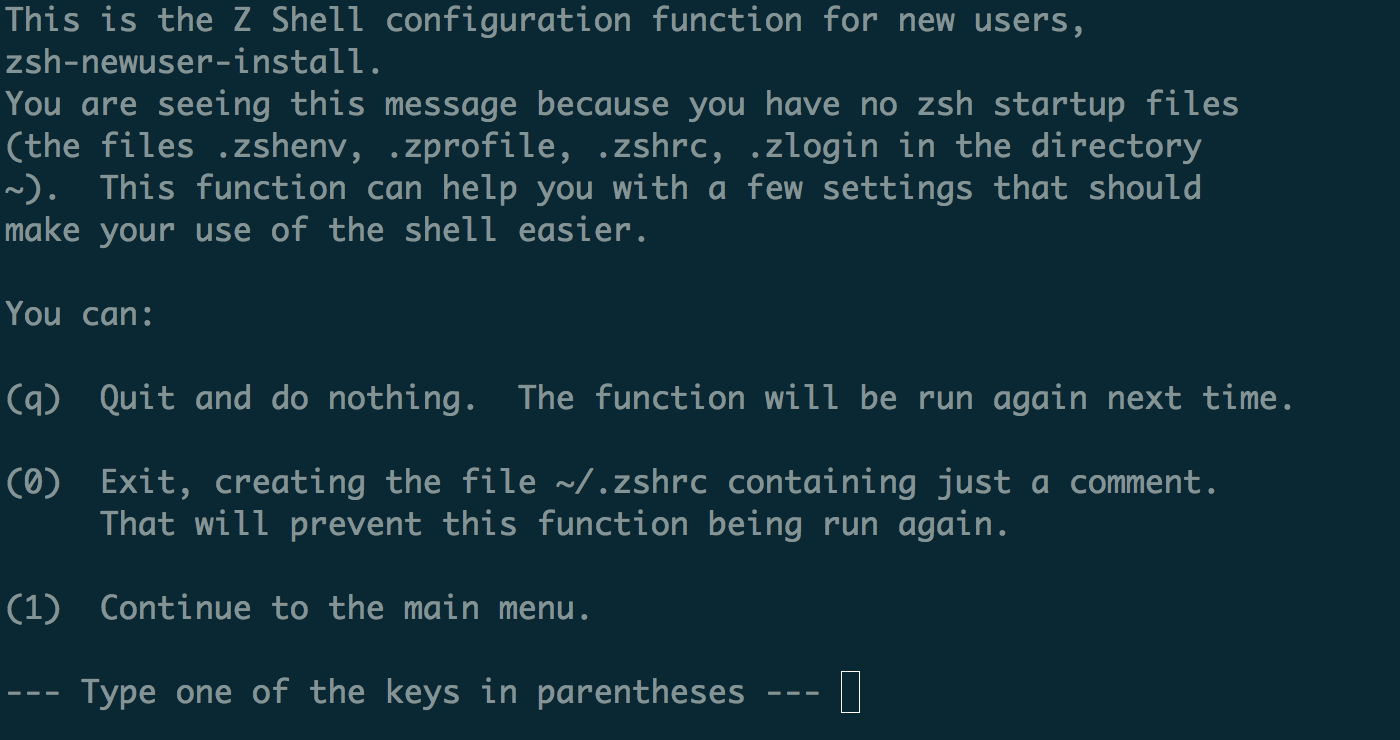 Приветствие от zsh
Мы, ничего не делая, выйдем (нажмём q ), потому что знаем секрет. Секрет в том, что не нужно писать длинный конфиг, если вы новый пользователь: частые проблемы и хотелки уже решили другие, и родилась такая замечательная штука — Oh My ZSH. Это набор плагинов и настроек, которые решают самые популярные задачи и делают ваш шелл просто офигенным. Установим его, следуя инструкциям с официального сайта:
Установка прошла, но ничего не поменялось? Надо закрыть терминал и снова открыть его, чтобы настройки, которые приехали к нам из oh-my-zsh, прочитались и применились. Закрыли-открыли, теперь видим новое приветствие:
 Приветствие шелла после установки Oh My ZSH!
Это стандартная тема oh-my-zsh под названием robbyrussell (по имени автора). Мы можем поставить любую из тем, которые поставляются с oh-my-zsh. Я, например, использую Bureau, когда-то я её писала, потому что не нашла подходящей. Чтобы поменять тему, напишите её название (маленькими буквами, как на странице со списком тем) в файле .zshrc . Он лежит в вашей домашней папке ( /Users/Ваш_логин или /home/ваш_логин ). Поскольку он начинается с точки, он скрыт. Включите отображение скрытых файлов. Тему нужно прописать в переменную ZSH_THEME , это в районе восьмой строки, вот так:
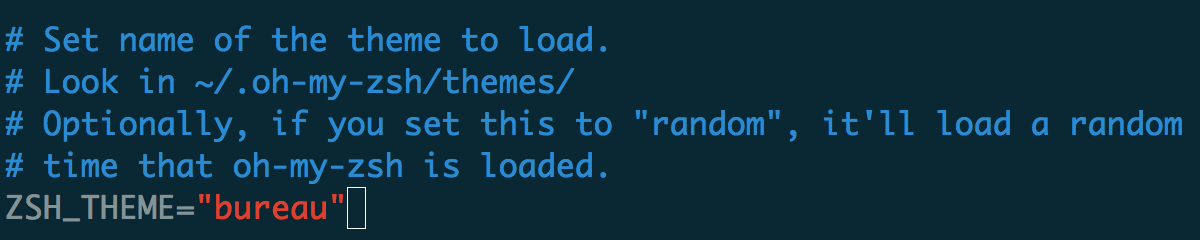 Меняем тему в конфиге с помощью переменной ZSH_THEME
Сохраните файл и снова перезапустите терминал (или откройте в нём новую вкладку). Теперь шелл выглядит по-новому:
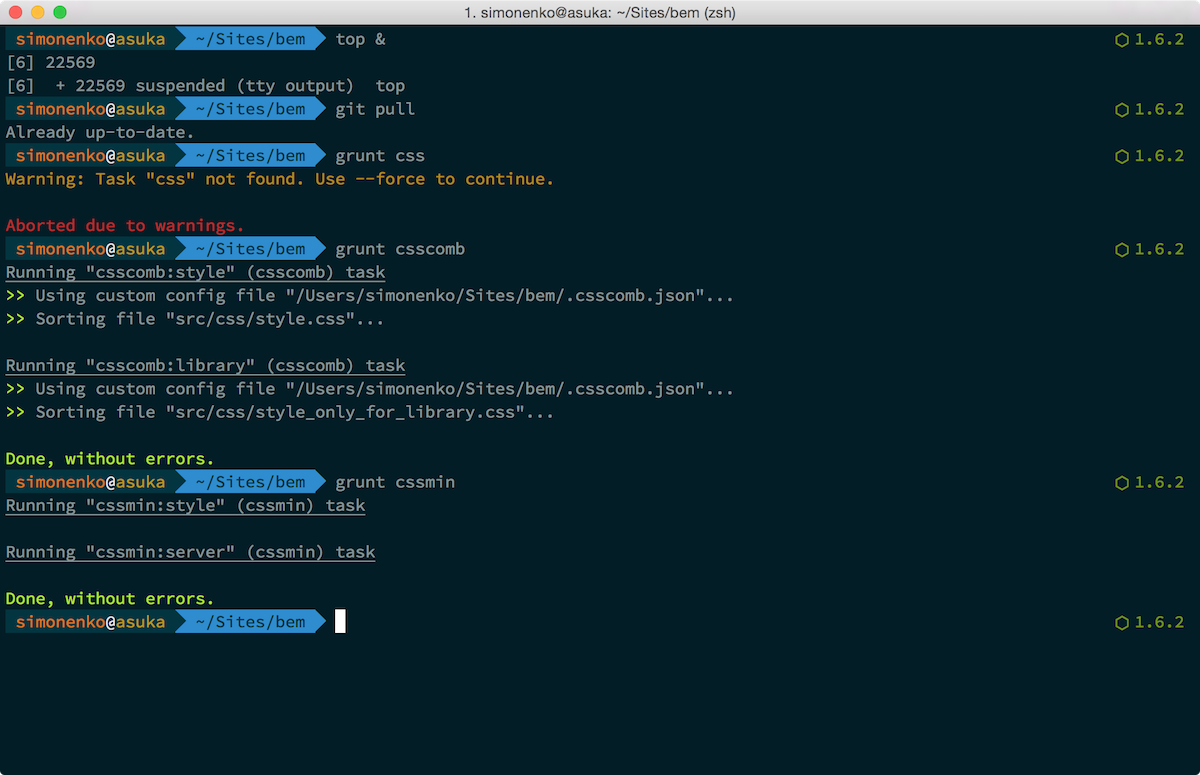
 Тема Bureau в шелле
Это тема Bureau. В верхней строчке сначала имя пользователя, потом имя машины, потом путь к папке, где пользователь сейчас находится. Справа текущее время. В следующей строке просто символы, которые обозначают, что ввод здесь, а справа после шестиугольника текущая версия Node.js, ветка Git (если пользователь сейчас в Git-репозитории), и кружочки, которые обозначают, что есть несохранённые изменения. В этой теме версия Node.js показывается только если вы используете Node Version Manager.
 Тема Agnoster в шелле
А это тема Лёши, можете её взять из github и сохранить в папке
/.oh-my-zsh/themes , или установить простой командой:
Не забудьте прописать тему meritt в вашем файле .zshrc .
Да и вообще, полистайте список тем и выберите ту, которая вам по душе. Или склейте свою из кусочков понравившихся тем, или даже напишите с нуля! Все темы лежат в папке
/.oh-my-zsh/themes . Делитесь вашими темами: выкладывайте скриншоты и ссылки на файлы тем.
Источник
50+ Terminal Commands for Beginners on Linux/OS X
Let’s learn the most common terminal commands that every Linux/OS X user should know. In this tutorial, we’ve drilled down some of the most important commands that are useful for beginners and essential for DevOps engineers and Sysadmins. With these terminal commands, one can easily do tasks like monitor system info, disk usage, file management, process management, configure/view network settings and a lot of other things.
If you’re working as a DevOps or SysAdmin or a C/C++ programmer on Linux, then these commands could even be more useful in automating a lot of your tasks. We’ve segregated them in five core areas. Please check from the table given below.
For those preparing for interviews should also go through the below Linux quiz to assess the level of their preparations.
Here is the table of content for quickly browsing through the terminal commands.
Table of Content .
50+ Terminal Commands – Linux/OS X Users.

1. Terminal Commands To Check System Memory.
1.1. The free command.
It’s the most frequently used command to track memory usage on Linux.
The “-m” option returns the usage data in MB format.
1.2. The
Another way to quickly check the memory consumption is by printing the command. You need root or access to run this command.
1.3. The command.
It reverts with the memory usage in the same way as the command does. But you need not be a root user to run this command.
1.4. The top command.
If you are in a situation, where the memory usage is between 90-100%. Then, you should use top command to determine the process responsible. Most of the time, you can verify the process consuming resources by looking at the or the columns in the top output.
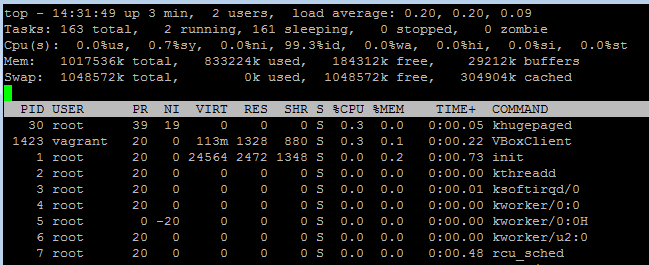 Running Top Command in Terminal
It also allows sorting on the columns. Press (Shift+O) to select a column via field letter. For example, press “a” letter to sort process with PID (Process ID).
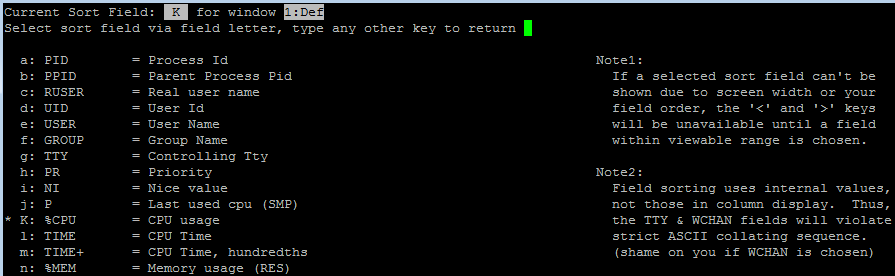 Sort Top Command Output
1.5. The command.
It’s an extension to the top command. And it provides several other options and details along with displaying the memory usage.
The top header in its output shows the CPU usage, RAM and swap statistics.
1.6. Additional Linux commands to isolate memory issues.
1. Print the top 10 processes consuming a lot of memory.
2. Kill a process while running the top command.
Run top and press “k”. It’ll prompt you for the process ID and ask for the signal to kill. You can enter the PID of your choice and provide 15 as the signal value.
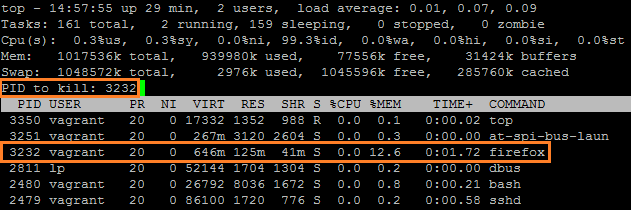 Using Top Command to Kill a Process.
3. Modify top command to print the absolute path in its output.
After running top, press “c” to display the processes with full path and arguments.
4. Sort “ps” output by memory usage, from high to low.
2. Terminal Commands To Check Disk/File Usage.
2.1. The du command.
It’s one of the standard Linux commands to retrieve the disk usage of files and folders.
1. If you wish to check the disk usage of a folder and its subfolder, then run the following command.
It displays the output in the form of disk blocks. To print in bytes, kilo bytes, mega or Gigabytes, use the “-h” option with du command.
2. To check the total space occupied by a directory, use the “-s” option with the du command.
3. Using “-c” switch will get the total size of the directory including the subdirectories printed at the last line. There is also an “-a” flag to display the usage of all files and folders.
4. With the “–exclude” switch, you can specify a file pattern. Then, the du command will filter the files matching the given pattern.
5. Locate the biggest files in the current directory and sub-directories.
6. Look out for the largest directories.
2.2. The df command.
Another Linux command to monitor disk space is df (disk free). Now, let’s see what can we do with it.
1. Print the disk usage of all the file systems.
2. Use a fixed memory block size.
By default, it prints memory blocks of 1K. But with the “-B” option, we can alter the default memory size.
3. Style output to human readable format.
Use “-h” option, it makes the display memory in the form of gigabytes, megabytes, etc.
4. Check the type of available file systems.
You can run the df command with “-T” option to show the type of all file systems.
You can even exclude a file system with -x option. Or provide a type with -t option, it’ll result in displaying the same kind of file systems.
2.3. Additional Terminal Commands for File Management.
There are some other useful tips that you can use to optimizing your disk management tasks.
1. Delete files marked for deletion but not yet deleted.
2. Search for files more than 100 MB.
3. Check files created within the last one week.
4. Remove files older than two weeks.
5. Monitor a log file for errors or some text.
3. Terminal Commands To Check on Running Processes.
3.1. The ps command.
It’s one of the most used Linux commands which returns a preview of the running processes along with their PID, CPU/RAM usage, and other details.
1. Check the Shell you are using.
2. Check the processes not owned by you.
grep -v option inverts the selection.
3. Remove grep command while filtering the process list.
4. Display all process including params and hierarchy.
5. List the files opened by a process.
6. Print the process running time since it started.
7. Check all threads of a running process.
3.2. The kill command.
Use case – When you’ve to stop a process behaving intermittently and which refuses to close itself. So the kill command comes for rescue in such conditions. Its syntax is as follows.
1. Terminate a process by ID.
The “-9” flag refers to KILL signal. Some of the other signals are HUP (-1), SIGINT (-2) and TERM (15).
3.2. The killall command.
Another Linux command which kills a process by name is as follows.
You can even kill multiple processes using the single command.
3.3. The STRACE command.
It is one of the Linux commands which allows watching a process execution. It intercepts the system calls and signals that a program exercises while running.
1. Trace a program using its PID.
2. Monitor a process for any specific system call.
3.4. The watch command.
Sometimes, we need to monitor a process at regular intervals. For example, tracking the progress of copying a large release build or folder. That’s where the watch command is useful.
1. Run ls command after every 1 second.
2. See the differences between previous and present output.
You can anytime press CTRL+z to take control back from the watch command.
4. Terminal Commands To Monitor & Manage Network.
4.1. The IFCONFIG and related commands.
The most common usage of command is to return the IP address of the system you are using. But you can also use it to initialize an interface, assign a new IP address and enable/disable the interface.
1. The below command will print the IP address of the current machine.
2. To print the information related to a particular interface, run the following.
3. Assign IP address and set gateway.
4. Enable/disable an interface.
4.2. Some nice ping command examples.
It’s basically to find out whether a machine on the network or the gateway is reachable. Here are some good examples.
1. Increase/decrease ping time interval.
2. Check if local I/F is active.
3. Update the size of the ping packet.
The above command changes the default packet size from 56 to 112.
4. Timeout a ping request.
5. Send X no. of packets and stop.
4.3. The TRACEROUTE command.
It’s for troubleshooting the network issues. It prints the no. of hops taken to reach the target.
4.4. The NETSTAT command.
This command allows a user to monitor both incoming and outgoing network connections. Most of the operating systems support this command. Let’s see some of its real-time applications.
1. Listing all TCP and UDP connections opened at a time.
2. List connections without resolving host, port and user name.
3. Listing only TCP connections.
4. Listing only UDP connections.
5. Display TCP connections in Listen state.
6. Display UDP connections in Listen state.
7. Display service names with PID.
8. Print routing table summary.
9. Retrieve IP address statistics.
10. Locate all programs in Listen state.
11. Find the port of a program is using.
12. Show all ports listening with process PID.
4.5. The dig command.
The full form of DIG command is domain information groper. It retrieves the DNS details like A record, CNAME, and MX records.
1. Display only MX Records.
2. Display only NS Records.
4.6. Miscellaneous network Linux commands.
1. Display all TCP sockets in use.
2. Resolve IP address from the hostname.
3. MTR – Top like traceroute command.
It combines the functionality of traceroute and ping tools. It examines the connectivity between the host and the given target system.
5. Linux Commands To Configure Terminal & Screen.
5.1. The screen command.
It might now be available on your system by default. So, to install it either use apt or yum as per the distribution you are using.
1. Start a screen session as the current user.
2. Reattach to a screen session.
3. Record a terminal session.
4. Play back a recorded terminal session.
5.2. Some Useful Terminal Command Shortcuts.
1. Open a new terminal.
2. Open a new tab in the existing terminal window.
3. Clear the screen.
4. Cache console output.
6. Some Important Terminal Commands for Quick Reference.
1. How to run a previous command as root?
2. How to find differences between two directories?
3. How to lock a directory.
The root user will still have access. To restore the permission, run the below command.
4. Smart cd commands.
5. How to replace same text in multiple files.
To replace the text Apple with Linux in all text files in current directory and down you can run this.
6. Listing files changed today.
Sometimes, we create a file during the day and forget what name we gave it. So here is the command to locate such files.
7. Shorten long commands.
Not all of us has the ability to memorize the long Linux commands. With the below command, we can assign user-friendly names in such cases.
8. Copy a file into multiple directories.
9. Disable incoming ping requests.
To block a flood of incoming pings, do the following.
To turn the above setting back, run the below command.
10. Some cool Nautilus tricks .
- Press CTRL+l to open a location.
- Use CTRL+up to open the parent directory.
- Press arrow keys to navigate through folders.
If you liked our explanation on the top terminal commands on Linux and Mac OS X, then do share it with others. Also, follow us on our social media (facebook/twitter) accounts.
Источник


