- How to Format Drive with Compatible File System for Mac and Windows?
- How can I make my external hard drive compatible with Mac and Windows?
- Two file systems compatible with Mac and Windows
- Two utilities to format a drive for Mac and Windows
- вњ” Format drive to exFAT via Diskpart
- вњ” Format drive via free partition formatting tool
- Conclusion
- How to Format a Hard Drive For Both Windows and Mac
- How to Format an External Drive in OS X
- How to Format an External Drive in Windows
- Как подружить Windows с файловой системой macOS
- У APFS есть один большой недостаток
- Как исправить ситуацию
- Как это работает
- Что еще есть интересного
How to Format Drive with Compatible File System for Mac and Windows?
Find out a common file system for Mac and Windows. Then format your external hard drive or USB flash drive with the file system to make your drive compatible with Mac and Windows.

By Bryce  / Last Updated December 8, 2020
How can I make my external hard drive compatible with Mac and Windows?
“I have two computers, one running Mac operating system, another running Windows. I want to copy and transfer files between the two computers using my portable external Western Digital hard drive that is originally formatted with NTFS. I have realized that NTFS drive is fully supported on Windows computer, but read only on Mac computer. That is to say, my external hard drive is unable to work well both in Mac and Windows. Is there anyone who can tell me how to make my hard drive compatible with Mac and Windows? Thanks a lot!”
Two file systems compatible with Mac and Windows
NTFS is the default file system for Windows operating system and HFS for Mac operating system. If you want to make your drive compatible with Mac and Windows, you need to format it with a common file system for Mac and Windows. FAT32 and exFAT can be compatible with Mac and Windows and you can choose one after realizing their respective merits and defects based on your demands:
FAT32 takes advantages in compatibility. It is compatible with various devices like DVD player, game console, etc. Apart from Mac and Windows, it can support Linux and Android. However, it is with significant defects: Single file size is up to 4GB and partition capacity is not beyond 2TB.
exFAT supports partition larger than 2TB and a single file over 4GB. But it is also with a defect: Compared with FAT32, the entire file system of exFAT is easier to be corrupted.
Two utilities to format a drive for Mac and Windows
From all above, you can have a general idea of FAT32 and exFAT file system. It is time to learn how to format your external hard drive or other external drives to a common file system for Mac and Windows.
вњ” Format drive to exFAT via Diskpart
In general, Windows built-in tools Disk Management and Diskpart can format drive to exFAT easily. However, in Disk Management, you’ll find that there is no exFAT option when you right-click the partition that you need to format and choose “Format Partition” if the partition is on an internal or external hard drive. Then, let’s see how to format a drive with exFAT using Diskpart utility.
PS.: Formatting will delete all data on the partition. It is advised to backup important data on the partition before formatting.
1. Connect your drive to working computer running Windows and make sure that it will be detected by operating system.
2. Open Run box by pressing “Windows” + “R” simultaneously and hitting “Enter”.
3. In the box, input “diskpart” and hit “Enter”.
4. In the Diskpart windows, type the command lines below and each command shall be followed by hitting “Enter” key:
(“n” is the disk number)
select partition m
(“m” is the partition number that’ll be formatting)
format fs: exfat

When you see Diskpart successfully formatted the volume, type “exit” and press “Enter
PS.: If you need to format the drive with FAT32, replace «format fs: exfat» with «format fs: fat32».
вњ” Format drive via free partition formatting tool
AOMEI Partition Assistant Standard is great partition formatting freeware, which offers you more file systems to choose during formatting. It allows you to format partition to exFAT, FAT32, NTFS, Ext2 and Ext3 and Ext4 on an external hard drive, internal hard drive, USB flash drive and SD card. It can work with Windows 10/8/8.1/7, XP, and Vista. And it can format large drive beyond 32GB to FAT32.
To format an external drive to file system compatible with Mac and PC, connect the drive to your computer, free download the software and follow the detailed steps given below (Take formatting hard drive to exFAT in Windows 7 for example):
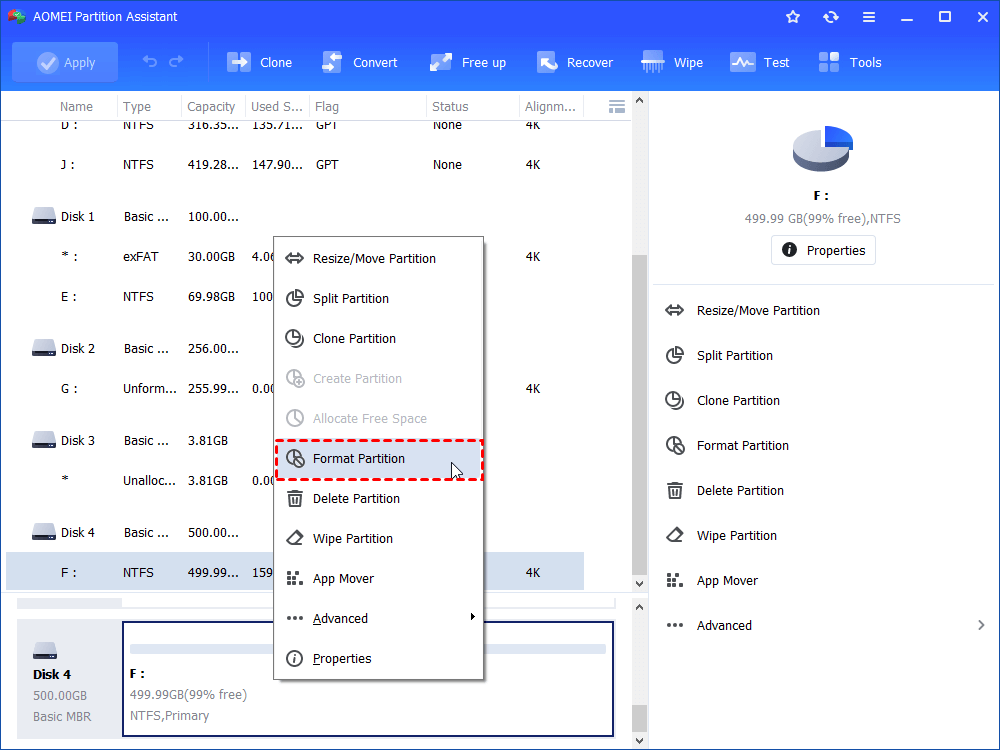
Step 1. Install and run it. In the main interface, right-click the partition on that need formatting and choose “Format Partition”.
Step 2. In this pop-up window, choose exFAT among listed file systems and click “OK”.
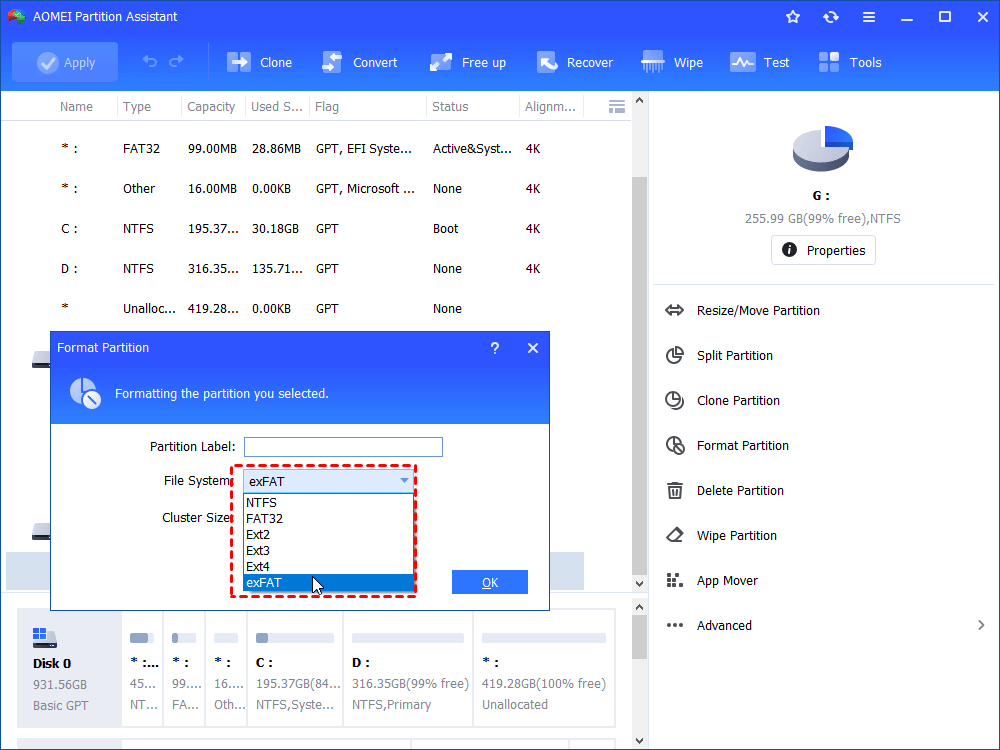
PS.: In this window, it is available to specify the Partition label to the partition and adjust cluster size.
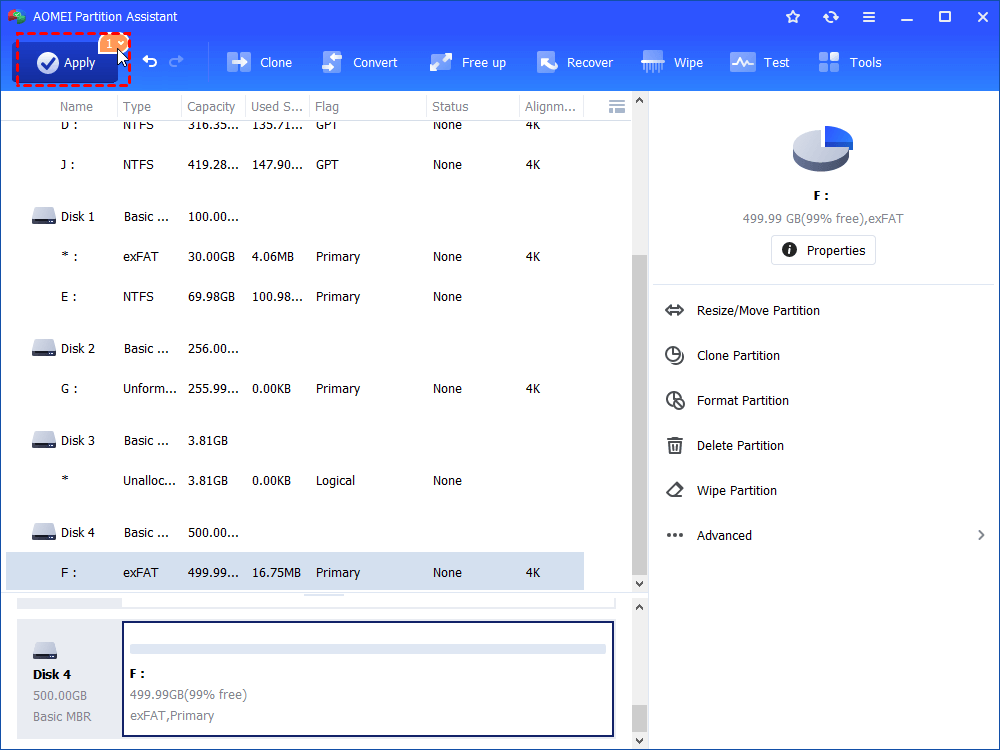
Step 3. Here you’ll go back to the main interface. Confirm formatting operation and click “Apply” > “Proceed” to perform this operation.
Notice: If there is no partition on your disk, you can create exFAT or FAT32 file system partition using “Create Partition” function.
Conclusion
It’s not a tough task to format your drive with a common file system for Mac and Windows. You can format it using Windows built-in tools or third-party partition formatting tool. In fact, AOMEI Partition Assistant Standard can provide you with more functions. For instance, it allows you to delete partition, resize partition and wipe partition, etc. And you can experience more features, covering converting to basic disk without losing data, recovering partition, and so on if you upgrade it to Professional version.
How to Format a Hard Drive For Both Windows and Mac
By Melanie Pinola 29 December 2015
Want to use one external drive for both your Windows PC and your Mac? One hurdle you’ll face is that, by default, these platforms use different filesystems. Windows uses NTFS and Mac OS uses HFS and they’re incompatible with each other. However, you can format the drive to work with both Windows and Mac by using the exFAT filesystem. Here’s how.
In this guide we’re using exFAT instead of FAT32, another filesystem that both Windows and Mac can read and write to, because FAT32 has a maximum 4GB file size limit whereas exFAT can work with files as large as 16EB (exabytes). exFAT also performs better than FAT32.
You can format the drive from either the Mac or the Windows machine. However, if you want to use part of the drive for OS X’s Time Machine backups, you should do this from the Mac, since there’s an extra step to make the drive compatible for Time Machine.
How to Format an External Drive in OS X
1. Connect the drive to the Mac.
2. Open Disk Utility. The easiest way to do that is hit CMD and the spacebar at the same time and type in Disk Utility to find the program.
3. Select the drive you want to format.

4. Click Erase.
If you don’t plan on using the drive for Time Machine, skip steps 5 to 11 below and continue with step 12.
5. Give the drive a descriptive name and leave the default settings: OS X Extended format and GUID partition map. These will format the drive in OS X’s HFS+ filetype so it will be compatible with Time Machine.
6. Click Erase and OS X will format the drive.
7. With the drive selected in Disk Utility, click Partition.
8. Enter the amount of space you want to set aside for Time Machine. In this example, we’re shrinking the Time Machine partition to 128 GB instead of allowing Time Machine to take up the whole drive.
9. Click Apply.
10. Select the new untitled partition so we can format it as exFAT for use with both Mac and Windows.
11. Click Erase.
12. Give the partition a name and select exFAT for the format.
13. Click Erase to finish.
Your exFAT-formatted drive or partition can now be used for both Windows and Mac. Note that using a drive frequently between Windows and Mac could increase the chances of file corruption, so make sure you have backups of the files on the shared drive and be extra careful about safely ejecting the drive before disconnecting it from your computer.
How to Format an External Drive in Windows
The instructions below are for Windows 10, but other versions of Windows from Windows 7 and up can also format an external drive as exFAT for use with Mac as well.
1. Connect the drive to your Windows PC.
2. Open the Disk Management tool. You can do that by typing «disk format» or «disk management» in Windows search or going to Control Panel > Administrative Tools > Create and format hard disk partitions.
3. Right-click on the external drive’s partition or unallocated space you want to format and choose New Simple Volume…
4. Follow the wizard to choose a volume size.
5. Assign a drive letter.
6. Choose exFAT as the file system in the Format Partition screen.
7. Give the volume a new name.
8. Click Next.
9. Click Finish.
Windows will format the drive as exFAT and you’ll be able to use the drive on both Windows and Mac.
Как подружить Windows с файловой системой macOS
APFS — файловая система, разработанная компанией Apple для замены использовавшейся ранее HFS+.
На данной файловой системе уже работают девайсы под управлением последних версий iOS и macOS.
У APFS есть один большой недостаток
Как и предыдущие версии файловых систем, разработанных Apple, APFS не поддерживается операционной системой Windows.
Если с родной для «окон» NTFS на Mac можно как минимум читать данные, то APFS не увидит ни один Windows-компьютер.
Об этом рано или поздно начинают задумываться все владельцы нескольких рабочих компьютеров с разными операционными системами или владельцы Mac, часто запускающие Windows через BootCamp.
Ну не на флешке же переносить данные из macOS.
Как исправить ситуацию

Простое и изящное решение проблемы предлагают ребята из Paragon Software, которые просто профи в подобных делах. Подружить враждующие файловые системы можно при помощи специальной утилиты APFS for Windows.
Программа стала логичным развитием Paragon HFS+ for Windows. Со старыми Mac, которые не обновляются до macOS Sierra, нужно использовать именно её.
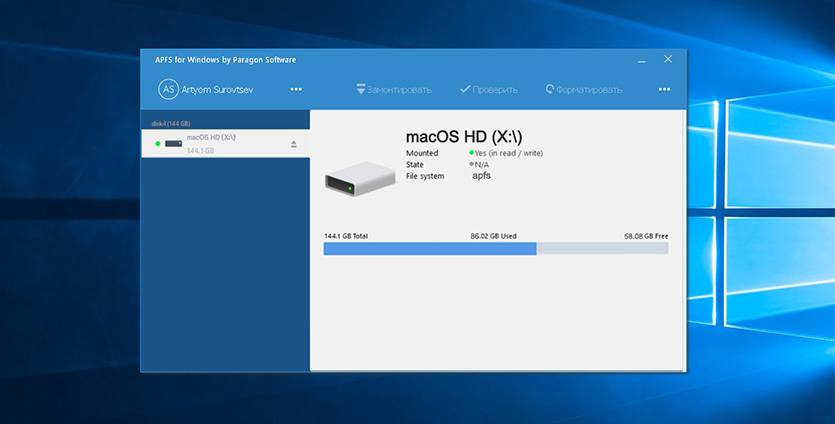
APFS for Windows представляет из себя системный драйвер для Windows, который и позволяет полноценно работать с накопителями, отформатированными в APFS. Поддерживается как чтение данных, так и запись на хорошей скорости.
Для доступа к важным данным предусмотрен режим монтирования read-only, защищающий оригиналы от перезаписи. APFS можно смонтировать даже из образа диска.
Поддерживаются как bit-to-bit raw copy диски, так и виртуальные диски популярных форматов VMDK,VDI,VHD,VHDX. Разработчики уже трудятся над поддержкой .E01 и .Ex0.
Как это работает

После установки Paragon APFS автоматически находит и монтирует все APFS-разделы и накопители, подключенные к компьютеру. После этого диски доступны в стандартном проводнике и сторонних файловых менеджерах.
Искать нужные данные довольно просто, ведь структура отображаемых папок будет идентична той, которую видит пользователь Mac.
Ничего сложного – разберется любая домохозяйка.
Что еще есть интересного
В macOS Mojave появилась поддержка шифрованных томов и APFS Container, которые составлены из нескольких физических разделов. Создатели Paragon APFS намерены добавить поддержку таких томов в следующих версиях продукта.
А вот прямая ссылка для загрузки.
Для тех, у кого «не приживется» файловая система APFS, в Paragon Software готовят приятный сюрприз — возможность конвертировать APFS обратно в HFS. Это уже тема для отдельной статьи.
Пока самое необходимое для всех активных пользователей macOS и Windows – APFS for Windows


