- How to create a bootable installer for macOS
- What you need to create a bootable installer
- Download macOS
- Use the ‘createinstallmedia’ command in Terminal
- Install Windows 10 on your Mac with Boot Camp Assistant
- What you need to install Windows 10 on Mac
- How to install Windows 10 on Mac
- 1. Check your Secure Boot setting
- 2. Use Boot Camp Assistant to create a Windows partition
- 3. Format the Windows (BOOTCAMP) partition
- 4. Install Windows
- 5. Use the Boot Camp installer in Windows
- How to switch between Windows and macOS
- Learn more
- Как создать загрузочную флешку macOS из Windows
- Как создать загрузочную флешку в Windows
- Как запустить Mac с флешки
- Артём Суровцев
- Коротко о гибком смартфоне Huawei Mate X
- Лучшие гаджеты и аксессуары за прошедшие 10 лет
- 👀 Читайте также . Всё по теме
- 5 лет пользуюсь macOS. Главные выводы после перехода с Windows
- Apple выпустила расширение Пароли iCloud для Google Chrome. Теперь Связка ключей работает на Windows
- В Windows появится поддержка Связки ключей iCloud, в том числе прямо в Chrome
- iMessage внезапно появился в Windows, но неофициально. Как работает новое приложение Beeper
- Появились первые изображения совершенно новой версии Windows
- Как пользоваться iPhone, если сломалась кнопка блокировки
- iPhone умеет читать голосом любые статьи на сайтах. Как это настроить
- Как вводить скрытые символы на клавиатуре iPhone. 30 полезных знаков и пиктограмм
- 🙈 Комментарии 13
How to create a bootable installer for macOS
You can use an external drive or secondary volume as a startup disk from which to install the Mac operating system.
These advanced steps are primarily for system administrators and others who are familiar with the command line. You don’t need a bootable installer to upgrade macOS or reinstall macOS, but it can be useful when you want to install on multiple computers without downloading the installer each time.
What you need to create a bootable installer
- A USB flash drive or other secondary volume formatted as Mac OS Extended, with at least 14GB of available storage
- A downloaded installer for macOS Big Sur, Catalina, Mojave, High Sierra, or El Capitan
Download macOS
- Download: macOS Big Sur, macOS Catalina, macOS Mojave, or macOS High Sierra
These download to your Applications folder as an app named Install macOS [ version name ]. If the installer opens after downloading, quit it without continuing installation. To get the correct installer, download from a Mac that is using macOS Sierra 10.12.5 or later, or El Capitan 10.11.6. Enterprise administrators, please download from Apple, not a locally hosted software-update server. - Download: OS X El Capitan
This downloads as a disk image named InstallMacOSX.dmg. On a Mac that is compatible with El Capitan, open the disk image and run the installer within, named InstallMacOSX.pkg. It installs an app named Install OS X El Capitan into your Applications folder. You will create the bootable installer from this app, not from the disk image or .pkg installer.
Use the ‘createinstallmedia’ command in Terminal
- Connect the USB flash drive or other volume that you’re using for the bootable installer.
- Open Terminal, which is in the Utilities folder of your Applications folder.
- Type or paste one of the following commands in Terminal. These assume that the installer is in your Applications folder, and MyVolume is the name of the USB flash drive or other volume you’re using. If it has a different name, replace MyVolume in these commands with the name of your volume.
Big Sur:*
Catalina:*
Mojave:*
High Sierra:*
El Capitan:
* If your Mac is using macOS Sierra or earlier, include the —applicationpath argument and installer path, similar to the way this is done in the command for El Capitan.
After typing the command:
- Press Return to enter the command.
- When prompted, type your administrator password and press Return again. Terminal doesn’t show any characters as you type your password.
- When prompted, type Y to confirm that you want to erase the volume, then press Return. Terminal shows the progress as the volume is erased.
- After the volume is erased, you may see an alert that Terminal would like to access files on a removable volume. Click OK to allow the copy to proceed.
- When Terminal says that it’s done, the volume will have the same name as the installer you downloaded, such as Install macOS Big Sur. You can now quit Terminal and eject the volume.


Install Windows 10 on your Mac with Boot Camp Assistant
With Boot Camp, you can install Microsoft Windows 10 on your Mac, then switch between macOS and Windows when restarting your Mac.
What you need to install Windows 10 on Mac
- MacBook introduced in 2015 or later
- MacBook Air introduced in 2012 or later
- MacBook Pro introduced in 2012 or later
- Mac mini introduced in 2012 or later
- iMac introduced in 2012 or later 1
- iMac Pro (all models)
- Mac Pro introduced in 2013 or later
The latest macOS updates, which can include updates to Boot Camp Assistant. You will use Boot Camp Assistant to install Windows 10.
64GB or more free storage space on your Mac startup disk:
- Your Mac can have as little as 64GB of free storage space, but at least 128GB of free storage space provides the best experience. Automatic Windows updates require that much space or more.
- If you have an iMac Pro or Mac Pro with 128GB of memory (RAM) or more, your startup disk needs at least as much free storage space as your Mac has memory. 2
An external USB flash drive with a storage capacity of 16GB or more, unless you’re using a Mac that doesn’t need a flash drive to install Windows.
A 64-bit version of Windows 10 Home or Windows 10 Pro on a disk image (ISO) or other installation media. If installing Windows on your Mac for the first time, this must be a full version of Windows, not an upgrade.
- If your copy of Windows came on a USB flash drive, or you have a Windows product key and no installation disc, download a Windows 10 disk image from Microsoft.
- If your copy of Windows came on a DVD, you might need to create a disk image of that DVD.

![]()
How to install Windows 10 on Mac
To install Windows, use Boot Camp Assistant, which is included with your Mac.
1. Check your Secure Boot setting
Learn how to check your Secure Boot setting. The default Secure Boot setting is Full Security. If you changed it to No Security, change it back to Full Security before installing Windows. After installing Windows, you can use any Secure Boot setting without affecting your ability to start up from Windows.
2. Use Boot Camp Assistant to create a Windows partition
Open Boot Camp Assistant, which is in the Utilities folder of your Applications folder. Follow the on-screen instructions.
- If you’re asked to insert a USB drive, plug your USB flash drive into your Mac. Boot Camp Assistant will use it to create a bootable USB drive for Windows installation.
- When Boot Camp Assistant asks you to set the size of the Windows partition, remember the minimum storage-space requirements in the previous section. Set a partition size that meets your needs, because you can’t change its size later.
3. Format the Windows (BOOTCAMP) partition
When Boot Camp Assistant finishes, your Mac restarts to the Windows installer. If the installer asks where to install Windows, select the BOOTCAMP partition and click Format. In most cases, the installer selects and formats the BOOTCAMP partition automatically.
4. Install Windows
Unplug any external devices that aren’t necessary during installation. Then click Next and follow the onscreen instructions to begin installing Windows.
5. Use the Boot Camp installer in Windows
After Windows installation completes, your Mac starts up in Windows and opens a ”Welcome to the Boot Camp installer” window. Follow the onscreen instructions to install Boot Camp and Windows support software (drivers). You will be asked to restart when done.
- If the Boot Camp installer never opens, open the Boot Camp installer manually and use it to complete Boot Camp installation.
- If you have an external display connected to a Thunderbolt 3 port on your Mac, the display will be blank (black, grey or blue) for up to 2 minutes during installation.
How to switch between Windows and macOS
Restart, then press and hold the Option (or Alt) ⌥ key during startup to switch between Windows and macOS.
Learn more
If you have one of these Intel-based Mac models using OS X El Capitan or later, you don’t need a USB flash drive to install Windows:
- MacBook introduced in 2015 or later
- MacBook Air introduced in 2017 or later 3
- MacBook Pro introduced in 2015 or later 3
- iMac introduced in 2015 or later
- iMac Pro (all models)
- Mac Pro introduced in late 2013 or later
For more information about using Windows on your Mac, open Boot Camp Assistant and click the Open Boot Camp Help button.
1. If you’re using an iMac (Retina 5K, 27-inch, Late 2014) or iMac (27-inch, Late 2013) or iMac (27-inch, Late 2012) with a 3TB hard drive and macOS Mojave or later, learn about an alert you might see during installation.
2. For example, if your Mac has 128GB of memory, its startup disk must have at least 128GB of storage space available for Windows. To see how much memory your Mac has, choose Apple menu > About This Mac. To see how much storage space is available, click the Storage tab in the same window.
3. These Mac models were offered with 128GB hard drives as an option. Apple recommends 256GB or larger hard drives so that you can create a Boot Camp partition of at least 128GB.
Information about products not manufactured by Apple, or independent websites not controlled or tested by Apple, is provided without recommendation or endorsement. Apple assumes no responsibility with regard to the selection, performance or use of third-party websites or products. Apple makes no representations regarding third-party website accuracy or reliability. Contact the vendor for additional information.
Как создать загрузочную флешку macOS из Windows
Когда компьютер Mac внезапно перестал запускаться, а резервной копии macOS под рукой нет, поможет чистая переустановка системы.
Если рядом есть другой Mac, то проблем с созданием загрузочной флешки не возникнет. Сейчас расскажем, как выкрутиться из ситуации с Windows-ПК.
? Спасибо re:Store за полезную информацию. ?
Как создать загрузочную флешку в Windows
1. Для создания флешки скачиваем приложение TransMac.
Утилита распространяете на сайте разработчика по цене $59. К счастью, есть бесплатный 15-дневный триал.
2. Теперь потребуется найти образ для установки macOS.
Официального способа скачать операционную систему из Windows нет. Придется либо искать друга с компьютером Mac, либо пользоваться известными всем сайтами.
Обратите внимание, что для работы утилиты TransMac нужен образ macOS в формате *.dmg
Если удастся найти друга с яблочным компьютером и скачать macOS из Mac App Store, будет проще у него же и сделать нагрузочную флешку по инструкции.
![]()
3. Когда образ скачан, а утилита установлена, запускаем TransMac от имени Администратора и соглашаемся на триальный период использования программы.
4. Подключаем к компьютеру флешку (понадобится накопитель емкостью 8ГБ и более)
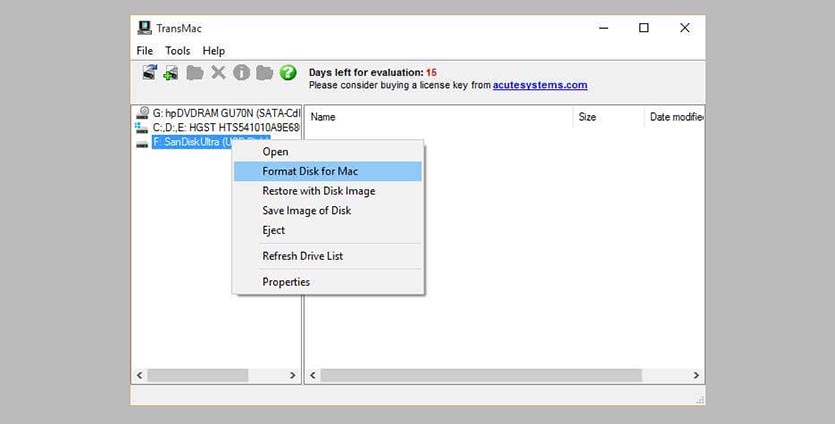
5. В боковом меню находим подключенный накопитель и через контекстное меню форматируем командой Format Disk for Mac.
Внимание! Данный процесс является необратимым, все данные с флешки будут удалены.
6. После окончания форматирования снова вызываем контекстное меню диска и выбираем пункт Restore with Disk Image.
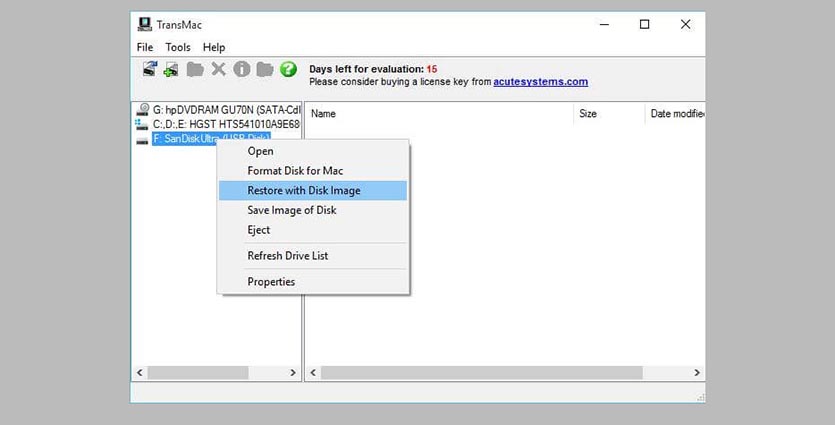
7. В открывшемся окне проводника указываем скачанный образ для установки macOS.
8. Подтверждаем запись образа на флешку и ждем 20-30 минут, пока процесс не завершится.
Все! Флешка для установки macOS готова.
Как запустить Mac с флешки
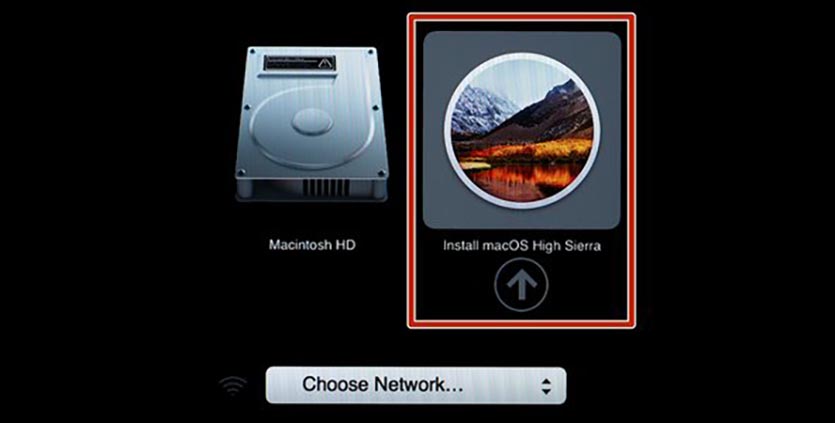
Подключаем наш накопитель к компьютеру Mac и включаем его с зажатой клавишей Alt (Option).
Обратите внимание, что для загрузки со внешних накопителей на Mac с чипом T2 нужно произвести некоторые манипуляции.
В меню выбора диска указываем флешку и производим установку macOS.
Следуйте подсказкам мастера установки и через несколько минут получите работоспособный Mac.
![]()
Артём Суровцев
Люблю технологии и все, что с ними связано. Верю, что величайшие открытия человечества еще впереди!
Коротко о гибком смартфоне Huawei Mate X
Лучшие гаджеты и аксессуары за прошедшие 10 лет
👀 Читайте также . Всё по теме

5 лет пользуюсь macOS. Главные выводы после перехода с Windows

Apple выпустила расширение Пароли iCloud для Google Chrome. Теперь Связка ключей работает на Windows
В Windows появится поддержка Связки ключей iCloud, в том числе прямо в Chrome

iMessage внезапно появился в Windows, но неофициально. Как работает новое приложение Beeper
Появились первые изображения совершенно новой версии Windows

Как пользоваться iPhone, если сломалась кнопка блокировки
iPhone умеет читать голосом любые статьи на сайтах. Как это настроить

Как вводить скрытые символы на клавиатуре iPhone. 30 полезных знаков и пиктограмм
🙈 Комментарии 13
Как наоборот сделать загрузочную флешку Windows 7 из-под Mac OS?
@sergeyc , чз Boot Camp Assistant
Shift-Option-⌘-R
Переустановка версии macOS, входившей в комплект поставки компьютера Mac, или ближайшей к ней версии из доступных.
Option+Command+R
Установит самую свежую доступную версию ОС.
Все работает от Интернет и флэшку делать не нужно!
@Phonerz , Артём хакинтош ставит. На Mac пока денег нет.
@near , аа! Спасибо за подсказку! Но, он забыл про этап на котором еще надо пропатчить установщик!
![]()
@Phonerz , до виндузятников никак не дойдет, что на маке не нужно трахаться с образами, флэшками, драйверами и прочим говнецом
![]()
Накой? Ненужны уже сто лет флешки, есть интернет – комп через него сам и восстановится.
Можете себе представить, есть места в мире где есть мак и нет интернета.
@Sviatoslav_Dmitrievsky , в мире нет мест без интернета. Либо там нет людей.
Это настолько устаревший способ, что в интернете в каждом форуме про использование TransMac масса комментариев, что он уже НЕ РАБОТАЕТ. Из личного опыта могу сказать, что работающую загрузочную флешку с TransMac вы можете создать только с Lion. С более новыми OS этого не получится. С сайта Apple вы сможете скачать системы только начиная с EL Capitan. Системы выше High Sierra уже не скачивается в виде dmg образа. Если не прав, то поправьте.
Я делаю не так. Загрузочная флешка не нужна. В роли загрузочной флешки я использую 16Гб ssd диска (на время установки).
Для этого нужно сделать так:
1. Скачать из App Store последнюю прошивку и поместить прошивку (расширение файла – .app) в раздел “Программы” (если начнется установка системы – остановить установку).
2. Запускаем “дисковую утилиту” и временно выделяем 16gb пространства для загрузочного образа, для этого жмем “вид”-“показывать все устройства” и выбираем контейнер disk1. Потом жмем “разбить на разделы”, затем снова жмем вкладку “разбить на разделы”, потом жмем “плюс”, ставим 16gb размер диска, вводим имя раздела “16Gb” (без кавычек), формат выбираем Mac OS Extended (журналируемый), а потом жмем “применить”.
3. Запускаем Терминал и копируем такую строку:
sudo /Applications/Install\ macOS\ Catalina.app/Contents/Resources/createinstallmedia –volume /Volumes/16Gb и нажать “Enter” (ввести пароль администратора). После этого создастся загрузочный образ на выделенном разделе ssd.
4. Потом перезагружаем и с нажатым alt выбираем запуск системы с созданного образа. Когда запустится консоль установки системы, выбрать “дисковую утилиту” и стираем диск, на котором стояла система в формат APFS, потом продолжить установку системы на уже отформатированный диск.
5. Если место на ssd жалко, то после установки системы стираем диск “16Gb” и в разделе “разбить диски” объединяем эти разделы и останется один общий раздел на диске ssd.
боже, чтобы сделать загрузочную флешку в macOS, нужно купить хероту за 59$ . Оо


