- Start up your Mac in Windows or macOS with Boot Camp
- Set the default operating system
- Restart in macOS
- Restart your Mac in macOS or Windows
- How to start up in macOS from Windows
- How to start up in Windows from macOS
- Learn more
- Install Windows 10 on your Mac with Boot Camp Assistant
- What you need to install Windows 10 on Mac
- How to install Windows 10 on Mac
- 1. Check your Secure Boot setting
- 2. Use Boot Camp Assistant to create a Windows partition
- 3. Format the Windows (BOOTCAMP) partition
- 4. Install Windows
- 5. Use the Boot Camp installer in Windows
- How to switch between Windows and macOS
- Learn more
- How to Dual-Boot Windows and macOS on a Mac
- What You’ll Need
- Install Windows 10 on Your Mac
- Set the Default Startup OS or Toggle Between OS X and Windows
- How to Make a Windows 10 USB Using Your Mac — Build a Bootable ISO From Your Mac’s Terminal
- Quincy Larson
- Step 1: Download the Windows 10 ISO file
- Step 2: Insert your USB storage drive into your Mac
- Step 3: Use the diskutil command to identify which drive your USB is mounted on
- Step 4: Format your USB Drive to work with Windows
- Step 5: Use hdiutil to mount the Windows 10 folder and prepare it for transfer.
- Step 6: Copy the Windows 10 ISO over to your USB Drive
- Step 7: Put your USB into your new PC and start loading Windows
- Quincy Larson
Start up your Mac in Windows or macOS with Boot Camp
After you use Boot Camp Assistant to install Windows on your Intel-based Mac, you can set the default operating system to either macOS or Windows. The default operating system is the one you want to use when you turn on or restart your Mac.
Set the default operating system
In Windows on your Mac, click  in the right side of the taskbar, click the Boot Camp icon
  , then choose Boot Camp Control Panel.
If a User Account Control dialog appears, click Yes.
Select the startup disk that has the default operating system you want to use.
If you want to start up using the default operating system now, click Restart. Otherwise, click OK.
You can’t change your startup volume to an external drive while you’re using Windows.
To learn how to change the default operating system using macOS, see Get started with Boot Camp.
Restart in macOS
In Windows on your Mac, do one of the following:
Restart using Startup Manager: Restart your Mac, then immediately press and hold the Option key. When the Startup Manager window appears, release the Option key, select your macOS startup disk, then press Return.
If you’re using a Mac notebook computer with an external keyboard, make sure you press and hold the Option key on the built-in keyboard.
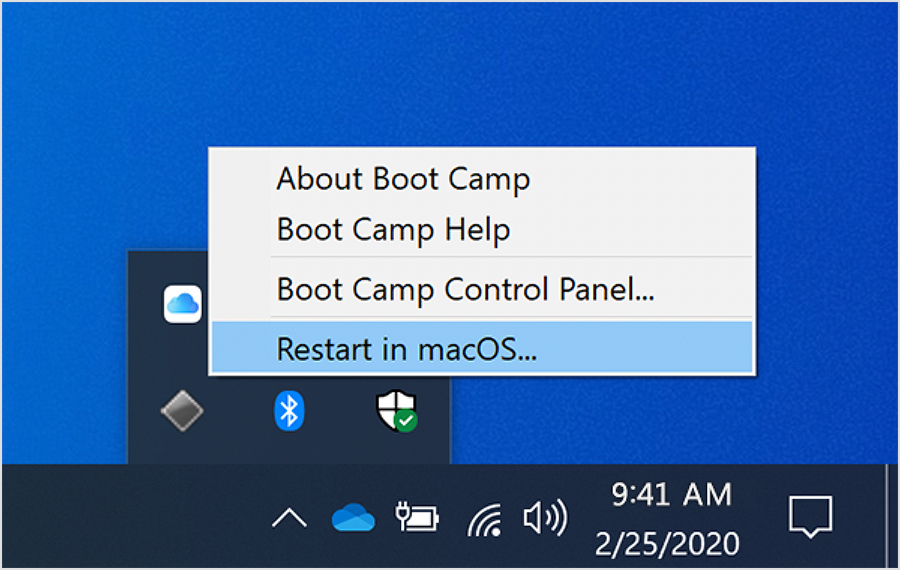
Restart using Boot Camp Control Panel: Click in the right side of the taskbar, click the Boot Camp icon , then choose Restart in macOS.
This also sets the default operating system to macOS.
For more information about restarting in macOS, see the Apple Support article Restart your Mac in macOS or Windows.
Restart your Mac in macOS or Windows
After installing Microsoft Windows on your Mac, you can choose whether your Mac starts up in macOS or Windows.
How to start up in macOS from Windows
- From the notification area on the right side of the Windows taskbar, click to show hidden icons.
- Click the Boot Camp icon .
- From the menu shown, choose Restart in macOS.
If you haven’t installed the latest Boot Camp updates, you might get the message ”Could not locate the OS X boot volume.»
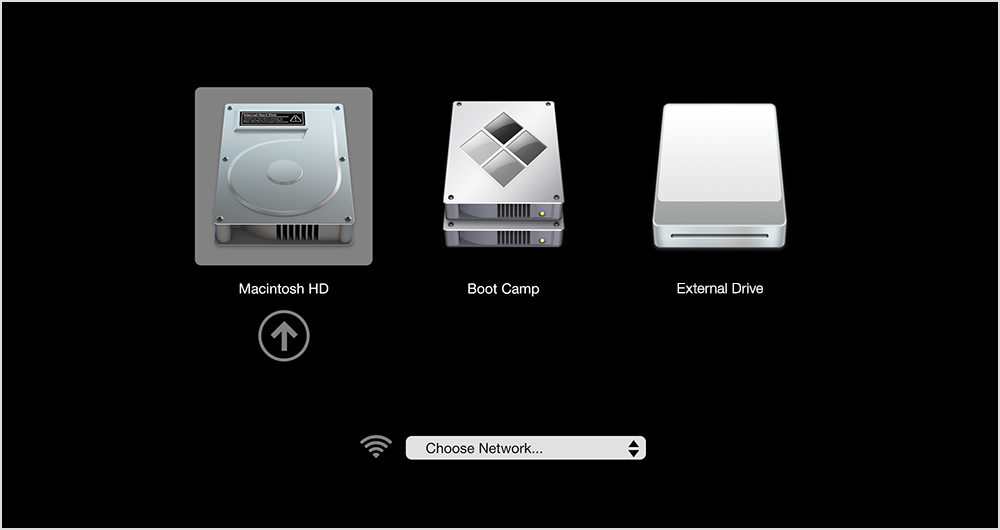
Or use Startup Manager as your Mac starts up:
- Restart your Mac from the Start menu in Windows.
- Press and hold the Option (or Alt) ⌥ key as your Mac begins to restart.
- Select your Mac startup volume (Macintosh HD) in the Startup Manager window, then press Return or click the up arrow:
How to start up in Windows from macOS
- Use Startup Manager to choose your Windows (Boot Camp) volume during startup.
- Or select your Boot Camp volume in Startup Disk preferences, then restart.
Learn more
- If you’re having difficulty using VoiceOver or another screen reader to complete these steps, please contact Apple Support.
- Learn how to install Windows 10 on your Mac.
Information about products not manufactured by Apple, or independent websites not controlled or tested by Apple, is provided without recommendation or endorsement. Apple assumes no responsibility with regard to the selection, performance, or use of third-party websites or products. Apple makes no representations regarding third-party website accuracy or reliability. Contact the vendor for additional information.
Install Windows 10 on your Mac with Boot Camp Assistant
With Boot Camp, you can install Microsoft Windows 10 on your Mac, then switch between macOS and Windows when restarting your Mac.
What you need to install Windows 10 on Mac
- MacBook introduced in 2015 or later
- MacBook Air introduced in 2012 or later
- MacBook Pro introduced in 2012 or later
- Mac mini introduced in 2012 or later
- iMac introduced in 2012 or later 1
- iMac Pro (all models)
- Mac Pro introduced in 2013 or later
The latest macOS updates, which can include updates to Boot Camp Assistant. You will use Boot Camp Assistant to install Windows 10.
64GB or more free storage space on your Mac startup disk:
- Your Mac can have as little as 64GB of free storage space, but at least 128GB of free storage space provides the best experience. Automatic Windows updates require that much space or more.
- If you have an iMac Pro or Mac Pro with 128GB of memory (RAM) or more, your startup disk needs at least as much free storage space as your Mac has memory. 2
An external USB flash drive with a storage capacity of 16GB or more, unless you’re using a Mac that doesn’t need a flash drive to install Windows.
A 64-bit version of Windows 10 Home or Windows 10 Pro on a disk image (ISO) or other installation media. If installing Windows on your Mac for the first time, this must be a full version of Windows, not an upgrade.
- If your copy of Windows came on a USB flash drive, or you have a Windows product key and no installation disc, download a Windows 10 disk image from Microsoft.
- If your copy of Windows came on a DVD, you might need to create a disk image of that DVD.

![]()
How to install Windows 10 on Mac
To install Windows, use Boot Camp Assistant, which is included with your Mac.
1. Check your Secure Boot setting
Learn how to check your Secure Boot setting. The default Secure Boot setting is Full Security. If you changed it to No Security, change it back to Full Security before installing Windows. After installing Windows, you can use any Secure Boot setting without affecting your ability to start up from Windows.
2. Use Boot Camp Assistant to create a Windows partition
Open Boot Camp Assistant, which is in the Utilities folder of your Applications folder. Follow the on-screen instructions.
- If you’re asked to insert a USB drive, plug your USB flash drive into your Mac. Boot Camp Assistant will use it to create a bootable USB drive for Windows installation.
- When Boot Camp Assistant asks you to set the size of the Windows partition, remember the minimum storage-space requirements in the previous section. Set a partition size that meets your needs, because you can’t change its size later.
3. Format the Windows (BOOTCAMP) partition
When Boot Camp Assistant finishes, your Mac restarts to the Windows installer. If the installer asks where to install Windows, select the BOOTCAMP partition and click Format. In most cases, the installer selects and formats the BOOTCAMP partition automatically.
4. Install Windows
Unplug any external devices that aren’t necessary during installation. Then click Next and follow the onscreen instructions to begin installing Windows.
5. Use the Boot Camp installer in Windows
After Windows installation completes, your Mac starts up in Windows and opens a ”Welcome to the Boot Camp installer” window. Follow the onscreen instructions to install Boot Camp and Windows support software (drivers). You will be asked to restart when done.
- If the Boot Camp installer never opens, open the Boot Camp installer manually and use it to complete Boot Camp installation.
- If you have an external display connected to a Thunderbolt 3 port on your Mac, the display will be blank (black, grey or blue) for up to 2 minutes during installation.
How to switch between Windows and macOS
Restart, then press and hold the Option (or Alt) ⌥ key during startup to switch between Windows and macOS.
Learn more
If you have one of these Intel-based Mac models using OS X El Capitan or later, you don’t need a USB flash drive to install Windows:
- MacBook introduced in 2015 or later
- MacBook Air introduced in 2017 or later 3
- MacBook Pro introduced in 2015 or later 3
- iMac introduced in 2015 or later
- iMac Pro (all models)
- Mac Pro introduced in late 2013 or later
For more information about using Windows on your Mac, open Boot Camp Assistant and click the Open Boot Camp Help button.
1. If you’re using an iMac (Retina 5K, 27-inch, Late 2014) or iMac (27-inch, Late 2013) or iMac (27-inch, Late 2012) with a 3TB hard drive and macOS Mojave or later, learn about an alert you might see during installation.
2. For example, if your Mac has 128GB of memory, its startup disk must have at least 128GB of storage space available for Windows. To see how much memory your Mac has, choose Apple menu > About This Mac. To see how much storage space is available, click the Storage tab in the same window.
3. These Mac models were offered with 128GB hard drives as an option. Apple recommends 256GB or larger hard drives so that you can create a Boot Camp partition of at least 128GB.
Information about products not manufactured by Apple, or independent websites not controlled or tested by Apple, is provided without recommendation or endorsement. Apple assumes no responsibility with regard to the selection, performance or use of third-party websites or products. Apple makes no representations regarding third-party website accuracy or reliability. Contact the vendor for additional information.
How to Dual-Boot Windows and macOS on a Mac
By Melanie Pinola 19 January 2018
Mac vs. Windows. Windows vs. Mac. Why choose when you can get the best of both worlds by dual-booting? Here’s how to install Windows on your Mac using Boot Camp so you can jump back and forth between the two operating systems on the same computer.

What You’ll Need
Before you start, make sure you have enough space on your hard drive for both Windows and Mac. We recommend at least 30GB for each, but the more space you have, the better. You’ll also need a USB flash drive (4GB or larger) and a Windows 10 ISO disk image, which you can download here from Microsoft, and a valid Windows 10 license. Finally, make sure your Mac model can support Windows 10 in Boot Camp—check this list to find out.
Install Windows 10 on Your Mac
In the steps below, we’ll use Boot Camp Assistant to create a bootable USB drive and install Windows 10 on a new partition. Then you’ll be able to choose which OS you want to use whenever you start the Mac up.
1. Download the Windows 10 ISO disk image from Microsoft using this link. Choose the 64-bit version of Windows. Also, some people, including myself, have gotten an error message if the ISO image is saved to your default Downloads folder, so save the ISO image to your Documents folder or somewhere else to avoid problems.
2. Open Boot Camp Assistant. You’ll find this in the Utilities folder or you can hit CMD + Spacebar to search for «Boot Camp Assistant.»
3. Click Continue at the Introduction screen.
4. Click Continue again at the Select Tasks screen.
5. Choose the Windows ISO image and select the destination USB drive. Note that the USB drive will be reformatted, so make sure you have a copy of any of the files on it somewhere else before proceeding.
6. Click Continue and then Continue again. Your Mac will format the USB drive and create the Windows installation media.
7. Click Install to accept the partition size for each OS. By default, Windows will have a 32GB partition, but you could also click the Divide Equally button to divide your Mac’s hard drive space equally between OS X and Windows.
7. Follow the prompts to finish installing Windows. The Mac will need to restart to complete the process and will automatically boot into Windows 10 when it’s done.
Set the Default Startup OS or Toggle Between OS X and Windows
Once you have Windows installed, you can set the default OS that will start each time you boot your Mac. To do this, head to the Startup Disk preference setting in Settings.
Every time the Mac starts, you can also toggle between OS X and Windows by holding down the Option (Alt) key immediately upon startup.
How to Make a Windows 10 USB Using Your Mac — Build a Bootable ISO From Your Mac’s Terminal

Quincy Larson

Most new PCs don’t come with DVD drives anymore. So it can be a pain to install Windows on a new computer.
Luckily, Microsoft makes a tool that you can use to install Windows from a USB storage drive (or «thumbdrive» as they are often called).
But what if you don’t have a second PC for setting up that USB storage drive in the first place?
In this tutorial we’ll show you how you can set this up from a Mac.
Step 1: Download the Windows 10 ISO file
You can download the ISO file straight from Windows. That’s right — everything we’re going to do here is 100% legal and sanctioned by Microsoft.
If you want an English-language version of the latest update of Windows 10, you can download the ISO here.
If you have a relatively new computer, you probably want the 64-bit version. If you’re not sure, go with the 32-bit version to be safe.
If you want a non-English-language version of Windows, or want to get an older update version, download the ISO here instead.
Step 2: Insert your USB storage drive into your Mac
The ISO file is only about 5 gigabytes, but I recommend you use a USB drive with at least 16 gigabytes of space just in case Windows needs more space during the installation process.
I bought a 32 gigabyte USB drive at Walmart for only $3, so this shouldn’t be very expensive.
Stick your USB drive into your Mac. Then open your terminal. You can do this using MacOS Spotlight by pressing both the ⌘ and Space bar at the same time, then typing «terminal» and hitting enter.
Don’t be intimidated by the command line interface. I’m going to tell you exactly which commands to enter.
Step 3: Use the diskutil command to identify which drive your USB is mounted on
Open Mac Spotlight using the ⌘ + space keyboard shortcut. Then type the word «terminal» and select Terminal from the dropdown list.
Paste the following command into your terminal and hit enter:
You will see output like this (note — your Mac’s terminal may be black text on a white background if you haven’t customized it).
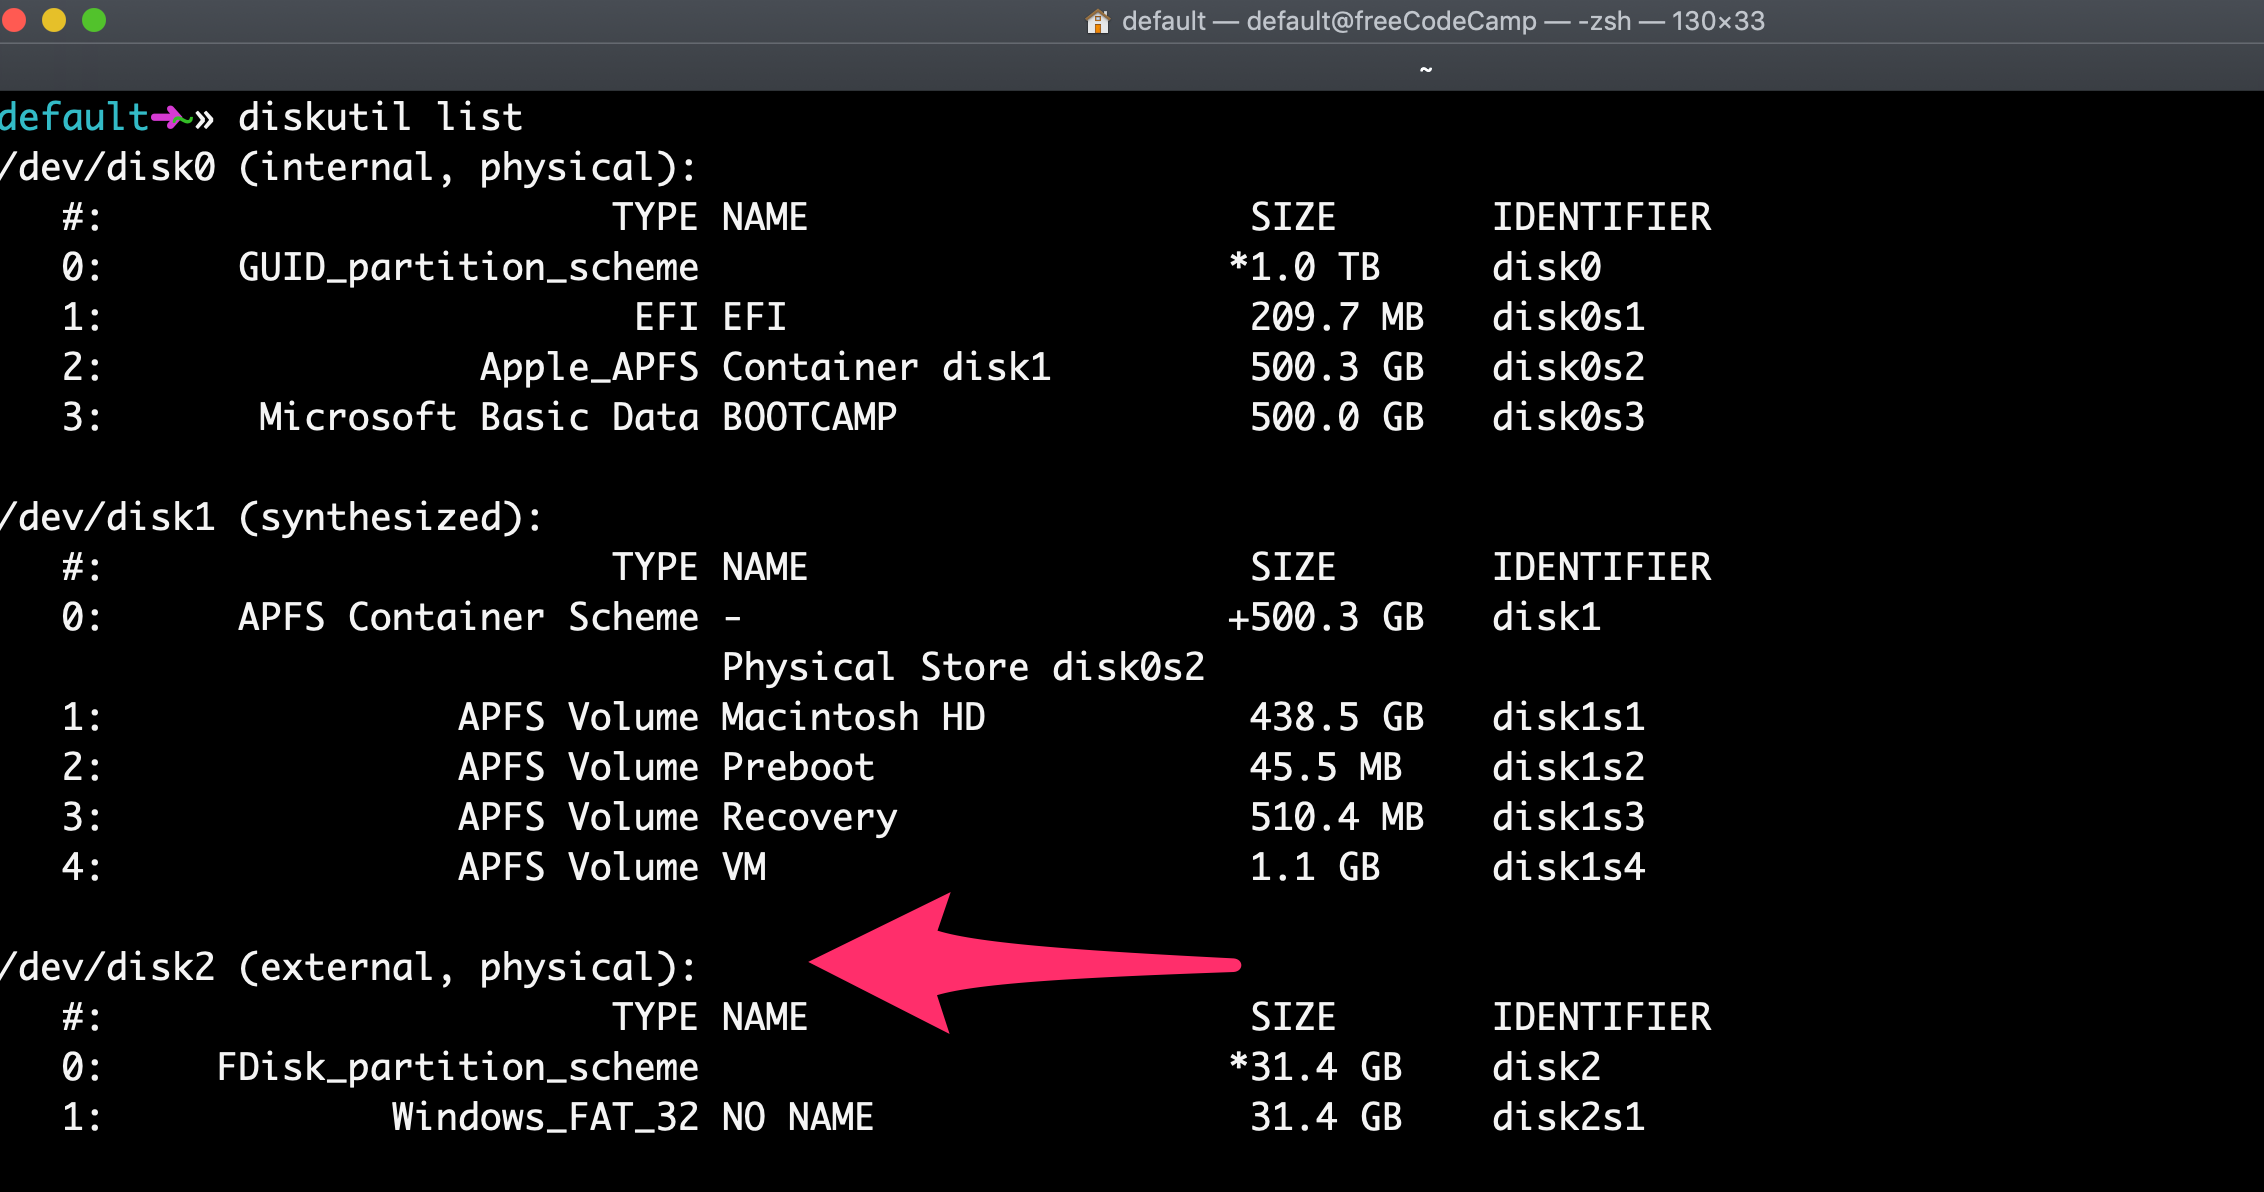
Copy the text I point to here. It will probably be something like
Step 4: Format your USB Drive to work with Windows
Next format your USB drive to Windows FAT32 format. This is a format that Windows 10 will recognize.
Note that you should replace the disk2 with the name of the your drive from step 3 if it wasn’t disk2 . (It may be disk3 or disk4 ).
Run this command using the correct disk number for your USB:
diskutil eraseDisk MS-DOS «WIN10» GPT /dev/disk2
Then you’ll see terminal output like this.
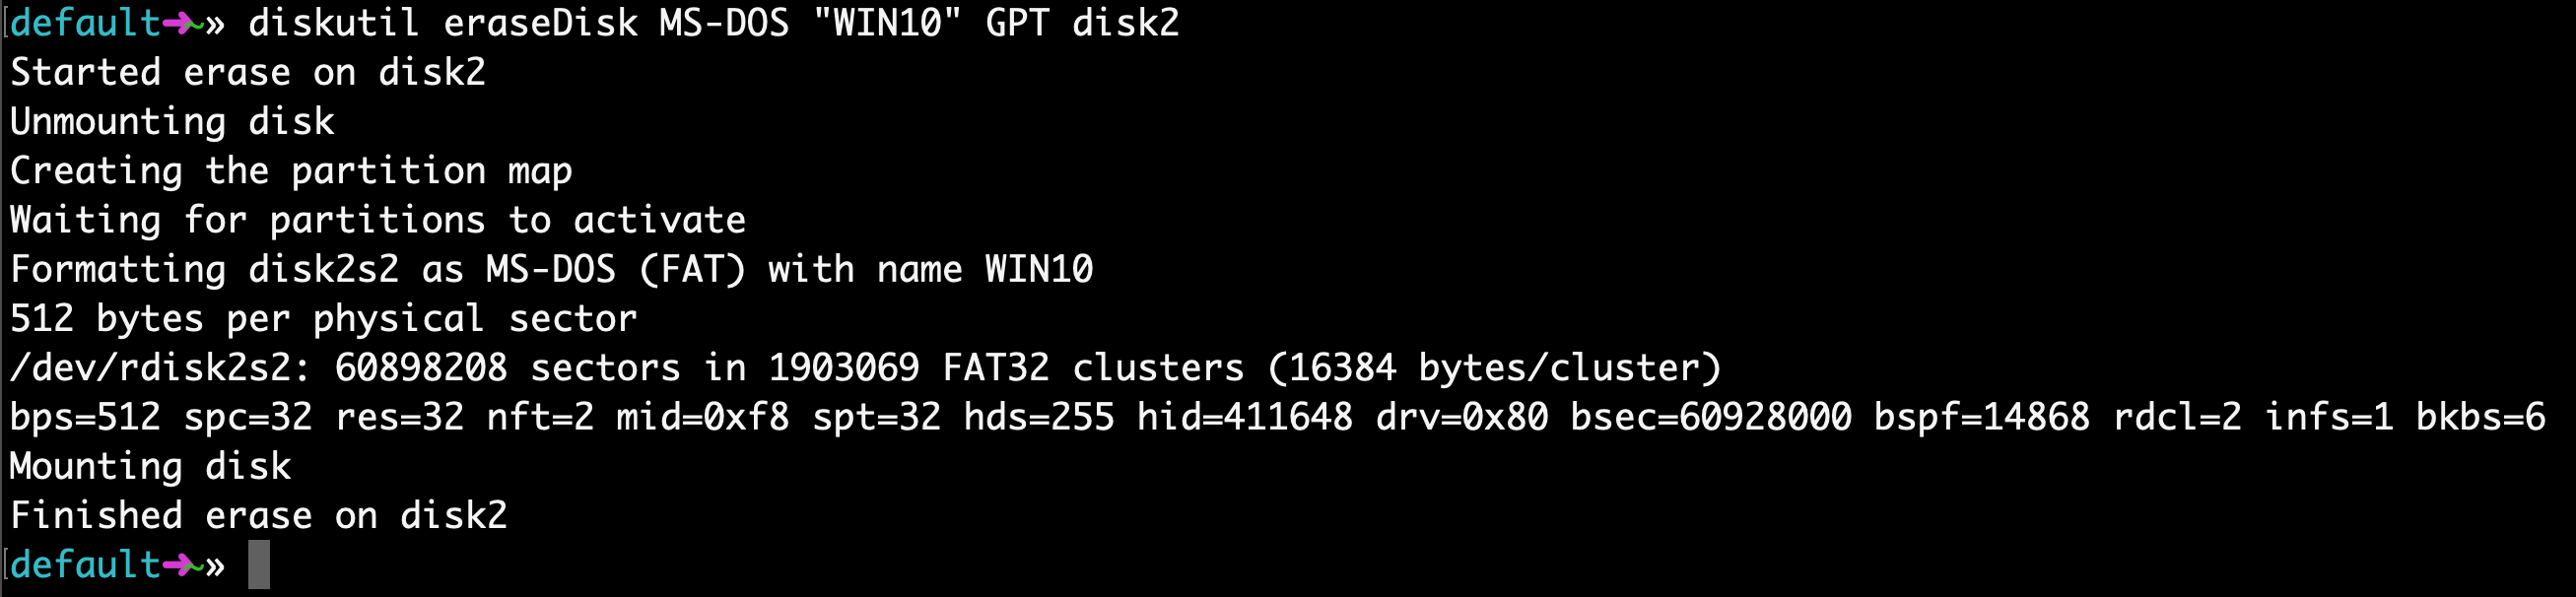
This will probably only take about 20 seconds on a newer computer, but may take longer on an older computer.
Note that for some hardware, you may instead need to run this command, which uses the MBR format for partitioning instead of GPT. Come back and try this command if step 7 fails, then redo steps 5, 6, and 7:
Step 5: Use hdiutil to mount the Windows 10 folder and prepare it for transfer.
Now we’re going to prep our downloaded ISO file so we can copy it over to our USB drive.
You will need to check where your downloaded Windows 10 ISO file is and use that. But your file is probably located in your
/Downloads folder with a name of Win10_1903_V1_English_x64.iso .
Step 6: Copy the Windows 10 ISO over to your USB Drive
Update April 2020: One of the files in the Windows 10 ISO – install.wim – is now too large to copy over to a FAT-32 formatted USB drive. So I’ll show you how to copy it over separately.
Thank you to @alexlubbock for coming up with this workaround.
First run this command to copy over everything but that file:
rsync -vha —exclude=sources/install.wim /Volumes/CCCOMA_X64FRE_EN-US_DV9/* /Volumes/WIN10
Then run this command to install Homebrew (if you don’t have it installed on your Mac yet):
/usr/bin/ruby -e «$(curl -fsSL https://raw.githubusercontent.com/Homebrew/install/master/install)»
Then use Homebrew to install a tool called wimlib with this terminal command:
brew install wimlib
Then go ahead and create the directory that you’re going to write the files into:
Then run this command. Note that this process may take several hours, you may see 0% progress until it finishes. Don’t abort it. It will use wimlib to split the install.wim file into 2 files less than 4 GB each (I use 3.8 GB in the following command), then copy them over to your USB:
wimlib-imagex split /Volumes/CCCOMA_X64FRE_EN-US_DV9/sources/install.wim /Volumes/WIN10/sources/install.swm 3800
Once that’s done, you can eject your USB from your Mac inside Finder. Note that Windows will automatically rejoin these files later when you’re installing.
Step 7: Put your USB into your new PC and start loading Windows
Congratulations — your computer now should boot directly from your USB drive. If it doesn’t, you may need to check your new PC’s BIOS and change the boot order to boot from your USB drive.
Windows will pop up a screen and start the installation process.
Enjoy your new PC, and your newly-installed copy of Windows.
Quincy Larson
The teacher who founded freeCodeCamp.org.
If you read this far, tweet to the author to show them you care. Tweet a thanks
Learn to code for free. freeCodeCamp’s open source curriculum has helped more than 40,000 people get jobs as developers. Get started
freeCodeCamp is a donor-supported tax-exempt 501(c)(3) nonprofit organization (United States Federal Tax Identification Number: 82-0779546)
Our mission: to help people learn to code for free. We accomplish this by creating thousands of videos, articles, and interactive coding lessons — all freely available to the public. We also have thousands of freeCodeCamp study groups around the world.
Donations to freeCodeCamp go toward our education initiatives, and help pay for servers, services, and staff.


